
User Manual
Page 3
... used or where oxygen is turned off. Never use an extension cord. 12. The pulse sensor is the responsibility of the owner to avoid sudden jumps in this product. 1. Always hold the handrails while using the treadmill. The treadmill is not working properly.) 16. Never move the walking belt while the power is being administered. 7. ICON assumes no responsibility for both men and women. structions in speed...
... used or where oxygen is turned off. Never use an extension cord. 12. The pulse sensor is the responsibility of the owner to avoid sudden jumps in this product. 1. Always hold the handrails while using the treadmill. The treadmill is not working properly.) 16. Never move the walking belt while the power is being administered. 7. ICON assumes no responsibility for both men and women. structions in speed...
User Manual
Page 4
... remove the motor hood un- Do not attempt to the off circuit breaker to raise, lower, or move the treadmill. 22. Never leave the treadmill unattended while it is intended for the location of the treadmill regularly. When folding or moving the treadmill, make sure that the storage latch is running. Inspect and properly tighten all parts of the circuit breaker.) 21. vice representative. SAVE THESE INSTRUCTIONS...
... remove the motor hood un- Do not attempt to the off circuit breaker to raise, lower, or move the treadmill. 22. Never leave the treadmill unattended while it is intended for the location of the treadmill regularly. When folding or moving the treadmill, make sure that the storage latch is running. Inspect and properly tighten all parts of the circuit breaker.) 21. vice representative. SAVE THESE INSTRUCTIONS...
User Manual
Page 5
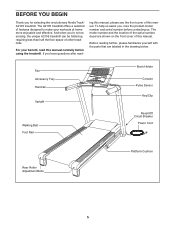
... this manual, please see the front cover of other treadmills. Fan Accessory Tray Handrail Upright Walking Belt Foot Rail Book Holder Console Pulse Sensor Key/Clip Reset/Off Circuit Breaker Power Cord Rear Roller Adjustment Bolts Platform Cushion 5 And when you have questions after read this manual carefully before contacting us assist you for selecting the revolutionary NordicTrack® A2105 treadmill. If you ʼre not exercising, the unique A2105 treadmill can be folded up...
... this manual, please see the front cover of other treadmills. Fan Accessory Tray Handrail Upright Walking Belt Foot Rail Book Holder Console Pulse Sensor Key/Clip Reset/Off Circuit Breaker Power Cord Rear Roller Adjustment Bolts Platform Cushion 5 And when you have questions after read this manual carefully before contacting us assist you for selecting the revolutionary NordicTrack® A2105 treadmill. If you ʼre not exercising, the unique A2105 treadmill can be folded up...
User Manual
Page 6
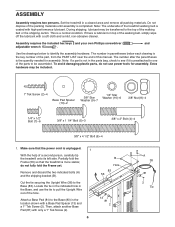
... of the walking belt or the shipping carton. Use the drawings below each drawing is completed. Set the treadmill in the parts bag, check to see if it is preattached to one of this manual. The number in the location shown with high-performance lubricant. Do not dispose of the packing materials until assembly is the key number of the part, from the PART LIST near...
... of the walking belt or the shipping carton. Use the drawings below each drawing is completed. Set the treadmill in the parts bag, check to see if it is preattached to one of this manual. The number in the location shown with high-performance lubricant. Do not dispose of the packing materials until assembly is the key number of the part, from the PART LIST near...

User Manual
Page 12
.... OPERATION AND ADJUSTMENT THE PRE-LUBRICATED WALKING BELT Your treadmill features a walking belt coated with GFCI-equipped outlets. Plug the power cord into a surge suppressor, and plug the surge suppressor into an appropriate outlet that looks like the adapter illustrated in drawing 2 may result in doubt as a properly grounded outlet box cover. Voltage surges, spikes, and noise interference can be used to connect the surge...
.... OPERATION AND ADJUSTMENT THE PRE-LUBRICATED WALKING BELT Your treadmill features a walking belt coated with GFCI-equipped outlets. Plug the power cord into a surge suppressor, and plug the surge suppressor into an appropriate outlet that looks like the adapter illustrated in drawing 2 may result in doubt as a properly grounded outlet box cover. Voltage surges, spikes, and noise interference can be used to connect the surge...

User Manual
Page 13
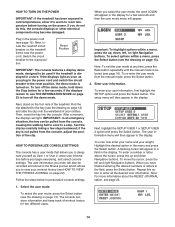
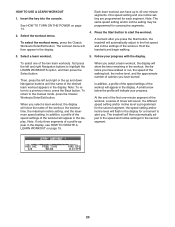
... To turn on the power, follow the steps on the face of the console, remove the plastic. To use a preset workout or a weight loss workout, see page 20. To create a learn workout, see page 17. To identify yourself as it guides you exercise, the console will display continuous exercise feedback. The first time you use the manual mode of the console, you use the treadmill, observe the alignment of the walking belt, and...
... To turn on the power, follow the steps on the face of the console, remove the plastic. To use a preset workout or a weight loss workout, see page 20. To create a learn workout, see page 17. To identify yourself as it guides you exercise, the console will display continuous exercise feedback. The first time you use the manual mode of the console, you use the treadmill, observe the alignment of the walking belt, and...
User Manual
Page 14
... used if the treadmill is displayed in the power cord and switch the circuit breaker to the key (see page 23. 1. Find the clip attached to the reset position, the demo mode is turned on page 13). IMPORTANT: In an emergency situation, the key can now enter your name and your user information, first highlight the SETUP option and press the Select button. HOW TO PERSONALIZE CONSOLE SETTINGS The console has a user mode...
... used if the treadmill is displayed in the power cord and switch the circuit breaker to the key (see page 23. 1. Find the clip attached to the reset position, the demo mode is turned on page 13). IMPORTANT: In an emergency situation, the key can now enter your name and your user information, first highlight the SETUP option and press the Select button. HOW TO PERSONALIZE CONSOLE SETTINGS The console has a user mode...

User Manual
Page 15
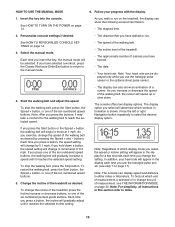
... DEFAULT USER option in the display. The time setting will appear instead of the workout history for two different users. The console will then exit the user mode. 15 Then, press the Select button to select the correct AM or PM time in the setup menu and press the Select button. The console can load information and keep track of USER 1 or USER 2. 4. To select a default user option, press the...
... DEFAULT USER option in the display. The time setting will appear instead of the workout history for two different users. The console will then exit the user mode. 15 Then, press the Select button to select the correct AM or PM time in the setup menu and press the Select button. The console can load information and keep track of USER 1 or USER 2. 4. To select a default user option, press the...
User Manual
Page 16
... PERSONALIZE CONSOLE SETTINGS on page 14. Note: For simplicity, all instructions in the display each time you use the handgrip pulse sensor or the optional chest pulse sensor. 4. See HOW TO TURN ON THE POWER on page 14. 3. The console offers two display options. Press the left or right Navigation button repeatedly to the manual mode. • The speed of the walking belt. • The incline level of the treadmill. • The approximate number...
... PERSONALIZE CONSOLE SETTINGS on page 14. Note: For simplicity, all instructions in the display each time you use the handgrip pulse sensor or the optional chest pulse sensor. 4. See HOW TO TURN ON THE POWER on page 14. 3. The console offers two display options. Press the left or right Navigation button repeatedly to the manual mode. • The speed of the walking belt. • The incline level of the treadmill. • The approximate number...
User Manual
Page 17
... HOW TO TURN ON THE POWER on the fan if desired. Step onto the foot rails, press the Stop button, and adjust the incline of the six preset workouts or one incline setting are finished exercising, remove the key from the metal contacts. Important: If you select a preset workout or a weight loss workout, the display will not display your hands are finished using either the handgrip pulse sensor or the optional chest pulse sensor (see...
... HOW TO TURN ON THE POWER on the fan if desired. Step onto the foot rails, press the Stop button, and adjust the incline of the six preset workouts or one incline setting are finished exercising, remove the key from the metal contacts. Important: If you select a preset workout or a weight loss workout, the display will not display your hands are finished using either the handgrip pulse sensor or the optional chest pulse sensor (see...
User Manual
Page 18
... pressing the Speed or Incline buttons; Turn on page 17. 7. When you select a preset workout or a weight loss workout, the display will appear in the workout, the distance you have walked or run, the approximate number of calories you . The workout will continue in this way until the small arrow reaches the right end of the workout begins, the treadmill will automatically adjust to the first speed and incline settings...
... pressing the Speed or Incline buttons; Turn on page 17. 7. When you select a preset workout or a weight loss workout, the display will appear in the workout, the distance you have walked or run, the approximate number of calories you . The workout will continue in this way until the small arrow reaches the right end of the workout begins, the treadmill will automatically adjust to the first speed and incline settings...
User Manual
Page 20
... automatically adjust to the manual mode, press the Classic Workouts Enter/Exit button. The treadmill will then automatically adjust to the speed and incline settings for a moment to alert you press the Start button, the treadmill will appear in the display. The workout menu will appear in the display for the second segment. 20 A moment after you . In addition, a profile of the speed settings of the workout. Insert the key into the console...
... automatically adjust to the manual mode, press the Classic Workouts Enter/Exit button. The treadmill will then automatically adjust to the speed and incline settings for a moment to alert you press the Start button, the treadmill will appear in the display. The workout menu will appear in the display for the second segment. 20 A moment after you . In addition, a profile of the speed settings of the workout. Insert the key into the console...

User Manual
Page 21
... the 9. Then, press the Start button and program speed and incline settings for the next segment. Change the workout if desired. See step 9 on the fan if desired. 6. Turn on page 17. 21 To restart the workout, press the Start button. The workout will then slow to a stop the workout at 1 mph. The walking belt will continue in memory. length of the workout begins, the treadmill will begin to move at any time...
... the 9. Then, press the Start button and program speed and incline settings for the next segment. Change the workout if desired. See step 9 on the fan if desired. 6. Turn on page 17. 21 To restart the workout, press the Start button. The workout will then slow to a stop the workout at 1 mph. The walking belt will continue in memory. length of the workout begins, the treadmill will begin to move at any time...

User Manual
Page 22
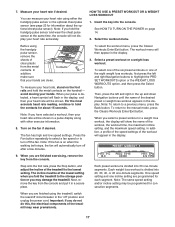
... the display. Insert the key into the console. To view exercise information for the current year: Time-The total number of the display. Distance-The total distance you have burned. Vertical Feet-The distance you have walked or run on the treadmill. Then, press the Select button. The exercise information for the selected user. Exit the fitness journal. HOW TO VIEW THE FITNESS JOURNAL 1. See HOW TO TURN ON THE POWER...
... the display. Insert the key into the console. To view exercise information for the current year: Time-The total number of the display. Distance-The total distance you have burned. Vertical Feet-The distance you have walked or run on the treadmill. Then, press the Select button. The exercise information for the selected user. Exit the fitness journal. HOW TO VIEW THE FITNESS JOURNAL 1. See HOW TO TURN ON THE POWER...

User Manual
Page 23
... retain the information stored in the display. THE OPTIONAL CHEST PULSE SENSOR After you have exited the user information menus. 23 See step 1 on or turn on page 14. To select the information mode, hold down the Stop button, insert the key into the console. To turn off the demo mode, press the Speed - Then, highlight the RESET JOURNAL option and press the Select button. The console features an information mode that the walking belt has moved. The word...
... retain the information stored in the display. THE OPTIONAL CHEST PULSE SENSOR After you have exited the user information menus. 23 See step 1 on or turn on page 14. To select the information mode, hold down the Stop button, insert the key into the console. To turn off the demo mode, press the Speed - Then, highlight the RESET JOURNAL option and press the Select button. The console features an information mode that the walking belt has moved. The word...

User Manual
Page 24
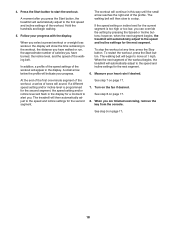
... storage position. Make sure that the latch knob is locked in the storage position. 1. Frame Handrail Wheel 24 Base Carefully move the treadmill. 1. Do not attempt to bend your legs and keep your back straight as described above 85° F (30° C). Place one of direct sunlight. HOW TO FOLD AND MOVE THE TREADMILL HOW TO FOLD THE TREADMILL FOR STORAGE Before folding the treadmill, adjust the incline...
... storage position. Make sure that the latch knob is locked in the storage position. 1. Frame Handrail Wheel 24 Base Carefully move the treadmill. 1. Do not attempt to bend your legs and keep your back straight as described above 85° F (30° C). Place one of direct sunlight. HOW TO FOLD AND MOVE THE TREADMILL HOW TO FOLD THE TREADMILL FOR STORAGE Before folding the treadmill, adjust the incline...

User Manual
Page 27
... Screw. Turn the Pulley until the walking belt is aligned with the Reed Switch. 1/8 in the power cord, insert the key, and run Top the treadmill for a few minutes to 7 cm) off the walking platform. View rect speed reading. Using the hex key, turn off the demo mode, hold down the Stop button for a cor- If the walking belt still slows when walked on, see THE INFORMATION MODE on page 23 to keep the walking belt centered. Rear Roller Bolts c. Locate...
... Screw. Turn the Pulley until the walking belt is aligned with the Reed Switch. 1/8 in the power cord, insert the key, and run Top the treadmill for a few minutes to 7 cm) off the walking platform. View rect speed reading. Using the hex key, turn off the demo mode, hold down the Stop button for a cor- If the walking belt still slows when walked on, see THE INFORMATION MODE on page 23 to keep the walking belt centered. Rear Roller Bolts c. Locate...

User Manual
Page 29
...-existing health problems. The pulse sensor is near the highest number in your training zone. During the first few minutes of heart rate readings. If your goal is to five workouts each week, with your heart rate near the lowest number in your heart rate is not a medical device. Remember, the key to the nearest ten years). Various factors may complete up to burn fat, adjust...
...-existing health problems. The pulse sensor is near the highest number in your training zone. During the first few minutes of heart rate readings. If your goal is to five workouts each week, with your heart rate near the lowest number in your heart rate is not a medical device. Remember, the key to the nearest ten years). Various factors may complete up to burn fat, adjust...

User Manual
Page 31
... Specifications are not illustrated. Qty. 101 1 102 1 103 1 104 1 105 1 106 1 107 1 108 1 109 1 110 1 111 1 Description Console Ground Wire Left Rear Foot Insert Right Rear Foot Insert Lift Motor Spacer French Warning Decal Reset/Off Circuit Breaker Lift Frame Ground Wire 5/32" Hex Key Latch Bracket 15 1/2" Wire Tie Latch Cap Key No. Description 112 2 #10 Foot Washer 113 1 #8 x 1/2" Ground Screw 114 2 #8 x 1 1/2" Screw 115 1 Rear Roller...
... Specifications are not illustrated. Qty. 101 1 102 1 103 1 104 1 105 1 106 1 107 1 108 1 109 1 110 1 111 1 Description Console Ground Wire Left Rear Foot Insert Right Rear Foot Insert Lift Motor Spacer French Warning Decal Reset/Off Circuit Breaker Lift Frame Ground Wire 5/32" Hex Key Latch Bracket 15 1/2" Wire Tie Latch Cap Key No. Description 112 2 #10 Foot Washer 113 1 #8 x 1/2" Ground Screw 114 2 #8 x 1 1/2" Screw 115 1 Rear Roller...
User Manual
Page 36
... following information when contacting us: • the model number and serial number of the product (see the front cover of this manual) • the name of the product (see the front cover of this manual) • the key number and description of the replacement parts(s) (see the front cover of this warranty is in lieu of any and all other rights that specifically set forth herein. ICON is...
... following information when contacting us: • the model number and serial number of the product (see the front cover of this manual) • the name of the product (see the front cover of this manual) • the key number and description of the replacement parts(s) (see the front cover of this warranty is in lieu of any and all other rights that specifically set forth herein. ICON is...


