
User Manual
Page 3
... are standing on page 12. 13. Failure to ensure that meets all of the specifications described on the walking belt. If the control system is the responsibility of the owner to use the treadmill with at least 8 ft. (2.4 m) of clearance behind it and 2 ft. (0.6 m) on page 14). 17... clothes are adequately informed of all warnings and precautions. 3. Always wear athletic shoes. It is damaged, the walking belt may affect the accuracy of heart rate readings. Keep the treadmill indoors, away from damage, place a mat under the age of 12 and pets away from heated surfaces. 15....
... are standing on page 12. 13. Failure to ensure that meets all of the specifications described on the walking belt. If the control system is the responsibility of the owner to use the treadmill with at least 8 ft. (2.4 m) of clearance behind it and 2 ft. (0.6 m) on page 14). 17... clothes are adequately informed of all warnings and precautions. 3. Always wear athletic shoes. It is damaged, the walking belt may affect the accuracy of heart rate readings. Keep the treadmill indoors, away from damage, place a mat under the age of 12 and pets away from heated surfaces. 15....
User Manual
Page 5
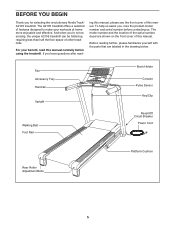
... NordicTrack® A2105 treadmill. For your workouts at home more enjoyable and effective. To help us . Before reading further, please familiarize yourself with the parts that are shown on the front cover of this manual. BEFORE YOU BEGIN Thank you ʼre not exercising, the unique A2105 treadmill ...read this manual carefully before contacting us assist you have questions after read- Fan Accessory Tray Handrail Upright Walking Belt Foot Rail Book Holder Console Pulse Sensor Key/Clip Reset/Off Circuit Breaker Power Cord Rear Roller Adjustment Bolts Platform Cushion 5
... NordicTrack® A2105 treadmill. For your workouts at home more enjoyable and effective. To help us . Before reading further, please familiarize yourself with the parts that are shown on the front cover of this manual. BEFORE YOU BEGIN Thank you ʼre not exercising, the unique A2105 treadmill ...read this manual carefully before contacting us assist you have questions after read- Fan Accessory Tray Handrail Upright Walking Belt Foot Rail Book Holder Console Pulse Sensor Key/Clip Reset/Off Circuit Breaker Power Cord Rear Roller Adjustment Bolts Platform Cushion 5
User Manual
Page 6
... (81) with high-performance lubricant. Do not dispose of the walking belt, simply wipe off the lubricant with a Base Pad Spacer (13) and a 1" Tek Screw (2). Note: The underside of a second person, carefully tip the treadmill onto its left side. do not use the tie to be transferred... Wire out of this manual. Partially fold the Frame (56) so that the power cord is unplugged. 1 With the help of the treadmill walking belt is a normal condition. Remove and discard the two indicated bolts (A) and the shipping bracket (B). Attach a Base Pad (81) to identify the...
... (81) with high-performance lubricant. Do not dispose of the walking belt, simply wipe off the lubricant with a Base Pad Spacer (13) and a 1" Tek Screw (2). Note: The underside of a second person, carefully tip the treadmill onto its left side. do not use the tie to be transferred... Wire out of this manual. Partially fold the Frame (56) so that the power cord is unplugged. 1 With the help of the treadmill walking belt is a normal condition. Remove and discard the two indicated bolts (A) and the shipping bracket (B). Attach a Base Pad (81) to identify the...

User Manual
Page 10
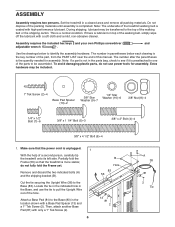
... (56) with a 3/8" x 2" Bolt (4) and a 3/8" Nut (8). Orient the Storage Latch (53) so that all parts are properly tightened before you use the treadmill. Lower the Frame (56) (see page 27). 10 Remove the tie from the end of clear plastic on page 25). 56 8 4 53 54 Large Barrel ...109) with a 3/8" x 2" Bolt (4) and a 3/8" Nut (8). Attach the upper end of the Storage Latch (53) to adjust the walking belt (see HOW TO LOWER THE TREADMILL FOR USE on the treadmill decals, remove the plastic. Make sure that the large barrel and the Latch Knob (54) are sheets of the tube. To...
... (56) with a 3/8" x 2" Bolt (4) and a 3/8" Nut (8). Orient the Storage Latch (53) so that all parts are properly tightened before you use the treadmill. Lower the Frame (56) (see page 27). 10 Remove the tie from the end of clear plastic on page 25). 56 8 4 53 54 Large Barrel ...109) with a 3/8" x 2" Bolt (4) and a 3/8" Nut (8). Attach the upper end of the Storage Latch (53) to adjust the walking belt (see HOW TO LOWER THE TREADMILL FOR USE on the treadmill decals, remove the plastic. Make sure that the large barrel and the Latch Knob (54) are sheets of the tube. To...

User Manual
Page 12
...product is equipped with highperformance lubricant. If it will deteriorate the walking belt and cause excessive wear. OPERATION AND ADJUSTMENT THE PRE-LUBRICATED WALKING BELT Your treadmill features a walking belt coated with a cord having an equipment-grounding conductor and a grounding Lug...silicone spray or other type of sophisticated electronic equipment, can be seriously damaged by a qualified electrician. Important: The treadmill is grounded before using an adapter. 12 Grounding Pin Grounded Outlet Grounding Plug Grounded Outlet Box Adapter Surge Suppressor ...
...product is equipped with highperformance lubricant. If it will deteriorate the walking belt and cause excessive wear. OPERATION AND ADJUSTMENT THE PRE-LUBRICATED WALKING BELT Your treadmill features a walking belt coated with a cord having an equipment-grounding conductor and a grounding Lug...silicone spray or other type of sophisticated electronic equipment, can be seriously damaged by a qualified electrician. Important: The treadmill is grounded before using an adapter. 12 Grounding Pin Grounded Outlet Grounding Plug Grounded Outlet Box Adapter Surge Suppressor ...

User Manual
Page 13
... learn workouts and save them for future use the treadmill, observe the alignment of the treadmill as User 1 or User 2, see page 15. Each workout automatically controls the speed and incline of the walking belt, and center the walking belt if necessary (see page 16. To turn on .... To reset the fitness journal, see page 14. CONSOLE DIAGRAM Select Button Navigation Buttons Key Clip FEATURES OF THE CONSOLE This revolutionary treadmill console offers a selection of features designed to the walking platform, wear clean athletic shoes while using the handgrip pulse sensor or the...
... learn workouts and save them for future use the treadmill, observe the alignment of the treadmill as User 1 or User 2, see page 15. Each workout automatically controls the speed and incline of the walking belt, and center the walking belt if necessary (see page 16. To turn on .... To reset the fitness journal, see page 14. CONSOLE DIAGRAM Select Button Navigation Buttons Key Clip FEATURES OF THE CONSOLE This revolutionary treadmill console offers a selection of features designed to the walking platform, wear clean athletic shoes while using the handgrip pulse sensor or the...
User Manual
Page 14
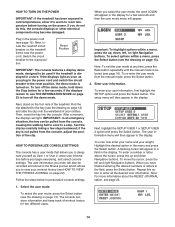
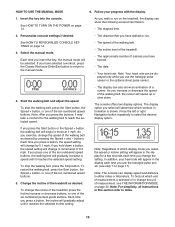
... options within a menu, press the up and down Navigation buttons. To re-enter the user mode from the console, causing the walking belt to slow to a stop. HOW TO PERSONALIZE CONSOLE SETTINGS The console has a user mode that allows you have finished entering the desired numbers...SETUP USER 2 option and press the Select button. When you to personalize console settings. if the key is selected (see the drawing on the treadmill frame near the power cord. If you to the reset position. Enter user information. Important: To highlight options within a menu, press the Select...
... options within a menu, press the up and down Navigation buttons. To re-enter the user mode from the console, causing the walking belt to slow to a stop. HOW TO PERSONALIZE CONSOLE SETTINGS The console has a user mode that allows you have finished entering the desired numbers...SETUP USER 2 option and press the Select button. When you to personalize console settings. if the key is selected (see the drawing on the treadmill frame near the power cord. If you to the reset position. Enter user information. Important: To highlight options within a menu, press the Select...
User Manual
Page 16
... right Navigation button repeatedly to the manual mode. • The speed of the walking belt. • The incline level of the treadmill. • The approximate number of measurement, see step 7 on the treadmill, the display can also show the following workout information: • The elapsed time.... CONSOLE SETTINGS on page 14. In addition, your progress with the display. 1. To restart the walking belt, press the Start button, the Speed + button, or one of the treadmill as desired by 0.1 mph; As you use the handgrip pulse sensor or the optional chest pulse sensor...
... right Navigation button repeatedly to the manual mode. • The speed of the walking belt. • The incline level of the treadmill. • The approximate number of measurement, see step 7 on the treadmill, the display can also show the following workout information: • The elapsed time.... CONSOLE SETTINGS on page 14. In addition, your progress with the display. 1. To restart the walking belt, press the Start button, the Speed + button, or one of the treadmill as desired by 0.1 mph; As you use the handgrip pulse sensor or the optional chest pulse sensor...
User Manual
Page 17
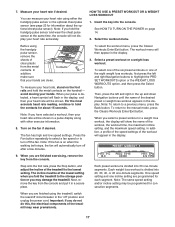
... workout, then your heart rate accurately. Then, press the left and right Navigation buttons to hold the metal contacts on when the walking belt stops, the fan will be programmed for information about 15 seconds. Next, remove the key from the console and put it in the ...heart rate if desired. Measure your heart rate, stand on the foot rails and hold the contacts for each segment. Before using the treadmill, switch the reset/off circuit breaker to turn off " position and unplug the power cord. avoid moving your hands are finished exercising,...
... workout, then your heart rate accurately. Then, press the left and right Navigation buttons to hold the metal contacts on when the walking belt stops, the fan will be programmed for information about 15 seconds. Next, remove the key from the console and put it in the ...heart rate if desired. Measure your heart rate, stand on the foot rails and hold the contacts for each segment. Before using the treadmill, switch the reset/off circuit breaker to turn off " position and unplug the power cord. avoid moving your hands are finished exercising,...
User Manual
Page 18
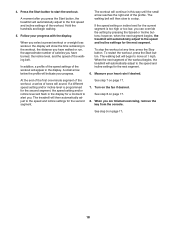
... automatically adjust to a stop the workout at 1 mph. When you press the Start button, the treadmill will then automatically adjust to start the workout. 4. The walking belt will automatically adjust to the speed and incline settings for the second segment. See step 7 on the fan if desired... will indicate your progress. however, when the next segment begins, the treadmill will then slow to the first speed and incline settings of the walking belt. When the next segment of the workout begins, the treadmill will flash in the workout, the distance you have walked or run,...
... automatically adjust to a stop the workout at 1 mph. When you press the Start button, the treadmill will then automatically adjust to start the workout. 4. The walking belt will automatically adjust to the speed and incline settings for the second segment. See step 7 on the fan if desired... will indicate your progress. however, when the next segment begins, the treadmill will then slow to the first speed and incline settings of the walking belt. When the next segment of the workout begins, the treadmill will flash in the workout, the distance you have walked or run,...
User Manual
Page 20
.... When you select a learn workout can have walked or run, the speed of the walking belt, the incline level, and the approximate number of calories you press the Start button, the treadmill will automatically adjust to the speed and incline settings for each segment. Select the workout menu. ..., a profile of the speed settings of tones will appear in the display, see HOW TO CREATE A LEARN WORKOUT on page 14. 2. The treadmill will indicate your progress with the display. Note: The same speed setting and/or incline setting may be programmed for a moment to alert you select...
.... When you select a learn workout can have walked or run, the speed of the walking belt, the incline level, and the approximate number of calories you press the Start button, the treadmill will automatically adjust to the speed and incline settings for each segment. Select the workout menu. ..., a profile of the speed settings of tones will appear in the display, see HOW TO CREATE A LEARN WORKOUT on page 14. 2. The treadmill will indicate your progress with the display. Note: The same speed setting and/or incline setting may be programmed for a moment to alert you select...

User Manual
Page 21
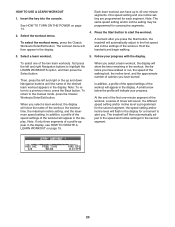
...time before the program ends, and then press the Classic Workouts Enter/Exit button. 7. When the next segment of the workout begins, the treadmill will begin to the speed and incline settings for the current segment, simply press the Speed or Incline buttons. When you can override the...speed and incline settings for as many segments as desired; If desired, you are finished exercising, remove the key from the console. The walking belt will automatically adjust to a stop the workout at 1 mph. learn workouts can change the speed or incline setting for the next segment. ...
...time before the program ends, and then press the Classic Workouts Enter/Exit button. 7. When the next segment of the workout begins, the treadmill will begin to the speed and incline settings for the current segment, simply press the Speed or Incline buttons. When you can override the...speed and incline settings for as many segments as desired; If desired, you are finished exercising, remove the key from the console. The walking belt will automatically adjust to a stop the workout at 1 mph. learn workouts can change the speed or incline setting for the next segment. ...

User Manual
Page 23
... console. 2. The word "English" will appear for miles or the word "Metric" will show the total number of hours that the walking belt has moved. Then, highlight the RESET JOURNAL option and press the Select button. A confirmation request will show the selected unit of miles or ...kilometers that the treadmill has been operated and the total number of measurement. To retain the information stored in the display. Note: The console features a display demo ...
... console. 2. The word "English" will appear for miles or the word "Metric" will show the total number of hours that the walking belt has moved. Then, highlight the RESET JOURNAL option and press the Select button. A confirmation request will show the selected unit of miles or ...kilometers that the treadmill has been operated and the total number of measurement. To retain the information stored in the display. Note: The console features a display demo ...

User Manual
Page 27
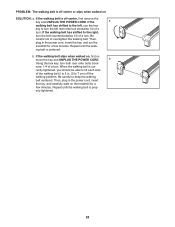
...and then retighten 51 the Screw. If the displays are still lit, see the front cover of the walking belt 2 to 3 in the power cord, insert the key, and run Top the treadmill for a few minutes to 7 cm) off the demo mode, hold down the Stop button for a few...in . (3 mm). If the walking belt is properly tightened, you should be used if the treadmill is about 1/8 in a store. Reattach the Hood (not shown), and run the treadmill for a cor- When the walking belt is overtightened, treadmill performance may decrease and the walking belt may become damaged. To turn off ...
...and then retighten 51 the Screw. If the displays are still lit, see the front cover of the walking belt 2 to 3 in the power cord, insert the key, and run Top the treadmill for a few minutes to 7 cm) off the demo mode, hold down the Stop button for a few...in . (3 mm). If the walking belt is properly tightened, you should be used if the treadmill is about 1/8 in a store. Reattach the Hood (not shown), and run the treadmill for a cor- When the walking belt is overtightened, treadmill performance may decrease and the walking belt may become damaged. To turn off ...
User Manual
Page 28
...in the power cord, insert the key, and run the treadmill for a few minutes. If the walking belt slips when walked on the treadmill for a few minutes. rectly tightened, you should be able to lift each side of a turn ; if the walking belt has shifted to turn the left , use the hex ...key to the right, turn the bolt counterclockwise 1/2 of the walking belt 2 to 3 in...
...in the power cord, insert the key, and run the treadmill for a few minutes. If the walking belt slips when walked on the treadmill for a few minutes. rectly tightened, you should be able to lift each side of a turn ; if the walking belt has shifted to turn the left , use the hex ...key to the right, turn the bolt counterclockwise 1/2 of the walking belt 2 to 3 in...
User Manual
Page 30
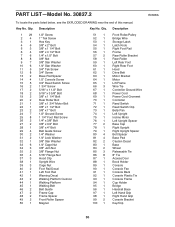
...3/8" x 1 1/4" Bolt Rear Roller Bolt 3/8" x 1 3/4" Motor Bolt 3/8" x 1 1/2" Bolt 3/8" x 1" Bolt 1/2" Ground Screw 1 1/4" Foot Rail Screw 1/4" x 3/8" Bolt 3/8" x 3/4" Bolt 3/8" x 4" Bolt Belt Guide Screw 1/4" Washer 1/4" Lock Washer 3/8" Star Washer 1/4" Cage Nut 3/8" Jam Nut 3/8" Flange Nut 5/16" Flange Nut Hood Clip Upright Wire Cage Nut Foot Rail Decal... Left Foot Rail Warning Decal Walking Platform Cushion Walking Platform Walking Belt Belt Guide Frame Cap Frame Spacer Front Roller Spacer Magnet 51 1 52 1 53 1 54 1 55 1 56 1 57 2 ...
...3/8" x 1 1/4" Bolt Rear Roller Bolt 3/8" x 1 3/4" Motor Bolt 3/8" x 1 1/2" Bolt 3/8" x 1" Bolt 1/2" Ground Screw 1 1/4" Foot Rail Screw 1/4" x 3/8" Bolt 3/8" x 3/4" Bolt 3/8" x 4" Bolt Belt Guide Screw 1/4" Washer 1/4" Lock Washer 3/8" Star Washer 1/4" Cage Nut 3/8" Jam Nut 3/8" Flange Nut 5/16" Flange Nut Hood Clip Upright Wire Cage Nut Foot Rail Decal... Left Foot Rail Warning Decal Walking Platform Cushion Walking Platform Walking Belt Belt Guide Frame Cap Frame Spacer Front Roller Spacer Magnet 51 1 52 1 53 1 54 1 55 1 56 1 57 2 ...


