

English Manual
Page 4
...please familiarize yourself with the parts that are labeled in the drawing below. Handlebar Seat Backrest Water Bottle Holder* CD/Accessory Tray Console FRONT Seat Latch Pedal/Strap Handgrip Pulse Sensor Wheel REAR Leveling Foot RIGHT SIDE *No water...product model number and serial number before using the NordicTrack 9600 recumbent bike. BEFORE YOU BEGIN Congratulations for the location of the decal). Mountain Time (excluding holidays). The NordicTrack 9600 recumbent bike offers an impressive array of features to the recumbent bike (see the front cover of this manual for...
...please familiarize yourself with the parts that are labeled in the drawing below. Handlebar Seat Backrest Water Bottle Holder* CD/Accessory Tray Console FRONT Seat Latch Pedal/Strap Handgrip Pulse Sensor Wheel REAR Leveling Foot RIGHT SIDE *No water...product model number and serial number before using the NordicTrack 9600 recumbent bike. BEFORE YOU BEGIN Congratulations for the location of the decal). Mountain Time (excluding holidays). The NordicTrack 9600 recumbent bike offers an impressive array of features to the recumbent bike (see the front cover of this manual for...
English Manual
Page 5
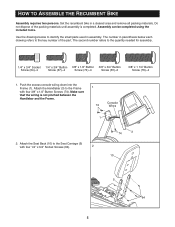
... Button 3/8" x 3/4" Button Screw (64)-4 Screw (67)-4 Screw (74)-4 Screw (81)-2 3/8" x 1 1/4" Button Screw (76)-4 1. Set the recumbent bike in assembly. HOW TO ASSEMBLE THE RECUMBENT BIKE Assembly requires two persons. Use the drawings below each drawing refers to the key number of the packing materials until assembly is... not pinched between the Handlebar and the Frame. 1 74 Console Wires 1 2. Attach the Seat Back...
... Button 3/8" x 3/4" Button Screw (64)-4 Screw (67)-4 Screw (74)-4 Screw (81)-2 3/8" x 1 1/4" Button Screw (76)-4 1. Set the recumbent bike in assembly. HOW TO ASSEMBLE THE RECUMBENT BIKE Assembly requires two persons. Use the drawings below each drawing refers to the key number of the packing materials until assembly is... not pinched between the Handlebar and the Frame. 1 74 Console Wires 1 2. Attach the Seat Back...

English Manual
Page 6
Attach the Seat (9) to the Seat Carriage 3 (5) with 4 four 1/4" x 3/4" Button Screws (67). Insert the four 1/2" Round Endcaps (80) into the pulse jack near the top of the Right Side Shield (8). 81 5 6 78 4. Attach the Seat Handlebar (6) to the Seat Carriage (5) with four 3/8" x 1 1/4" Button Screws (76) and two 3/8" x 3/4" Button Screws (81). 3. Next, insert the Pulse Plug (78) into the indicated holes in the Seat Handlebar (6). 9 8 76 67 5 67 67 6 80 6
Attach the Seat (9) to the Seat Carriage 3 (5) with 4 four 1/4" x 3/4" Button Screws (67). Insert the four 1/2" Round Endcaps (80) into the pulse jack near the top of the Right Side Shield (8). 81 5 6 78 4. Attach the Seat Handlebar (6) to the Seat Carriage (5) with four 3/8" x 1 1/4" Button Screws (76) and two 3/8" x 3/4" Button Screws (81). 3. Next, insert the Pulse Plug (78) into the indicated holes in the Seat Handlebar (6). 9 8 76 67 5 67 67 6 80 6

English Manual
Page 7
... is unplugged. HOW TO SET UP THE RECUMBENT BIKE HOW TO MOVE AND LEVEL THE RECUMBENT BIKE Before moving the recumbent bike. Lift Here Handlebar Wheels Leveling Feet HOW TO ADJUST THE SEAT To adjust the seat, lift the seat latch, slide the seat forward or backward to disconnect the cable if the recumbent bike will be operated. While one end of...
... is unplugged. HOW TO SET UP THE RECUMBENT BIKE HOW TO MOVE AND LEVEL THE RECUMBENT BIKE Before moving the recumbent bike. Lift Here Handlebar Wheels Leveling Feet HOW TO ADJUST THE SEAT To adjust the seat, lift the seat latch, slide the seat forward or backward to disconnect the cable if the recumbent bike will be operated. While one end of...

English Manual
Page 25
..., call Customer Care toll-free at 1-800-201-2109, Monday through Friday, 8 a.m. To change the system of the seat, see step 9 on page 20. LEVELING THE RECUMBENT BIKE If the recumbent bike rocks slightly during use ammonia or acid-based cleaners. SEAT ADJUSTMENT To adjust the position of measurement, see HOW TO MOVE AND LEVEL THE...
..., call Customer Care toll-free at 1-800-201-2109, Monday through Friday, 8 a.m. To change the system of the seat, see step 9 on page 20. LEVELING THE RECUMBENT BIKE If the recumbent bike rocks slightly during use ammonia or acid-based cleaners. SEAT ADJUSTMENT To adjust the position of measurement, see HOW TO MOVE AND LEVEL THE...

English Manual
Page 33
... are subject to change without notice. 33 Key No. Description 1 1 Frame 2 1 Seat Rail 3 1 Handlebar 4 1 Console 5 1 Seat Carriage 6 1 Seat Handlebar 7 1 Left Side Shield 8 1 Right Side Shield 9 1 Seat 10 1 Seat Back 11 1 Bottle Holder 12 1 Accessory Tray 13 1 Generator Assembly 14 1 Idler ...Arm Assembly 15 1 Drive Belt 16 1 Control Board 17 1 Chest Pulse Sensor 18 2 Leveling Foot 19 1 Seat Carriage Endcap 20 1 TV Cable 21 1 Power Receptical 22 1 Left Pedal 23 1 Right Pedal 24 1 Left Pedal Strap 25...
... are subject to change without notice. 33 Key No. Description 1 1 Frame 2 1 Seat Rail 3 1 Handlebar 4 1 Console 5 1 Seat Carriage 6 1 Seat Handlebar 7 1 Left Side Shield 8 1 Right Side Shield 9 1 Seat 10 1 Seat Back 11 1 Bottle Holder 12 1 Accessory Tray 13 1 Generator Assembly 14 1 Idler ...Arm Assembly 15 1 Drive Belt 16 1 Control Board 17 1 Chest Pulse Sensor 18 2 Leveling Foot 19 1 Seat Carriage Endcap 20 1 TV Cable 21 1 Power Receptical 22 1 Left Pedal 23 1 Right Pedal 24 1 Left Pedal Strap 25...


