
English Manual
Page 2
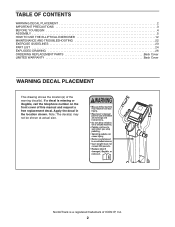
... manual and request a free replacement decal. Note: The decal(s) may not be shown at actual size. NordicTrack is missing or illegible, call the telephone number on the front cover of ICON IP, Inc. 2 TABLE OF CONTENTS WARNING DECAL PLACEMENT 2 IMPORTANT PRECAUTIONS 3 BEFORE YOU BEGIN 4 ASSEMBLY 5 HOW TO USE THE ELLIPTICAL EXERCISER 12 MAINTENANCE AND TROUBLESHOOTING 22 EXERCISE GUIDELINES 23 PART LIST 24 EXPLODED DRAWING 26 ORDERING REPLACEMENT PARTS Back Cover LIMITED WARRANTY...
... manual and request a free replacement decal. Note: The decal(s) may not be shown at actual size. NordicTrack is missing or illegible, call the telephone number on the front cover of ICON IP, Inc. 2 TABLE OF CONTENTS WARNING DECAL PLACEMENT 2 IMPORTANT PRECAUTIONS 3 BEFORE YOU BEGIN 4 ASSEMBLY 5 HOW TO USE THE ELLIPTICAL EXERCISER 12 MAINTENANCE AND TROUBLESHOOTING 22 EXERCISE GUIDELINES 23 PART LIST 24 EXPLODED DRAWING 26 ORDERING REPLACEMENT PARTS Back Cover LIMITED WARRANTY...
English Manual
Page 3
... userʼs movement, may affect the accuracy of heart rate readings. Your elliptical exerciser is the responsibility of the owner to mount, dismount, and use of this product. 1. Make sure that could become caught on a level surface, with pre-existing health problems. 2. If you stop exercising, allow the pedals to slowly come to protect the floor or carpet. Place your elliptical exerciser on your elliptical exerciser...
... userʼs movement, may affect the accuracy of heart rate readings. Your elliptical exerciser is the responsibility of the owner to mount, dismount, and use of this product. 1. Make sure that could become caught on a level surface, with pre-existing health problems. 2. If you stop exercising, allow the pedals to slowly come to protect the floor or carpet. Place your elliptical exerciser on your elliptical exerciser...
English Manual
Page 4
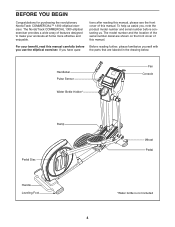
..., read this manual carefully before you , note the product model number and serial number before contacting us assist you use the elliptical exerciser. For your workouts at home more effective and enjoyable. Handlebar Pulse Sensor Water Bottle Holder* Fan Console Ramp Pedal Disc Handle Leveling Foot 4 Wheel Pedal *Water bottle is not included BEFORE YOU BEGIN Congratulations for purchasing the revolutionary NordicTrack COMMERCIAL™ 1300 elliptical exerciser. To help...
..., read this manual carefully before you , note the product model number and serial number before contacting us assist you use the elliptical exerciser. For your workouts at home more effective and enjoyable. Handlebar Pulse Sensor Water Bottle Holder* Fan Console Ramp Pedal Disc Handle Leveling Foot 4 Wheel Pedal *Water bottle is not included BEFORE YOU BEGIN Congratulations for purchasing the revolutionary NordicTrack COMMERCIAL™ 1300 elliptical exerciser. To help...
English Manual
Page 5
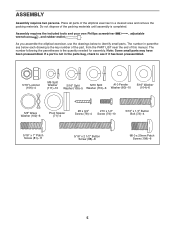
... x 1/2" Screw (78)-4 Screw (79)-10 5/16" x 1.5" Button Bolt (73)-4 5/16" x 1" Patch Screw (81)-11 5/16" x 2 1/2" Button Screw (88)-8 M10 x 20mm Patch Screw (108)-6 5 Note: Some small parts may have been preassembled. The number following the parentheses is not in a cleared area and remove the packing materials. ASSEMBLY Assembly requires two persons. If a part is the quantity needed for assembly. Do not dispose of the elliptical exerciser in the parts...
... x 1/2" Screw (78)-4 Screw (79)-10 5/16" x 1.5" Button Bolt (73)-4 5/16" x 1" Patch Screw (81)-11 5/16" x 2 1/2" Button Screw (88)-8 M10 x 20mm Patch Screw (108)-6 5 Note: Some small parts may have been preassembled. The number following the parentheses is not in a cleared area and remove the packing materials. ASSEMBLY Assembly requires two persons. If a part is the quantity needed for assembly. Do not dispose of the elliptical exerciser in the parts...

English Manual
Page 7
... Frame (1), connect the Upper Wire Harness (97) to two 5/8" Wave Washers (102). Attach the Upper Body Arm with five 5/16" x 1" Patch Screws (81) and five 5/16" Split Washers (105). 6 81 105 81 Do not pinch the Wire Harnesses (97, 54) during this step 97 54 1 105 81 4. Attach the Upright (6) to the Frame (1) with a 5/16" x 1" Patch Screw (81), a Large Axle Cover (94...
... Frame (1), connect the Upper Wire Harness (97) to two 5/8" Wave Washers (102). Attach the Upper Body Arm with five 5/16" x 1" Patch Screws (81) and five 5/16" Split Washers (105). 6 81 105 81 Do not pinch the Wire Harnesses (97, 54) during this step 97 54 1 105 81 4. Attach the Upright (6) to the Frame (1) with a 5/16" x 1" Patch Screw (81), a Large Axle Cover (94...

English Manual
Page 10
... this step Pulse Wire 65 6 78 10. Make sure that the Locknuts are in the hexagonal holes. Then, connect the console pulse wire to the right Upper Body Arm (12) with two 5/16" x 1.5" Button Bolts (73) and two 5/16" Locknuts (106). Tip: Avoid pinching the wires during this step. Attach the Right Handlebar (31) to the Hand Pulse Wire (65). Insert the excess wire downward into the Upright. 9.
... this step Pulse Wire 65 6 78 10. Make sure that the Locknuts are in the hexagonal holes. Then, connect the console pulse wire to the right Upper Body Arm (12) with two 5/16" x 1.5" Button Bolts (73) and two 5/16" Locknuts (106). Tip: Avoid pinching the wires during this step. Attach the Right Handlebar (31) to the Hand Pulse Wire (65). Insert the excess wire downward into the Upright. 9.
English Manual
Page 11
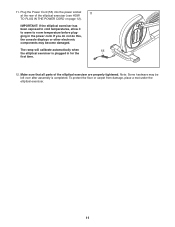
.... Make sure that all parts of the elliptical exerciser (see HOW TO PLUG IN THE POWER CORD on page 12). 11. If you do not do this, the console displays or other electronic components may be left over after assembly is plugged in the power cord. Plug the Power Cord (55) into the power socket 11 at the rear of the elliptical exerciser are properly tightened. Note: Some hardware may...
.... Make sure that all parts of the elliptical exerciser (see HOW TO PLUG IN THE POWER CORD on page 12). 11. If you do not do this, the console displays or other electronic components may be left over after assembly is plugged in the power cord. Plug the Power Cord (55) into the power socket 11 at the rear of the elliptical exerciser are properly tightened. Note: Some hardware may...
English Manual
Page 12
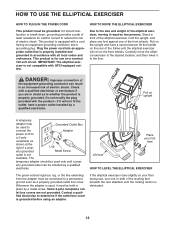
... TO USE THE ELLIPTICAL EXERCISER HOW TO PLUG IN THE POWER CORD This product must be held in doubt as a properly grounded outlet box cover. Pull on the upright and have a proper outlet installed by a qualified electrician. This product is not compatible with a cord having an equipment-grounding conductor and a grounding plug. HOW TO MOVE THE ELLIPTICAL EXERCISER Due to the size and weight of the elliptical exerciser, moving...
... TO USE THE ELLIPTICAL EXERCISER HOW TO PLUG IN THE POWER CORD This product must be held in doubt as a properly grounded outlet box cover. Pull on the upright and have a proper outlet installed by a qualified electrician. This product is not compatible with a cord having an equipment-grounding conductor and a grounding plug. HOW TO MOVE THE ELLIPTICAL EXERCISER Due to the size and weight of the elliptical exerciser, moving...

English Manual
Page 14
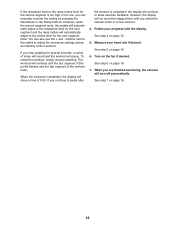
... toning workouts designed to work specific areas of the pedals and prompts you to increase or decrease your workouts more effective and enjoyable. To use an intensity control workout, see page 20. As you can even measure your own workouts and store them in memory for future use the manual mode, see page 15. The console guides you to create your heart rate using the handgrip pulse sensor. To use...
... toning workouts designed to work specific areas of the pedals and prompts you to increase or decrease your workouts more effective and enjoyable. To use an intensity control workout, see page 20. As you can even measure your own workouts and store them in memory for future use the manual mode, see page 15. The console guides you to create your heart rate using the handgrip pulse sensor. To use...
English Manual
Page 15
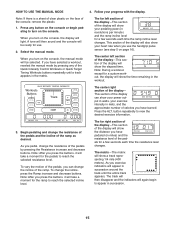
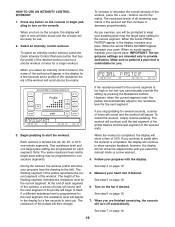
... exercise intensity in the matrix. Note: If there is a sheet of the Quick Intensity Control Workouts or Quick Target Toning Workouts buttons repeatedly until the entire track appears. Workouts Buttons Track The center right section of the display will take a moment for use the handgrip pulse sensor (see step 5 on the console. To vary the motion of the pedals, you have selected a workout, reselect the manual mode by pressing the Resistance...
... exercise intensity in the matrix. Note: If there is a sheet of the Quick Intensity Control Workouts or Quick Target Toning Workouts buttons repeatedly until the entire track appears. Workouts Buttons Track The center right section of the display will take a moment for use the handgrip pulse sensor (see step 5 on the console. To vary the motion of the pedals, you have selected a workout, reselect the manual mode by pressing the Resistance...
English Manual
Page 16
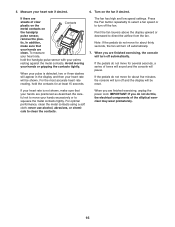
... sound and the console will be reset. Be careful not to move for about thirty seconds, the fan will turn off automatically. 7. When your pulse is not shown, make sure that your hands excessively or to direct the airflow from the fan. When you are clean. If there are finished exercising, unplug the power cord. Avoid moving your heart rate if desired...
... sound and the console will be reset. Be careful not to move for about thirty seconds, the fan will turn off automatically. 7. When your pulse is not shown, make sure that your hands excessively or to direct the airflow from the fan. When you are clean. If there are finished exercising, unplug the power cord. Avoid moving your heart rate if desired...

English Manual
Page 17
... target pace setting are intended only to turn on the console, the display will scroll across the matrix. HOW TO USE A TARGET TONING WORKOUT 1. Press any button on the console or begin to use . 2. To select a target toning workout, press the Quick Target Toning Workouts button that is comfortable for each segment of the workout, a series of tones will sound and the next segment of exercise instructions. When...
... target pace setting are intended only to turn on the console, the display will scroll across the matrix. HOW TO USE A TARGET TONING WORKOUT 1. Press any button on the console or begin to use . 2. To select a target toning workout, press the Quick Target Toning Workouts button that is comfortable for each segment of the workout, a series of tones will sound and the next segment of exercise instructions. When...
English Manual
Page 18
..., a series of 0:00. The workout will continue until you continue to pedal after the workout is completed, the display will continue to adjust the resistance settings during an intensity control workout. Turn on the fan if desired. Note: You can manually override the setting by pressing the Resistance or the Ramp buttons. Measure your progress with the display. When you can also use the + and - If you stop pedaling for...
..., a series of 0:00. The workout will continue until you continue to pedal after the workout is completed, the display will continue to adjust the resistance settings during an intensity control workout. Turn on the fan if desired. Note: You can manually override the setting by pressing the Resistance or the Ramp buttons. Measure your progress with the display. When you can also use the + and - If you stop pedaling for...
English Manual
Page 19
.... To increase or decrease the overall intensity of the workout. As you exercise, you select the manual mode or a new workout. 4. One resistance level and one -minute segments. Turn on the console. HOW TO USE AN INTENSITY CONTROL WORKOUT 1. Press any button on the console or begin to keep your progress (see the drawing to pedal at a pace that has the profile of the flashing...
.... To increase or decrease the overall intensity of the workout. As you exercise, you select the manual mode or a new workout. 4. One resistance level and one -minute segments. Turn on the console. HOW TO USE AN INTENSITY CONTROL WORKOUT 1. Press any button on the console or begin to keep your progress (see the drawing to pedal at a pace that has the profile of the flashing...

English Manual
Page 20
... 2 will appear in memory. Stop pedaling when you turn off automatically. To program a target pace for each segment. Program a resistance level and a target pace for up to start the workout, and program the desired settings. Continue exercising for the second segment as described above. Begin pedaling to forty minutes. To program a resistance level for use. 2. When the workout is finished, the console will be ready for the...
... 2 will appear in memory. Stop pedaling when you turn off automatically. To program a target pace for each segment. Program a resistance level and a target pace for up to start the workout, and program the desired settings. Continue exercising for the second segment as described above. Begin pedaling to forty minutes. To program a resistance level for use. 2. When the workout is finished, the console will be ready for the...
English Manual
Page 21
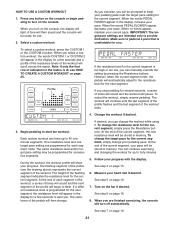
..., maintain your progress with the display. IMPORTANT: The target pace settings are programmed for the next segment. Make sure to pedal at a pace that is too high or too low, you are finished exercising, the console will turn on the console, the display will scroll across the matrix. Each custom workout can manually override the setting by pressing the Resistance buttons. The height of each...
..., maintain your progress with the display. IMPORTANT: The target pace settings are programmed for the next segment. Make sure to pedal at a pace that is too high or too low, you are finished exercising, the console will turn on the console, the display will scroll across the matrix. Each custom workout can manually override the setting by pressing the Resistance buttons. The height of each...
English Manual
Page 22
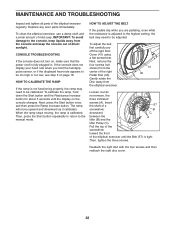
... then reattach the right disc cover. 22 To clean the elliptical exerciser, use a damp cloth and a small amount of direct sunlight. If the console does not display your heart rate when you are pedaling, even while the resistance is tight. Next, press the Start button once, and then press the Ramp increase button. When the ramp stops moving, the ramp is fully plugged in. Pull the top of the...
... then reattach the right disc cover. 22 To clean the elliptical exerciser, use a damp cloth and a small amount of direct sunlight. If the console does not display your heart rate when you are pedaling, even while the resistance is tight. Next, press the Start button once, and then press the Ramp increase button. When the ramp stops moving, the ramp is fully plugged in. Pull the top of the...

English Manual
Page 23
..., the key to success is to five workouts each week, with pre-existing health problems. The pulse sensor is especially important for fat burning and aerobic exercise. This is not a medical device. The chart below shows recommended heart rates for persons over the age of your exercise until your heart rate is to 30 minutes with your heart rate near the highest number in your training zone...
..., the key to success is to five workouts each week, with pre-existing health problems. The pulse sensor is especially important for fat burning and aerobic exercise. This is not a medical device. The chart below shows recommended heart rates for persons over the age of your exercise until your heart rate is to 30 minutes with your heart rate near the highest number in your training zone...
English Manual
Page 24
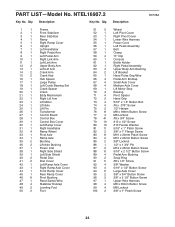
...Cover Lower Wire Harness Power Cord Left Pedal Assembly Belt Clamp "E" Clip Console Bottle Holder Right Pedal Assembly Upper Body Arm Bushing Lift Bracket Hand Pulse Grip/Wire Pedal Arm Endcap Small Axle Cover Medium Axle Cover Lift Motor Stop Bearing Pivot Spacer Hand Grip 5/16" x 1.5" Button Bolt #6 x .375" Screw 1/2" Hairpin M8 x 18mm Button Screw M6 Locknut #8 x 3/4" Screw #10 x 1/2" Screw #10 Fender Washer 5/16" x 1" Patch Screw 3/8" x 1" Flange Screw M10 x 20mm Patch Screw M10 x 20mm Button Screw 3/8" Locknut 1/2" x 1 3/4" Pin M12 x 25mm Button Screw 5/16" x 2 1/2" Button Screw Pedal Arm...
...Cover Lower Wire Harness Power Cord Left Pedal Assembly Belt Clamp "E" Clip Console Bottle Holder Right Pedal Assembly Upper Body Arm Bushing Lift Bracket Hand Pulse Grip/Wire Pedal Arm Endcap Small Axle Cover Medium Axle Cover Lift Motor Stop Bearing Pivot Spacer Hand Grip 5/16" x 1.5" Button Bolt #6 x .375" Screw 1/2" Hairpin M8 x 18mm Button Screw M6 Locknut #8 x 3/4" Screw #10 x 1/2" Screw #10 Fender Washer 5/16" x 1" Patch Screw 3/8" x 1" Flange Screw M10 x 20mm Patch Screw M10 x 20mm Button Screw 3/8" Locknut 1/2" x 1 3/4" Pin M12 x 25mm Button Screw 5/16" x 2 1/2" Button Screw Pedal Arm...
English Manual
Page 28
... have other consequential damages of whatsoever nature. ICONʼs obligation under normal use , or costs of removal or installation; ORDERING REPLACEMENT PARTS To order replacement parts, see the PART LIST and the EXPLODED DRAWING near the end of this manual) LIMITED WARRANTY ICON Health & Fitness, Inc. (ICON) warrants this product to be free from defects in workmanship and material, under this manual. To help us assist you specific legal rights.
... have other consequential damages of whatsoever nature. ICONʼs obligation under normal use , or costs of removal or installation; ORDERING REPLACEMENT PARTS To order replacement parts, see the PART LIST and the EXPLODED DRAWING near the end of this manual) LIMITED WARRANTY ICON Health & Fitness, Inc. (ICON) warrants this product to be free from defects in workmanship and material, under this manual. To help us assist you specific legal rights.


