
English Manual
Page 1
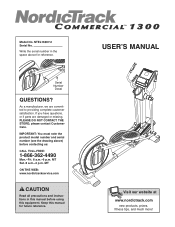
... number and serial number (see the drawing above for future reference. please contact Customer Care. Model No. USERʼS MANUAL Visit our website at www.nordictrack.com new products, prizes, fitness tips, and much more! MT ON THE WEB: www.nordictrackservice.com CAUTION Read all precautions and instructions in the space...
... number and serial number (see the drawing above for future reference. please contact Customer Care. Model No. USERʼS MANUAL Visit our website at www.nordictrack.com new products, prizes, fitness tips, and much more! MT ON THE WEB: www.nordictrackservice.com CAUTION Read all precautions and instructions in the space...
English Manual
Page 2
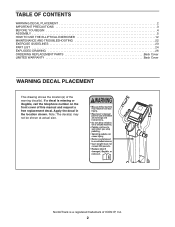
...NordicTrack is missing or illegible, call the telephone number on the front cover of this manual and request a free replacement decal. TABLE OF CONTENTS WARNING DECAL PLACEMENT 2 IMPORTANT PRECAUTIONS 3 BEFORE YOU BEGIN 4 ASSEMBLY 5 HOW TO USE THE ELLIPTICAL EXERCISER 12 MAINTENANCE AND TROUBLESHOOTING 22 EXERCISE GUIDELINES 23 PART... LIST 24 EXPLODED DRAWING 26 ORDERING REPLACEMENT PARTS Back Cover LIMITED WARRANTY Back Cover WARNING DECAL PLACEMENT ...
...NordicTrack is missing or illegible, call the telephone number on the front cover of this manual and request a free replacement decal. TABLE OF CONTENTS WARNING DECAL PLACEMENT 2 IMPORTANT PRECAUTIONS 3 BEFORE YOU BEGIN 4 ASSEMBLY 5 HOW TO USE THE ELLIPTICAL EXERCISER 12 MAINTENANCE AND TROUBLESHOOTING 22 EXERCISE GUIDELINES 23 PART... LIST 24 EXPLODED DRAWING 26 ORDERING REPLACEMENT PARTS Back Cover LIMITED WARRANTY Back Cover WARNING DECAL PLACEMENT ...

English Manual
Page 3
... to protect the floor or carpet. Place your elliptical exerciser on your elliptical exerciser before using your elliptical exerciser. The pulse sensor is enough clearance around your elliptical exerciser to a stop exercising, allow the pedals to slowly come to mount, dismount, and use your elliptical exerciser at all parts regularly. ICON assumes no responsibility for persons...
... to protect the floor or carpet. Place your elliptical exerciser on your elliptical exerciser before using your elliptical exerciser. The pulse sensor is enough clearance around your elliptical exerciser to a stop exercising, allow the pedals to slowly come to mount, dismount, and use your elliptical exerciser at all parts regularly. ICON assumes no responsibility for persons...
English Manual
Page 4
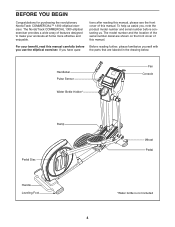
... cover of this manual. Before reading further, please familiarize yourself with the parts that are shown on the front cover of features designed to make your benefit, read this manual carefully before contacting us assist you have ques- The NordicTrack COMMERCIAL 1300 elliptical exerciser provides a wide array of this manual. The model number and...
... cover of this manual. Before reading further, please familiarize yourself with the parts that are shown on the front cover of features designed to make your benefit, read this manual carefully before contacting us assist you have ques- The NordicTrack COMMERCIAL 1300 elliptical exerciser provides a wide array of this manual. The model number and...
English Manual
Page 5
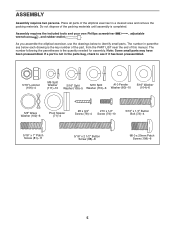
..." x 2 1/2" Button Screw (88)-8 M10 x 20mm Patch Screw (108)-6 5 ASSEMBLY Assembly requires two persons. If a part is the key number of the part, from the PART LIST near the end of the elliptical exerciser in the parts bag, check to identify small parts. Assembly requires the included tools and your own Phillips screwdriver wrench , and rubber mallet...
..." x 2 1/2" Button Screw (88)-8 M10 x 20mm Patch Screw (108)-6 5 ASSEMBLY Assembly requires two persons. If a part is the key number of the part, from the PART LIST near the end of the elliptical exerciser in the parts bag, check to identify small parts. Assembly requires the included tools and your own Phillips screwdriver wrench , and rubber mallet...
English Manual
Page 9
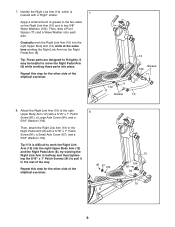
... 71 71 102 8 Grease 10 8. Repeat this step for the other side of the elliptical exerciser. 8 81 67 104 8 12 104 81 94 10 9 It may be helpful to move the Right Pedal Arm (8) while working these parts into the right Upper Body Arm (12) and the Right Pedal Arm (8), try working... the Right Link Arm into the Right Pedal Arm (8). Identify the Right Link Arm (10), which is difficult to two 5/8" Wave Washers (102). Tip: These parts are designed to the Right Pedal Arm (8) with a 5/16" x 1" Patch Screw (81), a Small Axle Cover (67), and a 5/16" Washer (104). Tip: If it in ...
... 71 71 102 8 Grease 10 8. Repeat this step for the other side of the elliptical exerciser. 8 81 67 104 8 12 104 81 94 10 9 It may be helpful to move the Right Pedal Arm (8) while working these parts into the right Upper Body Arm (12) and the Right Pedal Arm (8), try working... the Right Link Arm into the Right Pedal Arm (8). Identify the Right Link Arm (10), which is difficult to two 5/8" Wave Washers (102). Tip: These parts are designed to the Right Pedal Arm (8) with a 5/16" x 1" Patch Screw (81), a Small Axle Cover (67), and a 5/16" Washer (104). Tip: If it in ...
English Manual
Page 11
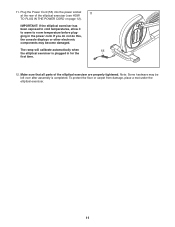
...be left over after assembly is plugged in the power cord. Make sure that all parts of the elliptical exerciser (see HOW TO PLUG IN THE POWER CORD on page 12). IMPORTANT: If the elliptical exerciser has been exposed to cold temperatures, allow it to warm to room temperature before...plugging in for the first time. 12. The ramp will calibrate automatically when 55 the elliptical exerciser is completed. Plug the Power Cord (55) into the power socket 11 at the rear of the elliptical exerciser are properly tightened. Note: Some hardware may become damaged. 11. To protect ...
...be left over after assembly is plugged in the power cord. Make sure that all parts of the elliptical exerciser (see HOW TO PLUG IN THE POWER CORD on page 12). IMPORTANT: If the elliptical exerciser has been exposed to cold temperatures, allow it to warm to room temperature before...plugging in for the first time. 12. The ramp will calibrate automatically when 55 the elliptical exerciser is completed. Plug the Power Cord (55) into the power socket 11 at the rear of the elliptical exerciser are properly tightened. Note: Some hardware may become damaged. 11. To protect ...
English Manual
Page 22
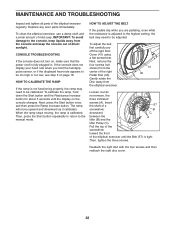
... the right disc cover. 22 MAINTENANCE AND TROUBLESHOOTING Inspect and tighten all parts of the right Pedal Disc (40). Replace any worn parts immediately. Next, remove the four screws (not shown) from the elliptical exerciser. 41 40 Loosen, but do not remove, the three indicated... screws (A). To clean the elliptical exerciser, use a damp cloth and a small amount of a 57 screwdriver B ...
... the right disc cover. 22 MAINTENANCE AND TROUBLESHOOTING Inspect and tighten all parts of the right Pedal Disc (40). Replace any worn parts immediately. Next, remove the four screws (not shown) from the elliptical exerciser. 41 40 Loosen, but do not remove, the three indicated... screws (A). To clean the elliptical exerciser, use a damp cloth and a small amount of a 57 screwdriver B ...

English Manual
Page 23
... general. The chart below shows recommended heart rates for longer than 20 minutes.) Breathe regularly and deeply as a guide to make exercise a regular and enjoyable part of rest between workouts. During the first few minutes of the chart (ages are essential for exercise. WORKOUT GUIDELINES Warming up increases your condition, complete...
... general. The chart below shows recommended heart rates for longer than 20 minutes.) Breathe regularly and deeply as a guide to make exercise a regular and enjoyable part of rest between workouts. During the first few minutes of the chart (ages are essential for exercise. WORKOUT GUIDELINES Warming up increases your condition, complete...

English Manual
Page 24
PART LIST-Model No. Qty. Description R0708A 1 1 Frame 2 1 Front Stabilizer 3 1 Rear Stabilizer 4 1 Ramp 5 1 Right Ramp Cover 6 1 Upright 7 1 Left Handlebar 8 1 Right Pedal Arm 9 1 Left Pedal Arm 10 1 ...
PART LIST-Model No. Qty. Description R0708A 1 1 Frame 2 1 Front Stabilizer 3 1 Rear Stabilizer 4 1 Ramp 5 1 Right Ramp Cover 6 1 Upright 7 1 Left Handlebar 8 1 Right Pedal Arm 9 1 Left Pedal Arm 10 1 ...

English Manual
Page 25
..." Wire Harness * - Key No. Qty. Ground Wire * - Power Jumper Wire * - Middle Wire Harness * - See the back cover of this manual for information about ordering replacement parts. *These parts are subject to change without notice. Qty. Userʼs Manual * -
..." Wire Harness * - Key No. Qty. Ground Wire * - Power Jumper Wire * - Middle Wire Harness * - See the back cover of this manual for information about ordering replacement parts. *These parts are subject to change without notice. Qty. Userʼs Manual * -
English Manual
Page 28
...is not responsible or liable for a minimal handling charge. Some states do not allow limitations on how long an implied warranty lasts. Parts and labor are warranted for which warranty claims are limited in lieu of any and all other rights that specifically set forth herein....please be free from state to you specific legal rights. For in China © 2008 ICON IP, Inc. ORDERING REPLACEMENT PARTS To order replacement parts, see the PART LIST and the EXPLODED DRAWING near the end of its authorized service centers. ICONʼs obligation under normal use or performance...
...is not responsible or liable for a minimal handling charge. Some states do not allow limitations on how long an implied warranty lasts. Parts and labor are warranted for which warranty claims are limited in lieu of any and all other rights that specifically set forth herein....please be free from state to you specific legal rights. For in China © 2008 ICON IP, Inc. ORDERING REPLACEMENT PARTS To order replacement parts, see the PART LIST and the EXPLODED DRAWING near the end of its authorized service centers. ICONʼs obligation under normal use or performance...


