
L12 User's Manual
Page 4
...with care Never place the strap around the neck of malfunction Should you notice smoke or an unusual smell coming from the camera or AC adapter, unplug the AC adapter and remove the batteries immediately, taking care to avoid burns. Repairs should be taken... following safety precautions in the event of an infant or child. After removing or disconnecting the power source, take the product to a Nikon-authorized service representative for inspection. Continued operation could result in explosion or fire. Introduction WARNINGS Turn off in their mouths. Introduction For Your...
...with care Never place the strap around the neck of malfunction Should you notice smoke or an unusual smell coming from the camera or AC adapter, unplug the AC adapter and remove the batteries immediately, taking care to avoid burns. Repairs should be taken... following safety precautions in the event of an infant or child. After removing or disconnecting the power source, take the product to a Nikon-authorized service representative for inspection. Continued operation could result in explosion or fire. Introduction WARNINGS Turn off in their mouths. Introduction For Your...
L12 User's Manual
Page 9
...8 Multi Selector 8 MENU Button 9 Help Displays 9 Preparation for Shooting 10 Insert the Batteries 10 Supported Batteries 10 Turning On and Off the Camera 10 Setting Display Language, Date, and Time 12 Inserting Memory Cards 14 Removing Memory Cards 15 L Basic Photography and Playback: Auto Mode 16 Step1... Select L (Auto) Mode and Turn the Camera On 16 Step2 Frame a Picture 18 Step3 Focus and Shoot 20 Step4 Viewing/Deleting Pictures 22 Viewing Pictures: Full-Frame Playback 22 Deleting ...
...8 Multi Selector 8 MENU Button 9 Help Displays 9 Preparation for Shooting 10 Insert the Batteries 10 Supported Batteries 10 Turning On and Off the Camera 10 Setting Display Language, Date, and Time 12 Inserting Memory Cards 14 Removing Memory Cards 15 L Basic Photography and Playback: Auto Mode 16 Step1... Select L (Auto) Mode and Turn the Camera On 16 Step2 Frame a Picture 18 Step3 Focus and Shoot 20 Step4 Viewing/Deleting Pictures 22 Viewing Pictures: Full-Frame Playback 22 Deleting ...

L12 User's Manual
Page 10
... Voice Recordings 57 Copying Voice Recordings 59 Connecting to Televisions, Computers, and Printers 61 Connecting to a TV 62 Connecting to a Computer 63 Before Connecting the Camera 63 Setting the USB Option 64 Transferring Pictures to a Computer 65 viii
... Voice Recordings 57 Copying Voice Recordings 59 Connecting to Televisions, Computers, and Printers 61 Connecting to a TV 62 Connecting to a Computer 63 Before Connecting the Camera 63 Setting the USB Option 64 Transferring Pictures to a Computer 65 viii

L12 User's Manual
Page 11
... Menus 76 Shooting Options: The Shooting Menu 76 Z Image Mode 77 d White Balance 79 q Continuous 81 A BSS ...82 d Color Options 83 Restrictions on Camera Settings 84 Playback Options: The Playback Menu 85 z Slide Show 87 A Delete ...88 D Protect 88 E Transfer Marking 89 L Copy...90 Basic... Camera Setup: The Setup Menu 91 R Menus...92 H Quick Startup 93 V Welcome Screen 93 W Date...94 Z Monitor Settings 97 f Date Imprint 98 b Vibration Reduction 100...
... Menus 76 Shooting Options: The Shooting Menu 76 Z Image Mode 77 d White Balance 79 q Continuous 81 A BSS ...82 d Color Options 83 Restrictions on Camera Settings 84 Playback Options: The Playback Menu 85 z Slide Show 87 A Delete ...88 D Protect 88 E Transfer Marking 89 L Copy...90 Basic... Camera Setup: The Setup Menu 91 R Menus...92 H Quick Startup 93 V Welcome Screen 93 W Date...94 Z Monitor Settings 97 f Date Imprint 98 b Vibration Reduction 100...

L12 User's Manual
Page 12
Introduction Technical Notes 107 Optional Accessories 107 Image/Sound File and Folder Names 108 Caring for the Camera 109 Cleaning 110 Storage ...111 Error Messages 112 Troubleshooting 117 Specifications 122 Supported Standards 125 Index...126 x
Introduction Technical Notes 107 Optional Accessories 107 Image/Sound File and Folder Names 108 Caring for the Camera 109 Cleaning 110 Storage ...111 Error Messages 112 Troubleshooting 117 Specifications 122 Supported Standards 125 Index...126 x
L12 User's Manual
Page 13
... icon marks notes, informa- ted or used : This icon marks cautions, infor- Notations • A Secure Digital (SD) memory card is referred to as a "memory card." • The setting at the time of a Nikon COOLPIX L12 digital camera. j mation that monitor icons can be read before use , and keep it . This icon marks tips, additional l information...
... icon marks notes, informa- ted or used : This icon marks cautions, infor- Notations • A Secure Digital (SD) memory card is referred to as a "memory card." • The setting at the time of a Nikon COOLPIX L12 digital camera. j mation that monitor icons can be read before use , and keep it . This icon marks tips, additional l information...
L12 User's Manual
Page 14
... the use with the latest product information, tips, answers to frequently asked questions (FAQs), and general advice on digital imaging and photography. See the URL below for contact information: http://nikonimaging.com/ Use Only Nikon Brand Electronic Accessories Nikon COOLPIX cameras are engineered and proven to operate within the operational and safety requirements of the...
... the use with the latest product information, tips, answers to frequently asked questions (FAQs), and general advice on digital imaging and photography. See the URL below for contact information: http://nikonimaging.com/ Use Only Nikon Brand Electronic Accessories Nikon COOLPIX cameras are engineered and proven to operate within the operational and safety requirements of the...
L12 User's Manual
Page 15
... the government has been obtained, the copying or reproduction of unused postage stamps or post cards issued by means of a scanner, digital camera or other device may be provided for example, pictures of empty sky). The copying or reproduction of stamps issued by the government ...certificates, etc.), commuter passes, or coupon tickets, except when a minimum of necessary copies are circulated in possession of material that has been digitally copied or reproduced by the government is the user's responsibility. Deleted files can sometimes be taken to avoid injury or damage to another ...
... the government has been obtained, the copying or reproduction of unused postage stamps or post cards issued by means of a scanner, digital camera or other device may be provided for example, pictures of empty sky). The copying or reproduction of stamps issued by the government ...certificates, etc.), commuter passes, or coupon tickets, except when a minimum of necessary copies are circulated in possession of material that has been digitally copied or reproduced by the government is the user's responsibility. Deleted files can sometimes be taken to avoid injury or damage to another ...

L12 User's Manual
Page 16
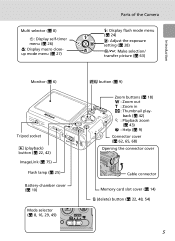
Introduction Parts of the Camera A (one-touch portrait) button (c 39) D-Lighting button (c 45) Power switch (c 10) Shutter-release button (c 20) F (vibration reduction) button (c 19, 38) Speaker (c 48, 54) Built-in flash (c 24) Built-in microphone (c 48, 49) Lens (c 110, 122) Lens cover closed Eyelet for camera strap Self-timer lamp (c 26) AF-assist illuminator (c 25, 100) Optional AC adapter power cable connector (under cover) (c 107) Lens cover Attaching the Camera Strap 4
Introduction Parts of the Camera A (one-touch portrait) button (c 39) D-Lighting button (c 45) Power switch (c 10) Shutter-release button (c 20) F (vibration reduction) button (c 19, 38) Speaker (c 48, 54) Built-in flash (c 24) Built-in microphone (c 48, 49) Lens (c 110, 122) Lens cover closed Eyelet for camera strap Self-timer lamp (c 26) AF-assist illuminator (c 25, 100) Optional AC adapter power cable connector (under cover) (c 107) Lens cover Attaching the Camera Strap 4
L12 User's Manual
Page 17
Multi selector (c 8) H: Display self-timer menu (c 26) L: Display macro closeup mode menu (c 27) Parts of the Camera J: Display flash mode menu (c 24) I: Adjust the exposure setting (c 28) d/E: Make selection/ transfer picture (c 63) Introduction Monitor (c 6) Tripod socket i (playback) button (c 22, 42) ImageLink (c 75) ...
Multi selector (c 8) H: Display self-timer menu (c 26) L: Display macro closeup mode menu (c 27) Parts of the Camera J: Display flash mode menu (c 24) I: Adjust the exposure setting (c 28) d/E: Make selection/ transfer picture (c 63) Introduction Monitor (c 6) Tripod socket i (playback) button (c 22, 42) ImageLink (c 75) ...

L12 User's Manual
Page 18
... playback. 6 See each page for the monitor indicators. * See "Voice Recording" (c 55) for the monitor indicators during shooting and playback (actual display varies with current camera settings). Shooting 20 21 19 18 2 5 1 34 AUTO 7 8 9 10 10 11 6 12 +1.0 13 17 9999 16 15 14 1 Shooting mode*... 16, 29, 38, 39, 49...
... playback. 6 See each page for the monitor indicators. * See "Voice Recording" (c 55) for the monitor indicators during shooting and playback (actual display varies with current camera settings). Shooting 20 21 19 18 2 5 1 34 AUTO 7 8 9 10 10 11 6 12 +1.0 13 17 9999 16 15 14 1 Shooting mode*... 16, 29, 38, 39, 49...

L12 User's Manual
Page 20
... Select one of fifteen "scenes" suited to different subjects of shooting conditions, such as indoor parties or night landscapes, and let the camera do the rest. Multi Selector In addition to perform the following operations. Move cursor up (c 27), and exposure compensation (c 28) ... functions, the multi selector is also used to activating the flash (c 24), self-timer (c 26), macro close-up (G). b: Scene mode (c 29) Select one of camera settings are indicated with G, H, I and J. T: Movie mode (c 49) Record movies. Move cursor down , left (I or G) Display the next picture (c 22)....
... Select one of fifteen "scenes" suited to different subjects of shooting conditions, such as indoor parties or night landscapes, and let the camera do the rest. Multi Selector In addition to perform the following operations. Move cursor up (c 27), and exposure compensation (c 28) ... functions, the multi selector is also used to activating the flash (c 24), self-timer (c 26), macro close-up (G). b: Scene mode (c 29) Select one of camera settings are indicated with G, H, I and J. T: Movie mode (c 49) Record movies. Move cursor down , left (I or G) Display the next picture (c 22)....

L12 User's Manual
Page 22
... the monitor will light for Shooting 3 Close the battery-chamber cover. 1 2 Supported Batteries This camera uses the following size AA batteries. • Two LR6 alkaline batteries (batteries supplied) • Two FR6/L91 lithium batteries • Two Nikon EN-MH1 rechargeable nickel-metal hydride batteries (available separately) • Two ZR6 oxyride batteries Turning...
... the monitor will light for Shooting 3 Close the battery-chamber cover. 1 2 Supported Batteries This camera uses the following size AA batteries. • Two LR6 alkaline batteries (batteries supplied) • Two FR6/L91 lithium batteries • Two Nikon EN-MH1 rechargeable nickel-metal hydride batteries (available separately) • Two ZR6 oxyride batteries Turning...
L12 User's Manual
Page 23
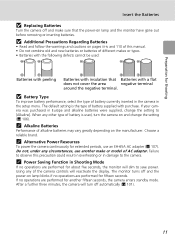
...with the following defects cannot be used , turn off automatically (c 101). 11 Preparation for Shooting Insert the Batteries j Replacing Batteries Turn the camera off and make or model of AC adapter. j Additional Precautions Regarding Batteries • Read and follow the warnings and cautions on pages iii... of alkaline batteries may vary greatly depending on lamp and the monitor have gone out before removing or inserting batteries. If your camera was purchased in Shooting Mode If no operations are performed for fifteen seconds. Do not, under any circumstances, use an EH-...
...with the following defects cannot be used , turn off automatically (c 101). 11 Preparation for Shooting Insert the Batteries j Replacing Batteries Turn the camera off and make or model of AC adapter. j Additional Precautions Regarding Batteries • Read and follow the warnings and cautions on pages iii... of alkaline batteries may vary greatly depending on lamp and the monitor have gone out before removing or inserting batteries. If your camera was purchased in Shooting Mode If no operations are performed for fifteen seconds. Do not, under any circumstances, use an EH-...

L12 User's Manual
Page 24
... Set time and date? No Yes Time zone London, Casablanca DaylightSaving l Daylight Saving Time If daylight saving time is in effect, turn on. The camera's clock is automatically set . 4 Press J. • The [Home time zone] menu is displayed. Setting Display Language, Date, and Time A ...language-selection dialog is displayed the first time the camera is turned on. 1 Turn on the camera. • The power-on lamp (green) will light for Shooting 2 Press the multi selector G, H, I or J to choose ...
... Set time and date? No Yes Time zone London, Casablanca DaylightSaving l Daylight Saving Time If daylight saving time is in effect, turn on. The camera's clock is automatically set . 4 Press J. • The [Home time zone] menu is displayed. Setting Display Language, Date, and Time A ...language-selection dialog is displayed the first time the camera is turned on. 1 Turn on the camera. • The power-on lamp (green) will light for Shooting 2 Press the multi selector G, H, I or J to choose ...
L12 User's Manual
Page 26
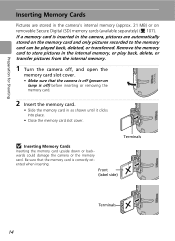
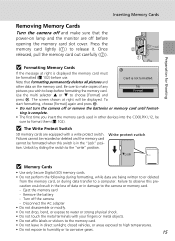
... pictures recorded to store pictures in the internal memory, or play back, delete, or transfer pictures from the internal memory. 1 Turn the camera off, and open the memory card slot cover. • Make sure that the memory card is correctly oriented when inserting. Terminals j Inserting... Inserting the memory card upside down or backwards could damage the camera or the memory card. If a memory card is inserted in the camera, pictures are stored in the camera's internal memory (approx. 21 MB) or on removable Secure Digital (SD) memory cards (available separately) (c 107). Remove the...
... pictures recorded to store pictures in the internal memory, or play back, delete, or transfer pictures from the internal memory. 1 Turn the camera off, and open the memory card slot cover. • Make sure that the memory card is correctly oriented when inserting. Terminals j Inserting... Inserting the memory card upside down or backwards could damage the camera or the memory card. If a memory card is inserted in the camera, pictures are stored in the camera's internal memory (approx. 21 MB) or on removable Secure Digital (SD) memory cards (available separately) (c 107). Remove the...
L12 User's Manual
Page 27
ting is displayed the memory card must be displayed. Write protect switch j Memory Cards • Use only Secure Digital (SD) memory cards. • Do not perform the following during formatting, while data are being written to or deleted from the memory card,...card lightly ( ) to observe this switch is not formatted. other devices into the COOLPIX L12, be formatted when this pre- To start formatting, choose [Format] again and press d. • Do not turn the camera off the camera - Pictures cannot be recorded or deleted and the memory card cannot be sure to ...
ting is displayed the memory card must be displayed. Write protect switch j Memory Cards • Use only Secure Digital (SD) memory cards. • Do not perform the following during formatting, while data are being written to or deleted from the memory card,...card lightly ( ) to observe this switch is not formatted. other devices into the COOLPIX L12, be formatted when this pre- To start formatting, choose [Format] again and press d. • Do not turn the camera off the camera - Pictures cannot be recorded or deleted and the memory card cannot be sure to ...
L12 User's Manual
Page 28
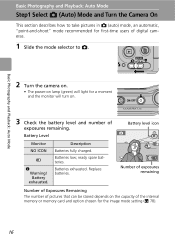
Basic Photography and Playback: Auto Mode 2 Turn the camera on. • The power-on lamp (green) will turn on the capacity of exposures remaining. Battery exhausted. Batteries exhausted. ON / OFF 3 Check the battery level ... of pictures that can be stored depends on . Description Batteries fully charged. Basic Photography and Playback: Auto Mode Step1 Select L (Auto) Mode and Turn the Camera On This section describes how to take pictures in L (auto) mode, an automatic, "point-and-shoot" mode recommended for a moment and the monitor will light...
Basic Photography and Playback: Auto Mode 2 Turn the camera on. • The power-on lamp (green) will turn on the capacity of exposures remaining. Battery exhausted. Batteries exhausted. ON / OFF 3 Check the battery level ... of pictures that can be stored depends on . Description Batteries fully charged. Basic Photography and Playback: Auto Mode Step1 Select L (Auto) Mode and Turn the Camera On This section describes how to take pictures in L (auto) mode, an automatic, "point-and-shoot" mode recommended for a moment and the monitor will light...
L12 User's Manual
Page 29
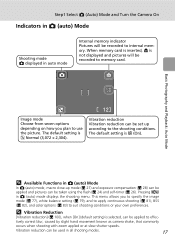
...) mode displays the shooting menu. When memory card is inserted, M is W (On). tively correct blur, caused by slight hand movement known as camera shake, that commonly occurs when shooting with zoom applied or at slow shutter speeds. l Vibration Reduction [Vibration reduction] (c 100), when [On] (...L (auto) Mode In L (auto) mode, macro close-up according to the shooting conditions. Step1 Select L (Auto) Mode and Turn the Camera On Indicators in L (auto) Mode Shooting mode L displayed in auto mode Internal memory indicator Pictures will be applied to effec- Basic Photography and...
...) mode displays the shooting menu. When memory card is inserted, M is W (On). tively correct blur, caused by slight hand movement known as camera shake, that commonly occurs when shooting with zoom applied or at slow shutter speeds. l Vibration Reduction [Vibration reduction] (c 100), when [On] (...L (auto) Mode In L (auto) mode, macro close-up according to the shooting conditions. Step1 Select L (Auto) Mode and Turn the Camera On Indicators in L (auto) Mode Shooting mode L displayed in auto mode Internal memory indicator Pictures will be applied to effec- Basic Photography and...

L12 User's Manual
Page 30
... with the main subject positioned near the center of the frame. Basic Photography and Playback: Auto Mode Step2 Frame a Picture 1 Ready the camera. • Hold the camera steadily in both hands, keeping your fingers and other objects away from the lens, flash, and AF-assist illuminator. • When taking ...pictures in "tall" orientation, turn the camera clockwise so that the subject fills a larger area of the monitor. 12 Using the Zoom Use the zoom buttons to zoom in T 18
... with the main subject positioned near the center of the frame. Basic Photography and Playback: Auto Mode Step2 Frame a Picture 1 Ready the camera. • Hold the camera steadily in both hands, keeping your fingers and other objects away from the lens, flash, and AF-assist illuminator. • When taking ...pictures in "tall" orientation, turn the camera clockwise so that the subject fills a larger area of the monitor. 12 Using the Zoom Use the zoom buttons to zoom in T 18


