User Manual
Page 1
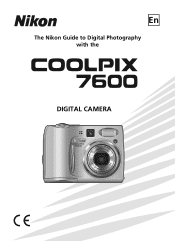
En The Nikon Guide to Digital Photography with the DIGITAL CAMERA
En The Nikon Guide to Digital Photography with the DIGITAL CAMERA
User Manual
Page 3
...the event of malfunction, the product should be read before using the camera strap Never place the strap around the neck of different types. • When inserting batteries, do not attempt to a Nikon-authorized service center for use other accident, take the equipment to ...insert them . Observe caution when using this product: • Before replacing the batteries, turn the camera off immediately in explosion or fire. The consequences that...
...the event of malfunction, the product should be read before using the camera strap Never place the strap around the neck of different types. • When inserting batteries, do not attempt to a Nikon-authorized service center for use other accident, take the equipment to ...insert them . Observe caution when using this product: • Before replacing the batteries, turn the camera off immediately in explosion or fire. The consequences that...
User Manual
Page 4
... reach of children Particular care should not be taken to prevent infants from the camera. Before removing the batteries, turn the camera off and allow the batteries to cool. • Discontinue use only the cables provided or sold by Nikon for an extended period, the batteries may become hot during use , or when...
... reach of children Particular care should not be taken to prevent infants from the camera. Before removing the batteries, turn the camera off and allow the batteries to cool. • Discontinue use only the cables provided or sold by Nikon for an extended period, the batteries may become hot during use , or when...
User Manual
Page 5
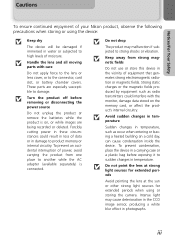
Notices/For Your Safety Cautions To ensure continued enjoyment of your Nikon product, observe the following precautions when storing or using or storing the camera. Forcibly cutting power in these circumstances could interfere with care Do not apply force to the lens or lens cover, or to sudden changes in ...
Notices/For Your Safety Cautions To ensure continued enjoyment of your Nikon product, observe the following precautions when storing or using or storing the camera. Forcibly cutting power in these circumstances could interfere with care Do not apply force to the lens or lens cover, or to sudden changes in ...
User Manual
Page 7
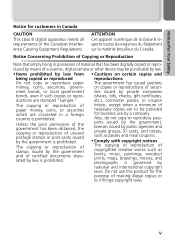
...." duced by means of the Canadian Interference Causing Equipment Regulations. Notices/For Your Safety Notice for customers in Canada CAUTION This class B digital apparatus meets all requirements of a scanner, digital camera or other device may be provided for business use this product for the purpose of certified documents stipulated by law is prohibited...
...." duced by means of the Canadian Interference Causing Equipment Regulations. Notices/For Your Safety Notice for customers in Canada CAUTION This class B digital apparatus meets all requirements of a scanner, digital camera or other device may be provided for business use this product for the purpose of certified documents stipulated by law is prohibited...
User Manual
Page 8
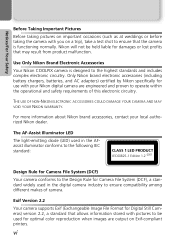
... Exif-compliant printers. For more information about Nikon brand accessories, contact your Nikon digital camera are output on a trip), take a test shot to the highest standards and includes complex electronic circuitry. Use Only Nikon Brand Electronic Accessories Your Nikon COOLPIX camera is functioning normally. Nikon will not be used in the digital camera industry to ensure compatibility among different makes of...
... Exif-compliant printers. For more information about Nikon brand accessories, contact your Nikon digital camera are output on a trip), take a test shot to the highest standards and includes complex electronic circuitry. Use Only Nikon Brand Electronic Accessories Your Nikon COOLPIX camera is functioning normally. Nikon will not be used in the digital camera industry to ensure compatibility among different makes of...
User Manual
Page 9
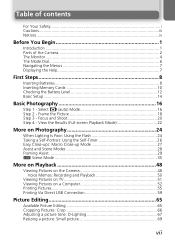
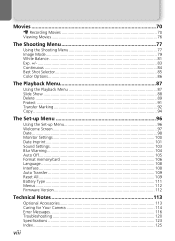
...-up Mode 27 Assist and Scene Modes 28 Framing Assist 29 e Scene Mode 35 More on Playback 48 Viewing Pictures on the Camera 48 Voice Memos: Recording and Playback 50 Viewing Pictures on TV 51 Viewing Pictures on a Computer 52 Printing Pictures 55 Printing Via... Select P (auto) Mode 16 Step 2 - Table of contents For Your Safety i Cautions...iii Notices ...iv Before You Begin 1 Introduction 1 Parts of the Camera 2 The Monitor 4 The Mode Dial 6 Navigating the Menus 7 Displaying the Help 7 First Steps 8 Inserting Batteries 8 Inserting Memory Cards 10 Checking the Battery Level ...
...-up Mode 27 Assist and Scene Modes 28 Framing Assist 29 e Scene Mode 35 More on Playback 48 Viewing Pictures on the Camera 48 Voice Memos: Recording and Playback 50 Viewing Pictures on TV 51 Viewing Pictures on a Computer 52 Printing Pictures 55 Printing Via... Select P (auto) Mode 16 Step 2 - Table of contents For Your Safety i Cautions...iii Notices ...iv Before You Begin 1 Introduction 1 Parts of the Camera 2 The Monitor 4 The Mode Dial 6 Navigating the Menus 7 Displaying the Help 7 First Steps 8 Inserting Batteries 8 Inserting Memory Cards 10 Checking the Battery Level ...
User Manual
Page 10
... Interface...108 Auto Transfer 109 Reset All ...109 Battery Type 111 Menus...112 Firmware Version 112 Technical Notes 113 Optional Accessories 113 Caring for Your Camera 114 Error Messages 116 Troubleshooting 120 Specifications 123 Index ...125 viii
... Interface...108 Auto Transfer 109 Reset All ...109 Battery Type 111 Menus...112 Firmware Version 112 Technical Notes 113 Optional Accessories 113 Caring for Your Camera 114 Error Messages 116 Troubleshooting 120 Specifications 123 Index ...125 viii
User Manual
Page 11
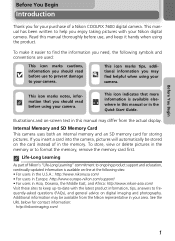
... in Asia, Oceania, the Middle East, and Africa: http://www.nikon-asia.com/ Visit these sites to your camera. Additional information may differ from the Nikon representative in your camera. Illustrations and on the card instead of a Nikon COOLPIX 7600 digital camera. If you insert a card into the camera, pictures will automatically be available from the actual display. This icon...
... in Asia, Oceania, the Middle East, and Africa: http://www.nikon-asia.com/ Visit these sites to your camera. Additional information may differ from the Nikon representative in your camera. Illustrations and on the card instead of a Nikon COOLPIX 7600 digital camera. If you insert a card into the camera, pictures will automatically be available from the actual display. This icon...

User Manual
Page 12
Before You Begin Parts of the Camera Power switch (Q 12) Shutter-release button (Q 20) Power-on lamp (Q 12) Microphone (Q 50) Viewfinder (Q 18) Built-in Speedlight (Q 24) Eyelet for camera strap Memory card slot cover (Q 10) Power connector cover for AC adapter Self-timer lamp (Q 26) Red-eye reduction lamp (Q 24) AF-Assist illuminator (Q vi, 25, 123) Lens (Q 18) Attaching the Camera Strap 2
Before You Begin Parts of the Camera Power switch (Q 12) Shutter-release button (Q 20) Power-on lamp (Q 12) Microphone (Q 50) Viewfinder (Q 18) Built-in Speedlight (Q 24) Eyelet for camera strap Memory card slot cover (Q 10) Power connector cover for AC adapter Self-timer lamp (Q 26) Red-eye reduction lamp (Q 24) AF-Assist illuminator (Q vi, 25, 123) Lens (Q 18) Attaching the Camera Strap 2

User Manual
Page 13
Before You Begin Parts of the Camera Mode dial (Q 6) Green (AF) lamp Red (!) lamp (Q 20) (Q 20) Viewfinder (Q 18) Monitor (Q 5, 18) Zoom (l/O) buttons (Q 18) Menu button (Q 77, 87) Multi selector (!/Y/&/V) (Q 7) u(delete) button (Q 22, 23) x(play) button (Q 22) Speaker Battery-chamber cover (Q 8) Battery-chamber Tripod socket (Q 25, 26) cover latch (Q 8) Interface connector cover (Q 51, 53) Interface connector cover USB connector (Q 53, 59) Audio/video (AV) out connector (Q 51) 3
Before You Begin Parts of the Camera Mode dial (Q 6) Green (AF) lamp Red (!) lamp (Q 20) (Q 20) Viewfinder (Q 18) Monitor (Q 5, 18) Zoom (l/O) buttons (Q 18) Menu button (Q 77, 87) Multi selector (!/Y/&/V) (Q 7) u(delete) button (Q 22, 23) x(play) button (Q 22) Speaker Battery-chamber cover (Q 8) Battery-chamber Tripod socket (Q 25, 26) cover latch (Q 8) Interface connector cover (Q 51, 53) Interface connector cover USB connector (Q 53, 59) Audio/video (AV) out connector (Q 51) 3

User Manual
Page 14
... 10 11 12 1 Shooting mode 16 2 AE-L1 40 3 Focus indicator2 20 4 Zoom indicator2 18 5 Battery level indicator3 12 6 Internal memory/memory card indicator 16 7 Camera shake icon4 25 8 "Date not set" icon5 14 9 Time zone 99 10 Self-timer indicator 26 11 Date imprint indicator 101 12 Date counter/ stored... shooting mode . . . . . 84 20 Best Shot Selector (BSS 85 21 White balance 81 22 Color options 86 23 Macro close-up mode 27 5 Appears when camera clock has not been set. 6 Indicates that...
... 10 11 12 1 Shooting mode 16 2 AE-L1 40 3 Focus indicator2 20 4 Zoom indicator2 18 5 Battery level indicator3 12 6 Internal memory/memory card indicator 16 7 Camera shake icon4 25 8 "Date not set" icon5 14 9 Time zone 99 10 Self-timer indicator 26 11 Date imprint indicator 101 12 Date counter/ stored... shooting mode . . . . . 84 20 Best Shot Selector (BSS 85 21 White balance 81 22 Color options 86 23 Macro close-up mode 27 5 Appears when camera clock has not been set. 6 Indicates that...

User Manual
Page 16
... to shooting conditions. W Movie (Q 70-76) Make movies with the "W" mark next to a particular type of movies. You can perform such tasks as setting the camera clock and adjusting monitor brightness. 6 i Portrait Assist N Landscape Assist j Sports Assist m Night Portrait Assist Use framing assist to help compose pictures suited to the mode...) Choose this mode to display the SETUP menu, where you can select from six shooting menus to different subjects or shooting conditions and let the camera do the rest.
... to shooting conditions. W Movie (Q 70-76) Make movies with the "W" mark next to a particular type of movies. You can perform such tasks as setting the camera clock and adjusting monitor brightness. 6 i Portrait Assist N Landscape Assist j Sports Assist m Night Portrait Assist Use framing assist to help compose pictures suited to the mode...) Choose this mode to display the SETUP menu, where you can select from six shooting menus to different subjects or shooting conditions and let the camera do the rest.
User Manual
Page 17
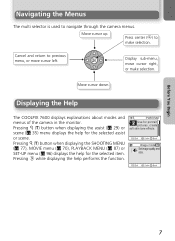
Cancel and return to navigate through the camera menus. Pressing O (T) button when displaying the SHOOTING MENU (Q 77), MOVIE menu (Q 70), PLAYBACK MENU (Q 87) or SET-UP menu (Q 96) displays the help for the ... selection. PORTRAIT Use for the selected item. Exit Confirm Back Image mode Set image quality and size. Displaying the Help The COOLPIX 7600 displays explanations about modes and menus of the camera in the monitor. Move cursor up. Display sub-menu, move cursor left. Before You Begin Navigating the Menus The multi selector...
Cancel and return to navigate through the camera menus. Pressing O (T) button when displaying the SHOOTING MENU (Q 77), MOVIE menu (Q 70), PLAYBACK MENU (Q 87) or SET-UP menu (Q 96) displays the help for the ... selection. PORTRAIT Use for the selected item. Exit Confirm Back Image mode Set image quality and size. Displaying the Help The COOLPIX 7600 displays explanations about modes and menus of the camera in the monitor. Move cursor up. Display sub-menu, move cursor left. Before You Begin Navigating the Menus The multi selector...
User Manual
Page 18
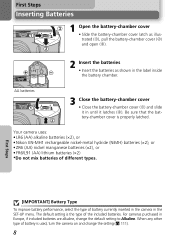
Your camera uses: • LR6 (AA) alkaline batteries (×2), or • Nikon EN-MH1 rechargeable nickel-metal hydride (NiMH) batteries (×2), or • ZR6 (AA) nickel manganese batteries (×2), or • FR6/L91 (AA) lithium batteries (×2)... *Do not mix batteries of the included batteries. When any other type of battery currently inserted in the camera in until it in...
Your camera uses: • LR6 (AA) alkaline batteries (×2), or • Nikon EN-MH1 rechargeable nickel-metal hydride (NiMH) batteries (×2), or • ZR6 (AA) nickel manganese batteries (×2), or • FR6/L91 (AA) lithium batteries (×2)... *Do not mix batteries of the included batteries. When any other type of battery currently inserted in the camera in until it in...

User Manual
Page 19
...left unused for an extended period. ies with different charges. Note that due to observe this precaution could result in damage to the camera. 9 First Steps Do not use an EH-62B AC adapter (Q 113). Choose a reliable brand. Charge each pair of alkaline ...around the negative terminal. For more information on lamp has gone out before removing or inserting batteries. Alternative Power Sources To power the camera continuously for longer periods after the batteries have faulty insulation. • Batteries with a flat negative terminal. This is normal, and the...
...left unused for an extended period. ies with different charges. Note that due to observe this precaution could result in damage to the camera. 9 First Steps Do not use an EH-62B AC adapter (Q 113). Choose a reliable brand. Charge each pair of alkaline ...around the negative terminal. For more information on lamp has gone out before removing or inserting batteries. Alternative Power Sources To power the camera continuously for longer periods after the batteries have faulty insulation. • Batteries with a flat negative terminal. This is normal, and the...

User Manual
Page 20
...card upside down or backwards could damage the camera or the card. Terminals Front Inserting Memory ...no memory card has been inserted in the camera, pictures or sounds will be stored in the memory, and if the camera contains a memory card, then they will ...automatically be stored on the card. 1 Confirm that the camera is in the correct orientation.... 4 Close the memory card slot cover First Steps 10 Inserting Memory Cards Pictures or sounds can be stored in the camera's internal...
...card upside down or backwards could damage the camera or the card. Terminals Front Inserting Memory ...no memory card has been inserted in the camera, pictures or sounds will be stored in the memory, and if the camera contains a memory card, then they will ...automatically be stored on the card. 1 Confirm that the camera is in the correct orientation.... 4 Close the memory card slot cover First Steps 10 Inserting Memory Cards Pictures or sounds can be stored in the camera's internal...
User Manual
Page 21
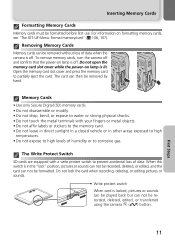
... the card can then be removed by hand. Inserting Memory Cards Formatting Memory Cards Memory cards must be removed without loss of data when the camera is off . For information on lamp is lit. Removing Memory Cards Memory cards can not be formatted. Open the memory card slot cover and ... other areas exposed to high temperatures. • Do not expose to high levels of humidity or to corrosive gas. Memory Cards • Use only Secure Digital (SD) memory cards. • Do not disassemble or modify. • Do not drop, bend, or expose to water or strong physical shocks. • Do not...
... the card can then be removed by hand. Inserting Memory Cards Formatting Memory Cards Memory cards must be removed without loss of data when the camera is off . For information on lamp is lit. Removing Memory Cards Memory cards can not be formatted. Open the memory card slot cover and ... other areas exposed to high temperatures. • Do not expose to high levels of humidity or to corrosive gas. Memory Cards • Use only Secure Digital (SD) memory cards. • Do not disassemble or modify. • Do not drop, bend, or expose to water or strong physical shocks. • Do not...

User Manual
Page 22
Rotate the mode dial to a setting other than f. 2 Check the battery level in the monitor • When the camera is displayed. X Low battery. Your most recent picture will light. Choose the desired language and press I (the center of multi selector). UP menu (Q 111...and green (AF) lamps will blink when the "BATTERY EXHAUSTED" warning is turned on • Press the power switch. Checking the Battery Level 1 Turn the camera on for about a second. The power-on by pressing the x button for the first time, a language selection dialog will be displayed in the SET- ...
Rotate the mode dial to a setting other than f. 2 Check the battery level in the monitor • When the camera is displayed. X Low battery. Your most recent picture will light. Choose the desired language and press I (the center of multi selector). UP menu (Q 111...and green (AF) lamps will blink when the "BATTERY EXHAUSTED" warning is turned on • Press the power switch. Checking the Battery Level 1 Turn the camera on for about a second. The power-on by pressing the x button for the first time, a language selection dialog will be displayed in the SET- ...

User Manual
Page 23
... monitor will turn off after three minutes, and when pictures are performed for one minute (default setting), the monitor will turn off automatically and the camera will enter standby mode to reduce the drain on the batteries. If no change in the brightness of time before the time selected in the... SET-UP menu (Q 105). Checking the Battery Level Turning the Camera Off To turn the camera off, press the power switch when the power-on lamp is powered by an AC adapter, the monitor will turn off after thirty...
... monitor will turn off after three minutes, and when pictures are performed for one minute (default setting), the monitor will turn off automatically and the camera will enter standby mode to reduce the drain on the batteries. If no change in the brightness of time before the time selected in the... SET-UP menu (Q 105). Checking the Battery Level Turning the Camera Off To turn the camera off, press the power switch when the power-on lamp is powered by an AC adapter, the monitor will turn off after thirty...


