
Reference Manual complete instructions - English
Page 5
... recordings of personal image data. Press the d button M z menu icon M Conformity marking M k button v Introduction Read This First Disposing of Data Storage Devices Please note that is accurate and complete, we would appreciate it with . Before discarding a data storage device or transferring ownership to another person, make sure to change the specifications of the camera's settings in the setup menu (A119). After resetting, erase all data in the device using commercially available software...
... recordings of personal image data. Press the d button M z menu icon M Conformity marking M k button v Introduction Read This First Disposing of Data Storage Devices Please note that is accurate and complete, we would appreciate it with . Before discarding a data storage device or transferring ownership to another person, make sure to change the specifications of the camera's settings in the setup menu (A119). After resetting, erase all data in the device using commercially available software...

Reference Manual complete instructions - English
Page 25
... 7 Quick retouch icon 73 8 Red-eye correction icon 74 9 Internal memory indicator 10 Current image number/ total number of images 11 Movie length or elapsed playback time 12 Image mode 127 13 Easy panorama 39 14 Movie options 140 15 Small picture icon 77 16 Crop icon 67, 78 17 Volume indicator 91 18 Quick effects guide Easy panorama playback guide 19 Sequence playback guide Movie playback guide 20 Time of recording 21 Date of recording 22 Charging AC adapter connection indicator 23 Battery level indicator 19 24 File number and type 204 25 Recorded location data...
... 7 Quick retouch icon 73 8 Red-eye correction icon 74 9 Internal memory indicator 10 Current image number/ total number of images 11 Movie length or elapsed playback time 12 Image mode 127 13 Easy panorama 39 14 Movie options 140 15 Small picture icon 77 16 Crop icon 67, 78 17 Volume indicator 91 18 Quick effects guide Easy panorama playback guide 19 Sequence playback guide Movie playback guide 20 Time of recording 21 Date of recording 22 Charging AC adapter connection indicator 23 Battery level indicator 19 24 File number and type 204 25 Recorded location data...

Reference Manual complete instructions - English
Page 190
... card/Format memory M k button Use this setting while a wireless connection is displayed and press the k button. • Do not turn the camera off or open the battery-chamber/memory card slot cover during formatting. • You may not be recovered. Formatting the Internal Memory • Remove the memory card from the camera. • Select Format memory in the setup menu and then press the k button. Language Press the d button M z menu icon M Language M k button Select a language for display of camera menus and messages. 172 Using the Menu The Setup Menu Make sure to save important...
... card/Format memory M k button Use this setting while a wireless connection is displayed and press the k button. • Do not turn the camera off or open the battery-chamber/memory card slot cover during formatting. • You may not be recovered. Formatting the Internal Memory • Remove the memory card from the camera. • Select Format memory in the setup menu and then press the k button. Language Press the d button M z menu icon M Language M k button Select a language for display of camera menus and messages. 172 Using the Menu The Setup Menu Make sure to save important...

Reference Manual complete instructions - English
Page 209
... Error Messages There are hidden. The file cannot be modified. Save previously recorded data as a time-lapse movie? If you need to keep copies of any images, make sure to select No and save the copy. Image cannot be edited. 72, 199 Cannot record movie. Image cannot be viewed on the memory card. • Remove the memory card to play back images 12 in the internal memory. • To copy the images saved in the camera. Display Cause/Solution A Card is insufficient space to format the memory card...
... Error Messages There are hidden. The file cannot be modified. Save previously recorded data as a time-lapse movie? If you need to keep copies of any images, make sure to select No and save the copy. Image cannot be edited. 72, 199 Cannot record movie. Image cannot be viewed on the memory card. • Remove the memory card to play back images 12 in the internal memory. • To copy the images saved in the camera. Display Cause/Solution A Card is insufficient space to format the memory card...

Reference Manual complete instructions - English
Page 214
..., 145 Shooting Issues Problem Cause/Solution A Cannot switch to the camera, and the clock battery operates for setting time zone and date is displayed when the camera is turned on movies. Screen for several days even after the camera battery is exhausted; Charging time of the clock battery takes about 10 - When Autofocus mode is set to retain certain settings. Cannot take pictures or record movies. Problem Cause/Solution A Date not stamped on • The current shooting mode does not support images even when Date stamp. 166 Date stamp is...
..., 145 Shooting Issues Problem Cause/Solution A Cannot switch to the camera, and the clock battery operates for setting time zone and date is displayed when the camera is turned on movies. Screen for several days even after the camera battery is exhausted; Charging time of the clock battery takes about 10 - When Autofocus mode is set to retain certain settings. Cannot take pictures or record movies. Problem Cause/Solution A Date not stamped on • The current shooting mode does not support images even when Date stamp. 166 Date stamp is...

Reference Manual complete instructions - English
Page 215
... the camera (using the self- 52 timer at the same time is selected for Shutter sound in Sound settings in the setup menu. • Digital zoom cannot be used with your palms, etc. Off is more effective). If you want to continue recording movies with the size/frame rate set to W (off particles in the setup menu. Off is not adjusted properly. 32, 47, 129 197 Technical Notes Troubleshooting AF-assist illuminator does not light. White balance...
... the camera (using the self- 52 timer at the same time is selected for Shutter sound in Sound settings in the setup menu. • Digital zoom cannot be used with your palms, etc. Off is more effective). If you want to continue recording movies with the size/frame rate set to W (off particles in the setup menu. Off is not adjusted properly. 32, 47, 129 197 Technical Notes Troubleshooting AF-assist illuminator does not light. White balance...

Reference Manual complete instructions - English
Page 220
... camera. - • Use a sufficiently charged battery. • Insert a memory card with sufficient free space into the camera. Set Bluetooth M Connection to Enable. • If the camera is set to Off, turn on Auto download in the - If it is being operated. 202 Technical Notes Troubleshooting Turn on the camera or change the setting to upload images or - uploading may not be downloaded automatically. • Perform the operations described below when uploading automatically. - SnapBridge app. - Images 11 saved in the internal memory...
... camera. - • Use a sufficiently charged battery. • Insert a memory card with sufficient free space into the camera. Set Bluetooth M Connection to Enable. • If the camera is set to Off, turn on Auto download in the - If it is being operated. 202 Technical Notes Troubleshooting Turn on the camera or change the setting to upload images or - uploading may not be downloaded automatically. • Perform the operations described below when uploading automatically. - SnapBridge app. - Images 11 saved in the internal memory...
Reference Manual complete instructions - English
Page 244
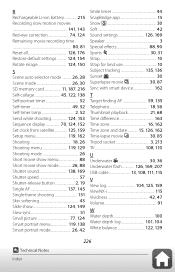
R Rechargeable Li-ion battery 215 Recording slow motion movies 141, 143 Red-eye correction 74, 124 Remaining movie recording time 80, 81 Reset all 126, 176 Restore default settings 124, 154 Rotate image 124, 150 S Scene auto selector mode 26, 28 Scene mode 26, 30 SD memory card 11, 187, 216 Self-collage 45, 122, 138 Self-portrait timer 52 Self-timer 49, 52 Self-timer lamp 2, 52 Send while shooting 124, 153 Sequence display 70, 124...
R Rechargeable Li-ion battery 215 Recording slow motion movies 141, 143 Red-eye correction 74, 124 Remaining movie recording time 80, 81 Reset all 126, 176 Restore default settings 124, 154 Rotate image 124, 150 S Scene auto selector mode 26, 28 Scene mode 26, 30 SD memory card 11, 187, 216 Self-collage 45, 122, 138 Self-portrait timer 52 Self-timer 49, 52 Self-timer lamp 2, 52 Send while shooting 124, 153 Sequence display 70, 124...

Quick Start Guide - English for customers in the Americas
Page 5
... devices using commercial deletion software, or format the device in Format memory or Format card in the malicious use of the conformity markings that deleting images or formatting data storage devices such as other data. Disposing of Data Storage Devices Please note that the camera complies with Copyright Notices Under copyright law, photographs or recordings of copyrighted works made to change the specifications of the hardware and software described in these manuals...
... devices using commercial deletion software, or format the device in Format memory or Format card in the malicious use of the conformity markings that deleting images or formatting data storage devices such as other data. Disposing of Data Storage Devices Please note that the camera complies with Copyright Notices Under copyright law, photographs or recordings of copyrighted works made to change the specifications of the hardware and software described in these manuals...

Quick Start Guide - English for customers in Europe
Page 5
... using commercial deletion software, or format the device in Format memory or Format card in the setup menu (A19), then completely refill it were you to bring any time and without the permission of this manual may be taken to avoid injury or damage to property when physically destroying memory cards. Care should be restricted in camera memory does not completely erase the original image data. Deleted files can not be used...
... using commercial deletion software, or format the device in Format memory or Format card in the setup menu (A19), then completely refill it were you to bring any time and without the permission of this manual may be taken to avoid injury or damage to property when physically destroying memory cards. Care should be restricted in camera memory does not completely erase the original image data. Deleted files can not be used...

Quick Start Guide - English for customers in Asia and Africa
Page 5
...-in camera memory does not completely erase the original image data. For the COOLPIX W300, the log data saved on the memory card, select Create log M End all logs M Erase logs. Deleted files can not be used without the permission of the copyright holder. Care should be recovered from the actual product. • Nikon reserves the right to change the specifications of the hardware and software described in these manuals...
...-in camera memory does not completely erase the original image data. For the COOLPIX W300, the log data saved on the memory card, select Create log M End all logs M Erase logs. Deleted files can not be used without the permission of the copyright holder. Care should be recovered from the actual product. • Nikon reserves the right to change the specifications of the hardware and software described in these manuals...
Reference Manual
Page 155
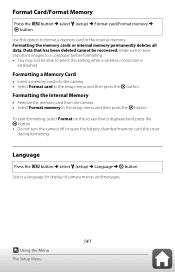
...button Use this option to select this setting while a wireless connection is displayed and press the k button. • Do not turn the camera off or open the battery-chamber/memory card slot cover during formatting. Formatting the memory cards or internal memory permanently deletes all data. Formatting the Internal Memory • Remove the memory card from the camera. • Select Format memory in the setup menu and then press the k button. Language Press the d button M select z (setup) M Language M k button Select a language for display of camera menus and messages. 141 Using the Menu...
...button Use this option to select this setting while a wireless connection is displayed and press the k button. • Do not turn the camera off or open the battery-chamber/memory card slot cover during formatting. Formatting the memory cards or internal memory permanently deletes all data. Formatting the Internal Memory • Remove the memory card from the camera. • Select Format memory in the setup menu and then press the k button. Language Press the d button M select z (setup) M Language M k button Select a language for display of camera menus and messages. 141 Using the Menu...
Reference Manual
Page 164
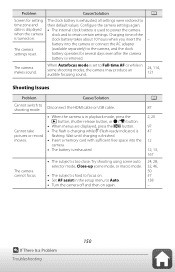
... a memory card with sufficient free space into the camera or connect the AC adapter The camera (available separately) to shooting mode. The camera makes sound. clock and to time zone and their default values. battery into the camera. • The battery is exhausted. Cannot take pictures or record movies. • When the camera is in the setup menu to Auto. • Turn the camera off and then on again. Try shooting using scene auto selector mode, Close-up scene mode, or macro mode. •...
... a memory card with sufficient free space into the camera or connect the AC adapter The camera (available separately) to shooting mode. The camera makes sound. clock and to time zone and their default values. battery into the camera. • The battery is exhausted. Cannot take pictures or record movies. • When the camera is in the setup menu to Auto. • Turn the camera off and then on again. Try shooting using scene auto selector mode, Close-up scene mode, or macro mode. •...
Reference Manual
Page 171
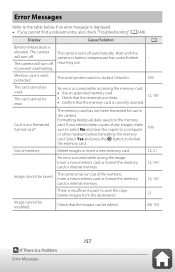
... - Error Messages Refer to the table below if an error message is displayed. • If you need to keep copies of any images, make sure to select No and save the copy. to format the memory card. Memory card is locked. Format card? Display Cause/Solution A Battery temperature is not formatted. Delete images from the destination. 21 Image cannot be saved. Insert a new memory card or format the memory card or internal memory. 12, 141 Image cannot be modified. The camera will turn off resuming use in the camera...
... - Error Messages Refer to the table below if an error message is displayed. • If you need to keep copies of any images, make sure to select No and save the copy. to format the memory card. Memory card is locked. Format card? Display Cause/Solution A Battery temperature is not formatted. Delete images from the destination. 21 Image cannot be saved. Insert a new memory card or format the memory card or internal memory. 12, 141 Image cannot be modified. The camera will turn off resuming use in the camera...
Reference Manual
Page 172
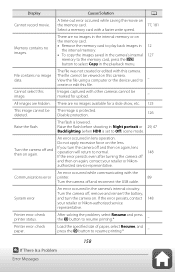
... again, lens operation will return to select Copy in the internal memory or on . Do not apply excessive force on again, contact your retailer or Nikon-authorized service representative. System error An error occurred in lens operation. Display Cause/Solution A Cannot record movie. Memory contains no image data. There are hidden. View the file using a computer or the device used to resume printing.* - Cannot select this camera. There are no images in the playback menu. Turn the camera off...
... again, lens operation will return to select Copy in the internal memory or on . Do not apply excessive force on again, contact your retailer or Nikon-authorized service representative. System error An error occurred in lens operation. Display Cause/Solution A Cannot record movie. Memory contains no image data. There are hidden. View the file using a computer or the device used to resume printing.* - Cannot select this camera. There are no images in the playback menu. Turn the camera off...
Reference Manual
Page 158
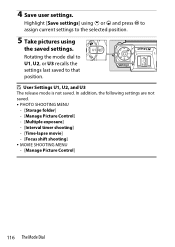
... U3 The release mode is not saved. Rotating the mode dial to U1, U2, or U3 recalls the settings last saved to the selected position. 5 Take pictures using 1 or 3 and press J to assign current settings to that position. Highlight [Save settings] using the saved settings. In addition, the following settings are not saved. • PHOTO SHOOTING MENU - [Storage folder] - [Manage Picture Control] - [Multiple exposure] - [Interval timer shooting] - [Time-lapse movie] - [Focus shift shooting] • MOVIE SHOOTING MENU - [Manage Picture Control] 116 The Mode Dial 4 Save user settings.
... U3 The release mode is not saved. Rotating the mode dial to U1, U2, or U3 recalls the settings last saved to the selected position. 5 Take pictures using 1 or 3 and press J to assign current settings to that position. Highlight [Save settings] using the saved settings. In addition, the following settings are not saved. • PHOTO SHOOTING MENU - [Storage folder] - [Manage Picture Control] - [Multiple exposure] - [Interval timer shooting] - [Time-lapse movie] - [Focus shift shooting] • MOVIE SHOOTING MENU - [Manage Picture Control] 116 The Mode Dial 4 Save user settings.

Reference Manual
Page 712
... recording control] in the setup menu? • Pictures may be unable to upload pictures when the camera is performed ˔ The effects of [Set Picture Control], [Active D-Lighting], or [Vignette control] are not visible: In the case of NEF (RAW) images, the effects can only be copied to a computer: Depending on the operating system, you may display correctly if default settings are restored using the [Reset all settings] item in the setup menu. ˔...
... recording control] in the setup menu? • Pictures may be unable to upload pictures when the camera is performed ˔ The effects of [Set Picture Control], [Active D-Lighting], or [Vignette control] are not visible: In the case of NEF (RAW) images, the effects can only be copied to a computer: Depending on the operating system, you may display correctly if default settings are restored using the [Reset all settings] item in the setup menu. ˔...
Reference Guide PDF Edition
Page 52
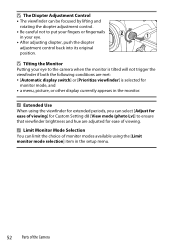
.... D The Diopter Adjustment Control • The viewfinder can be focused by lifting and rotating the diopter adjustment control. • Be careful not to ensure that viewfinder brightness and hue are met: • [Automatic display switch] or [Prioritize viewfinder] is selected for monitor mode, and • a menu, picture, or other display currently appears in the setup menu. 52 Parts of the Camera A Extended Use When using the viewfinder...
.... D The Diopter Adjustment Control • The viewfinder can be focused by lifting and rotating the diopter adjustment control. • Be careful not to ensure that viewfinder brightness and hue are met: • [Automatic display switch] or [Prioritize viewfinder] is selected for monitor mode, and • a menu, picture, or other display currently appears in the setup menu. 52 Parts of the Camera A Extended Use When using the viewfinder...

Reference Guide PDF Edition
Page 791
... viewed using a card reader or other device. Copy pictures from the memory card to a computer using Nikon software. ˔ Pictures are not visible: In the case of [Set Picture Control], [Active D-Lighting], or [Vignette control] are not displayed on the operating system, you may display correctly if default settings are restored using the [Reset all settings] item in the setup menu. ˔ The Image Dust Off option in the video recording menu? • Pictures may be unable to upload pictures when the camera is connected...
... viewed using a card reader or other device. Copy pictures from the memory card to a computer using Nikon software. ˔ Pictures are not visible: In the case of [Set Picture Control], [Active D-Lighting], or [Vignette control] are not displayed on the operating system, you may display correctly if default settings are restored using the [Reset all settings] item in the setup menu. ˔ The Image Dust Off option in the video recording menu? • Pictures may be unable to upload pictures when the camera is connected...

Reference Guide PDF Edition
Page 913
... USB cable 4 USB connection priority 737 USB power delivery 744 Z Zebra pattern 686 V Vibration reduction 526 Video file type 214 Video flicker reduction 585 Video recording menu 576 Video-record button 93 View all in continuous mode ....... 629 View assist 685 View mode (photo Lv 624 Viewfinder brightness 711 Viewfinder color balance 712 Vignette control 516, 584 Virtual horizon type 631 Vivid (Set Picture Control 193 Voice memo 295 Voice memo options 732 W Warm display colors 626 WB bracketing 183 U button 158 White balance...
... USB cable 4 USB connection priority 737 USB power delivery 744 Z Zebra pattern 686 V Vibration reduction 526 Video file type 214 Video flicker reduction 585 Video recording menu 576 Video-record button 93 View all in continuous mode ....... 629 View assist 685 View mode (photo Lv 624 Viewfinder brightness 711 Viewfinder color balance 712 Vignette control 516, 584 Virtual horizon type 631 Vivid (Set Picture Control 193 Voice memo 295 Voice memo options 732 W Warm display colors 626 WB bracketing 183 U button 158 White balance...


