
User Manual
Page 4
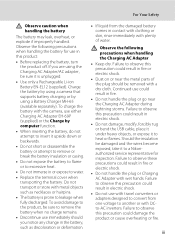
...children Particular care should be performed only by qualified technicians. WARNINGS Turn off in their mouths. For Your Safety To prevent damage to your Nikon product or injury to yourself or to others, read the following safety precautions in the event of malfunction Should you notice smoke or an ... other accident, take the equipment to a Nikonauthorized service representative for inspection, after unplugging the product and/or removing the battery. Handle the camera strap with care Never place the strap around the neck of the camera or Charging AC Adapter could result in injury...
...children Particular care should be performed only by qualified technicians. WARNINGS Turn off in their mouths. For Your Safety To prevent damage to your Nikon product or injury to yourself or to others, read the following safety precautions in the event of malfunction Should you notice smoke or an ... other accident, take the equipment to a Nikonauthorized service representative for inspection, after unplugging the product and/or removing the battery. Handle the camera strap with care Never place the strap around the neck of the camera or Charging AC Adapter could result in injury...
User Manual
Page 5
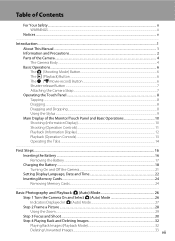
... or electric shock. • Do not handle the plug or Charging AC Adapter with plenty of the plug should you are using a Battery Charger MH-65 (available separately). Observe the following precautions when handling the Charging AC Adapter • Keep dry. Failure to observe this ...product: • Before replacing the battery, turn the product off. To charge the battery with DCto-AC inverters. Failure to observe this precaution could result in electric shock. • Do not damage, modify...
... or electric shock. • Do not handle the plug or Charging AC Adapter with plenty of the plug should you are using a Battery Charger MH-65 (available separately). Observe the following precautions when handling the Charging AC Adapter • Keep dry. Failure to observe this ...product: • Before replacing the battery, turn the product off. To charge the battery with DCto-AC inverters. Failure to observe this precaution could result in electric shock. • Do not damage, modify...

User Manual
Page 8
... or the local authorities in the State of California WARNING Handling the cord on the battery indicates that this symbol or not, are designated for customers in European countries: • All batteries, whether marked with Canadian ICES-003. Nikon Inc., 1300 Walt Whitman Road Melville, New York 11747-3064 USA Tel: 631-547...
... or the local authorities in the State of California WARNING Handling the cord on the battery indicates that this symbol or not, are designated for customers in European countries: • All batteries, whether marked with Canadian ICES-003. Nikon Inc., 1300 Walt Whitman Road Melville, New York 11747-3064 USA Tel: 631-547...
User Manual
Page 9
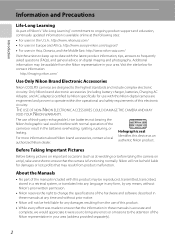
...)...10 Shooting (Operation Controls)...11 Playback (Information Display)...12 Playback (Operation Controls)...13 Operating the Tabs...14 First Steps ...16 Inserting the Battery ...16 Removing the Battery ...17 Charging the Battery ...18 Turning On and Off the Camera...21 Setting Display Language, Date and Time 22 Inserting Memory Cards ...24 Removing Memory Cards...
...)...10 Shooting (Operation Controls)...11 Playback (Information Display)...12 Playback (Operation Controls)...13 Operating the Tabs...14 First Steps ...16 Inserting the Battery ...16 Removing the Battery ...17 Charging the Battery ...18 Turning On and Off the Camera...21 Setting Display Language, Date and Time 22 Inserting Memory Cards ...24 Removing Memory Cards...
User Manual
Page 14
...the information in these manuals is functioning normally. Only Nikon brand electronic accessories (including battery charger, batteries, Charging AC Adapter, and AC adapters) certified by any means, without Nikon's prior written permission. • Nikon reserves the right to change the specifications of the ...in these manuals at any time and without prior notice. • Nikon will not be held liable for contact information: http://imaging.nikon.com/ Use Only Nikon Brand Electronic Accessories Nikon COOLPIX cameras are engineered and proven to the highest standards and include complex...
...the information in these manuals is functioning normally. Only Nikon brand electronic accessories (including battery charger, batteries, Charging AC Adapter, and AC adapters) certified by any means, without Nikon's prior written permission. • Nikon reserves the right to change the specifications of the ...in these manuals at any time and without prior notice. • Nikon will not be held liable for contact information: http://imaging.nikon.com/ Use Only Nikon Brand Electronic Accessories Nikon COOLPIX cameras are engineered and proven to the highest standards and include complex...

User Manual
Page 17
Introduction Parts of the Camera 11 1 10 2 3 4 9 5 1 b (e movie-record) button....... 6, 128 2 Charge lamp 19, 165 Flash lamp 35 3 A (shooting mode) button 6, 41 4 c (playback) button 6, 32, 87 5 Battery-chamber/ memory card slot cover 16, 24 8 76 6 Battery latch 16, 17 7 Battery chamber 16 8 Memory card slot 24 9 Tripod socket 10 Monitor/touch panel 10 11 Speaker 112, 133 5
Introduction Parts of the Camera 11 1 10 2 3 4 9 5 1 b (e movie-record) button....... 6, 128 2 Charge lamp 19, 165 Flash lamp 35 3 A (shooting mode) button 6, 41 4 c (playback) button 6, 32, 87 5 Battery-chamber/ memory card slot cover 16, 24 8 76 6 Battery latch 16, 17 7 Battery chamber 16 8 Memory card slot 24 9 Tripod socket 10 Monitor/touch panel 10 11 Speaker 112, 133 5
User Manual
Page 22
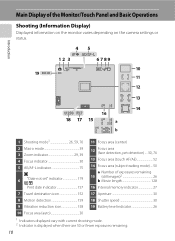
... 157 16 Internal memory indicator 27 7 Travel destination icon 152 17 Aperture 30 8 Motion detection 159 18 Shutter speed 30 9 Vibration reduction icon 158 19 Battery level indicator 26 10 Focus area (auto 30 1 Indicators displayed vary with current shooting mode. 2 Indicator is displayed when there are 50 or fewer exposures...
... 157 16 Internal memory indicator 27 7 Travel destination icon 152 17 Aperture 30 8 Motion detection 159 18 Shutter speed 30 9 Vibration reduction icon 158 19 Battery level indicator 26 10 Focus area (auto 30 1 Indicators displayed vary with current shooting mode. 2 Indicator is displayed when there are 50 or fewer exposures...

User Manual
Page 24
..., 95, 98 2 File number and type 178 3 Date/time of frames 32 b Movie length 133 10 Internal memory indicator 27 11 Rating indicator 101 12 Battery level indicator 26 1 Indicators displayed vary with current playback mode. 2 Indicators displayed vary depending on the setting for shooting. 3 The icon for the image currently...
..., 95, 98 2 File number and type 178 3 Date/time of frames 32 b Movie length 133 10 Internal memory indicator 27 11 Rating indicator 101 12 Battery level indicator 26 1 Indicators displayed vary with current playback mode. 2 Indicators displayed vary depending on the setting for shooting. 3 The icon for the image currently...

User Manual
Page 28
... in the direction indicated by the arrow (1) and fully insert the battery (2). First Steps First Steps Inserting the Battery Insert a Rechargeable Li-ion Battery EN-EL12 (supplied) into the camera. • Charge the battery before the first use or when the battery is running low (A 18). 1 Open the battery-chamber/memory card slot cover. 2 Insert the...
... in the direction indicated by the arrow (1) and fully insert the battery (2). First Steps First Steps Inserting the Battery Insert a Rechargeable Li-ion Battery EN-EL12 (supplied) into the camera. • Charge the battery before the first use or when the battery is running low (A 18). 1 Open the battery-chamber/memory card slot cover. 2 Insert the...
User Manual
Page 29
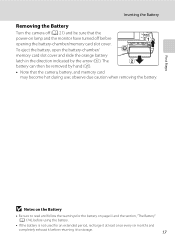
... card may become hot during use; First Steps B Notes on the Battery • Be sure to storage. 17 Inserting the Battery Removing the Battery Turn the camera off before returning it to read and follow the warnings for the battery on lamp and the monitor have turned off (A 21) and be... removed by the arrow (1). observe due caution when removing the battery. To eject the battery, open the battery-chamber/ memory card slot cover and slide the orange battery latch in the direction indicated by hand (2). • Note that the power-on page iii and the...
... card may become hot during use; First Steps B Notes on the Battery • Be sure to storage. 17 Inserting the Battery Removing the Battery Turn the camera off before returning it to read and follow the warnings for the battery on lamp and the monitor have turned off (A 21) and be... removed by the arrow (1). observe due caution when removing the battery. To eject the battery, open the battery-chamber/ memory card slot cover and slide the orange battery latch in the direction indicated by hand (2). • Note that the power-on page iii and the...
User Manual
Page 30
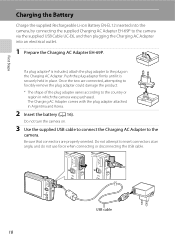
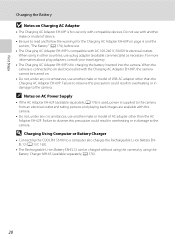
... the camera was purchased. USB cable 18 If a plug adapter* is securely held in Argentina and Korea. 2 Insert the battery (A 16). First Steps Charging the Battery Charge the supplied Rechargeable Li-ion Battery EN-EL12 inserted into the camera, by connecting the supplied Charging AC Adapter EH-69P to insert connectors at an...
... the camera was purchased. USB cable 18 If a plug adapter* is securely held in Argentina and Korea. 2 Insert the battery (A 16). First Steps Charging the Battery Charge the supplied Rechargeable Li-ion Battery EN-EL12 inserted into the camera, by connecting the supplied Charging AC Adapter EH-69P to insert connectors at an...
User Manual
Page 31
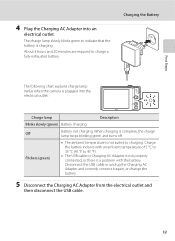
...required to 95 °F). • The USB cable or Charging AC Adapter is not properly connected, or there is charging. Off Battery not charging. First Steps 4 Plug the Charging AC Adapter into the electrical outlet. When charging is plugged into an electrical outlet.... Charge lamp Description Blinks slowly (green) Battery charging. Flickers (green) • The ambient temperature is not suited to indicate that the battery is a problem with an ambient temperature of 5 °C to 35 °C (41 °...
...required to 95 °F). • The USB cable or Charging AC Adapter is not properly connected, or there is charging. Off Battery not charging. First Steps 4 Plug the Charging AC Adapter into the electrical outlet. When charging is plugged into an electrical outlet.... Charge lamp Description Blinks slowly (green) Battery charging. Flickers (green) • The ambient temperature is not suited to indicate that the battery is a problem with an ambient temperature of 5 °C to 35 °C (41 °...
User Manual
Page 32
... result in overheating or in damage to the camera. D Charging Using Computer or Battery Charger • Connecting the COOLPIX S6100 to a computer also charges the Rechargeable Li-ion Battery ENEL12 (A 137, 165). • The Rechargeable Li-ion Battery EN-EL12 can be turned on. • Do not, under any circumstances, ...69P, the camera cannot be charged without using the camera by using in other than the Charging AC Adapter EH-69P. When using the Battery Charger MH-65 (available separately; A 176) is used, power is supplied to read and follow the warnings for use a plug ...
... result in overheating or in damage to the camera. D Charging Using Computer or Battery Charger • Connecting the COOLPIX S6100 to a computer also charges the Rechargeable Li-ion Battery ENEL12 (A 137, 165). • The Rechargeable Li-ion Battery EN-EL12 can be turned on. • Do not, under any circumstances, ...69P, the camera cannot be charged without using the camera by using in other than the Charging AC Adapter EH-69P. When using the Battery Charger MH-65 (available separately; A 176) is used, power is supplied to read and follow the warnings for use a plug ...
User Manual
Page 33
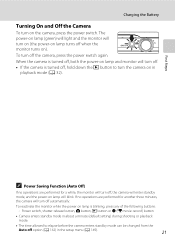
... power-on lamp turns off when the monitor turns on lamp and monitor will turn off the camera, press the power switch again. Charging the Battery Turning On and Off the Camera To turn off. • If the camera is blinking, press any of the following buttons: -
... power-on lamp turns off when the monitor turns on lamp and monitor will turn off the camera, press the power switch again. Charging the Battery Turning On and Off the Camera To turn off. • If the camera is blinking, press any of the following buttons: -
User Manual
Page 36
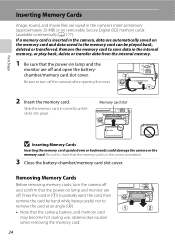
If a memory card is in the correct orientation. 3 Close the battery-chamber/memory card slot cover. Slide the memory card in correctly until it clicks into place. Removing Memory Cards Before removing memory cards, turn off ... are saved in the camera's internal memory (approximately 20 MB) or on lamp and the monitor are off. Be sure to check that the camera, battery, and memory card may become hot during use;
If a memory card is in the correct orientation. 3 Close the battery-chamber/memory card slot cover. Slide the memory card in correctly until it clicks into place. Removing Memory Cards Before removing memory cards, turn off ... are saved in the camera's internal memory (approximately 20 MB) or on lamp and the monitor are off. Be sure to check that the camera, battery, and memory card may become hot during use;
User Manual
Page 37
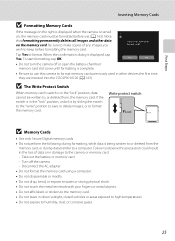
... right is displayed when the camera is turned on the memory card. Take out the battery or memory card - Note that formatting permanently deletes all images and other devices the first time they are inserted into the COOLPIX S6100 (A 163). Tap Yes to humidity, dust, or corrosive gases. 25 Ye s No • Do...
... right is displayed when the camera is turned on the memory card. Take out the battery or memory card - Note that formatting permanently deletes all images and other devices the first time they are inserted into the COOLPIX S6100 (A 163). Tap Yes to humidity, dust, or corrosive gases. 25 Ye s No • Do...
User Manual
Page 38
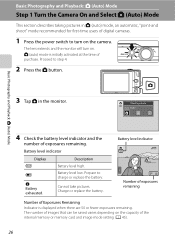
...an automatic, "point-and shoot" mode recommended for first-time users of digital cameras. 1 Press the power switch to turn on. Battery level indicator 3 Number of exposures remaining Number of Exposures Remaining Indicator is initially activated at the time of purchase. Prepare to step 4.... 2 Press the A button. Cannot take pictures. Battery level indicator Display b B N Battery exhausted. Description Battery level high. Charge or replace the battery. The number of images that can be saved varies depending on the camera. Shooting mode...
...an automatic, "point-and shoot" mode recommended for first-time users of digital cameras. 1 Press the power switch to turn on. Battery level indicator 3 Number of exposures remaining Number of Exposures Remaining Indicator is initially activated at the time of purchase. Prepare to step 4.... 2 Press the A button. Cannot take pictures. Battery level indicator Display b B N Battery exhausted. Description Battery level high. Charge or replace the battery. The number of images that can be saved varies depending on the camera. Shooting mode...

User Manual
Page 40
... by the camera will be framed by a single border. 3 When taking pictures in microphone. Up to 12 faces can be careful not to open the battery-chamber/memory card slot cover and tighten the tripod screw. • Set Vibration reduction (A 158) to Off when using a tripod to stabilize the camera during...
... by the camera will be framed by a single border. 3 When taking pictures in microphone. Up to 12 faces can be careful not to open the battery-chamber/memory card slot cover and tighten the tripod screw. • Set Vibration reduction (A 158) to Off when using a tripod to stabilize the camera during...
User Manual
Page 43
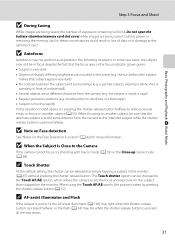
...-release button. the subject is taken by simply tapping a subject in the scene (e.g. window blind or windows in the following situations. Do not open the battery-chamber/memory card slot cover while images are being saved, the number of a white wall) • Several objects are at the same distance from the...
...-release button. the subject is taken by simply tapping a subject in the scene (e.g. window blind or windows in the following situations. Do not open the battery-chamber/memory card slot cover while images are being saved, the number of a white wall) • Several objects are at the same distance from the...

User Manual
Page 47
... , until the flash is selected for Blink proof (A 79) • There are functions with which noise reduction is taken. • Blinks: Flash charging. If the battery is low, the monitor display will turn off, and remain off ) when On is fully charged. See "Camera Settings That Cannot Be Applied Simultaneously" (A 80...
... , until the flash is selected for Blink proof (A 79) • There are functions with which noise reduction is taken. • Blinks: Flash charging. If the battery is low, the monitor display will turn off, and remain off ) when On is fully charged. See "Camera Settings That Cannot Be Applied Simultaneously" (A 80...


