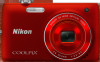
User Manual
Page 13
... indicators can be stored on the memory card and delete, playback and format operations will be more A information is available elsewhere in the camera's internal memory or on removable memory cards. Notations • Secure Digital (SD) memory card, SDHC memory card, and SDXC memory card are referred to as the "default setting." • The names of menu items displayed in the camera monitor, and the names of buttons or messages displayed on the memory card. Illustrations and Screen Display Illustrations and text displays...
... indicators can be stored on the memory card and delete, playback and format operations will be more A information is available elsewhere in the camera's internal memory or on removable memory cards. Notations • Secure Digital (SD) memory card, SDHC memory card, and SDXC memory card are referred to as the "default setting." • The names of menu items displayed in the camera monitor, and the names of buttons or messages displayed on the memory card. Illustrations and Screen Display Illustrations and text displays...

User Manual
Page 17
Parts of the Camera Introduction 1 2 3 4 5 Under the connector cover 6 78 9 10 11 12 13 1 Monitor/touch panel 10, 27 2 b (e movie-record) button....... 6, 126 3 Charge lamp 19, 139 Flash lamp 35 4 A (shooting mode) button 6, 40 5 c (playback) button 6, 32, 85 6 USB/audio/video output connector 132, 135, 141 7 Tripod socket 8 Speaker 109, 131 9 Connector cover 132, 135, 141 10 Battery-chamber/ memory card slot cover 16, 24 11 Memory card slot 24 12 Battery chamber 16 13 Battery latch 16, 17 5
Parts of the Camera Introduction 1 2 3 4 5 Under the connector cover 6 78 9 10 11 12 13 1 Monitor/touch panel 10, 27 2 b (e movie-record) button....... 6, 126 3 Charge lamp 19, 139 Flash lamp 35 4 A (shooting mode) button 6, 40 5 c (playback) button 6, 32, 85 6 USB/audio/video output connector 132, 135, 141 7 Tripod socket 8 Speaker 109, 131 9 Connector cover 132, 135, 141 10 Battery-chamber/ memory card slot cover 16, 24 11 Memory card slot 24 12 Battery chamber 16 13 Battery latch 16, 17 5
User Manual
Page 37
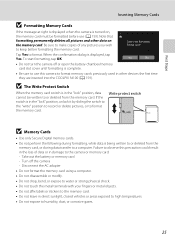
.... Take out the battery or memory card - To start formatting, tap OK. If the switch is in the "lock" position, unlock it by sliding the switch to the "write" position to record or delete pictures, or to keep before use this precaution could result in the loss of any pictures you wish to format the memory card. Yes No • Do not turn the camera off the camera - Disconnect the AC adapter...
.... Take out the battery or memory card - To start formatting, tap OK. If the switch is in the "lock" position, unlock it by sliding the switch to the "write" position to record or delete pictures, or to keep before use this precaution could result in the loss of any pictures you wish to format the memory card. Yes No • Do not turn the camera off the camera - Disconnect the AC adapter...

User Manual
Page 39
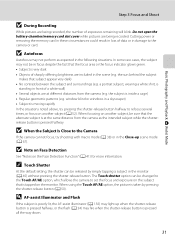
... Touch Shutter At the default setting, the shutter can be displayed in the monitor (A 45). Power switch, shutter-release button, A button or b (e movie-record) button Basic Photography and Playback: A (Auto) Mode B Note on the memory card. In these situations, the camera reduces the effects of camera shake may be changed by simply tapping a subject in the monitor. D Functions Available in pictures before recording them. 27 Step 1 Turn the Camera On and Select A (Auto) Mode Indicators Displayed in A (Auto) Mode Shooting mode A displayed in the setup menu (A 146...
... Touch Shutter At the default setting, the shutter can be displayed in the monitor (A 45). Power switch, shutter-release button, A button or b (e movie-record) button Basic Photography and Playback: A (Auto) Mode B Note on the memory card. In these situations, the camera reduces the effects of camera shake may be changed by simply tapping a subject in the monitor. D Functions Available in pictures before recording them. 27 Step 1 Turn the Camera On and Select A (Auto) Mode Indicators Displayed in A (Auto) Mode Shooting mode A displayed in the setup menu (A 146...
User Manual
Page 43
... number of exposures remaining will blink. C Touch Shutter At the default setting, the shutter can be released by pressing the shutter-release button (A 50). Basic Photography and Playback: A (Auto) Mode Step 3 Focus and Shoot B During Recording While pictures are at the same distance from the camera (e.g. In some rare cases, the subject may fire when the shutter-release button is moving rapidly In the situations noted above, try shooting with macro mode...
... number of exposures remaining will blink. C Touch Shutter At the default setting, the shutter can be released by pressing the shutter-release button (A 50). Basic Photography and Playback: A (Auto) Mode Step 3 Focus and Shoot B During Recording While pictures are at the same distance from the camera (e.g. In some rare cases, the subject may fire when the shutter-release button is moving rapidly In the situations noted above, try shooting with macro mode...
User Manual
Page 44
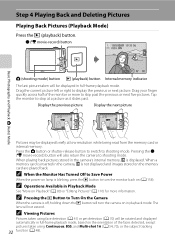
... the camera, C is displayed. b (e movie-record) button 15 05 2011 15 : 30 0003. Tap the monitor to skip past . C Operations Available in full-frame playback mode, based on Playback" (A 80) or "Editing Pictures" (A 110) for more to stop at low resolution while being read from the memory card or internal memory. C Viewing Pictures Pictures taken using Continuous, BSS, and Multi-shot 16 ( A 54, 70), or the subject tracking 32 function (A 48...
... the camera, C is displayed. b (e movie-record) button 15 05 2011 15 : 30 0003. Tap the monitor to skip past . C Operations Available in full-frame playback mode, based on Playback" (A 80) or "Editing Pictures" (A 110) for more to stop at low resolution while being read from the memory card or internal memory. C Viewing Pictures Pictures taken using Continuous, BSS, and Multi-shot 16 ( A 54, 70), or the subject tracking 32 function (A 48...
User Manual
Page 48
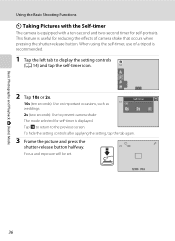
... a tripod is equipped with a ten-second and two-second timer for self-portraits. Basic Photography and Playback: A (Auto) Mode Using the Basic Shooting Functions n Taking Pictures with the Self-timer The camera is recommended. 1 Tap the left tab to display the setting controls (A 14) and tap the self-timer icon. 2 Tap 10s or 2s. 10s (ten seconds): Use on important occasions, such as weddings Self-timer Off 2s (two seconds): Use to the previous screen.
... a tripod is equipped with a ten-second and two-second timer for self-portraits. Basic Photography and Playback: A (Auto) Mode Using the Basic Shooting Functions n Taking Pictures with the Self-timer The camera is recommended. 1 Tap the left tab to display the setting controls (A 14) and tap the self-timer icon. 2 Tap 10s or 2s. 10s (ten seconds): Use on important occasions, such as weddings Self-timer Off 2s (two seconds): Use to the previous screen.
User Manual
Page 50
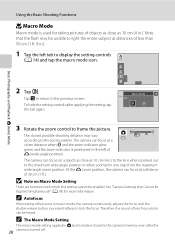
... the lens when zoomed out to display the setting controls (A 14) and tap the macro mode icon. Therefore, the sound of less than 50 cm (1 ft. 8 in .). Using the Basic Shooting Functions p Macro Mode Macro mode is used for more information. Tap J to return to the zoom position. At the G zoom position, the camera can be enabled. See "Camera Settings that the flash may vary according to the previous screen. C Autofocus When taking pictures of objects...
... the lens when zoomed out to display the setting controls (A 14) and tap the macro mode icon. Therefore, the sound of less than 50 cm (1 ft. 8 in .). Using the Basic Shooting Functions p Macro Mode Macro mode is used for more information. Tap J to return to the zoom position. At the G zoom position, the camera can be enabled. See "Camera Settings that the flash may vary according to the previous screen. C Autofocus When taking pictures of objects...

User Manual
Page 55
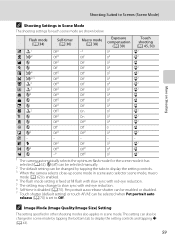
...;768 1024 × 768 Suited to display on Shooting Adjusting the A (Auto) Mode setting A Image Mode (Changing Image Quality/Image Size) A (auto) M Tap the bottom tab M A Image mode Image mode refers to the combination of 16:9 are functions with which pictures are recorded. P 4224×2376 4224 × 2376 Pictures with an aspect ratio of pictures that Cannot Be Applied Simultaneously" (A 78) for enlargements or high-quality prints. L 2592×1944 2592 ×...
...;768 1024 × 768 Suited to display on Shooting Adjusting the A (Auto) Mode setting A Image Mode (Changing Image Quality/Image Size) A (auto) M Tap the bottom tab M A Image mode Image mode refers to the combination of 16:9 are functions with which pictures are recorded. P 4224×2376 4224 × 2376 Pictures with an aspect ratio of pictures that Cannot Be Applied Simultaneously" (A 78) for enlargements or high-quality prints. L 2592×1944 2592 ×...
User Manual
Page 67
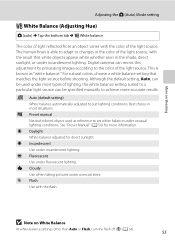
Digital cameras can be specified manually to achieve more information. For natural colors, choose a white balance setting that white objects appear white whether seen in the color of the light source. b Preset manual Neutral-colored object used under incandescent lighting. f Cloudy Use when taking pictures under fluorescent lighting. B Note on Shooting Adjusting the A (Auto) Mode setting w White Balance (Adjusting Hue) A (auto) M Tap the bottom tab M w White balance The color of light reflected from an object varies with the color of the light source, with the...
Digital cameras can be specified manually to achieve more information. For natural colors, choose a white balance setting that white objects appear white whether seen in the color of the light source. b Preset manual Neutral-colored object used under incandescent lighting. f Cloudy Use when taking pictures under fluorescent lighting. B Note on Shooting Adjusting the A (Auto) Mode setting w White Balance (Adjusting Hue) A (auto) M Tap the bottom tab M w White balance The color of light reflected from an object varies with the color of the light source, with the...
User Manual
Page 71
... auto release shutter can be enabled or disabled. 7 Touch shutter (default setting) or touch AF/AE can be changed in scene mode by tapping the tabs to display the setting controls. 3 When the camera selects close-up scene mode in scene auto selector scene mode, macro mode (A 62) is enabled. 4 The flash mode setting is fixed at fill flash with slow sync with red-eye reduction. 5 The setting may change to slow sync with red-eye reduction. 6 Self-time is set...
... auto release shutter can be enabled or disabled. 7 Touch shutter (default setting) or touch AF/AE can be changed in scene mode by tapping the tabs to display the setting controls. 3 When the camera selects close-up scene mode in scene auto selector scene mode, macro mode (A 62) is enabled. 4 The flash mode setting is fixed at fill flash with slow sync with red-eye reduction. 5 The setting may change to slow sync with red-eye reduction. 6 Self-time is set...

User Manual
Page 92
... playback mode. b Press the A button, b (e movie-record) button, or shutter-release button. 32 More on Playback Operations in full-frame playback mode. 44 To Select a picture View thumbnails Playback zoom Playback movies Set the picture rating/play back pictures by rating. 99 Bottom tab Tap the bottom tab to specify the playback settings and edit pictures. 98 Press the c button to display the playbackmode selection menu and change to favorite 85 pictures, auto sort, or list by rating Make playback settings Switch to another playback mode Switch to shooting mode Use...
... playback mode. b Press the A button, b (e movie-record) button, or shutter-release button. 32 More on Playback Operations in full-frame playback mode. 44 To Select a picture View thumbnails Playback zoom Playback movies Set the picture rating/play back pictures by rating. 99 Bottom tab Tap the bottom tab to specify the playback settings and edit pictures. 98 Press the c button to display the playbackmode selection menu and change to favorite 85 pictures, auto sort, or list by rating Make playback settings Switch to another playback mode Switch to shooting mode Use...
User Manual
Page 139
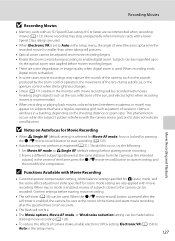
... ten seconds. • The flash will be used . C Functions Available with Movie Recording • Current exposure compensation setting, white balance setting specified for A (auto) mode, and the scene effect adjustment slider specified for Movie AF mode, focus is locked by setting Electronic VR (A 154) to Auto in the setup menu. 127 Movie Recording and Playback Confirm settings before starting movie recording. • The self-timer (A 36) can be magnified up to 4× the optical zoom ratio applied before movie recording began. • There...
... ten seconds. • The flash will be used . C Functions Available with Movie Recording • Current exposure compensation setting, white balance setting specified for A (auto) mode, and the scene effect adjustment slider specified for Movie AF mode, focus is locked by setting Electronic VR (A 154) to Auto in the setup menu. 127 Movie Recording and Playback Confirm settings before starting movie recording. • The self-timer (A 36) can be magnified up to 4× the optical zoom ratio applied before movie recording began. • There...
User Manual
Page 146
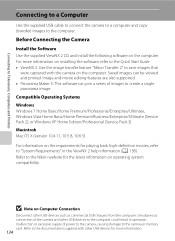
... of power to the camera, causing damage to the camera or memory card. Simultaneous connection of the camera and other USB devices to the computer could result in the ViewNX 2 help information (A 138). B Note on Computer Connection Disconnect other USB devices for more information on installing the software, refer to the Quick Start Guide. • ViewNX 2: Use the image transfer feature "Nikon Transfer 2" to the Nikon website for playing back high-definition movies, refer...
... of power to the camera, causing damage to the camera or memory card. Simultaneous connection of the camera and other USB devices to the computer could result in the ViewNX 2 help information (A 138). B Note on Computer Connection Disconnect other USB devices for more information on installing the software, refer to the Quick Start Guide. • ViewNX 2: Use the image transfer feature "Nikon Transfer 2" to the Nikon website for playing back high-definition movies, refer...
User Manual
Page 148
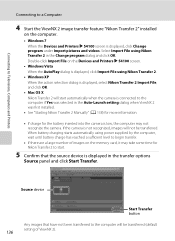
... Printers K S4100 screen is low, the computer may take some time for Nikon Transfer 2 to start automatically when the camera is connected to the computer if Yes was selected in the Auto-Launch setting dialog when ViewNX 2 was first installed. • See "Starting Nikon Transfer 2 Manually" (A 138) for more information. • If charge for the battery inserted into the camera is displayed, click Change program under Import pictures and videos. If the camera is displayed in the Change...
... Printers K S4100 screen is low, the computer may take some time for Nikon Transfer 2 to start automatically when the camera is connected to the computer if Yes was selected in the Auto-Launch setting dialog when ViewNX 2 was first installed. • See "Starting Nikon Transfer 2 Manually" (A 138) for more information. • If charge for the battery inserted into the camera is displayed, click Change program under Import pictures and videos. If the camera is displayed in the Change...
User Manual
Page 171
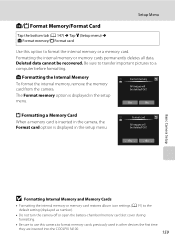
...the COOLPIX S4100. 159 OK? Yes No Basic Camera Setup B Formatting Internal Memory and Memory Cards • Formatting the internal memory or memory card restores album icon settings (A 91) to the default setting (displayed as number). • Do not turn the camera off or open the battery-chamber/memory card slot cover during formatting. • Be sure to use this option to a computer before formatting. l Formatting the Internal Memory To format the internal memory, remove the memory card from the camera. Formatting the internal memory or memory cards permanently deletes all...
...the COOLPIX S4100. 159 OK? Yes No Basic Camera Setup B Formatting Internal Memory and Memory Cards • Formatting the internal memory or memory card restores album icon settings (A 91) to the default setting (displayed as number). • Do not turn the camera off or open the battery-chamber/memory card slot cover during formatting. • Be sure to use this option to a computer before formatting. l Formatting the Internal Memory To format the internal memory, remove the memory card from the camera. Formatting the internal memory or memory cards permanently deletes all...
User Manual
Page 192
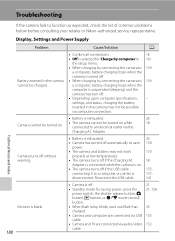
... power switch, the shutter-release button, A button, c button, or b (e movie-record) button. • When flash lamp blinks, wait until flash has charged. • Camera and computer are connected via USB cable. • Camera and TV are connected via the 18 Charging AC Adapter. Display, Settings and Power Supply Problem Cause/Solution A Battery inserted in the camera cannot be turned on . • The camera turns off if the USB cable 135, connecting it to an electrical outlet via audio/video cable. 21 21, 158 35 135 132 Troubleshooting...
... power switch, the shutter-release button, A button, c button, or b (e movie-record) button. • When flash lamp blinks, wait until flash has charged. • Camera and computer are connected via USB cable. • Camera and TV are connected via the 18 Charging AC Adapter. Display, Settings and Power Supply Problem Cause/Solution A Battery inserted in the camera cannot be turned on . • The camera turns off if the USB cable 135, connecting it to an electrical outlet via audio/video cable. 21 21, 158 35 135 132 Troubleshooting...
User Manual
Page 194
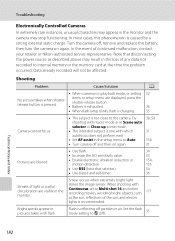
...; Set AF assist in the setup menu to Auto. • Turn camera off particles in the monitor. When shooting with flash. Flash is recommended. Set the flash mode setting to internal memory or the memory card at the time the problem occurred. Note that disconnecting the power source as the sun, reflections of light or partial discoloration are displayed, press the shutter-release button. • Battery is exhausted. 26 • When flash lamp blinks, flash is charging. 35 Camera cannot focus. •...
...; Set AF assist in the setup menu to Auto. • Turn camera off particles in the monitor. When shooting with flash. Flash is recommended. Set the flash mode setting to internal memory or the memory card at the time the problem occurred. Note that disconnecting the power source as the sun, reflections of light or partial discoloration are displayed, press the shutter-release button. • Battery is exhausted. 26 • When flash lamp blinks, flash is charging. 35 Camera cannot focus. •...
User Manual
Page 197
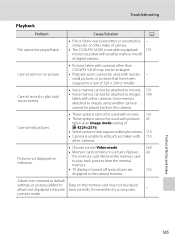
.... • Playback zoom cannot be attached to Data on television. • Choose correct Video mode. 160 • Memory card contains no pictures. Cannot zoom in the camera monitor. pictures mode. Cannot edit pictures. • These options cannot be used with another make of camera. • The COOLPIX S4100 is turned off and pictures are 133 displayed in on this camera. Album icon restored to default settings, or pictures added to images 109 taken with movies, - Remove the memory card to play back...
.... • Playback zoom cannot be attached to Data on television. • Choose correct Video mode. 160 • Memory card contains no pictures. Cannot zoom in the camera monitor. pictures mode. Cannot edit pictures. • These options cannot be used with another make of camera. • The COOLPIX S4100 is turned off and pictures are 133 displayed in on this camera. Album icon restored to default settings, or pictures added to images 109 taken with movies, - Remove the memory card to play back...
User Manual
Page 205
... 7 Print 142, 143 Print date 106, 153 Print order 103 Printer 140 Q Quick retouch 115 QVGA 128, 129 R Rating 99 Rechargeable battery 172 Rechargeable Li-ion battery 16, 18 Recording movies 126 Red-eye reduction 34, 35 Reset all 164 Rotate image 107 RSCN 174 S Scene auto selector x 61 Scene mode 58, 63 Self-timer 36 Self-timer lamp 4, 37 Setup menu 146 Shooting 26, 28, 30, 152 Shooting mode 40 Shutter sound 157 Shutter speed 30 Shutter-release button 4, 30...
... 7 Print 142, 143 Print date 106, 153 Print order 103 Printer 140 Q Quick retouch 115 QVGA 128, 129 R Rating 99 Rechargeable battery 172 Rechargeable Li-ion battery 16, 18 Recording movies 126 Red-eye reduction 34, 35 Reset all 164 Rotate image 107 RSCN 174 S Scene auto selector x 61 Scene mode 58, 63 Self-timer 36 Self-timer lamp 4, 37 Setup menu 146 Shooting 26, 28, 30, 152 Shooting mode 40 Shutter sound 157 Shutter speed 30 Shutter-release button 4, 30...


