
Reference Manual
Page 3
... displayed on the screen ( button 32 Power-on lamp (charge lamp) ...34 Getting started ...36 Attaching the strap ...37 Attaching/removing the lens cap and lens hood 38 Inserting the battery and memory card 39 Charging the battery ...41 Opening the monitor ...43 Camera setup ...44 Basic operations of shooting and playback 47 Shooting still images ...48 Recording movies ...53 Switching between the monitor and viewfinder 54 Playing back images ...55 Deleting images ...57 Shooting features ...60 Selecting a shooting mode (mode dial 61 Auto mode...
... displayed on the screen ( button 32 Power-on lamp (charge lamp) ...34 Getting started ...36 Attaching the strap ...37 Attaching/removing the lens cap and lens hood 38 Inserting the battery and memory card 39 Charging the battery ...41 Opening the monitor ...43 Camera setup ...44 Basic operations of shooting and playback 47 Shooting still images ...48 Recording movies ...53 Switching between the monitor and viewfinder 54 Playing back images ...55 Deleting images ...57 Shooting features ...60 Selecting a shooting mode (mode dial 61 Auto mode...

Reference Manual
Page 22
... timer) Setting the flash mode, self-timer, focus mode, and exposure compensation (page 98) Menu operations (page 162) • When the shooting mode is set the f‑number. For setting Apply the item that you selected by rotating the multi selector. • While a zoomed image is displayed: Move the display area. Menu operations (page 162) 22 Parts of the camera Principle functions of a sequence in a sequence (page 138) • Scroll an image shot with easy panorama. • Play back movies. • Switch...
... timer) Setting the flash mode, self-timer, focus mode, and exposure compensation (page 98) Menu operations (page 162) • When the shooting mode is set the f‑number. For setting Apply the item that you selected by rotating the multi selector. • While a zoomed image is displayed: Move the display area. Menu operations (page 162) 22 Parts of the camera Principle functions of a sequence in a sequence (page 138) • Scroll an image shot with easy panorama. • Play back movies. • Switch...

Reference Manual
Page 70
...], [100-6400], [3200], or [6400]. • The Bulb or Time setting cannot be used when shooting. • It is recommended that you use a sufficiently charged battery or the EH-5d AC Adapter and the EP-5C Power Connector (both available separately) to save images if a slow shutter speed is used when a setting other than [Single] is selected for the camera to prevent the camera from turning off unexpectedly.
...], [100-6400], [3200], or [6400]. • The Bulb or Time setting cannot be used when shooting. • It is recommended that you use a sufficiently charged battery or the EH-5d AC Adapter and the EP-5C Power Connector (both available separately) to save images if a slow shutter speed is used when a setting other than [Single] is selected for the camera to prevent the camera from turning off unexpectedly.

Reference Manual
Page 89
... only image saved. Easy panorama Use this mode to green. - 2 Frame the subject and take a picture. • The camera focuses on the area in highlights or shadows is minimized • If [Off] is set : - When there is a big difference between the bright and dark areas, the HDR icon on the shooting screen changes to shoot panorama images that seen on the shooting screen. • After taking a picture, do not turn the camera off before the screen switches...
... only image saved. Easy panorama Use this mode to green. - 2 Frame the subject and take a picture. • The camera focuses on the area in highlights or shadows is minimized • If [Off] is set : - When there is a big difference between the bright and dark areas, the HDR icon on the shooting screen changes to shoot panorama images that seen on the shooting screen. • After taking a picture, do not turn the camera off before the screen switches...
Reference Manual
Page 125
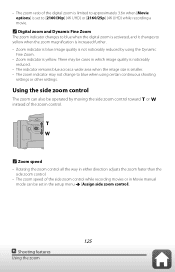
.... • Zoom indicator is blue: Image quality is not noticeably reduced by moving the side zoom control toward or instead of the zoom control. Zoom speed • Rotating the zoom control all the way in either direction adjusts the zoom faster than the side zoom control. • The zoom speed of the side zoom control while recording movies or in the setup menu [Assign side zoom control]. 125 Shooting features Using the zoom Using the side zoom control The zoom can be set to...
.... • Zoom indicator is blue: Image quality is not noticeably reduced by moving the side zoom control toward or instead of the zoom control. Zoom speed • Rotating the zoom control all the way in either direction adjusts the zoom faster than the side zoom control. • The zoom speed of the side zoom control while recording movies or in the setup menu [Assign side zoom control]. 125 Shooting features Using the zoom Using the side zoom control The zoom can be set to...

Reference Manual
Page 180
... [A] (auto) in [Contrast] and in [Saturation] Results for [Monochrome]. Customizing existing COOLPIX Picture Controls: quick adjust and manual adjust (page 178) Rotate the mode dial to , , , , or * Picture Control button button Custom * The setting can also be previewed on the screen during shooting. The values set manually are disabled if quick adjust is not available in (Movie manual) mode. 180 Using the menu The shooting menu ( , , , , or mode) Custom Picture Control In Custom Picture Control (COOLPIX Custom Picture Control), customize the settings of [Image sharpening...
... [A] (auto) in [Contrast] and in [Saturation] Results for [Monochrome]. Customizing existing COOLPIX Picture Controls: quick adjust and manual adjust (page 178) Rotate the mode dial to , , , , or * Picture Control button button Custom * The setting can also be previewed on the screen during shooting. The values set manually are disabled if quick adjust is not available in (Movie manual) mode. 180 Using the menu The shooting menu ( , , , , or mode) Custom Picture Control In Custom Picture Control (COOLPIX Custom Picture Control), customize the settings of [Image sharpening...

Reference Manual
Page 200
... button button Zoom memory 200 Using the menu The shooting menu ( , , , , or mode) Zoom memory When the zoom control is moved, the zoom position (equivalent to focal length/ angle of the first to third images is saved and multiple exposure ends. • It may take some time until the third image is switched to the positions that have been selected by setting the check box to on in this menu option. 2 Press the shutter-release button...
... button button Zoom memory 200 Using the menu The shooting menu ( , , , , or mode) Zoom memory When the zoom control is moved, the zoom position (equivalent to focal length/ angle of the first to third images is saved and multiple exposure ends. • It may take some time until the third image is switched to the positions that have been selected by setting the check box to on in this menu option. 2 Press the shutter-release button...

Reference Manual
Page 218
... either direction. 218 Using the menu The playback menu Notes about [Protect] Formatting the memory card permanently deletes all data including protected files. Still images can be rotated 90 degrees clockwise or 90 degrees counterclockwise. Images that were saved in which saved images are displayed during playback. Repeat steps 1 and 2 to set [Protect] on additional images. 3 Press the button to select ON or OFF. • When ON is selected, is displayed under the selected image. Playback mode button Protect button 1 Use the...
... either direction. 218 Using the menu The playback menu Notes about [Protect] Formatting the memory card permanently deletes all data including protected files. Still images can be rotated 90 degrees clockwise or 90 degrees counterclockwise. Images that were saved in which saved images are displayed during playback. Repeat steps 1 and 2 to set [Protect] on additional images. 3 Press the button to select ON or OFF. • When ON is selected, is displayed under the selected image. Playback mode button Protect button 1 Use the...

Reference Manual
Page 245
... Using the menu The setup menu Inserting the battery and memory card (page 39), Memory cards (page 288) Folders for storing files Still images and movies shot or recorded with this camera are saved in folders of files in the following situations: - When a file in a folder is in white on the image displayed on the camera). • A new folder is disabled. button (setup) button Peaking button Option On (default setting) Off Description Peaking is disabled. Notes about peaking After turning on the camera or after switching from playback mode...
... Using the menu The setup menu Inserting the battery and memory card (page 39), Memory cards (page 288) Folders for storing files Still images and movies shot or recorded with this camera are saved in folders of files in the following situations: - When a file in a folder is in white on the image displayed on the camera). • A new folder is disabled. button (setup) button Peaking button Option On (default setting) Off Description Peaking is disabled. Notes about peaking After turning on the camera or after switching from playback mode...

Reference Manual
Page 270
... battery is a problem Troubleshooting [Reset file numbering] cannot be used. Cannot take pictures or record movies. • When the camera is complete. The camera body (page 17) • When shooting in playback mode, press the button, shutter-release button, or ( ) button. When [Autofocus mode] is locked. Shooting Cannot switch to [Full-time AF] or while in flash is charging while is not possible. Disconnect the USB cable. Change the memory card, or use the EN-EL20 Rechargeable Li-ion Battery. Use EN-EL20a. Autofocus mode (still images...
... battery is a problem Troubleshooting [Reset file numbering] cannot be used. Cannot take pictures or record movies. • When the camera is complete. The camera body (page 17) • When shooting in playback mode, press the button, shutter-release button, or ( ) button. When [Autofocus mode] is locked. Shooting Cannot switch to [Full-time AF] or while in flash is charging while is not possible. Disconnect the USB cable. Change the memory card, or use the EN-EL20 Rechargeable Li-ion Battery. Use EN-EL20a. Autofocus mode (still images...

Reference Manual
Page 274
... connection is a problem Troubleshooting Stop the wireless connection. • Some functions cannot be used simultaneously when shooting (page 127) Playback, editing File cannot be played back. • This camera may not be selected (displayed in [Backlighting] - [Easy panorama] • When using the Bulb setting or Time setting to capture images with a long timeexposure • When the shooting menu [Continuous] is set to [Continuous H], [Preshooting cache], [Continuous H: 120 fps], or [Continuous H: 60 fps] • When using [Smile timer] while shooting...
... connection is a problem Troubleshooting Stop the wireless connection. • Some functions cannot be used simultaneously when shooting (page 127) Playback, editing File cannot be played back. • This camera may not be selected (displayed in [Backlighting] - [Easy panorama] • When using the Bulb setting or Time setting to capture images with a long timeexposure • When the shooting menu [Continuous] is set to [Continuous H], [Preshooting cache], [Continuous H: 120 fps], or [Continuous H: 60 fps] • When using [Smile timer] while shooting...

Reference Manual
Page 277
... is a problem Troubleshooting Cannot upload images to upload during Bluetooth communication, communication may be disconnected while uploading. To upload original files, use [Download pictures] in the camera, still images are registered in the SnapBridge app, switch to the camera you want to connect in the [Network menu (page 223)] [Bluetooth] [Paired devices] in the camera. • After performing the setup menu [Reset all] or [Network menu (page 223)] [Restore default settings] in the camera, unpair...
... is a problem Troubleshooting Cannot upload images to upload during Bluetooth communication, communication may be disconnected while uploading. To upload original files, use [Download pictures] in the camera, still images are registered in the SnapBridge app, switch to the camera you want to connect in the [Network menu (page 223)] [Bluetooth] [Paired devices] in the camera. • After performing the setup menu [Reset all] or [Network menu (page 223)] [Restore default settings] in the camera, unpair...
Reference Manual
Page 282
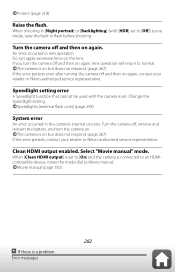
... camera is on again, lens operation will return to Movie manual. Turn the camera off and then on the lens. Speedlight setting error A Speedlight function that cannot be used with [HDR] set to [On] and the camera is a problem Error messages When [Clean HDMI output] is set . Protect (page 218) Raise the flash. Change the Speedlight setting. If you turn the camera on again. The camera is set to [Off]) scene mode, raise the built-in flash before shooting...
... camera is on again, lens operation will return to Movie manual. Turn the camera off and then on the lens. Speedlight setting error A Speedlight function that cannot be used with [HDR] set to [On] and the camera is a problem Error messages When [Clean HDMI output] is set . Protect (page 218) Raise the flash. Change the Speedlight setting. If you turn the camera on again. The camera is set to [Off]) scene mode, raise the built-in flash before shooting...
Reference Manual
Page 158
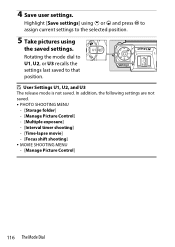
...settings] using 1 or 3 and press J to assign current settings to that position. Rotating the mode dial to U1, U2, or U3 recalls the settings last saved to the selected position. 5 Take pictures using the saved settings. 4 Save user settings. D User Settings U1, U2, and U3 The release mode is not saved. In addition, the following settings are not saved. • PHOTO SHOOTING MENU - [Storage folder] - [Manage Picture Control] - [Multiple exposure] - [Interval timer shooting] - [Time-lapse movie] - [Focus shift shooting] • MOVIE SHOOTING MENU - [Manage Picture Control] 116 The Mode...
...settings] using 1 or 3 and press J to assign current settings to that position. Rotating the mode dial to U1, U2, or U3 recalls the settings last saved to the selected position. 5 Take pictures using the saved settings. 4 Save user settings. D User Settings U1, U2, and U3 The release mode is not saved. In addition, the following settings are not saved. • PHOTO SHOOTING MENU - [Storage folder] - [Manage Picture Control] - [Multiple exposure] - [Interval timer shooting] - [Time-lapse movie] - [Focus shift shooting] • MOVIE SHOOTING MENU - [Manage Picture Control] 116 The Mode...

Reference Manual
Page 712
... on the operating system, you may display correctly if default settings are restored using the [Reset all settings] item in the setup menu. ˔ The Image Dust Off option in the setup menu? • Pictures may be unable to a computer using a card reader or other device. 670 Problems and Solutions View NEF (RAW) images using Nikon software. Copy pictures from the memory card to upload pictures when the camera is performed ˔ The effects of [Set Picture Control], [Active D-Lighting], or [Vignette control] are...
... on the operating system, you may display correctly if default settings are restored using the [Reset all settings] item in the setup menu. ˔ The Image Dust Off option in the setup menu? • Pictures may be unable to a computer using a card reader or other device. 670 Problems and Solutions View NEF (RAW) images using Nikon software. Copy pictures from the memory card to upload pictures when the camera is performed ˔ The effects of [Set Picture Control], [Active D-Lighting], or [Vignette control] are...
Reference Guide PDF Edition
Page 52
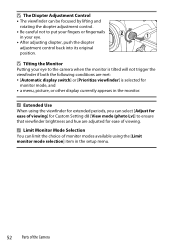
... adjustment control. • Be careful not to put your fingers or fingernails in your eye to ensure that viewfinder brightness and hue are met: • [Automatic display switch] or [Prioritize viewfinder] is tilted will not trigger the viewfinder if both the following conditions are adjusted for monitor mode, and • a menu, picture, or other display currently appears in the setup menu. 52 Parts...
... adjustment control. • Be careful not to put your fingers or fingernails in your eye to ensure that viewfinder brightness and hue are met: • [Automatic display switch] or [Prioritize viewfinder] is tilted will not trigger the viewfinder if both the following conditions are adjusted for monitor mode, and • a menu, picture, or other display currently appears in the setup menu. 52 Parts...

Reference Guide PDF Edition
Page 791
...; Image Dust Off reference data recorded before image sensor cleaning is performed are used with photographs taken after image sensor cleaning is connected to a computer using Nikon software. Copy pictures from the memory card to a computer. Problems and Solutions 791 View NEF (RAW) pictures using NX Studio. ˔ Pictures cannot be copied to a computer: Depending on the operating system, you may display correctly if default settings are restored using the [Reset all settings] item in the setup menu. ˔ The Image...
...; Image Dust Off reference data recorded before image sensor cleaning is performed are used with photographs taken after image sensor cleaning is connected to a computer using Nikon software. Copy pictures from the memory card to a computer. Problems and Solutions 791 View NEF (RAW) pictures using NX Studio. ˔ Pictures cannot be copied to a computer: Depending on the operating system, you may display correctly if default settings are restored using the [Reset all settings] item in the setup menu. ˔ The Image...

Reference Guide PDF Edition
Page 913
... USB cable 4 USB connection priority 737 USB power delivery 744 Z Zebra pattern 686 V Vibration reduction 526 Video file type 214 Video flicker reduction 585 Video recording menu 576 Video-record button 93 View all in continuous mode ....... 629 View assist 685 View mode (photo Lv 624 Viewfinder brightness 711 Viewfinder color balance 712 Vignette control 516, 584 Virtual horizon type 631 Vivid (Set Picture Control 193 Voice memo 295 Voice memo options 732 W Warm display colors 626 WB bracketing 183 U button 158 White balance...
... USB cable 4 USB connection priority 737 USB power delivery 744 Z Zebra pattern 686 V Vibration reduction 526 Video file type 214 Video flicker reduction 585 Video recording menu 576 Video-record button 93 View all in continuous mode ....... 629 View assist 685 View mode (photo Lv 624 Viewfinder brightness 711 Viewfinder color balance 712 Vignette control 516, 584 Virtual horizon type 631 Vivid (Set Picture Control 193 Voice memo 295 Voice memo options 732 W Warm display colors 626 WB bracketing 183 U button 158 White balance...

Setting Guide Video Edition
Page 4
... camera is now ready to start recording. ● You can also be recorded to 1. indicator remaining ● Sound is recommended for extended recording. For more information, see page 744 of camera controls and insert a battery and memory card. ● The supplied EH-7P charging AC adapter or an optional AC adapter is recorded via USB. Before making videos, learn the names and locations of the Z 9 Reference Guide, available from the Nikon Download...
... camera is now ready to start recording. ● You can also be recorded to 1. indicator remaining ● Sound is recommended for extended recording. For more information, see page 744 of camera controls and insert a battery and memory card. ● The supplied EH-7P charging AC adapter or an optional AC adapter is recorded via USB. Before making videos, learn the names and locations of the Z 9 Reference Guide, available from the Nikon Download...

Setting Guide Video Edition
Page 47
... the setup menu and make sure that the camera clock is off. • [Reset]: Reset the time code to 00:00:00.00. • [Enter manually]: Enter the hour, minute, second, and frame number manually. • [Current time]: Set the time code to compensate for each frame when shooting videos, select [On] or [On (with videos recorded in MOV format. ■ The Time Code Display Time codes are incremented continuously. Time Codes Time codes are available only with HDMI Camera controls - i-button menu - ber...
... the setup menu and make sure that the camera clock is off. • [Reset]: Reset the time code to 00:00:00.00. • [Enter manually]: Enter the hour, minute, second, and frame number manually. • [Current time]: Set the time code to compensate for each frame when shooting videos, select [On] or [On (with videos recorded in MOV format. ■ The Time Code Display Time codes are incremented continuously. Time Codes Time codes are available only with HDMI Camera controls - i-button menu - ber...


