
Product Manual
Page 20
...E59 The Setup Menu ...E60 Welcome Screen...E60 xviii Introduction Editing Movies ...E19 Extracting Only the Desired Portion of a Movie E19 Saving a Frame from a Movie as a Still Image E20 The Shooting Menu (j, k, l or m Mode E21 Image Quality ...E21 Image Size...E22 Picture Control (COOLPIX Picture Control) (Changing the Settings for Image Recording E23 Custom Picture Control (COOLPIX Custom Picture Control E27 White Balance (Adjusting Hue E28 Metering ...E31 Continuous Shooting ...E32 ISO Sensitivity ...E36 Exposure Bracketing...E37 AF Area Mode...E38 Autofocus Mode...E41 Flash Exp.
...E59 The Setup Menu ...E60 Welcome Screen...E60 xviii Introduction Editing Movies ...E19 Extracting Only the Desired Portion of a Movie E19 Saving a Frame from a Movie as a Still Image E20 The Shooting Menu (j, k, l or m Mode E21 Image Quality ...E21 Image Size...E22 Picture Control (COOLPIX Picture Control) (Changing the Settings for Image Recording E23 Custom Picture Control (COOLPIX Custom Picture Control E27 White Balance (Adjusting Hue E28 Metering ...E31 Continuous Shooting ...E32 ISO Sensitivity ...E36 Exposure Bracketing...E37 AF Area Mode...E38 Autofocus Mode...E41 Flash Exp.

Product Manual
Page 26
...viewfinder. 9 Switch the information displayed in the monitor. 10 s (display) button Play back images. 36 c (playback) button Delete the last image that was saved. 37 l (delete) button 4 A 34, 35 Start and stop pressing when you feel resistance slightly): Set focus and exposure. Parts of the Camera and Main Functions Control Shutter-release button Main Function When pressed halfway (i.e., if you stop movie recording. 89 b (e movie-record) button w (function) button When the shooting mode is j, k, l, m or M: Display or close the setting menus such as 75 Continuous or...
...viewfinder. 9 Switch the information displayed in the monitor. 10 s (display) button Play back images. 36 c (playback) button Delete the last image that was saved. 37 l (delete) button 4 A 34, 35 Start and stop pressing when you feel resistance slightly): Set focus and exposure. Parts of the Camera and Main Functions Control Shutter-release button Main Function When pressed halfway (i.e., if you stop movie recording. 89 b (e movie-record) button w (function) button When the shooting mode is j, k, l, m or M: Display or close the setting menus such as 75 Continuous or...

Product Manual
Page 34
... Shooting menu Image quality Image size Picture Control Custom Picture Control White balance Metering Continuous 2 Use the multi selector to select a menu item. • HI or rotation: Select an item above or below. • JK: Select an item on how to switch tabs. Apply selection 3 After completing the settings, press the d button or shutter-release button. • Press the shutter-release button to display the shooting screen. C Notes About the Command Dial Operation When a Menu is Displayed...
... Shooting menu Image quality Image size Picture Control Custom Picture Control White balance Metering Continuous 2 Use the multi selector to select a menu item. • HI or rotation: Select an item above or below. • JK: Select an item on how to switch tabs. Apply selection 3 After completing the settings, press the d button or shutter-release button. • Press the shutter-release button to display the shooting screen. C Notes About the Command Dial Operation When a Menu is Displayed...

Product Manual
Page 46
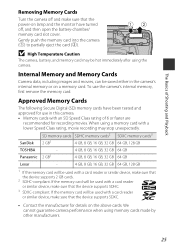
Insert the card into this camera. Preparation 3 Insert a Memory Card 1 Turn off the camera and open the battery-chamber/memory card slot cover. 2 Insert the memory card. • Slide the memory card in until it with this camera, make sure to Insert the Memory Card in the setup menu. 24 The Basics of Shooting and Playback B Be Careful to format it clicks into place. Memory card slot B Formatting Memory Cards The first time you insert a memory card that has been used in another...
Insert the card into this camera. Preparation 3 Insert a Memory Card 1 Turn off the camera and open the battery-chamber/memory card slot cover. 2 Insert the memory card. • Slide the memory card in until it with this camera, make sure to Insert the Memory Card in the setup menu. 24 The Basics of Shooting and Playback B Be Careful to format it clicks into place. Memory card slot B Formatting Memory Cards The first time you insert a memory card that has been used in another...
Product Manual
Page 47
...; Contact the manufacturer for use the camera's internal memory, first remove the memory card. Internal Memory and Memory Cards Camera data, including images and movies, can be used with a lower Speed Class rating, movie recording may be hot immediately after using memory cards made by other manufacturers. 25 If the memory card will be used with a card reader or similar device, make sure that the device supports 2 GB cards. 2 SDHC-compliant. To use in the camera's internal memory or on lamp and the...
...; Contact the manufacturer for use the camera's internal memory, first remove the memory card. Internal Memory and Memory Cards Camera data, including images and movies, can be used with a lower Speed Class rating, movie recording may be hot immediately after using memory cards made by other manufacturers. 25 If the memory card will be used with a card reader or similar device, make sure that the device supports 2 GB cards. 2 SDHC-compliant. To use in the camera's internal memory or on lamp and the...

Product Manual
Page 49
... Shooting and Playback C The Auto Off Function Flashes No operations performed No operations performed 25m 0s 1/250 F5.6 840 Camera enters standby mode. 3 min Camera turns off setting in the setup menu (A95). • While the camera is in the monitor (A10). 27 The time can be changed using the Auto off . • The time that is about 1 minute. Press the power switch, shutter-release button, c button, or b (e movierecord) button. - Rotate the mode dial. C Monitor Display Press the s button...
... Shooting and Playback C The Auto Off Function Flashes No operations performed No operations performed 25m 0s 1/250 F5.6 840 Camera enters standby mode. 3 min Camera turns off setting in the setup menu (A95). • While the camera is in the monitor (A10). 27 The time can be changed using the Auto off . • The time that is about 1 minute. Press the power switch, shutter-release button, c button, or b (e movierecord) button. - Rotate the mode dial. C Monitor Display Press the s button...

Product Manual
Page 80
... used settings for shooting can also be saved by rotating the mode dial to M (the default settings for the shooting mode j are saved at the time of purchase). 2 Change to a frequently used combination of shooting settings. • See A57 for settings details. 3 Press the d button to display the shooting menu. 4 Use the multi selector HI to select Save user settings, and press the k button. • The current settings are saved. Shooting menu Multiple exposure Save user settings Reset user settings Zoom memory Startup zoom position M exposure preview B The Clock Battery If the internal...
... used settings for shooting can also be saved by rotating the mode dial to M (the default settings for the shooting mode j are saved at the time of purchase). 2 Change to a frequently used combination of shooting settings. • See A57 for settings details. 3 Press the d button to display the shooting menu. 4 Use the multi selector HI to select Save user settings, and press the k button. • The current settings are saved. Shooting menu Multiple exposure Save user settings Reset user settings Zoom memory Startup zoom position M exposure preview B The Clock Battery If the internal...

Product Manual
Page 88
... flash mode is set to the lens is displayed, the camera can focus varies depending on the zoom position. D Macro close-up images. C Focus Mode Setting • The setting may not be available with the Flash The flash may not be unable to light the entire subject at distances of less than 50 cm (1 ft 8 in .) to the subject. B Infinity Use when shooting distant scenes through window glass or when shooting...
... flash mode is set to the lens is displayed, the camera can focus varies depending on the zoom position. D Macro close-up images. C Focus Mode Setting • The setting may not be available with the Flash The flash may not be unable to light the entire subject at distances of less than 50 cm (1 ft 8 in .) to the subject. B Infinity Use when shooting distant scenes through window glass or when shooting...
Product Manual
Page 118
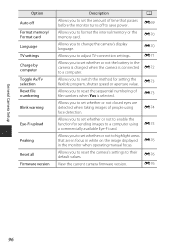
General Camera Setup Option Auto off to save power. E70 E71 Allows you to change the camera's display language. Allows you to adjust TV-connection settings. Allows you to set whether or not to highlight areas that are detected when taking images of time that passes E69 before the monitor turns off Format memory/ Format card Language TV settings Charge by computer Toggle Av/Tv selection Reset file numbering Blink warning Eye-Fi upload Peaking Reset all Firmware version Description A Allows you to...
General Camera Setup Option Auto off to save power. E70 E71 Allows you to change the camera's display language. Allows you to adjust TV-connection settings. Allows you to set whether or not to highlight areas that are detected when taking images of time that passes E69 before the monitor turns off Format memory/ Format card Language TV settings Charge by computer Toggle Av/Tv selection Reset file numbering Blink warning Eye-Fi upload Peaking Reset all Firmware version Description A Allows you to...

Product Manual
Page 149
.... B COOLPIX Picture Control • The COOLPIX Picture Control function of this camera cannot be used with other makes of cameras, Capture NX, Capture NX 2 and ViewNX 2 Picture Control function. • The setting may not be changed when using certain settings of Custom 1 in COOLPIX Custom Picture Control. e Monochrome Shoots monochrome photographs such as blue, red, and green. Recommended for balanced results. Select for images that emphasize primary colors, such as in black-andwhite or sepia. f Custom 1* Changes to the setting...
.... B COOLPIX Picture Control • The COOLPIX Picture Control function of this camera cannot be used with other makes of cameras, Capture NX, Capture NX 2 and ViewNX 2 Picture Control function. • The setting may not be changed when using certain settings of Custom 1 in COOLPIX Custom Picture Control. e Monochrome Shoots monochrome photographs such as blue, red, and green. Recommended for balanced results. Select for images that emphasize primary colors, such as in black-andwhite or sepia. f Custom 1* Changes to the setting...
Product Manual
Page 202
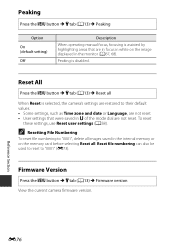
... camera's settings are restored to "0001" (E73). Reset file numbering can also be used to reset to their default values. • Some settings, such as Time zone and date or Language, are not reset. Peaking Press the d button M z tab (A13) M Peaking Option On (default setting) Off Description When operating manual focus, focusing is disabled. Peaking is assisted by highlighting areas that are in focus in white on the memory card before selecting Reset all images saved in M of the mode...
... camera's settings are restored to "0001" (E73). Reset file numbering can also be used to reset to their default values. • Some settings, such as Time zone and date or Language, are not reset. Peaking Press the d button M z tab (A13) M Peaking Option On (default setting) Off Description When operating manual focus, focusing is disabled. Peaking is assisted by highlighting areas that are in focus in white on the memory card before selecting Reset all images saved in M of the mode...

Product Manual
Page 203
... "lock" position. - Delete images or insert a new memory card. 37, 94, 24 Reference Section E77 Slide the write-protect switch to format the memory card. The memory card has not been formatted for use . memory card. Error Messages Refer to the table below if an error message is write protected. Wait until - The camera will turn The inside of the Eye-Fi card is locked. off to prevent The camera turns off automatically. Memory card is displayed. Formatting deletes all data saved on the Card is in the camera. Format card...
... "lock" position. - Delete images or insert a new memory card. 37, 94, 24 Reference Section E77 Slide the write-protect switch to format the memory card. The memory card has not been formatted for use . memory card. Error Messages Refer to the table below if an error message is write protected. Wait until - The camera will turn The inside of the Eye-Fi card is locked. off to prevent The camera turns off automatically. Memory card is displayed. Formatting deletes all data saved on the Card is in the camera. Format card...
Product Manual
Page 204
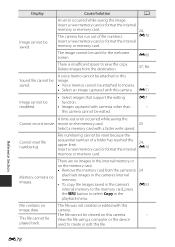
... file cannot be saved. Display Image cannot be View the file using a computer or the device played back. movie on the memory card. • Remove the memory card from the destination. 37, 94 Sound file cannot be used to save the copy. Memory contains no The file was not created or edited with this image. • Voice memos cannot be reset because the sequential number of file numbers. 24, E70 Insert a new memory card or format the internal memory or memory card. The file...
... file cannot be saved. Display Image cannot be View the file using a computer or the device played back. movie on the memory card. • Remove the memory card from the destination. 37, 94 Sound file cannot be used to save the copy. Memory contains no The file was not created or edited with this image. • Voice memos cannot be reset because the sequential number of file numbers. 24, E70 Insert a new memory card or format the internal memory or memory card. The file...
Product Manual
Page 213
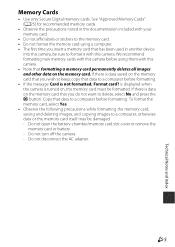
... is data saved on the memory card. Do not open the battery-chamber/memory card slot cover or remove the memory card or battery. - Format card? Do not turn off the camera. - If there is not formatted. Copy that formatting a memory card permanently deletes all images and other data on the memory card that you do not want to delete, select No and press the k button. F5 Technical Notes and Index We recommend formatting new memory cards with this camera before using them...
... is data saved on the memory card. Do not open the battery-chamber/memory card slot cover or remove the memory card or battery. - Format card? Do not turn off the camera. - If there is not formatted. Copy that formatting a memory card permanently deletes all images and other data on the memory card that you do not want to delete, select No and press the k button. F5 Technical Notes and Index We recommend formatting new memory cards with this camera before using them...

Product Manual
Page 216
... time were reset after the camera's clock battery was exhausted. sleep mode. - Technical Notes and Index F8 Depending upon the computer specifications, - Off is on . Battery charging stops if the camera is connected, the 22 Camera cannot camera cannot be turned on in the E72 setup menu. - Use the charging AC adapter to charge the battery. - settings, and status, battery charging may not charge for Charge by computer in playback mode by removing or disconnecting the power source. The camera turns...
... time were reset after the camera's clock battery was exhausted. sleep mode. - Technical Notes and Index F8 Depending upon the computer specifications, - Off is on . Battery charging stops if the camera is connected, the 22 Camera cannot camera cannot be turned on in the E72 setup menu. - Use the charging AC adapter to charge the battery. - settings, and status, battery charging may not charge for Charge by computer in playback mode by removing or disconnecting the power source. The camera turns...

Product Manual
Page 217
... or clocks. camera off • The camera or battery has become hot. Press the power switch, shutter-release button, c button or b (e movie-record) button, or rotate the mode dial. • You cannot turn on again. Set the correct time and date recording are connected via an HDMI cable. 100, E13 • Interval timer shooting in the setup not correct. It may take a while to a darker place or use the viewfinder. • Adjust the monitor brightness...
... or clocks. camera off • The camera or battery has become hot. Press the power switch, shutter-release button, c button or b (e movie-record) button, or rotate the mode dial. • You cannot turn on again. Set the correct time and date recording are connected via an HDMI cable. 100, E13 • Interval timer shooting in the setup not correct. It may take a while to a darker place or use the viewfinder. • Adjust the monitor brightness...
Product Manual
Page 218
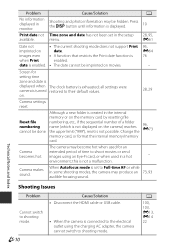
...Camera makes sound. Cannot switch to their default values. Although a new folder is exhausted; Change the 96, E73 memory card, or format the internal memory/memory card. menu. 28, 95, E61 Date not • The current shooting mode does not support Print imprinted on . 28, 29 Camera settings reset. images even • A function that restricts the Print date function is set in monitor. on date. images using the charging AC adapter, the camera cannot switch to Full-time AF or while in the internal memory or on the memory card by resetting file Reset file...
...Camera makes sound. Cannot switch to their default values. Although a new folder is exhausted; Change the 96, E73 memory card, or format the internal memory/memory card. menu. 28, 95, E61 Date not • The current shooting mode does not support Print imprinted on . 28, 29 Camera settings reset. images even • A function that restricts the Print date function is set in monitor. on date. images using the charging AC adapter, the camera cannot switch to Full-time AF or while in the internal memory or on the memory card by resetting file Reset file...

Product Manual
Page 220
... in saved images. - • The flash window is blocked. • The subject is released. Noise can be used in the following scene modes. -Scene auto selector, Portrait, Night portrait, Easy panorama, Pet portrait 76 95, E67 76 40 Image size not available. • A function that restricts digital zoom is enabled. • Digital zoom is selected for Sound settings > Shutter sound in the setup menu. Problem Cause/Solution A Flash does not fire. • A shooting mode where the flash cannot...
... in saved images. - • The flash window is blocked. • The subject is released. Noise can be used in the following scene modes. -Scene auto selector, Portrait, Night portrait, Easy panorama, Pet portrait 76 95, E67 76 40 Image size not available. • A function that restricts digital zoom is enabled. • Digital zoom is selected for Sound settings > Shutter sound in the setup menu. Problem Cause/Solution A Flash does not fire. • A shooting mode where the flash cannot...
Product Manual
Page 222
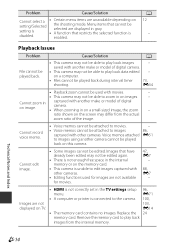
... setting is connected to the camera. 100, Images are not 103, displayed on TV. Cause/Solution A • This camera may not be attached to images 86, captured with another make or model of digital camera. • This camera may differ from the internal memory. captured with other cameras. • Editing functions used with movies. - • This camera may not be able to play back images - Voice memos attached E51 to play back data edited - Replace...
... setting is connected to the camera. 100, Images are not 103, displayed on TV. Cause/Solution A • This camera may not be attached to images 86, captured with another make or model of digital camera. • This camera may differ from the internal memory. captured with other cameras. • Editing functions used with movies. - • This camera may not be able to play back images - Voice memos attached E51 to play back data edited - Replace...

Product Manual
Page 223
... paper size with camera. Replace the memory card. • Remove the memory card to enter connection standby displayed on the mode. 98 smart device. Turn off . 26 • The battery is exhausted. 26 Nikon Transfer 2 • The USB cable is not correctly connected. 100, does not start Nikon Transfer 2 103 computer. Wi-Fi Problem Cause/Solution A SSID (network Select Connect to smart device in ViewNX 2. connected to a • The computer is not set to print images when Auto is...
... paper size with camera. Replace the memory card. • Remove the memory card to enter connection standby displayed on the mode. 98 smart device. Turn off . 26 • The battery is exhausted. 26 Nikon Transfer 2 • The USB cable is not correctly connected. 100, does not start Nikon Transfer 2 103 computer. Wi-Fi Problem Cause/Solution A SSID (network Select Connect to smart device in ViewNX 2. connected to a • The computer is not set to print images when Auto is...


