P100 User's Manual
Page 4
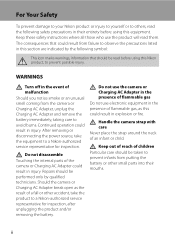
.... Keep out of reach of a fall or other small parts into their entirety before using this Nikon product, to prevent possible injury. Should the camera or Charging AC Adapter break open as this section are indicated by qualified technicians. ii The consequences that should ... removing or disconnecting the power source, take the product to a Nikon-authorized service representative for inspection. Handle the camera strap with care Never place the strap around the neck of the camera or Charging AC Adapter could result from failure to observe the precautions listed in...
.... Keep out of reach of a fall or other small parts into their entirety before using this Nikon product, to prevent possible injury. Should the camera or Charging AC Adapter break open as this section are indicated by qualified technicians. ii The consequences that should ... removing or disconnecting the power source, take the product to a Nikon-authorized service representative for inspection. Handle the camera strap with care Never place the strap around the neck of the camera or Charging AC Adapter could result from failure to observe the precautions listed in...
P100 User's Manual
Page 5
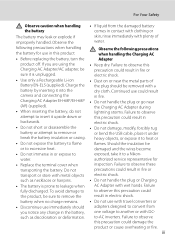
... use could result in or expose to exposed, take it to a Nikon- authorized service representative for use immediately should be or to flame flames. such as discoloration or deformation. iii Failure to observe this Charging AC Adapter/AC adapter, be sure to remove the AC Adapter with DCto...-AC inverters. damaged and the wires become • Do not immerse in electric shock. Charge the battery by inserting it into the camera and connecting the Charging AC Adapter EH-68P/EH-68P (AR) (supplied). • When inserting the battery, do not attempt to...
... use could result in or expose to exposed, take it to a Nikon- authorized service representative for use immediately should be or to flame flames. such as discoloration or deformation. iii Failure to observe this Charging AC Adapter/AC adapter, be sure to remove the AC Adapter with DCto...-AC inverters. damaged and the wires become • Do not immerse in electric shock. Charge the battery by inserting it into the camera and connecting the Charging AC Adapter EH-68P/EH-68P (AR) (supplied). • When inserting the battery, do not attempt to...
P100 User's Manual
Page 9
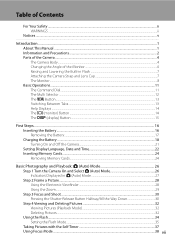
... Displays ...14 The x (monitor) Button ...14 The s (display) Button ...15 First Steps ...16 Inserting the Battery ...16 Removing the Battery...17 Charging the Battery ...18 Turning On and Off the Camera...21 Setting Display Language, Date and Time 22 Inserting Memory Cards...24 Removing Memory Cards...24 Basic Photography and Playback: A (Auto...
... Displays ...14 The x (monitor) Button ...14 The s (display) Button ...15 First Steps ...16 Inserting the Battery ...16 Removing the Battery...17 Charging the Battery ...18 Turning On and Off the Camera...21 Setting Display Language, Date and Time 22 Inserting Memory Cards...24 Removing Memory Cards...24 Basic Photography and Playback: A (Auto...
P100 User's Manual
Page 12
Table of Contents Transferring Pictures from a Camera to a Computer 141 Charging While Connecting to a Computer 145 Connecting to a Printer...146 Connecting the Camera and Printer...147 Printing Pictures One at a Time...148 Printing Multiple Pictures ...149 Basic Camera Setup ...152 Setup Menu...152 c Welcome Screen...Card 166 n Language...167 H TV Settings...167 V Charge by Computer ...168 d Blink Warning...169 p Reset All...171 P Reset file numbering...174 r Firmware Version...174 Caring for the Camera...175 Caring for the Camera ...175 Cleaning ...177 Storage ...178 Technical Notes and ...
Table of Contents Transferring Pictures from a Camera to a Computer 141 Charging While Connecting to a Computer 145 Connecting to a Printer...146 Connecting the Camera and Printer...147 Printing Pictures One at a Time...148 Printing Multiple Pictures ...149 Basic Camera Setup ...152 Setup Menu...152 c Welcome Screen...Card 166 n Language...167 H TV Settings...167 V Charge by Computer ...168 d Blink Warning...169 p Reset All...171 P Reset file numbering...174 r Firmware Version...174 Caring for the Camera...175 Caring for the Camera ...175 Cleaning ...177 Storage ...178 Technical Notes and ...
P100 User's Manual
Page 14
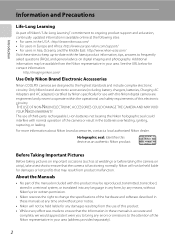
...Learning As part of this electronic circuitry. Only Nikon brand electronic accessories (including battery chargers, batteries, Charging AC Adapters and AC adapters) certified by Nikon specifically for use with this Nikon digital camera are designed to the highest standards and include ... information: http://imaging.nikon.com/ Use Only Nikon Brand Electronic Accessories Nikon COOLPIX cameras are engineered and proven to operate within the operational and safety requirements of Nikon's "Life-Long Learning" commitment to -date with normal operation of the Nikon representative in your area...
...Learning As part of this electronic circuitry. Only Nikon brand electronic accessories (including battery chargers, batteries, Charging AC Adapters and AC adapters) certified by Nikon specifically for use with this Nikon digital camera are designed to the highest standards and include ... information: http://imaging.nikon.com/ Use Only Nikon Brand Electronic Accessories Nikon COOLPIX cameras are engineered and proven to operate within the operational and safety requirements of Nikon's "Life-Long Learning" commitment to -date with normal operation of the Nikon representative in your area...
P100 User's Manual
Page 28
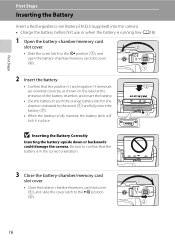
... in place. B Inserting the Battery Correctly Inserting the battery upside down or backwards could damage the camera. First Steps First Steps Inserting the Battery Insert a Rechargeable Li-ion Battery EN-EL5 (supplied) into the camera. • Charge the battery before first use or when the battery is running low (A18). 1 Open the battery...
... in place. B Inserting the Battery Correctly Inserting the battery upside down or backwards could damage the camera. First Steps First Steps Inserting the Battery Insert a Rechargeable Li-ion Battery EN-EL5 (supplied) into the camera. • Charge the battery before first use or when the battery is running low (A18). 1 Open the battery...
P100 User's Manual
Page 30
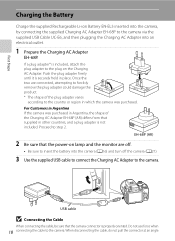
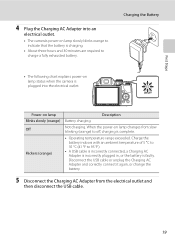
... supplied Rechargeable Li-ion Battery EN-EL5 inserted into the camera, by connecting the supplied Charging AC Adapter EH-68P to step 2. Proceed to the camera via the supplied USB Cable UC-E6, and then plugging the Charging AC Adapter into the camera (A16) and turn off . • Be sure to ... adapter to forcibly remove the plug adapter could damage the product. * The shape of the Charging AC Adapter EH-68P (AR) differs from that the camera connector is securely held in which the camera was purchased in Argentina, the shape of the plug adapter varies according to the country or...
... supplied Rechargeable Li-ion Battery EN-EL5 inserted into the camera, by connecting the supplied Charging AC Adapter EH-68P to step 2. Proceed to the camera via the supplied USB Cable UC-E6, and then plugging the Charging AC Adapter into the camera (A16) and turn off . • Be sure to ... adapter to forcibly remove the plug adapter could damage the product. * The shape of the Charging AC Adapter EH-68P (AR) differs from that the camera connector is securely held in which the camera was purchased in Argentina, the shape of the plug adapter varies according to the country or...
P100 User's Manual
Page 31
.... 19 Flickers (orange) • Operating temperature range exceeded. Off Not charging. Charging the Battery • The following chart explains power-on lamp status when the camera is plugged into an electrical outlet. • The camera's power-on lamp Description Blinks slowly (orange) Battery charging. Power-on lamp slowly blinks orange to indicate that the battery...
.... 19 Flickers (orange) • Operating temperature range exceeded. Off Not charging. Charging the Battery • The following chart explains power-on lamp status when the camera is plugged into an electrical outlet. • The camera's power-on lamp Description Blinks slowly (orange) Battery charging. Power-on lamp slowly blinks orange to indicate that the battery...
P100 User's Manual
Page 32
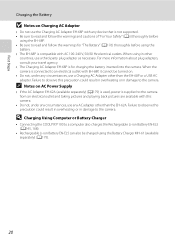
... in overheating or in damage to read and follow the warnings for charging the battery inserted into the camera. D Charging Using Computer or Battery Charger • Connecting the COOLPIX P100 to the camera. For more information about plug adapters, consult your travel agency. • The Charging AC Adapter EH-68P is for "The Battery" (A176) thoroughly before...
... in overheating or in damage to read and follow the warnings for charging the battery inserted into the camera. D Charging Using Computer or Battery Charger • Connecting the COOLPIX P100 to the camera. For more information about plug adapters, consult your travel agency. • The Charging AC Adapter EH-68P is for "The Battery" (A176) thoroughly before...
P100 User's Manual
Page 33
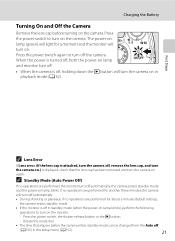
Charging the Battery Turning On and Off the Camera Remove the lens cap before the camera enters standby mode can be changed from the Auto off the camera. Press the power switch to turn on the monitor. - Press the power switch again to turn the camera on again. When the power ...moment and the monitor will turn off automatically. • During shooting or playback, if no operations are performed for about a minute (default setting), the camera enters standby mode. • If the monitor is off, holding down the c button will turn off (A165) in playback mode (A32). Press ...
Charging the Battery Turning On and Off the Camera Remove the lens cap before the camera enters standby mode can be changed from the Auto off the camera. Press the power switch to turn on the monitor. - Press the power switch again to turn the camera on again. When the power ...moment and the monitor will turn off automatically. • During shooting or playback, if no operations are performed for about a minute (default setting), the camera enters standby mode. • If the monitor is off, holding down the c button will turn off (A165) in playback mode (A32). Press ...

P100 User's Manual
Page 38
... remaining capacity of the internal memory or memory card, the image quality, and the image size (A77). 26 Recharge or replace with a fully-charged battery. The number of pictures that can be stored depends on . 2 Rotate the mode dial to A. B Battery level low; N Battery exhausted. prepare...3 Check the battery level and number of exposures remaining in A (auto) mode, an automatic, "pointand-shoot" mode recommended for first-time users of digital cameras. 1 Remove the lens cap and press the power switch. • The power will be turned on, and the lens will extend. • The power...
... remaining capacity of the internal memory or memory card, the image quality, and the image size (A77). 26 Recharge or replace with a fully-charged battery. The number of pictures that can be stored depends on . 2 Rotate the mode dial to A. B Battery level low; N Battery exhausted. prepare...3 Check the battery level and number of exposures remaining in A (auto) mode, an automatic, "pointand-shoot" mode recommended for first-time users of digital cameras. 1 Remove the lens cap and press the power switch. • The power will be turned on, and the lens will extend. • The power...
P100 User's Manual
Page 48
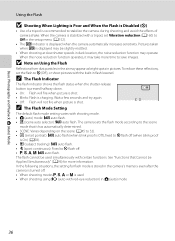
... Off in the setup menu (A152). • The E indicator is charging. Wait a few seconds and try again. • Off: Flash will fire when picture is shot. • Blinks: Flash is displayed when the camera automatically increases sensitivity. Pictures taken when E is shot. C The Flash ..., the noise reduction function may take more information. The flash cannot be Applied Simultaneously" (A96) for flash mode is stored in the camera's memory even after the camera is turned off . • A, B, C, D: U auto flash. See "Functions that it may operate. When the noise reduction ...
... Off in the setup menu (A152). • The E indicator is charging. Wait a few seconds and try again. • Off: Flash will fire when picture is shot. • Blinks: Flash is displayed when the camera automatically increases sensitivity. Pictures taken when E is shot. C The Flash ..., the noise reduction function may take more information. The flash cannot be Applied Simultaneously" (A96) for flash mode is stored in the camera's memory even after the camera is turned off . • A, B, C, D: U auto flash. See "Functions that it may operate. When the noise reduction ...

P100 User's Manual
Page 100
...under any circumstances, use the AC Adapter EH-62A (available separately from Nikon). D More Information 88 See "File and Folder Names" (A181) for... of frames have been recorded. Failure to observe this precaution could result in overheating or in damage to the camera. • Do not rotate the mode dial to a different setting while performing interval timer shooting. Shooting Options... on Interval Timer Shooting • To prevent the camera from turning off unexpectedly during recording, use a fully charged battery. • To power the camera continuously for more information.
...under any circumstances, use the AC Adapter EH-62A (available separately from Nikon). D More Information 88 See "File and Folder Names" (A181) for... of frames have been recorded. Failure to observe this precaution could result in overheating or in damage to the camera. • Do not rotate the mode dial to a different setting while performing interval timer shooting. Shooting Options... on Interval Timer Shooting • To prevent the camera from turning off unexpectedly during recording, use a fully charged battery. • To power the camera continuously for more information.
P100 User's Manual
Page 152
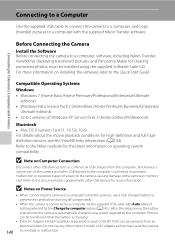
... playback conditions for creating panorama photos, must be powered from turning off unexpectedly. • When the camera is used, COOLPIX P100 can be transferred while the battery is charging. • If the AC Adapter EH-62A (available separately) is connected to transfer pictures, use ... to the computer could result in the setup menu, the battery inserted into the camera is automatically charged using the supplied Software Suite CD. Refer to a computer, software, including Nikon Transfer, ViewNX for displaying transferred pictures, and Panorama Maker for high-definition and full...
... playback conditions for creating panorama photos, must be powered from turning off unexpectedly. • When the camera is used, COOLPIX P100 can be transferred while the battery is charging. • If the AC Adapter EH-62A (available separately) is connected to transfer pictures, use ... to the computer could result in the setup menu, the battery inserted into the camera is automatically charged using the supplied Software Suite CD. Refer to a computer, software, including Nikon Transfer, ViewNX for displaying transferred pictures, and Panorama Maker for high-definition and full...

P100 User's Manual
Page 154
... starts to charge the camera battery, wait until the battery level rises. • If there are a large number of the battery in the camera is displayed, click Change program under Import pictures and videos. Connecting to Televisions, Computers and Printers Connecting to a Computer 4 Start Nikon Transfer installed ...images on the memory card, it may take some time for Nikon Transfer to a folder on the computer. • Windows 7 When the Devices and Printers K P100 screen is low, the computer may not recognize the camera and it may not be possible to transfer pictures. Select Copy...
... starts to charge the camera battery, wait until the battery level rises. • If there are a large number of the battery in the camera is displayed, click Change program under Import pictures and videos. Connecting to Televisions, Computers and Printers Connecting to a Computer 4 Start Nikon Transfer installed ...images on the memory card, it may take some time for Nikon Transfer to a folder on the computer. • Windows 7 When the Devices and Printers K P100 screen is low, the computer may not recognize the camera and it may not be possible to transfer pictures. Select Copy...
P100 User's Manual
Page 155
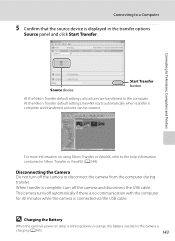
... is connected via the USB cable. For more information on lamp is charging (A145). 143 P100 P100 Source device Start Transfer button At the Nikon Transfer default settings, all pictures are transferred to the computer. Disconnecting the Camera Do not turn off the camera and disconnect the USB cable. When transfer is complete, turn off automatically...
... is connected via the USB cable. For more information on lamp is charging (A145). 143 P100 P100 Source device Start Transfer button At the Nikon Transfer default settings, all pictures are transferred to the computer. Disconnecting the Camera Do not turn off the camera and disconnect the USB cable. When transfer is complete, turn off automatically...
P100 User's Manual
Page 157
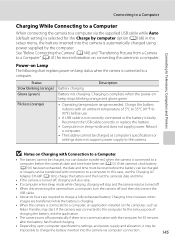
... can data be transferred, when the camera is automatically charged using power supplied by the computer. See "Before Connecting the Camera" (A140) and "Transferring Pictures from a computer, turn the camera off , charging will also stop. • If a computer enters sleep mode while charging, charging will stop and the camera may be charged as Nikon Transfer, may start. Power-on Lamp...
... can data be transferred, when the camera is automatically charged using power supplied by the computer. See "Before Connecting the Camera" (A140) and "Transferring Pictures from a computer, turn the camera off , charging will also stop. • If a computer enters sleep mode while charging, charging will stop and the camera may be charged as Nikon Transfer, may start. Power-on Lamp...

P100 User's Manual
Page 158
... a time (A148) Print multiple pictures (A149) Turn camera off unexpectedly. • The AC Adapter EH-62A (available separately from Nikon) can connect the camera directly to the printer and print pictures without using a computer. Do not, under any circumstances, use a fully charged battery to prevent the camera from turning off and disconnect USB cable B Notes...
... a time (A148) Print multiple pictures (A149) Turn camera off unexpectedly. • The AC Adapter EH-62A (available separately from Nikon) can connect the camera directly to the printer and print pictures without using a computer. Do not, under any circumstances, use a fully charged battery to prevent the camera from turning off and disconnect USB cable B Notes...
P100 User's Manual
Page 159
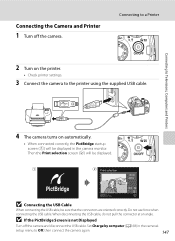
..., do not pull the connector at an angle. Then the Print selection screen (2) will be sure that the connectors are oriented correctly. Set Charge by computer (A168) in the camera's setup menu to a Printer 2 Turn on automatically. • When connected correctly, the PictBridge startup screen (1) will be displayed. 1 2 Print selection 15/05...
..., do not pull the connector at an angle. Then the Print selection screen (2) will be sure that the connectors are oriented correctly. Set Charge by computer (A168) in the camera's setup menu to a Printer 2 Turn on automatically. • When connected correctly, the PictBridge startup screen (1) will be displayed. 1 2 Print selection 15/05...
P100 User's Manual
Page 164
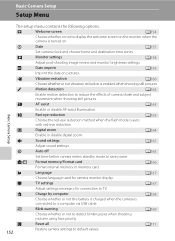
... reduction method when the flash mode is enabled when shooting still pictures. V Charge by computer A168 Choose whether or not the battery is charged when the camera is turned on. d Date A155 Set camera clock and choose home and destination time zones. u Digital zoom A164 Enable ...or disable digital zoom. f Date imprint A159 Imprint the date on the monitor when the camera is connected to ...
... reduction method when the flash mode is enabled when shooting still pictures. V Charge by computer A168 Choose whether or not the battery is charged when the camera is turned on. d Date A155 Set camera clock and choose home and destination time zones. u Digital zoom A164 Enable ...or disable digital zoom. f Date imprint A159 Imprint the date on the monitor when the camera is connected to ...


