P100 User's Manual
Page 9
... Display Language, Date and Time 22 Inserting Memory Cards...24 Removing Memory Cards...24 Basic Photography and Playback: A (Auto) Mode 26 Step 1 Turn the Camera On and Select A (Auto) Mode 26 Indicators Displayed in A (Auto) Mode 27 Step 2 Frame a Picture...28 Using the Electronic Viewfinder ...28 Using the Zoom...29 Step 3 Focus and Shoot ...30 Pressing the Shutter-Release Button Halfway/All the Way Down 30 Step 4 Viewing and Deleting Pictures 32 Viewing Pictures (Playback Mode) ...32 Deleting Pictures...32 Using the Flash...34 Setting the Flash Mode...35 Taking Pictures with the Self...
... Display Language, Date and Time 22 Inserting Memory Cards...24 Removing Memory Cards...24 Basic Photography and Playback: A (Auto) Mode 26 Step 1 Turn the Camera On and Select A (Auto) Mode 26 Indicators Displayed in A (Auto) Mode 27 Step 2 Frame a Picture...28 Using the Electronic Viewfinder ...28 Using the Zoom...29 Step 3 Focus and Shoot ...30 Pressing the Shutter-Release Button Halfway/All the Way Down 30 Step 4 Viewing and Deleting Pictures 32 Viewing Pictures (Playback Mode) ...32 Deleting Pictures...32 Using the Flash...34 Setting the Flash Mode...35 Taking Pictures with the Self...
P100 User's Manual
Page 11
... of Contents Viewing Continuously Shot Pictures (Pictures in a sequence 102 Viewing Multiple Pictures: Thumbnail Playback 104 Calendar display ...105 Taking a Closer Look: Playback Zoom 106 Playback Options: Playback Menu 107 a Print Set: Setting the Pictures and Number of Copies to Print 108 b Slide Show...110 c Delete: Deleting Multiple Pictures 111 d Protect ...113 f Rotate Image...114 i Hide Image...114 h Copy: Copying Between the Internal Memory and Memory Card 115 C Sequence Display Options...116 C Choose Key Picture...116 Voice Memos: Recording and Playback 117 Recording Voice...
... of Contents Viewing Continuously Shot Pictures (Pictures in a sequence 102 Viewing Multiple Pictures: Thumbnail Playback 104 Calendar display ...105 Taking a Closer Look: Playback Zoom 106 Playback Options: Playback Menu 107 a Print Set: Setting the Pictures and Number of Copies to Print 108 b Slide Show...110 c Delete: Deleting Multiple Pictures 111 d Protect ...113 f Rotate Image...114 i Hide Image...114 h Copy: Copying Between the Internal Memory and Memory Card 115 C Sequence Display Options...116 C Choose Key Picture...116 Voice Memos: Recording and Playback 117 Recording Voice...

P100 User's Manual
Page 13
... "default setting". • The names of menu items displayed in the camera monitor, and the names of buttons or messages displayed in a computer monitor are sometimes omitted from actual display. If a memory card is inserted, all those who use , to prevent damage to help you for your Nikon digital camera. Screen Samples In this manual thoroughly before using the camera. This icon indicates that monitor indicators can be stored on the memory card and delete, playback, and format operations...
... "default setting". • The names of menu items displayed in the camera monitor, and the names of buttons or messages displayed in a computer monitor are sometimes omitted from actual display. If a memory card is inserted, all those who use , to prevent damage to help you for your Nikon digital camera. Screen Samples In this manual thoroughly before using the camera. This icon indicates that monitor indicators can be stored on the memory card and delete, playback, and format operations...
P100 User's Manual
Page 24
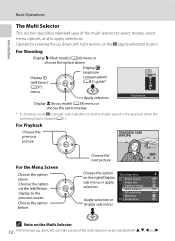
... For the Menu Screen Choose the option above Display o (exposure Display n (self-timer) compensation) (A41) guide* (A37) menu Apply selection Flash mode Display D (focus mode) (A38) menu or choose the option below Choose the next picture 44 Choose the option on the right/Display sub-menu or apply selection Apply selection or display sub-menu Shooting menu Image quality Image size Optimize image White balance ISO sensitivity Metering Continuous C Note on the left , right section, or the k (apply selection) button. Operate by...
... For the Menu Screen Choose the option above Display o (exposure Display n (self-timer) compensation) (A41) guide* (A37) menu Apply selection Flash mode Display D (focus mode) (A38) menu or choose the option below Choose the next picture 44 Choose the option on the right/Display sub-menu or apply selection Apply selection or display sub-menu Shooting menu Image quality Image size Optimize image White balance ISO sensitivity Metering Continuous C Note on the left , right section, or the k (apply selection) button. Operate by...
P100 User's Manual
Page 33
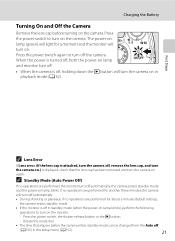
... (green) will light for about a minute (default setting), the camera enters standby mode. • If the monitor is displayed, check that elapses before turning on lamp blinks. Press the power switch to turn off , holding down the c button will turn off. • When the camera is off the camera. Rotate the mode dial. • The time that the lens cap has been removed and turn on . Charging the Battery Turning On and Off the Camera Remove...
... (green) will light for about a minute (default setting), the camera enters standby mode. • If the monitor is displayed, check that elapses before turning on lamp blinks. Press the power switch to turn off , holding down the c button will turn off. • When the camera is off the camera. Rotate the mode dial. • The time that the lens cap has been removed and turn on . Charging the Battery Turning On and Off the Camera Remove...
P100 User's Manual
Page 39
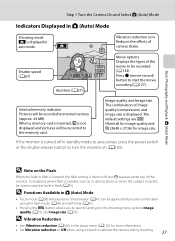
... Image size (A76). Internal memory indicator Pictures will be recorded to be recorded to start the movie recording (A127). In situations where flash is needed, such as in flash is lowered, the flash setting is fixed to specify settings for image size. If the monitor is turned off and W appears at the top of the movie to the memory card. Basic Photography and Playback: A (Auto) Mode Step 1 Turn the Camera On and Select A (Auto) Mode Indicators Displayed in A (Auto) Mode Shooting mode A is displayed in flash (A35). Image quality and Image size...
... Image size (A76). Internal memory indicator Pictures will be recorded to be recorded to start the movie recording (A127). In situations where flash is needed, such as in flash is lowered, the flash setting is fixed to specify settings for image size. If the monitor is turned off and W appears at the top of the movie to the memory card. Basic Photography and Playback: A (Auto) Mode Step 1 Turn the Camera On and Select A (Auto) Mode Indicators Displayed in A (Auto) Mode Shooting mode A is displayed in flash (A35). Image quality and Image size...
P100 User's Manual
Page 48
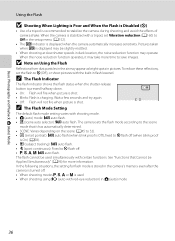
... more time to the scene mode that Cannot be used • When shooting using V (auto with a tripod, set the flash to W flash off . • When shooting modes A, B, C or D is turned off . • A, B, C, D: U auto flash. Pictures taken when E is displayed may be slightly mottled. • When shooting at slow shutter speeds in dark location, the noise reduction function may appear as bright spots in the setup menu (A152). • The E indicator is stabilized with red-eye...
... more time to the scene mode that Cannot be used • When shooting using V (auto with a tripod, set the flash to W flash off . • When shooting modes A, B, C or D is turned off . • A, B, C, D: U auto flash. Pictures taken when E is displayed may be slightly mottled. • When shooting at slow shutter speeds in dark location, the noise reduction function may appear as bright spots in the setup menu (A152). • The E indicator is stabilized with red-eye...

P100 User's Manual
Page 49
...-second timer. When using the self-timer, use of yourself, such as in group souvenir shots, or if you want to reduce camera shake when you press the shutter-release button. The selftimer lamp will be cancelled. 3 Frame the picture and press the shutter-release button halfway. • Focus and exposure will blink. When the camera is stabilized with the Self-Timer The self-timer is useful for self-timer is displayed. • If a setting...
...-second timer. When using the self-timer, use of yourself, such as in group souvenir shots, or if you want to reduce camera shake when you press the shutter-release button. The selftimer lamp will be cancelled. 3 Frame the picture and press the shutter-release button halfway. • Focus and exposure will blink. When the camera is stabilized with the Self-Timer The self-timer is useful for self-timer is displayed. • If a setting...
P100 User's Manual
Page 76
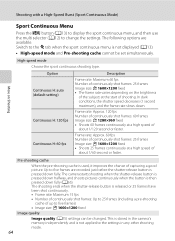
... continuous menu is pressed down . Shooting with a High-Speed Burst (Sport Continuous Mode) More on the brightness of the subject at a high speed of about 1/60 second or faster. Frame rate: Approx. 60 fps Number of continuously shot frames: 25 frames Image size: B 1600×1200 fixed • Shoots 25 frames continuously at a high speed of shooting. The following options are recorded just before the shutter-release button is not displayed...
... continuous menu is pressed down . Shooting with a High-Speed Burst (Sport Continuous Mode) More on the brightness of the subject at a high speed of about 1/60 second or faster. Frame rate: Approx. 60 fps Number of continuously shot frames: 25 frames Image size: B 1600×1200 fixed • Shoots 25 frames continuously at a high speed of shooting. The following options are recorded just before the shutter-release button is not displayed...
P100 User's Manual
Page 86
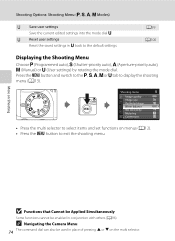
...; Press the d button to display the shooting menu (A13). Shooting menu Image quality Image size Optimize image White balance ISO sensitivity Metering Continuous • Press the multi selector to select items and set functions on Shooting B Functions that Cannot be Applied Simultaneously Some functions cannot be used in M back to the default settings. A99 A100 Displaying the Shooting Menu Choose A (Programmed auto), B (Shutter-priority auto), C (Aperture-priority auto), D (Manual) or M (User settings) by rotating the mode dial. Press the d button and switch to the A, B, C, D or...
...; Press the d button to display the shooting menu (A13). Shooting menu Image quality Image size Optimize image White balance ISO sensitivity Metering Continuous • Press the multi selector to select items and set functions on Shooting B Functions that Cannot be Applied Simultaneously Some functions cannot be used in M back to the default settings. A99 A100 Displaying the Shooting Menu Choose A (Programmed auto), B (Shutter-priority auto), C (Aperture-priority auto), D (Manual) or M (User settings) by rotating the mode dial. Press the d button and switch to the A, B, C, D or...
P100 User's Manual
Page 88
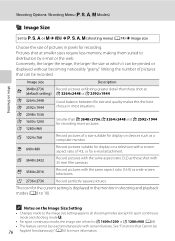
...-screen televisions. See "Functions that can be printed or displayed without becoming noticeably "grainy," limiting the number of pictures in pixels for recording. Pictures shot at E 3264×2448 or D 2592×1944. H 2736×2736 Record perfectly square pictures. C Notes on Shooting Shooting Options: Shooting Menu (A, B, C, D Modes) r Image Size Set to A, B, C or D M d M A, B, C, D (shooting menu) (A74) M Image size Choose the size of pictures that Cannot be 76 Applied Simultaneously" (A96) for more pictures. More on the Image Size Setting...
...-screen televisions. See "Functions that can be printed or displayed without becoming noticeably "grainy," limiting the number of pictures in pixels for recording. Pictures shot at E 3264×2448 or D 2592×1944. H 2736×2736 Record perfectly square pictures. C Notes on Shooting Shooting Options: Shooting Menu (A, B, C, D Modes) r Image Size Set to A, B, C or D M d M A, B, C, D (shooting menu) (A74) M Image size Choose the size of pictures that Cannot be 76 Applied Simultaneously" (A96) for more pictures. More on the Image Size Setting...

P100 User's Manual
Page 119
... retouched images in playback menu. h Copy A115 Copy files between memory card and internal memory. c Delete A111 Delete a picture. a Print set Slide show . g Small picture A124 Create a small copy of copies for the series of pictures that were shot continuously (Pictures in an automatic slide show Delete Protect • Press the multi selector to displaying the key picture only. C Choose key picture A116 Change the key picture for each. j Black border A125 Create a new picture surrounded by pressing the d button and switching to...
... retouched images in playback menu. h Copy A115 Copy files between memory card and internal memory. c Delete A111 Delete a picture. a Print set Slide show . g Small picture A124 Create a small copy of copies for the series of pictures that were shot continuously (Pictures in an automatic slide show Delete Protect • Press the multi selector to displaying the key picture only. C Choose key picture A116 Change the key picture for each. j Black border A125 Create a new picture surrounded by pressing the d button and switching to...
P100 User's Manual
Page 152
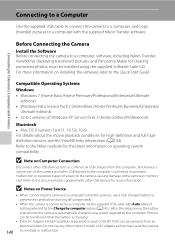
...of AC adapter as commercial USB chargers from an electrical outlet. Do not use a fully charged battery to the camera or memory card. Simultaneous connection of the camera and other USB devices for more information on operating system compatibility. Connecting to Televisions, Computers and Printers Connecting to a Computer Use the supplied USB cable to connect the camera to a computer, and copy (transfer) pictures to a computer, software, including Nikon Transfer, ViewNX for displaying transferred pictures, and Panorama Maker for creating panorama photos, must be powered from...
...of AC adapter as commercial USB chargers from an electrical outlet. Do not use a fully charged battery to the camera or memory card. Simultaneous connection of the camera and other USB devices for more information on operating system compatibility. Connecting to Televisions, Computers and Printers Connecting to a Computer Use the supplied USB cable to connect the camera to a computer, and copy (transfer) pictures to a computer, software, including Nikon Transfer, ViewNX for displaying transferred pictures, and Panorama Maker for creating panorama photos, must be powered from...
P100 User's Manual
Page 157
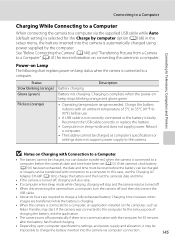
...'s specifications or settings does not support power supply to a computer. Connecting to Televisions, Computers and Printers Connecting to a Computer Charging While Connecting to a Computer When connecting the camera to a computer via computer connection. 145 If the camera's clock battery (A156) has been exhausted, the date and time must be reset before the battery can be charged or images can data be impossible to charge the battery inserted into the camera via the supplied USB cable while Auto (default setting...
...'s specifications or settings does not support power supply to a computer. Connecting to Televisions, Computers and Printers Connecting to a Computer Charging While Connecting to a Computer When connecting the camera to a computer via computer connection. 145 If the camera's clock battery (A156) has been exhausted, the date and time must be reset before the battery can be charged or images can data be impossible to charge the battery inserted into the camera via the supplied USB cable while Auto (default setting...

P100 User's Manual
Page 196
...;2736 • Pictures created with movies. Check results in the picture just taken. Memory card is insufficient space to a 25 in this camera. Someone may have had their eyes closed when the picture was detected in playback mode. 58 N Image cannot be saved. N Out of Replace the memory card, or format file numbers. Error Messages Display P Card is any data on the memory card will be deleted when formatted. Format card? If there is not formatted. To format the memory card, select Yes...
...;2736 • Pictures created with movies. Check results in the picture just taken. Memory card is insufficient space to a 25 in this camera. Someone may have had their eyes closed when the picture was detected in playback mode. 58 N Image cannot be saved. N Out of Replace the memory card, or format file numbers. Error Messages Display P Card is any data on the memory card will be deleted when formatted. Format card? If there is not formatted. To format the memory card, select Yes...
P100 User's Manual
Page 200
...; Standby mode for more information. While displaying image deletion screens 32, 33 • You cannot switch the display while displaying a certain 183 error message. off until the inside of the camera has cooled. • Battery is cold. 176 • The camera turns off if it is connected to the Charging AC 18 Adapter while it is turned on while connected to an 20 electrical outlet via USB cable. 140 • Camera and...
...; Standby mode for more information. While displaying image deletion screens 32, 33 • You cannot switch the display while displaying a certain 183 error message. off until the inside of the camera has cooled. • Battery is cold. 176 • The camera turns off if it is connected to the Charging AC 18 Adapter while it is turned on while connected to an 20 electrical outlet via USB cable. 140 • Camera and...
P100 User's Manual
Page 201
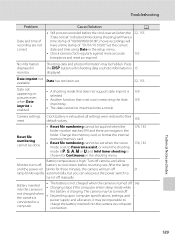
... turns off, battery to cool down before the clock was set (when the 22, 155 "Date not set now is restricting the date 159 imprinting. • The date cannot be impossible to charge the battery inserted into the camera is not charged when the camera is connected to Panorama assist, or when the shooting mode is A, B, C, D or M and Intvl timer shooting is 15 displayed. Change the memory card, or format the internal memory/memory card. • Reset file numbering cannot be set...
... turns off, battery to cool down before the clock was set (when the 22, 155 "Date not set now is restricting the date 159 imprinting. • The date cannot be impossible to charge the battery inserted into the camera is not charged when the camera is connected to Panorama assist, or when the shooting mode is A, B, C, D or M and Intvl timer shooting is 15 displayed. Change the memory card, or format the internal memory/memory card. • Reset file numbering cannot be set...
P100 User's Manual
Page 202
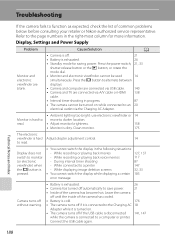
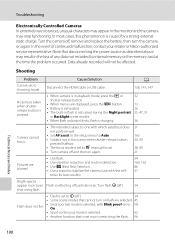
... , remove and replace the battery, then turn on again. Data already recorded will not be affected. Shooting Problem Cause/Solution A Cannot set to shooting mode Disconnect the HDMI cable or USB cable. 138, 141, 147 No picture taken when shutterrelease button is pressed. • When camera is in playback mode, press the c or shutter-release button. • When menus are selected. 45 Flash does not fire. • Smart portrait mode is selected, with the self- Turn...
... , remove and replace the battery, then turn on again. Data already recorded will not be affected. Shooting Problem Cause/Solution A Cannot set to shooting mode Disconnect the HDMI cable or USB cable. 138, 141, 147 No picture taken when shutterrelease button is pressed. • When camera is in playback mode, press the c or shutter-release button. • When menus are selected. 45 Flash does not fire. • Smart portrait mode is selected, with the self- Turn...
P100 User's Manual
Page 205
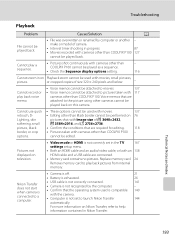
... timer shooting in on Nikon Transfer, refer to help information contained in the TV 167 settings setup menu. • Both an HDMI cable and an audio/video cable, or both an 138 HDMI cable and a USB cable are attached to launch Nikon Transfer automatically. 141 - 140 144 For more information on picture. Technical Notes and Index 193 options. Playback zoom cannot be used with cameras other than COOLPIX P100 - Replace memory card. 24 Remove memory card to play a sequence. • Pictures shot continuously...
... timer shooting in on Nikon Transfer, refer to help information contained in the TV 167 settings setup menu. • Both an HDMI cable and an audio/video cable, or both an 138 HDMI cable and a USB cable are attached to launch Nikon Transfer automatically. 141 - 140 144 For more information on picture. Technical Notes and Index 193 options. Playback zoom cannot be used with cameras other than COOLPIX P100 - Replace memory card. 24 Remove memory card to play a sequence. • Pictures shot continuously...
P100 User's Manual
Page 213
... Print set 108 Print Set Date Option 109 Printer 146 Programmed auto mode 68 Protect 113 Q Quick retouch 120 R Rear-curtain sync 34 Rechargeable battery 179 Recording 127 Recording slow motion movies 130 Red-eye reduction 34, 163 Reset all 171 Reset file numbering 174 Index Resetting Saved Settings 100 Rotate image 114 RSCN 181 S Saturation 80 Save to user setting 99 Scene auto selector 43 Scene mode 45 Self-timer 37 Self-timer lamp 37, 55 Sequence display options 116 Setup menu 152 Shooting 26, 42 Shooting menu...
... Print set 108 Print Set Date Option 109 Printer 146 Programmed auto mode 68 Protect 113 Q Quick retouch 120 R Rear-curtain sync 34 Rechargeable battery 179 Recording 127 Recording slow motion movies 130 Red-eye reduction 34, 163 Reset all 171 Reset file numbering 174 Index Resetting Saved Settings 100 Rotate image 114 RSCN 181 S Saturation 80 Save to user setting 99 Scene auto selector 43 Scene mode 45 Self-timer 37 Self-timer lamp 37, 55 Sequence display options 116 Setup menu 152 Shooting 26, 42 Shooting menu...


