P100 User's Manual
Page 3
Introduction First Steps Basic Photography and Playback: A (Auto) Mode More on Shooting More on Playback Editing Pictures Movie Recording and Playback Connecting to Televisions, Computers and Printers Basic Camera Setup Caring for the Camera Technical Notes and Index i
Introduction First Steps Basic Photography and Playback: A (Auto) Mode More on Shooting More on Playback Editing Pictures Movie Recording and Playback Connecting to Televisions, Computers and Printers Basic Camera Setup Caring for the Camera Technical Notes and Index i
P100 User's Manual
Page 4
...in injury. After removing or disconnecting the power source, take the product to a Nikon-authorized service representative for inspection. The consequences that could result in their mouths. Should the camera or Charging AC Adapter break open as this could result in this section are indicated... the battery immediately, taking care to avoid burns. Handle the camera strap with care Never place the strap around the neck of a fall or other small parts into their entirety before using this Nikon product, to prevent possible injury. Continued operation could result in...
...in injury. After removing or disconnecting the power source, take the product to a Nikon-authorized service representative for inspection. The consequences that could result in their mouths. Should the camera or Charging AC Adapter break open as this could result in this section are indicated... the battery immediately, taking care to avoid burns. Handle the camera strap with care Never place the strap around the neck of a fall or other small parts into their entirety before using this Nikon product, to prevent possible injury. Continued operation could result in...
P100 User's Manual
Page 5
... remove or or bend the USB cable, place it under break the battery insulation or casing. iii Charge the battery by inserting it into the camera and connecting the Charging AC Adapter EH-68P/EH-68P (AR) (supplied). • When inserting the battery, do not attempt to insert it is ... is unplugged. For Your Safety Observe caution when handling • If liquid from one voltage to another or with DCto-AC inverters. Failure to a Nikon- damaged and the wires become • Do not immerse in fire or electric shock. Do not transport or store with wet hands. Failure to observe...
... remove or or bend the USB cable, place it under break the battery insulation or casing. iii Charge the battery by inserting it into the camera and connecting the Charging AC Adapter EH-68P/EH-68P (AR) (supplied). • When inserting the battery, do not attempt to insert it is ... is unplugged. For Your Safety Observe caution when handling • If liquid from one voltage to another or with DCto-AC inverters. Failure to a Nikon- damaged and the wires become • Do not immerse in fire or electric shock. Do not transport or store with wet hands. Failure to observe...
P100 User's Manual
Page 6
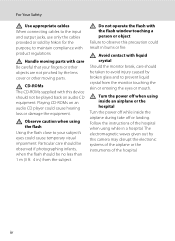
... iv For Your Safety Use appropriate cables When connecting cables to the input and output jacks, use only the cables provided or sold by Nikon for the purpose, to maintain compliance with care Be careful that your subject's eyes could cause temporary visual impairment. Avoid contact with liquid ...Playing CD-ROMs on audio CD equipment. The electromagnetic waves given out by the lens cover or other objects are not pinched by this camera may disrupt the electronic systems of the airplane or the instruments of the hospital when using inside an airplane or the hospital Turn the ...
... iv For Your Safety Use appropriate cables When connecting cables to the input and output jacks, use only the cables provided or sold by Nikon for the purpose, to maintain compliance with care Be careful that your subject's eyes could cause temporary visual impairment. Avoid contact with liquid ...Playing CD-ROMs on audio CD equipment. The electromagnetic waves given out by the lens cover or other objects are not pinched by this camera may disrupt the electronic systems of the airplane or the instruments of the hospital when using inside an airplane or the hospital Turn the ...
P100 User's Manual
Page 9
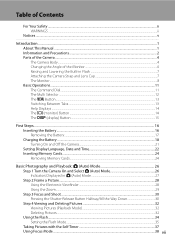
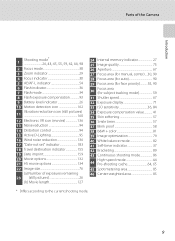
...(display) Button ...15 First Steps ...16 Inserting the Battery ...16 Removing the Battery...17 Charging the Battery ...18 Turning On and Off the Camera...21 Setting Display Language, Date and Time 22 Inserting Memory Cards...24 Removing Memory Cards...24 Basic Photography and Playback: A (Auto) Mode 26... Step 1 Turn the Camera On and Select A (Auto) Mode 26 Indicators Displayed in A (Auto) Mode 27 Step 2 Frame a Picture...28 Using the Electronic Viewfinder ...28...
...(display) Button ...15 First Steps ...16 Inserting the Battery ...16 Removing the Battery...17 Charging the Battery ...18 Turning On and Off the Camera...21 Setting Display Language, Date and Time 22 Inserting Memory Cards...24 Removing Memory Cards...24 Basic Photography and Playback: A (Auto) Mode 26... Step 1 Turn the Camera On and Select A (Auto) Mode 26 Indicators Displayed in A (Auto) Mode 27 Step 2 Frame a Picture...28 Using the Electronic Viewfinder ...28...
P100 User's Manual
Page 10
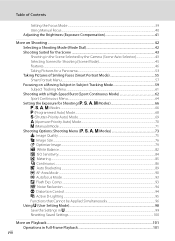
... Compensation 41 More on Shooting ...42 Selecting a Shooting Mode (Mode Dial 42 Shooting Suited for the Scene ...43 Shooting in the Scene Selected by the Camera (Scene Auto Selector 43 Selecting Scenes for Shooting (Scene Mode 45 Features...46 Taking Pictures for a Panorama ...53 Taking Pictures of Smiling Faces (Smart Portrait...
... Compensation 41 More on Shooting ...42 Selecting a Shooting Mode (Mode Dial 42 Shooting Suited for the Scene ...43 Shooting in the Scene Selected by the Camera (Scene Auto Selector 43 Selecting Scenes for Shooting (Scene Mode 45 Features...46 Taking Pictures for a Panorama ...53 Taking Pictures of Smiling Faces (Smart Portrait...
P100 User's Manual
Page 11
......136 Movie Playback ...137 Deleting Movie...137 Connecting to Televisions, Computers and Printers 138 Connecting to a TV...138 Connecting to a Computer...140 Before Connecting the Camera ...140 ix
......136 Movie Playback ...137 Deleting Movie...137 Connecting to Televisions, Computers and Printers 138 Connecting to a TV...138 Connecting to a Computer...140 Before Connecting the Camera ...140 ix
P100 User's Manual
Page 12
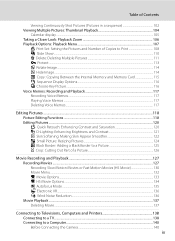
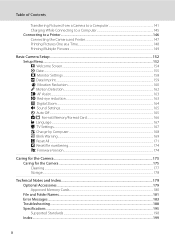
...a Computer 141 Charging While Connecting to a Computer 145 Connecting to a Printer...146 Connecting the Camera and Printer...147 Printing Pictures One at a Time...148 Printing Multiple Pictures ...149 Basic Camera Setup ...152 Setup Menu...152 c Welcome Screen...154 d Date ...155 e Monitor Settings...158 ... ...168 d Blink Warning...169 p Reset All...171 P Reset file numbering...174 r Firmware Version...174 Caring for the Camera...175 Caring for the Camera ...175 Cleaning ...177 Storage ...178 Technical Notes and Index ...179 Optional Accessories ...179 Approved Memory Cards ...180 File and...
...a Computer 141 Charging While Connecting to a Computer 145 Connecting to a Printer...146 Connecting the Camera and Printer...147 Printing Pictures One at a Time...148 Printing Multiple Pictures ...149 Basic Camera Setup ...152 Setup Menu...152 c Welcome Screen...154 d Date ...155 e Monitor Settings...158 ... ...168 d Blink Warning...169 p Reset All...171 P Reset file numbering...174 r Firmware Version...174 Caring for the Camera...175 Caring for the Camera ...175 Cleaning ...177 Storage ...178 Technical Notes and Index ...179 Optional Accessories ...179 Approved Memory Cards ...180 File and...

P100 User's Manual
Page 13
... manual may be helpful when using the camera. C Memory Cards Pictures taken with your purchase of Nikon COOLPIX P100 digital camera. The memory card must be removed before using the camera. Introduction Introduction About This Manual Thank you enjoy taking pictures with this camera can be stored in bold text. This...Conventions To make it where all new pictures will be more clearly shown. If a memory card is written to help you for your Nikon digital camera. Read this manual, images are used to store pictures to as a "memory card". • The setting at the time of ...
... manual may be helpful when using the camera. C Memory Cards Pictures taken with your purchase of Nikon COOLPIX P100 digital camera. The memory card must be removed before using the camera. Introduction Introduction About This Manual Thank you enjoy taking pictures with this camera can be stored in bold text. This...Conventions To make it where all new pictures will be more clearly shown. If a memory card is written to help you for your Nikon digital camera. Read this manual, images are used to store pictures to as a "memory card". • The setting at the time of ...
P100 User's Manual
Page 14
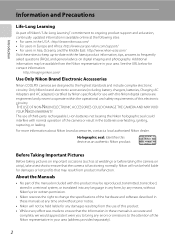
... in the batteries overheating, igniting, rupturing, or leaking. THE USE OF NON-NIKON ELECTRONIC ACCESSORIES COULD DAMAGE THE CAMERA AND MAY VOID YOUR NIKON WARRANTY. See the URL below for contact information: http://imaging.nikon.com/ Use Only Nikon Brand Electronic Accessories Nikon COOLPIX cameras are engineered and proven to operate within the operational and safety requirements of...
... in the batteries overheating, igniting, rupturing, or leaking. THE USE OF NON-NIKON ELECTRONIC ACCESSORIES COULD DAMAGE THE CAMERA AND MAY VOID YOUR NIKON WARRANTY. See the URL below for contact information: http://imaging.nikon.com/ Use Only Nikon Brand Electronic Accessories Nikon COOLPIX cameras are engineered and proven to operate within the operational and safety requirements of...

P100 User's Manual
Page 15
... government was digitally copied or reproduced by means of making illegal copies or to be provided for the purpose of a scanner, digital camera or other device may be recovered from being in possession of material that deleting images or formatting data storage devices such as memory cards... or built-in camera memory does not completely erase the original image data. Deleted files can sometimes be punishable by law. • Items prohibited by law ...
... government was digitally copied or reproduced by means of making illegal copies or to be provided for the purpose of a scanner, digital camera or other device may be recovered from being in possession of material that deleting images or formatting data storage devices such as memory cards... or built-in camera memory does not completely erase the original image data. Deleted files can sometimes be punishable by law. • Items prohibited by law ...
P100 User's Manual
Page 16
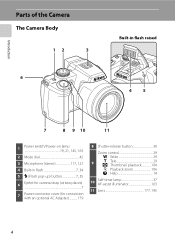
Introduction Parts of the Camera The Camera Body 12 3 6 Built-in flash raised 45 7 8 9 10 11 1 Power switch/Power-on lamp 19, 21, 145, 165 2 Mode dial 42 3 Microphone (stereo 117, 127 4 Built-in flash 7, 34 5 m (Flash pop-up) button 7, 35 6 Eyelet for camera strap (at two places 7 7 Power connector cover (for connection with an optional AC Adapter 179 8 Shutter-release button 30 Zoom control 29 f : Wide 29 9 g : Tele 29 h : Thumbnail playback 104 i : Playback zoom 106 j : Help 14 10 Self-timer lamp 37 AF-assist illuminator 163 11 Lens 177, 195 4
Introduction Parts of the Camera The Camera Body 12 3 6 Built-in flash raised 45 7 8 9 10 11 1 Power switch/Power-on lamp 19, 21, 145, 165 2 Mode dial 42 3 Microphone (stereo 117, 127 4 Built-in flash 7, 34 5 m (Flash pop-up) button 7, 35 6 Eyelet for camera strap (at two places 7 7 Power connector cover (for connection with an optional AC Adapter 179 8 Shutter-release button 30 Zoom control 29 f : Wide 29 9 g : Tele 29 h : Thumbnail playback 104 i : Playback zoom 106 j : Help 14 10 Self-timer lamp 37 AF-assist illuminator 163 11 Lens 177, 195 4

P100 User's Manual
Page 17
Introduction Parts of the Camera 1 23 4 5 678 9 18 19 20 PUSH TO EJECT 10 11 12 13 14 15 16 17 21 22 23 1 Speaker 117, 137 2 x (monitor) button 14 3 ...
Introduction Parts of the Camera 1 23 4 5 678 9 18 19 20 PUSH TO EJECT 10 11 12 13 14 15 16 17 21 22 23 1 Speaker 117, 137 2 x (monitor) button 14 3 ...
P100 User's Manual
Page 18
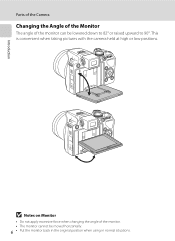
B Notes on Monitor • Do not apply excessive force when changing the angle of the monitor can be moved horizontally. 6 • Put the monitor back in the original position when using in normal situations. Introduction Parts of the Camera Changing the Angle of the Monitor The angle of the monitor. • The monitor cannot be lowered down to 82° or raised upward to 90°. This is convenient when taking pictures with the camera held at high or low positions.
B Notes on Monitor • Do not apply excessive force when changing the angle of the monitor can be moved horizontally. 6 • Put the monitor back in the original position when using in normal situations. Introduction Parts of the Camera Changing the Angle of the Monitor The angle of the monitor. • The monitor cannot be lowered down to 82° or raised upward to 90°. This is convenient when taking pictures with the camera held at high or low positions.
P100 User's Manual
Page 19
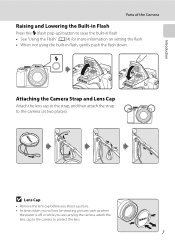
... you will not be shooting pictures such as when the power is off, or while you are carrying the camera, attach the lens cap to the camera to the camera (at two places). Attaching the Camera Strap and Lens Cap Attach the lens cap to the strap, and then attach the strap to protect... the lens. 7 Introduction Parts of the Camera Raising and Lowering the Built-in Flash Press the m (flash pop-up) button to raise the built-in flash. • See "Using the Flash" (A34) ...
... you will not be shooting pictures such as when the power is off, or while you are carrying the camera, attach the lens cap to the camera to the camera (at two places). Attaching the Camera Strap and Lens Cap Attach the lens cap to the strap, and then attach the strap to protect... the lens. 7 Introduction Parts of the Camera Raising and Lowering the Built-in Flash Press the m (flash pop-up) button to raise the built-in flash. • See "Using the Flash" (A34) ...
P100 User's Manual
Page 20
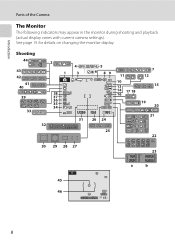
Shooting 44 43 42 41 40 39 33 2 1 38 37 36 35 34 32 4 3 1/250 31 5 6 89 F5.6 999 26 24 11 10 13 14 17 18 16 7 12 15 19 20 21 25 22 30 29 28 27 23 999 1m00s 9999 1m00s a b 45 46 1/250 F5.6 17 8 Introduction Parts of the Camera The Monitor The following indicators may appear in the monitor during shooting and playback (actual display varies with current camera settings). See page 15 for details on changing the monitor display.
Shooting 44 43 42 41 40 39 33 2 1 38 37 36 35 34 32 4 3 1/250 31 5 6 89 F5.6 999 26 24 11 10 13 14 17 18 16 7 12 15 19 20 21 25 22 30 29 28 27 23 999 1m00s 9999 1m00s a b 45 46 1/250 F5.6 17 8 Introduction Parts of the Camera The Monitor The following indicators may appear in the monitor during shooting and playback (actual display varies with current camera settings). See page 15 for details on changing the monitor display.
P100 User's Manual
Page 21
Parts of the Camera Introduction Shooting mode* 1 26, 43, 45, 55, 59, 62, 66, 98 2 Focus mode 38 3 Zoom indicator 29 4 Focus indicator 30 5 AE/AF-L indicator 54 6 Flash ...
Parts of the Camera Introduction Shooting mode* 1 26, 43, 45, 55, 59, 62, 66, 98 2 Focus mode 38 3 Zoom indicator 29 4 Focus indicator 30 5 AE/AF-L indicator 54 6 Flash ...
P100 User's Manual
Page 22
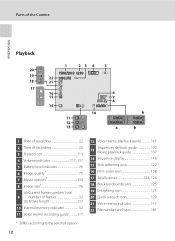
Parts of the Camera Introduction Playback 20 19 18 17 1 23 4 5 15/05/2010 12:00 22 9999.JPG 21 16 15 14 11 12 13 6 7 8 999/999 10 ...
Parts of the Camera Introduction Playback 20 19 18 17 1 23 4 5 15/05/2010 12:00 22 9999.JPG 21 16 15 14 11 12 13 6 7 8 999/999 10 ...
P100 User's Manual
Page 28
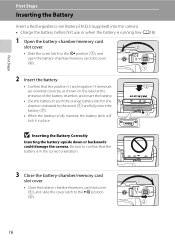
... is in place. B Inserting the Battery Correctly Inserting the battery upside down or backwards could damage the camera. First Steps First Steps Inserting the Battery Insert a Rechargeable Li-ion Battery EN-EL5 (supplied) into the camera. • Charge the battery before first use or when the battery is running low (A18). 1 Open...
... is in place. B Inserting the Battery Correctly Inserting the battery upside down or backwards could damage the camera. First Steps First Steps Inserting the Battery Insert a Rechargeable Li-ion Battery EN-EL5 (supplied) into the camera. • Charge the battery before first use or when the battery is running low (A18). 1 Open...
P100 User's Manual
Page 29
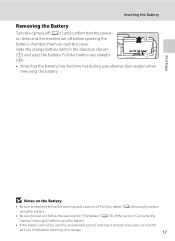
...Aii) thoroughly before using the battery. • Be sure to read and follow the warnings for "The Battery" (A176) of the section "Caring for the Camera" thoroughly before using the battery. • If the battery will not be used for an extended period, recharge it at least once every six months... and run it to storage. 17 PUSH TO EJECT • Note that the power- Inserting the Battery Removing the Battery Turn the camera off before returning it flat before opening the battery-chamber/memory card slot cover. First Steps B Notes on lamp and the monitor are off (...
...Aii) thoroughly before using the battery. • Be sure to read and follow the warnings for "The Battery" (A176) of the section "Caring for the Camera" thoroughly before using the battery. • If the battery will not be used for an extended period, recharge it at least once every six months... and run it to storage. 17 PUSH TO EJECT • Note that the power- Inserting the Battery Removing the Battery Turn the camera off before returning it flat before opening the battery-chamber/memory card slot cover. First Steps B Notes on lamp and the monitor are off (...


