
Product Manual
Page 17
...the Flash 5 Using Menus (the d Button 6 The Monitor 8 Shooting Mode 8 Playback Mode 10 The Basics of Shooting and Playback... 12 Preparation 1 Insert the Batteries 12 Applicable Batteries 13 Preparation 2 Insert a Memory Card.......... 14 Internal Memory and Memory Cards......... 15 Preparation 3 Setting the Display Language, Date, and Time 16 Step 1 Turn the Camera On 20 Step 2 Select a Shooting Mode 22 Available Shooting Modes 23 Step 3 Frame a Picture 24 Using the Zoom 25 Step 4 Focus and Shoot 26 The Shutter-release Button 27 Step 5 Play Back Images 28 Step 6 Delete Images...
...the Flash 5 Using Menus (the d Button 6 The Monitor 8 Shooting Mode 8 Playback Mode 10 The Basics of Shooting and Playback... 12 Preparation 1 Insert the Batteries 12 Applicable Batteries 13 Preparation 2 Insert a Memory Card.......... 14 Internal Memory and Memory Cards......... 15 Preparation 3 Setting the Display Language, Date, and Time 16 Step 1 Turn the Camera On 20 Step 2 Select a Shooting Mode 22 Available Shooting Modes 23 Step 3 Frame a Picture 24 Using the Zoom 25 Step 4 Focus and Shoot 26 The Shutter-release Button 27 Step 5 Play Back Images 28 Step 6 Delete Images...

Product Manual
Page 18
... Focus Lock 61 Playback Features 62 Playback Zoom 62 Thumbnail Playback, Calendar Display..... 63 Functions That Can Be Set with the d Button (Playback Menu 64 Recording and Playing Back Movies ... 65 Recording Movies 65 Functions That Can Be Set with the d Button (Movie Menu 69 Playing Back Movies 70 General Camera Setup 72 Functions That Can Be Set with the d Button (Setup Menu 72 Connecting the Camera to a TV, Computer, or Printer 74 Connection Methods 74 Using ViewNX 2 76 Installing ViewNX 2 76 Transferring Images to the Computer....... 77 Viewing Images 79...
... Focus Lock 61 Playback Features 62 Playback Zoom 62 Thumbnail Playback, Calendar Display..... 63 Functions That Can Be Set with the d Button (Playback Menu 64 Recording and Playing Back Movies ... 65 Recording Movies 65 Functions That Can Be Set with the d Button (Movie Menu 69 Playing Back Movies 70 General Camera Setup 72 Functions That Can Be Set with the d Button (Setup Menu 72 Connecting the Camera to a TV, Computer, or Printer 74 Connection Methods 74 Using ViewNX 2 76 Installing ViewNX 2 76 Transferring Images to the Computer....... 77 Viewing Images 79...

Product Manual
Page 19
... Picture: Reducing the Size of a Movie E25 Saving a Frame from a Movie as a Still Image E26 The Shooting Menu (for A (Auto) Mode E27 Image Mode Settings (Image Size and Quality E27 White Balance (Adjusting Hue E29 Continuous Shooting E32 ISO Sensitivity E34 Color Options E35 AF Area Mode E36 The Smart Portrait Menu E40 Skin Softening E40 Smile Timer E40 Blink Proof E41 The Playback Menu E42 Print Order (Creating a DPOF Print Order E42 Slide Show E45 Protect E46 Rotate Image E48 Copy (Copy Between Internal Memory...
... Picture: Reducing the Size of a Movie E25 Saving a Frame from a Movie as a Still Image E26 The Shooting Menu (for A (Auto) Mode E27 Image Mode Settings (Image Size and Quality E27 White Balance (Adjusting Hue E29 Continuous Shooting E32 ISO Sensitivity E34 Color Options E35 AF Area Mode E36 The Smart Portrait Menu E40 Skin Softening E40 Smile Timer E40 Blink Proof E41 The Playback Menu E42 Print Order (Creating a DPOF Print Order E42 Slide Show E45 Protect E46 Rotate Image E48 Copy (Copy Between Internal Memory...

Product Manual
Page 20
... Movie Options E52 AF Area Mode E55 Autofocus Mode E55 Movie VR E56 Wind Noise Reduction E56 The Setup Menu E57 Welcome Screen E57 Time Zone and Date E58 Monitor Settings E60 Print Date (Imprinting Date and Time E62 Photo VR E63 Motion Detection E64 AF Assist E65 Sound Settings E65 Auto Off E66 Format Memory/Format Card E67 Language E68 TV Settings E68 Blink Warning E69 Eye-Fi Upload E70 Reset All E71 Battery Type E72 Firmware Version E72 Error Messages E73 File...
... Movie Options E52 AF Area Mode E55 Autofocus Mode E55 Movie VR E56 Wind Noise Reduction E56 The Setup Menu E57 Welcome Screen E57 Time Zone and Date E58 Monitor Settings E60 Print Date (Imprinting Date and Time E62 Photo VR E63 Motion Detection E64 AF Assist E65 Sound Settings E65 Auto Off E66 Format Memory/Format Card E67 Language E68 TV Settings E68 Blink Warning E69 Eye-Fi Upload E70 Reset All E71 Battery Type E72 Firmware Version E72 Error Messages E73 File...

Product Manual
Page 31
... 7 Quick retouch icon 64, E9 8 Red-eye correction icon 64, E10 9 Internal memory indicator 15 (a) Current image number/ 10 total number of images (b) Movie length 11 Volume indicator 70 12 Image mode 54, E27 13 Movie options 69, E52 14 Easy panorama 36, E2 15 Crop icon 62, E15 16 Small picture icon 64, E14 Easy panorama playback guide ... 36, E5 17 Sequence playback guide 64, E6 Movie playback guide 70 18 Time of recording 16 19 Date of recording 16 20 Battery level indicator 20 21 File number and...
... 7 Quick retouch icon 64, E9 8 Red-eye correction icon 64, E10 9 Internal memory indicator 15 (a) Current image number/ 10 total number of images (b) Movie length 11 Volume indicator 70 12 Image mode 54, E27 13 Movie options 69, E52 14 Easy panorama 36, E2 15 Crop icon 62, E15 16 Small picture icon 64, E14 Easy panorama playback guide ... 36, E5 17 Sequence playback guide 64, E6 Movie playback guide 70 18 Time of recording 16 19 Date of recording 16 20 Battery level indicator 20 21 File number and...

Product Manual
Page 35
... camera's internal memory or on lamp and the monitor have turned off and make sure that has been used in the setup menu. Internal Memory and Memory Cards Camera data, including images and movies, can be hot immediately after using the camera. The Basics of Shooting and Playback B Formatting Memory Cards The first time you insert a memory card that the power-on a memory card. Removing Memory Cards Turn the camera off , and then open the battery-chamber/ memory card slot cover. To use the camera's internal memory, first remove the memory card. 15 Insert the card...
... camera's internal memory or on lamp and the monitor have turned off and make sure that has been used in the setup menu. Internal Memory and Memory Cards Camera data, including images and movies, can be hot immediately after using the camera. The Basics of Shooting and Playback B Formatting Memory Cards The first time you insert a memory card that the power-on a memory card. Removing Memory Cards Turn the camera off , and then open the battery-chamber/ memory card slot cover. To use the camera's internal memory, first remove the memory card. 15 Insert the card...

Product Manual
Page 41
... you need to raise the flash (A 5, 44). The Basics of Shooting and Playback C Notes About the Flash When you perform any of the following operations: ➝ Press the power switch, shutter-release button, A (shooting mode) button, c (playback) button, or b (e movie-record) button 21 Camera turns off setting in the setup menu (A 72). • While the camera is in dark locations or when the subject is about 30 seconds. C The Auto Off Function Flashes No operations performed No operations performed...
... you need to raise the flash (A 5, 44). The Basics of Shooting and Playback C Notes About the Flash When you perform any of the following operations: ➝ Press the power switch, shutter-release button, A (shooting mode) button, c (playback) button, or b (e movie-record) button 21 Camera turns off setting in the setup menu (A 72). • While the camera is in dark locations or when the subject is about 30 seconds. C The Auto Off Function Flashes No operations performed No operations performed...

Product Manual
Page 51
... take images using settings that for the scene mode currently enabled. Shooting Features Shooting Features G (Easy Auto) Mode The camera automatically selects the optimum scene mode when you frame an image, making it even easier to that suit the scene. e Portrait f Landscape h Night portrait* g Night landscape* i Close-up j Backlighting U Other scenes * One image is captured at a slow shutter speed. Enter shooting mode M A (shooting mode) button M G (easy auto) mode M k button When the camera selects a scene mode, the shooting mode icon displayed in G (Easy Auto) Mode • Self...
... take images using settings that for the scene mode currently enabled. Shooting Features Shooting Features G (Easy Auto) Mode The camera automatically selects the optimum scene mode when you frame an image, making it even easier to that suit the scene. e Portrait f Landscape h Night portrait* g Night landscape* i Close-up j Backlighting U Other scenes * One image is captured at a slow shutter speed. Enter shooting mode M A (shooting mode) button M G (easy auto) mode M k button When the camera selects a scene mode, the shooting mode icon displayed in G (Easy Auto) Mode • Self...

Product Manual
Page 67
Shooting Features Using the Self-timer The camera is not applied by pressing the k button within a few seconds, the selection will be used. 3 Frame the picture and press the shutter-release button halfway. 10 • Focus and exposure are set. 1 / 2 5 0 F 3.0 47 The self-timer cannot be canceled. • When the shooting mode is Pet portrait scene mode, Y (pet portrait auto release) is displayed (A 37). Set Photo VR to Off in the setup menu (A 72) when...
Shooting Features Using the Self-timer The camera is not applied by pressing the k button within a few seconds, the selection will be used. 3 Frame the picture and press the shutter-release button halfway. 10 • Focus and exposure are set. 1 / 2 5 0 F 3.0 47 The self-timer cannot be canceled. • When the shooting mode is Pet portrait scene mode, Y (pet portrait auto release) is displayed (A 37). Set Photo VR to Off in the setup menu (A 72) when...

Product Manual
Page 86
... data, or in damage to the subject or the amount of zoom applied, subjects with a lower Speed Class rating are used. • When using the camera's internal memory, saving movies may take some time. • There may be some degradation in image quality when digital zoom is used. • The sounds of exposures remaining or the indicator showing the maximum movie length flashes while images are saved in the recorded movies. - B Notes About Saving Images and Recording Movies The indicator...
... data, or in damage to the subject or the amount of zoom applied, subjects with a lower Speed Class rating are used. • When using the camera's internal memory, saving movies may take some time. • There may be some degradation in image quality when digital zoom is used. • The sounds of exposures remaining or the indicator showing the maximum movie length flashes while images are saved in the recorded movies. - B Notes About Saving Images and Recording Movies The indicator...
Product Manual
Page 93
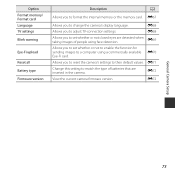
... format the internal memory or the memory card. E72 View the current camera firmware version. E72 General Camera Setup 73 E68 Allows you to set whether or not to enable the function for sending images to match the type of batteries that are detected when taking images of people using a commercially available Eye-Fi card. Option Format memory/ Format card Language TV settings Blink warning Eye-Fi upload Reset all Battery type Firmware version Description A Allows you to change the camera's display language. E71 Change this setting...
... format the internal memory or the memory card. E72 View the current camera firmware version. E72 General Camera Setup 73 E68 Allows you to set whether or not to enable the function for sending images to match the type of batteries that are detected when taking images of people using a commercially available Eye-Fi card. Option Format memory/ Format card Language TV settings Blink warning Eye-Fi upload Reset all Battery type Firmware version Description A Allows you to change the camera's display language. E71 Change this setting...

Product Manual
Page 128
... in shooting modes other functions. C Printing Images of exposures remaining display shows "9999". C Number of Images That Can Be Saved • The approximate number of images that can be saved can be changed setting is 10,000 or more, the number of Size 1:1 Change the printer setting to "Border." E28 Reference Section The changed when using memory cards with the same capacity and the same image mode setting. The images may vary greatly depending on the make of the memory card...
... in shooting modes other functions. C Printing Images of exposures remaining display shows "9999". C Number of Images That Can Be Saved • The approximate number of images that can be saved can be changed setting is 10,000 or more, the number of Size 1:1 Change the printer setting to "Border." E28 Reference Section The changed when using memory cards with the same capacity and the same image mode setting. The images may vary greatly depending on the make of the memory card...

Product Manual
Page 170
... About Eye-Fi Cards • Note that images will result in the batteries being depleted in the monitor (A 8, 10). • w: Eye-Fi upload is not compatible with the Endless Memory function. C Eye-Fi Communication Indicator The communication status of the Eye-Fi card in the camera can be transmitted even if Disable is set to the instruction manual of time. Eye-Fi Upload d button M z menu icon M Eye-Fi upload M k button Select whether or not the camera's Eye-Fi card (available...
... About Eye-Fi Cards • Note that images will result in the batteries being depleted in the monitor (A 8, 10). • w: Eye-Fi upload is not compatible with the Endless Memory function. C Eye-Fi Communication Indicator The communication status of the Eye-Fi card in the camera can be transmitted even if Disable is set to the instruction manual of time. Eye-Fi Upload d button M z menu icon M Eye-Fi upload M k button Select whether or not the camera's Eye-Fi card (available...

Product Manual
Page 175
... USB cable. Printer error: check paper. Printer error: paper jam. Raise the flash when shooting in the camera's internal circuitry. resume printing.* Reference Section E75 If the error persists, contact 4, 20 your retailer or Nikon-authorized service representative. 12, 20 Printer error: check printer status. E19 System error An error occurred in Night portrait or Backlighting (when HDR is set to resume printing.* - Load the specified size of paper. Display Cause/Solution A Raise the flash...
... USB cable. Printer error: check paper. Printer error: paper jam. Raise the flash when shooting in the camera's internal circuitry. resume printing.* Reference Section E75 If the error persists, contact 4, 20 your retailer or Nikon-authorized service representative. 12, 20 Printer error: check printer status. E19 System error An error occurred in Night portrait or Backlighting (when HDR is set to resume printing.* - Load the specified size of paper. Display Cause/Solution A Raise the flash...

Product Manual
Page 181
... in the operating instructions included with no effect on and off (black), this is not a malfunction and has no more than 0.01% being saved or deleted. Handle with caution. • Do not use . Batteries are constructed with the device. • Images in the camera. Forcibly cutting power in these displays may contain pixels that are always lit (white, red, blue, or green) or always...
... in the operating instructions included with no effect on and off (black), this is not a malfunction and has no more than 0.01% being saved or deleted. Handle with caution. • Do not use . Batteries are constructed with the device. • Images in the camera. Forcibly cutting power in these displays may contain pixels that are always lit (white, red, blue, or green) or always...

Product Manual
Page 183
... been used in another device into this camera. Copy that you do not want to a computer before formatting. Do not open the battery-chamber/memory card slot cover or remove the memory card or batteries. - Format card? To format the memory card, select Yes. • Observe the following precautions while formatting the memory card, saving and deleting images, and copying images to a computer before formatting. • If the message Card is not formatted. If there is data saved on the memory card that data...
... been used in another device into this camera. Copy that you do not want to a computer before formatting. Do not open the battery-chamber/memory card slot cover or remove the memory card or batteries. - Format card? To format the memory card, select Yes. • Observe the following precautions while formatting the memory card, saving and deleting images, and copying images to a computer before formatting. • If the message Card is not formatted. If there is data saved on the memory card that data...

Product Manual
Page 185
... consulting your retailer or Nikon-authorized service representative. If the problem persists, turn off . F7 Cause/Solution A Wait for the flash to charge. • The camera and computer are connected via an audio/ 74, E16 video cable or HDMI cable. Power, Display, Settings Issues Technical Notes and Index Problem The camera is on again. • The camera is blank. Leave - Troubleshooting If the camera fails to function as expected, check the...
... consulting your retailer or Nikon-authorized service representative. If the problem persists, turn off . F7 Cause/Solution A Wait for the flash to charge. • The camera and computer are connected via an audio/ 74, E16 video cable or HDMI cable. Power, Display, Settings Issues Technical Notes and Index Problem The camera is on again. • The camera is blank. Leave - Troubleshooting If the camera fails to function as expected, check the...
Product Manual
Page 186
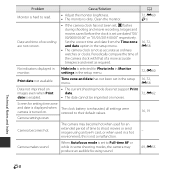
Cause/Solution • Adjust the monitor brightness. • The monitor is turned on. Time zone and date has not been set to shoot movies or send images using an Eye-Fi card, or when used for Photo info in a hot - Screen for setting time zone and date is displayed when camera is dirty. Camera settings reset. The clock battery is not a malfunction. environment; this is exhausted; Images and movies saved before the clock is not as accurate as...
Cause/Solution • Adjust the monitor brightness. • The monitor is turned on. Time zone and date has not been set to shoot movies or send images using an Eye-Fi card, or when used for Photo info in a hot - Screen for setting time zone and date is displayed when camera is dirty. Camera settings reset. The clock battery is not a malfunction. environment; this is exhausted; Images and movies saved before the clock is not as accurate as...
Product Manual
Page 190
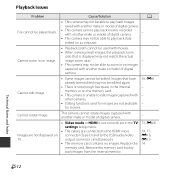
... to play back data edited on image. Cause/Solution • This camera may not be able to play back images saved with another make or model of digital camera. • This camera cannot play back movies recorded with another make or model of digital camera. • This camera may not be used for images are not available for movies. Remove the memory card to play back images from the internal memory. Replace the memory card. Cannot zoom in the TV settings setup menu. • The cables are not displayed on images...
... to play back data edited on image. Cause/Solution • This camera may not be able to play back images saved with another make or model of digital camera. • This camera cannot play back movies recorded with another make or model of digital camera. • This camera may not be used for images are not available for movies. Remove the memory card to play back images from the internal memory. Replace the memory card. Cannot zoom in the TV settings setup menu. • The cables are not displayed on images...

Product Manual
Page 191
... not set to print images from a PictBridge-compatible printer. Replace the memory card. • Remove the memory card to start when camera is not recognized by the camera. • The printer automatically selects the paper size. For more information about Nikon Transfer 2, refer to select the paper size. • The printer does not support the paper sizes specified by the computer. • The computer is off. • The batteries are not displayed. Use the printer to help...
... not set to print images from a PictBridge-compatible printer. Replace the memory card. • Remove the memory card to start when camera is not recognized by the camera. • The printer automatically selects the paper size. For more information about Nikon Transfer 2, refer to select the paper size. • The printer does not support the paper sizes specified by the computer. • The computer is off. • The batteries are not displayed. Use the printer to help...


