
User Manual
Page 4
...the strap around the neck of flammable gas Do not use electronic equipment in low-temperature burns. ii After removing or disconnecting the power source, take the product to avoid burns. Keep out of reach of the camera or AC adapter could result from the camera ...to a Nikonauthorized service representative for inspection. Do not disassemble Touching the internal parts of children Particular care should be read before using this Nikon product, to observe the precautions listed in this equipment. Leaving the devices in use the product will read the following symbol: This ...
...the strap around the neck of flammable gas Do not use electronic equipment in low-temperature burns. ii After removing or disconnecting the power source, take the product to avoid burns. Keep out of reach of the camera or AC adapter could result from the camera ...to a Nikonauthorized service representative for inspection. Do not disassemble Touching the internal parts of children Particular care should be read before using this Nikon product, to observe the precautions listed in this equipment. Leaving the devices in use the product will read the following symbol: This ...
User Manual
Page 5
... when handling the Battery Chargers (available • Use only the batteries approved for use with Nikon digital cameras only, and are for use could result in fire. • Do not handle the power cable or go near the metal parts of different makes or types. • When charging... or attempt to observe this precaution could result • Do not transport or store with COOLPIX L310. • Insert batteries in electric shock. • Do not damage, modify, forcibly tug or bend the power cable, place it under heavy objects, or expose it is unplugged. iii When replacing the...
... when handling the Battery Chargers (available • Use only the batteries approved for use with Nikon digital cameras only, and are for use could result in fire. • Do not handle the power cable or go near the metal parts of different makes or types. • When charging... or attempt to observe this precaution could result • Do not transport or store with COOLPIX L310. • Insert batteries in electric shock. • Do not damage, modify, forcibly tug or bend the power cable, place it under heavy objects, or expose it is unplugged. iii When replacing the...

User Manual
Page 6
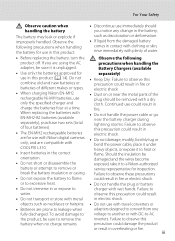
... the skin or entering the eyes or mouth. Observe caution when using while in a hospital. Turn the power off when using inside an airplane or the hospital Turn the power off while inside the airplane during take off or landing. For Your Safety Use appropriate cables When connecting cables... to the input and output jacks, use only the cables provided or sold by Nikon for the purpose, to maintain compliance with...
... the skin or entering the eyes or mouth. Observe caution when using while in a hospital. Turn the power off when using inside an airplane or the hospital Turn the power off while inside the airplane during take off or landing. For Your Safety Use appropriate cables When connecting cables... to the input and output jacks, use only the cables provided or sold by Nikon for the purpose, to maintain compliance with...

User Manual
Page 16
... 23 1 g : tele 23 h : thumbnail playback 63 i : playback zoom 65 j : help 35 2 Shutter-release button 24 3 Self-timer lamp 31 4 Power switch/Power-on lamp 20, 116 5 Speaker 88 6 Built-in microphone 80 7 Eyelet for camera strap 6 8 Flash 7, 28 9 DC input connector (for AC adapter available ...separately from Nikon) .... 15, 129 10 USB connector and audio/video output 91, 95, 98 11 Pin cover 91, 95, 98 12 m...
... 23 1 g : tele 23 h : thumbnail playback 63 i : playback zoom 65 j : help 35 2 Shutter-release button 24 3 Self-timer lamp 31 4 Power switch/Power-on lamp 20, 116 5 Speaker 88 6 Built-in microphone 80 7 Eyelet for camera strap 6 8 Flash 7, 28 9 DC input connector (for AC adapter available ...separately from Nikon) .... 15, 129 10 USB connector and audio/video output 91, 95, 98 11 Pin cover 91, 95, 98 12 m...

User Manual
Page 18
B Lens Cap • Remove the lens cap before you take a picture. • At times when you will not be taking pictures such as when the power is off or while you are 6 carrying the camera, attach the lens cap to the camera to the camera. Attach them at two places. Introduction Parts of the Camera Attaching the Camera Strap and Lens Cap Attach the lens cap to the camera strap, and then attach the strap to protect the lens.
B Lens Cap • Remove the lens cap before you take a picture. • At times when you will not be taking pictures such as when the power is off or while you are 6 carrying the camera, attach the lens cap to the camera to the camera. Attach them at two places. Introduction Parts of the Camera Attaching the Camera Strap and Lens Cap Attach the lens cap to the camera strap, and then attach the strap to protect the lens.
User Manual
Page 26
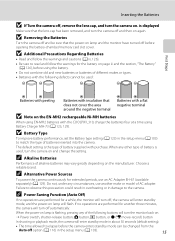
...Four EN-MH2 rechargeable Ni-MH (nickel metal hydride) batteries * EN-MH1 rechargeable Ni-MH batteries cannot be hot immediately after using the camera. The power-on lamp (green) will light, and then the monitor will turn the camera on ). Before opening the battery-chamber/memory card slot cover, hold ...down to prevent the batteries from falling out. If the camera is turned off . Press the power switch again to turn off , hold the camera upside down the c button 14 to turn on lamp and monitor turn the camera off , both...
...Four EN-MH2 rechargeable Ni-MH (nickel metal hydride) batteries * EN-MH1 rechargeable Ni-MH batteries cannot be hot immediately after using the camera. The power-on lamp (green) will light, and then the monitor will turn the camera on ). Before opening the battery-chamber/memory card slot cover, hold ...down to prevent the batteries from falling out. If the camera is turned off . Press the power switch again to turn off , hold the camera upside down the c button 14 to turn on lamp and monitor turn the camera off , both...
User Manual
Page 27
... cautions (A iii, 126). • Be sure to match the type of alkaline batteries may vary greatly depending on . C Alternative Power Sources To power the camera continuously for the battery on the EN-MH2 rechargeable Ni-MH batteries When using Battery Charger MH-73 (A 123, 129). ..., and turn the camera on the manufacturer. When any of battery supplied with the COOLPIX L310, charge the batteries four at a time using EN-MH2 batteries with purchase. Choose a reliable brand. C Power Saving Function (Auto Off) If no operations are performed for another make or model...
... cautions (A iii, 126). • Be sure to match the type of alkaline batteries may vary greatly depending on . C Alternative Power Sources To power the camera continuously for the battery on the EN-MH2 rechargeable Ni-MH batteries When using Battery Charger MH-73 (A 123, 129). ..., and turn the camera on the manufacturer. When any of battery supplied with the COOLPIX L310, charge the batteries four at a time using EN-MH2 batteries with purchase. Choose a reliable brand. C Power Saving Function (Auto Off) If no operations are performed for another make or model...

User Manual
Page 28
... while setting the region in step 4. selection screen and the date and time setting screen for the camera clock are displayed. 1 Press the power switch to turn on (the power-on lamp turns off when the monitor turns on). 2 Press the multi selector H or I to choose Yes and press the k button. Press... When the first time the camera is turned on the camera. Cancel Time zone and date Choose time zone and set date and time? The power-on lamp (green) will light, and then the monitor will turn on , the language-
... while setting the region in step 4. selection screen and the date and time setting screen for the camera clock are displayed. 1 Press the power switch to turn on (the power-on lamp turns off when the monitor turns on). 2 Press the multi selector H or I to choose Yes and press the k button. Press... When the first time the camera is turned on the camera. Cancel Time zone and date Choose time zone and set date and time? The power-on lamp (green) will light, and then the monitor will turn on , the language-
User Manual
Page 30
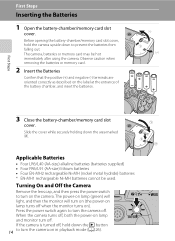
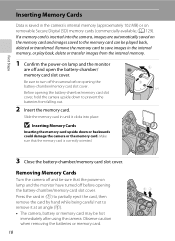
Be sure to prevent the batteries from the internal memory. 1 Confirm the power-on removable Secure Digital (SD) memory cards (commercially available; (A 129). B Inserting Memory Cards Inserting the memory card upside down to turn off before opening the ... automatically saved on lamp and the monitor have turned off the camera before opening the battery-chamber/memory card slot cover. Make sure that the power-on the memory card and images saved to remove it clicks into the camera, images are off and be sure that the memory card is...
Be sure to prevent the batteries from the internal memory. 1 Confirm the power-on removable Secure Digital (SD) memory cards (commercially available; (A 129). B Inserting Memory Cards Inserting the memory card upside down to turn off before opening the ... automatically saved on lamp and the monitor have turned off the camera before opening the battery-chamber/memory card slot cover. Make sure that the power-on the memory card and images saved to remove it clicks into the camera, images are off and be sure that the memory card is...

User Manual
Page 32
... of images that can be saved varies depending on the capacity of pictures that suits the scene (A 34). 1 Remove the lens cap and press the power switch to turn on . The lens extends and the monitor turns on the camera. Basic Photography and Playback: G Easy Auto Mode 3 Press the multi selector...
... of images that can be saved varies depending on the capacity of pictures that suits the scene (A 34). 1 Remove the lens cap and press the power switch to turn on . The lens extends and the monitor turns on the camera. Basic Photography and Playback: G Easy Auto Mode 3 Press the multi selector...

User Manual
Page 33
... the image mode menu. C Note on the Flash When the flash is lowered, the flash setting is fixed at off in standby mode to save power (the poweron lamp is flashing) (A 116), press the following buttons to turn it (A 24, 34). • The self-timer (A 31) and exposure compensation ... When the monitor has turned off and W is displayed at a person's face, the camera automatically detects the face and focuses on it back on. ➝ Power switch, shutter-release button, A button, or b (e movie-record) button C Functions Available in Easy Auto Mode • When the camera is backlit, be ...
... the image mode menu. C Note on the Flash When the flash is lowered, the flash setting is fixed at off in standby mode to save power (the poweron lamp is flashing) (A 116), press the following buttons to turn it (A 24, 34). • The self-timer (A 31) and exposure compensation ... When the monitor has turned off and W is displayed at a person's face, the camera automatically detects the face and focuses on it back on. ➝ Power switch, shutter-release button, A button, or b (e movie-record) button C Functions Available in Easy Auto Mode • When the camera is backlit, be ...
User Manual
Page 38
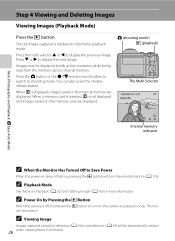
...mode) c (playback) The Multi Selector 15/05/2012 15:30 0004.JPG 4/ 4 Internal memory indicator C When the Monitor Has Turned Off to Save Power When the power-on lamp is off, hold down the c button to shooting mode. C Viewing Image Images captured using face detection (A 24) or pet detection (A 43)...next image. Images may be automatically rotated 26 when viewing them in full-frame playback mode. Press I or K to display the previous image. C Power On by Pressing the c Button When the camera is flashing, pressing the c button will turn on (A 116). When C is not displayed and ...
...mode) c (playback) The Multi Selector 15/05/2012 15:30 0004.JPG 4/ 4 Internal memory indicator C When the Monitor Has Turned Off to Save Power When the power-on lamp is off, hold down the c button to shooting mode. C Viewing Image Images captured using face detection (A 24) or pet detection (A 43)...next image. Images may be automatically rotated 26 when viewing them in full-frame playback mode. Press I or K to display the previous image. C Power On by Pressing the c Button When the camera is flashing, pressing the c button will turn on (A 116). When C is not displayed and ...

User Manual
Page 58
... repeats automatic shooting by pressing the A button to change to another shooting mode. 46 Exit automatic shooting with the smile detection feature by turning the power off or by face detection and smile detection. 4 Exit this shooting mode. The camera enters smart portrait mode. If the camera detects a person's face, the...
... repeats automatic shooting by pressing the A button to change to another shooting mode. 46 Exit automatic shooting with the smile detection feature by turning the power off or by face detection and smile detection. 4 Exit this shooting mode. The camera enters smart portrait mode. If the camera detects a person's face, the...

User Manual
Page 109
... 68) Connect to printer (A 98) Print images one at a time (A 99) Print multiple images (A 100) Turn camera off unexpectedly. • To power the camera continuously for printing images: • Insert a memory card into a DPOF-compatible printer's card slot • Take a memory card to a digital...images transferred to a computer from turning off and disconnect USB cable B Notes on Power Source • When connecting the camera to a printer, use batteries with adequate charge remaining to power the camera to prevent the camera from your personal printer and printing over a direct...
... 68) Connect to printer (A 98) Print images one at a time (A 99) Print multiple images (A 100) Turn camera off unexpectedly. • To power the camera continuously for printing images: • Insert a memory card into a DPOF-compatible printer's card slot • Take a memory card to a digital...images transferred to a computer from turning off and disconnect USB cable B Notes on Power Source • When connecting the camera to a printer, use batteries with adequate charge remaining to power the camera to prevent the camera from your personal printer and printing over a direct...
User Manual
Page 115
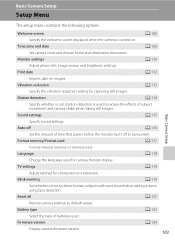
... date Imprint date on . Basic Camera Setup Setup Menu The setup menu contains the following options. Blink warning A 119 Set whether or not to save power. Language A 118 Choose the language used . Sound settings A 115 Basic Camera Setup Specify sound settings. Auto off A 116 Set the amount of batteries used for...
... date Imprint date on . Basic Camera Setup Setup Menu The setup menu contains the following options. Blink warning A 119 Set whether or not to save power. Language A 118 Choose the language used . Sound settings A 115 Basic Camera Setup Specify sound settings. Auto off A 116 Set the amount of batteries used for...

User Manual
Page 120
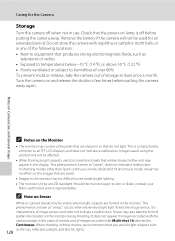
... zone, choose w Home time zone in step 2 and perform steps 3 and 4, to set , the shooting date and time can provide several days of backup power after about 10 hours of the batteries that is independent of charging. Basic Camera Setup Setup Menu C The Clock Battery The camera's clock is... powered by a clock battery that power the camera. The clock battery charges when the main batteries are installed or an AC adapter is connected, and can be imprinted on...
... zone, choose w Home time zone in step 2 and perform steps 3 and 4, to set , the shooting date and time can provide several days of backup power after about 10 hours of the batteries that is independent of charging. Basic Camera Setup Setup Menu C The Clock Battery The camera's clock is... powered by a clock battery that power the camera. The clock battery charges when the main batteries are installed or an AC adapter is connected, and can be imprinted on...
User Manual
Page 125
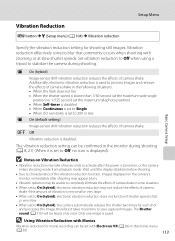
... vibration reduction is used to process images and remove the effects of the vibration reduction function, images displayed on the camera's monitor immediately after the power is fast or very slow. • When set to Off, no icon is disabled. D Using Vibration Reduction with Electronic VR (A 86) in the following situations...
... vibration reduction is used to process images and remove the effects of the vibration reduction function, images displayed on the camera's monitor immediately after the power is fast or very slow. • When set to Off, no icon is disabled. D Using Vibration Reduction with Electronic VR (A 86) in the following situations...
User Manual
Page 128
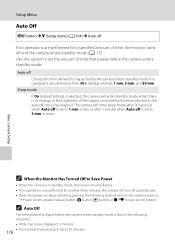
...If On (default setting) is selected, the camera will enter standby mode when there is no change in the auto off automatically. • When the power-on lamp is flashing, pressing the following situations: • While menus are displayed: 3 minutes 116 • During slide show playback: Up to ...of time, the monitor turns off is set to 5 min or more. C When the Monitor Has Turned Off to Save Power • When the camera is fixed in standby mode, the power-on . ➝ Power switch, shutter-release button, A button, c button, or b (e movie-record) button C Auto Off The time allowed ...
...If On (default setting) is selected, the camera will enter standby mode when there is no change in the auto off automatically. • When the power-on lamp is flashing, pressing the following situations: • While menus are displayed: 3 minutes 116 • During slide show playback: Up to ...of time, the monitor turns off is set to 5 min or more. C When the Monitor Has Turned Off to Save Power • When the camera is fixed in standby mode, the power-on . ➝ Power switch, shutter-release button, A button, c button, or b (e movie-record) button C Auto Off The time allowed ...
User Manual
Page 137
...or the magnetic fields produced by broken glass and to prevent the liquid crystal from strong magnetic fields Do not use or save this Nikon product, observe the following precautions when using or storing the camera. B Avoid sudden changes in temperature Sudden changes in camera malfunction ...or damage to the lens. Forcibly cutting power in these circumstances could interfere with care Do not apply force to the lens, monitor, memory card slot or battery chamber. Should the...
...or the magnetic fields produced by broken glass and to prevent the liquid crystal from strong magnetic fields Do not use or save this Nikon product, observe the following precautions when using or storing the camera. B Avoid sudden changes in temperature Sudden changes in camera malfunction ...or damage to the lens. Forcibly cutting power in these circumstances could interfere with care Do not apply force to the lens, monitor, memory card slot or battery chamber. Should the...
User Manual
Page 140
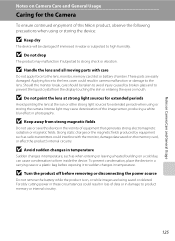
... and does not indicate a malfunction. Smear may be affected. • When framing bright subjects, vertical comet-like streaks that the power-on lamp is lit by an LED backlight. Notes on Camera Care and General Usage Caring for Continuous. Should the monitor begin to...of partial discoloration in any of storage at least once a month. it is a characteristic common to dim or flicker, contact your Nikon-authorized service representative. Images saved using the product will not be visible when bright subjects are always lit or that produces strong electromagnetic fields...
... and does not indicate a malfunction. Smear may be affected. • When framing bright subjects, vertical comet-like streaks that the power-on lamp is lit by an LED backlight. Notes on Camera Care and General Usage Caring for Continuous. Should the monitor begin to...of partial discoloration in any of storage at least once a month. it is a characteristic common to dim or flicker, contact your Nikon-authorized service representative. Images saved using the product will not be visible when bright subjects are always lit or that produces strong electromagnetic fields...


