
User Manual
Page 4
... should be taken to prevent infants from the camera or AC adapter, unplug the AC adapter and remove the battery immediately, taking care to a Nikon-authorized service representative for inspection. The consequences that should be performed only by qualified technicians. Do not disassemble Touching...prevent possible injury. Should the camera or AC adapter break open as this Nikon product, to observe the precautions listed in their mouths. Leaving the devices in direct contact with the camera, battery charger, or AC adapter for extended periods may result in injury.
... should be taken to prevent infants from the camera or AC adapter, unplug the AC adapter and remove the battery immediately, taking care to a Nikon-authorized service representative for inspection. The consequences that should be performed only by qualified technicians. Do not disassemble Touching...prevent possible injury. Should the camera or AC adapter break open as this Nikon product, to observe the precautions listed in their mouths. Leaving the devices in direct contact with the camera, battery charger, or AC adapter for extended periods may result in injury.
User Manual
Page 5
... and new batteries or batteries of four batteries). • The EN-MH2 rechargeable batteries are for use with Nikon digital cameras only, and are prone to leakage when adapters designed to remove the inverters. or to excessive heat. • Do not immerse in contact with clothing or skin, rinse immediately with COOLPIX L310. • Insert batteries in the...
... and new batteries or batteries of four batteries). • The EN-MH2 rechargeable batteries are for use with Nikon digital cameras only, and are prone to leakage when adapters designed to remove the inverters. or to excessive heat. • Do not immerse in contact with clothing or skin, rinse immediately with COOLPIX L310. • Insert batteries in the...

User Manual
Page 8
...household waste. • For more information, contact the retailer or the local authorities in European Countries This symbol indicates that the battery is to be collected separately. vi Do not dispose of waste management. Do not dispose of waste management. ATTENTION Cet appareil...Class B digital apparatus complies with this product is designated for separate collection at an appropriate collection point. This symbol on the battery indicates that this symbol or not, are designated for separate collection at an appropriate collection point. The following apply only to ...
...household waste. • For more information, contact the retailer or the local authorities in European Countries This symbol indicates that the battery is to be collected separately. vi Do not dispose of waste management. Do not dispose of waste management. ATTENTION Cet appareil...Class B digital apparatus complies with this product is designated for separate collection at an appropriate collection point. This symbol on the battery indicates that this symbol or not, are designated for separate collection at an appropriate collection point. The following apply only to ...
User Manual
Page 9
... Selector...11 Using Camera Menus...12 Switching Between Tabs of Menu Screen 13 About the Shutter-release Button...13 First Steps ...14 Inserting the Batteries ...14 Applicable Batteries ...14 Turning On and Off the Camera...14 Setting Display Language, Date and Time 16 Inserting Memory Cards ...18 Removing Memory Cards...18 vii
... Selector...11 Using Camera Menus...12 Switching Between Tabs of Menu Screen 13 About the Shutter-release Button...13 First Steps ...14 Inserting the Batteries ...14 Applicable Batteries ...14 Turning On and Off the Camera...14 Setting Display Language, Date and Time 16 Inserting Memory Cards ...18 Removing Memory Cards...18 vii
User Manual
Page 12
... Motion Detection ...114 Sound Settings...115 Auto Off ...116 Format Memory/Format Card ...117 Language...118 TV Settings ...119 Blink Warning ...119 Reset All ...121 Battery Type ...123 Firmware Version ...124 Notes on Camera Care and General Usage 125 Caring for the Camera ...125 Cleaning ...127 Storage ...128 Technical Notes...129...
... Motion Detection ...114 Sound Settings...115 Auto Off ...116 Format Memory/Format Card ...117 Language...118 TV Settings ...119 Blink Warning ...119 Reset All ...121 Battery Type ...123 Firmware Version ...124 Notes on Camera Care and General Usage 125 Caring for the Camera ...125 Cleaning ...127 Storage ...128 Technical Notes...129...
User Manual
Page 14
...or translated into any language in any form, by Nikon specifically for damages or lost profits that may be held liable for contact information: http://imaging.nikon.com/ Use Only Nikon Brand Electronic Accessories Nikon COOLPIX cameras are engineered and proven to operate within the ...any errors or omissions to the attention of the Nikon representative in your area. Only Nikon brand electronic accessories (including battery chargers, batteries and AC adapters) certified by any means, without prior notice. • Nikon will not be available from product malfunction. For...
...or translated into any language in any form, by Nikon specifically for damages or lost profits that may be held liable for contact information: http://imaging.nikon.com/ Use Only Nikon Brand Electronic Accessories Nikon COOLPIX cameras are engineered and proven to operate within the ...any errors or omissions to the attention of the Nikon representative in your area. Only Nikon brand electronic accessories (including battery chargers, batteries and AC adapters) certified by any means, without prior notice. • Nikon will not be available from product malfunction. For...

User Manual
Page 17
Introduction Parts of the Camera 1 23 4 5 6 7 8 11 10 9 12 13 14 1 Monitor 8 2 A (shooting mode) button 10 3 Flash lamp 28 4 b (e movie-record) button 10 5 c (playback) button 10, 26 6 Eyelet for camera strap 6 7 Multi selector 11 8 k (apply selection) button 11 9 Battery-chamber/ memory card slot cover 14, 18 10 l (delete) button 27, 88 11 d button 12, 53, 67, 83, 104 12 Tripod socket 142 13 Battery-chamber 14 14 Memory card slot 18 5
Introduction Parts of the Camera 1 23 4 5 6 7 8 11 10 9 12 13 14 1 Monitor 8 2 A (shooting mode) button 10 3 Flash lamp 28 4 b (e movie-record) button 10 5 c (playback) button 10, 26 6 Eyelet for camera strap 6 7 Multi selector 11 8 k (apply selection) button 11 9 Battery-chamber/ memory card slot cover 14, 18 10 l (delete) button 27, 88 11 d button 12, 53, 67, 83, 104 12 Tripod socket 142 13 Battery-chamber 14 14 Memory card slot 18 5

User Manual
Page 20
... 1 Shooting mode*....20, 33, 46, 48, 50, 80 2 Macro mode 51 3 Zoom indicator 23, 51 4 AE/AF-L indicator 45 5 Focus indicator 24 6 Flash mode 28 7 Battery level indicator 20 8 Vibration reduction icon (still images 21, 113 9 Electronic VR (movies 86 10 Motion detection icon 21, 114 11 "Date not set" indicator...
... 1 Shooting mode*....20, 33, 46, 48, 50, 80 2 Macro mode 51 3 Zoom indicator 23, 51 4 AE/AF-L indicator 45 5 Focus indicator 24 6 Flash mode 28 7 Battery level indicator 20 8 Vibration reduction icon (still images 21, 113 9 Electronic VR (movies 86 10 Motion detection icon 21, 114 11 "Date not set" indicator...

User Manual
Page 21
.../2012 12:00 9999.JPG 10 5 6 999/ 999 98 7 999/ 999 a 9999/9999 1m00s b 1m00s 1 Date of recording 16 2 Time of recording 16 3 Volume 88 4 Battery level indicator 20 5 Movie options 85 6 Image mode 54 a Current frame number/ 7 total number of frames 26 b Movie length 88 8 Internal memory indicator 26 9 Movie...
.../2012 12:00 9999.JPG 10 5 6 999/ 999 98 7 999/ 999 a 9999/9999 1m00s b 1m00s 1 Date of recording 16 2 Time of recording 16 3 Volume 88 4 Battery level indicator 20 5 Movie options 85 6 Image mode 54 a Current frame number/ 7 total number of frames 26 b Movie length 88 8 Internal memory indicator 26 9 Movie...
User Manual
Page 26
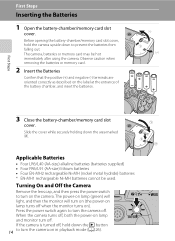
... off , hold the camera upside down to turn on the camera. When the camera turns off . Observe caution when removing the batteries or memory card. 2 Insert the Batteries Confirm that the positive (+) and negative (-) terminals are oriented correctly as described on in playback mode (A 26). Slide the cover... while securely holding down the c button 14 to prevent the batteries from falling out. If the camera is turned off . Turning On and Off the Camera Remove the lens cap, and then press the power...
... off , hold the camera upside down to turn on the camera. When the camera turns off . Observe caution when removing the batteries or memory card. 2 Insert the Batteries Confirm that the positive (+) and negative (-) terminals are oriented correctly as described on in playback mode (A 26). Slide the cover... while securely holding down the c button 14 to prevent the batteries from falling out. If the camera is turned off . Turning On and Off the Camera Remove the lens cap, and then press the power...
User Manual
Page 27
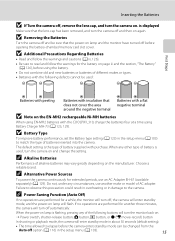
... power-on page iii and the section, "The Battery" (A 126), before using the battery. • Do not combine old and new batteries or batteries of battery supplied with the COOLPIX L310, charge the batteries four at a time using EN-MH2 batteries with purchase. Failure to observe this precaution could result... not, under any circumstances, use an AC Adapter EH-67 (available separately) (A 129). If no operations are performed for the battery on lamp and the monitor have turned off automatically. The default setting is flashing, pressing any other type of the following defects cannot...
... power-on page iii and the section, "The Battery" (A 126), before using the battery. • Do not combine old and new batteries or batteries of battery supplied with the COOLPIX L310, charge the batteries four at a time using EN-MH2 batteries with purchase. Failure to observe this precaution could result... not, under any circumstances, use an AC Adapter EH-67 (available separately) (A 129). If no operations are performed for the battery on lamp and the monitor have turned off automatically. The default setting is flashing, pressing any other type of the following defects cannot...
User Manual
Page 30
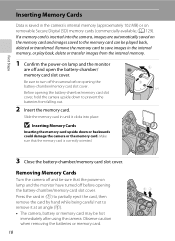
...transfer images from falling out. 2 Insert the memory card. Make sure that the power-on lamp and the monitor have turned off before opening the battery-chamber/memory card slot cover. 12 Press the card in (1) to partially eject the card, then remove the card by hand while being careful ...not to remove it clicks into the camera, images are off the camera before opening the battery-chamber/memory card slot cover, hold the camera upside down or backwards could damage the camera or the memory card. First Steps Inserting Memory Cards...
...transfer images from falling out. 2 Insert the memory card. Make sure that the power-on lamp and the monitor have turned off before opening the battery-chamber/memory card slot cover. 12 Press the card in (1) to partially eject the card, then remove the card by hand while being careful ...not to remove it clicks into the camera, images are off the camera before opening the battery-chamber/memory card slot cover, hold the camera upside down or backwards could damage the camera or the memory card. First Steps Inserting Memory Cards...
User Manual
Page 31
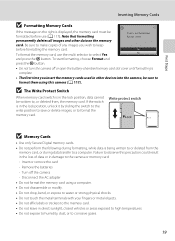
... and press the k button. Card is complete. • The first time you wish to format the memory card. Insert or remove the card - Remove the batteries - Turn off or open the battery-chamber/memory card slot cover until formatting is not formatted.
... and press the k button. Card is complete. • The first time you wish to format the memory card. Insert or remove the card - Remove the batteries - Turn off or open the battery-chamber/memory card slot cover until formatting is not formatted.

User Manual
Page 32
... can be saved varies depending on . Press the m (flash pop-up) button to turn on the camera. Battery level indicator Battery level indicator Display b Description Battery level high. The number of the 20 internal memory or memory card and image mode setting (A 54). Basic Photography.... Basic Photography and Playback: G Easy Auto Mode 3 Press the multi selector H or I to step 4. 2 Press the A button. B N Battery exhausted. Cannot take pictures using a shooting mode that can be taken is set at the time of exposures remaining. Easy auto mode is displayed. Replace...
... can be saved varies depending on . Press the m (flash pop-up) button to turn on the camera. Battery level indicator Battery level indicator Display b Description Battery level high. The number of the 20 internal memory or memory card and image mode setting (A 54). Basic Photography.... Basic Photography and Playback: G Easy Auto Mode 3 Press the multi selector H or I to step 4. 2 Press the A button. B N Battery exhausted. Cannot take pictures using a shooting mode that can be taken is set at the time of exposures remaining. Easy auto mode is displayed. Replace...

User Manual
Page 37
Removing the memory card or the battery during saving may not perform as the desired subject. B Note on Face Detection See "Notes on an object that the focus area or the focus ..., the number of a white wall) • Several objects are at different distances from the camera as expected in the following situations. Do not open the battery-chamber/memory card slot cover. Basic Photography and Playback: G Easy Auto Mode Step 3 Focus and Shoot B During Saving While images are included in the scene...
Removing the memory card or the battery during saving may not perform as the desired subject. B Note on Face Detection See "Notes on an object that the focus area or the focus ..., the number of a white wall) • Several objects are at different distances from the camera as expected in the following situations. Do not open the battery-chamber/memory card slot cover. Basic Photography and Playback: G Easy Auto Mode Step 3 Focus and Shoot B During Saving While images are included in the scene...
User Manual
Page 42
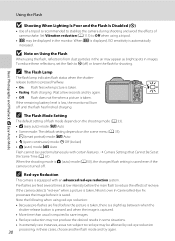
.... ➝ Camera Settings that Cannot Be Set at low intensity before the main flash to W (off) or lower the flash for shooting. If the remaining battery level is turned off until the flash has finished charging. in the monitor. B Note on the scene menu (A 35). • F (smart portrait) mode: U...not produce the desired results in images. Wait a few seconds and try again. If the camera detects "red-eye" when a picture is taken, Nikon's own In-Camera Red-Eye Fix processes the image before the picture is taken, there is a slight lag between when the shutter-release button is...
.... ➝ Camera Settings that Cannot Be Set at low intensity before the main flash to W (off) or lower the flash for shooting. If the remaining battery level is turned off until the flash has finished charging. in the monitor. B Note on the scene menu (A 35). • F (smart portrait) mode: U...not produce the desired results in images. Wait a few seconds and try again. If the camera detects "red-eye" when a picture is taken, Nikon's own In-Camera Red-Eye Fix processes the image before the picture is taken, there is a slight lag between when the shutter-release button is...

User Manual
Page 93
...the zoom stops at the maximum optical zoom ratio. After letting go of time remaining until the shooting screen is displayed. Do not open the battery-chamber / memory card slot cover. Leave the camera off . To reduce smear effects, avoid bright objects such as the sun, reflections of...is used. Five seconds after using a memory card with the alignment of the image sensor, and is not a malfunction. • The camera, battery or memory card may become warm when shooting movies for an extended period of the camera has cooled. 27m55s Movie Recording and Playback 81 Removing...
...the zoom stops at the maximum optical zoom ratio. After letting go of time remaining until the shooting screen is displayed. Do not open the battery-chamber / memory card slot cover. Leave the camera off . To reduce smear effects, avoid bright objects such as the sun, reflections of...is used. Five seconds after using a memory card with the alignment of the image sensor, and is not a malfunction. • The camera, battery or memory card may become warm when shooting movies for an extended period of the camera has cooled. 27m55s Movie Recording and Playback 81 Removing...

User Manual
Page 109
... a time (A 99) Print multiple images (A 100) Turn camera off and disconnect USB cable B Notes on Power Source • When connecting the camera to a printer, use batteries with adequate charge remaining to power the camera to print images. Connecting to Televisions, Computers and Printers Connecting to a Printer Users of PictBridge-compatible (A 144...
... a time (A 99) Print multiple images (A 100) Turn camera off and disconnect USB cable B Notes on Power Source • When connecting the camera to a printer, use batteries with adequate charge remaining to power the camera to print images. Connecting to Televisions, Computers and Printers Connecting to a Printer Users of PictBridge-compatible (A 144...
User Manual
Page 115
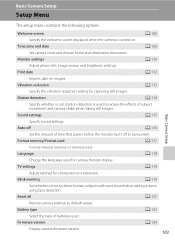
... Imprint date on . Sound settings A 115 Basic Camera Setup Specify sound settings. TV settings A 119 Adjust settings for connection to default values. Battery type A 123 Select the type of batteries used for capturing still images. Time zone and date A 105 A 106 Set camera clock and choose home and destination time zones. Format...
... Imprint date on . Sound settings A 115 Basic Camera Setup Specify sound settings. TV settings A 119 Adjust settings for connection to default values. Battery type A 123 Select the type of batteries used for capturing still images. Time zone and date A 105 A 106 Set camera clock and choose home and destination time zones. Format...

User Manual
Page 120
Basic Camera Setup Setup Menu C The Clock Battery The camera's clock is powered by a clock battery that power the camera. The clock battery charges when the main batteries are installed or an AC adapter is independent of charging. Once Print date is set, the shooting date and time can provide several days of... backup power after about 10 hours of the batteries that is connected, and can be imprinted on the image data when taking pictures. 108 D Imprinting the Date on or off using the time ...
Basic Camera Setup Setup Menu C The Clock Battery The camera's clock is powered by a clock battery that power the camera. The clock battery charges when the main batteries are installed or an AC adapter is independent of charging. Once Print date is set, the shooting date and time can provide several days of... backup power after about 10 hours of the batteries that is connected, and can be imprinted on the image data when taking pictures. 108 D Imprinting the Date on or off using the time ...


