
User Manual
Page 3
Introduction First Steps Basic Photography and Playback: G Easy Auto Mode More on Shooting More on Playback Editing Image Movie Recording and Playback Connecting to Televisions, Computers and Printers Basic Camera Setup Notes on Camera Care and General Usage Technical Notes i
Introduction First Steps Basic Photography and Playback: G Easy Auto Mode More on Shooting More on Playback Editing Image Movie Recording and Playback Connecting to Televisions, Computers and Printers Basic Camera Setup Notes on Camera Care and General Usage Technical Notes i

User Manual
Page 4
After removing or disconnecting the power source, take the product to a Nikon-authorized service representative for extended periods may result in explosion or fire. Do not use the camera or AC adapter in the presence of flammable gas Do not use electronic equipment in the presence ...of children Particular care should be taken to prevent infants from the camera or AC adapter, unplug the AC adapter and remove the battery immediately, taking care to observe the precautions listed in this Nikon product, to a Nikonauthorized service representative for extended periods while the devices...
After removing or disconnecting the power source, take the product to a Nikon-authorized service representative for extended periods may result in explosion or fire. Do not use the camera or AC adapter in the presence of flammable gas Do not use electronic equipment in the presence ...of children Particular care should be taken to prevent infants from the camera or AC adapter, unplug the AC adapter and remove the battery immediately, taking care to observe the precautions listed in this Nikon product, to a Nikonauthorized service representative for extended periods while the devices...
User Manual
Page 5
... the batteries with COOLPIX L310. • Insert batteries in this battery when no charge remains. Failure to remove or break the battery insulation or casing. Should the insulation be sure it to a Nikon-authorized service representative for use with Nikon digital cameras only, and are... compatible with EN-MH2-B2 batteries (available separately), purchase two sets (total of different makes or types. • When charging Nikon EN-MH2 rechargeable Ni-MH batteries...
... the batteries with COOLPIX L310. • Insert batteries in this battery when no charge remains. Failure to remove or break the battery insulation or casing. Should the insulation be sure it to a Nikon-authorized service representative for use with Nikon digital cameras only, and are... compatible with EN-MH2-B2 batteries (available separately), purchase two sets (total of different makes or types. • When charging Nikon EN-MH2 rechargeable Ni-MH batteries...

User Manual
Page 6
... glass and to observe this precaution could result in .) from the monitor touching the skin or entering the eyes or mouth. Avoid contact with this camera may disrupt the electronic systems of the airplane or the instruments of the hospital when using while in a hospital. Do not operate the flash with... the hospital. For Your Safety Use appropriate cables When connecting cables to the input and output jacks, use only the cables provided or sold by Nikon for the purpose, to your fingers or other objects are not pinched by the lens cover or other moving parts with care Be careful that...
... glass and to observe this precaution could result in .) from the monitor touching the skin or entering the eyes or mouth. Avoid contact with this camera may disrupt the electronic systems of the airplane or the instruments of the hospital when using while in a hospital. Do not operate the flash with... the hospital. For Your Safety Use appropriate cables When connecting cables to the input and output jacks, use only the cables provided or sold by Nikon for the purpose, to your fingers or other objects are not pinched by the lens cover or other moving parts with care Be careful that...
User Manual
Page 9
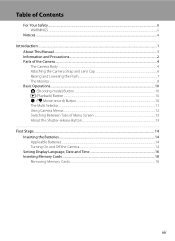
...of Contents For Your Safety...ii WARNINGS...ii Notices ...v Introduction ...1 About This Manual ...1 Information and Precautions...2 Parts of the Camera...4 The Camera Body ...4 Attaching the Camera Strap and Lens Cap 6 Raising and Lowering the Flash...7 The Monitor...8 Basic Operations...10 A (Shooting mode) Button ...10 ...c (Playback) Button ...10 b (e Movie-record) Button ...10 The Multi Selector...11 Using Camera Menus...12 Switching Between Tabs of Menu Screen 13 About the Shutter-release Button...13 First Steps ...14 Inserting the Batteries ...14 Applicable...
...of Contents For Your Safety...ii WARNINGS...ii Notices ...v Introduction ...1 About This Manual ...1 Information and Precautions...2 Parts of the Camera...4 The Camera Body ...4 Attaching the Camera Strap and Lens Cap 6 Raising and Lowering the Flash...7 The Monitor...8 Basic Operations...10 A (Shooting mode) Button ...10 ...c (Playback) Button ...10 b (e Movie-record) Button ...10 The Multi Selector...11 Using Camera Menus...12 Switching Between Tabs of Menu Screen 13 About the Shutter-release Button...13 First Steps ...14 Inserting the Batteries ...14 Applicable...
User Manual
Page 10
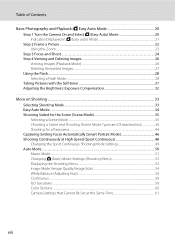
Table of Contents Basic Photography and Playback: G Easy Auto Mode 20 Step 1 Turn the Camera On and Select G (Easy Auto) Mode 20 Indicators Displayed in G (Easy auto) Mode 21 Step 2 Frame a Picture ...22 Using the Zoom...23 Step 3 Focus and ... Displaying the Shooting Menu...53 Image Mode (Image Quality/Image Size 54 White Balance (Adjusting Hue) ...56 Continuous ...58 ISO Sensitivity ...59 Color Options...60 Camera Settings that Cannot Be Set at the Same Time 61 viii
Table of Contents Basic Photography and Playback: G Easy Auto Mode 20 Step 1 Turn the Camera On and Select G (Easy Auto) Mode 20 Indicators Displayed in G (Easy auto) Mode 21 Step 2 Frame a Picture ...22 Using the Zoom...23 Step 3 Focus and ... Displaying the Shooting Menu...53 Image Mode (Image Quality/Image Size 54 White Balance (Adjusting Hue) ...56 Continuous ...58 ISO Sensitivity ...59 Color Options...60 Camera Settings that Cannot Be Set at the Same Time 61 viii

User Manual
Page 11
... Connecting to a TV...91 Using ViewNX 2 ...93 Installing ViewNX 2...93 Transferring Images to the Computer...95 Viewing Images...96 Connecting to a Printer...97 Connecting the Camera and Printer...98 Printing Images One at a Time...99 Printing Multiple Images...100 ix
... Connecting to a TV...91 Using ViewNX 2 ...93 Installing ViewNX 2...93 Transferring Images to the Computer...95 Viewing Images...96 Connecting to a Printer...97 Connecting the Camera and Printer...98 Printing Images One at a Time...99 Printing Multiple Images...100 ix
User Manual
Page 12
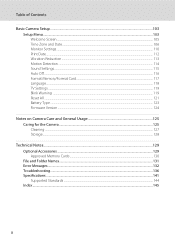
Table of Contents Basic Camera Setup ...103 Setup Menu...103 Welcome Screen ...105 Time Zone and Date...106 Monitor Settings...110 Print Date...112 Vibration Reduction ...113 Motion Detection ...114 ... Card ...117 Language...118 TV Settings ...119 Blink Warning ...119 Reset All ...121 Battery Type ...123 Firmware Version ...124 Notes on Camera Care and General Usage 125 Caring for the Camera ...125 Cleaning ...127 Storage ...128 Technical Notes...129 Optional Accessories ...129 Approved Memory Cards ...130 File and Folder Names...131 Error...
Table of Contents Basic Camera Setup ...103 Setup Menu...103 Welcome Screen ...105 Time Zone and Date...106 Monitor Settings...110 Print Date...112 Vibration Reduction ...113 Motion Detection ...114 ... Card ...117 Language...118 TV Settings ...119 Blink Warning ...119 Reset All ...121 Battery Type ...123 Firmware Version ...124 Notes on Camera Care and General Usage 125 Caring for the Camera ...125 Cleaning ...127 Storage ...128 Technical Notes...129 Optional Accessories ...129 Approved Memory Cards ...130 File and Folder Names...131 Error...

User Manual
Page 13
... written to help you enjoy taking pictures with this manual thoroughly before using the camera. Read this camera can be helpful when using the camera. C Memory Cards Pictures taken with your Nikon digital camera. This icon marks tips, additional D information that should be read before the internal... A information is inserted, all those who use , to prevent damage to find the information you for purchasing a Nikon COOLPIX L310 digital camera. Screen Samples In this manual may be stored in the Quick Start Guide. Symbols and Conventions To make it easier to the...
... written to help you enjoy taking pictures with this manual thoroughly before using the camera. Read this camera can be helpful when using the camera. C Memory Cards Pictures taken with your Nikon digital camera. This icon marks tips, additional D information that should be read before the internal... A information is inserted, all those who use , to prevent damage to find the information you for purchasing a Nikon COOLPIX L310 digital camera. Screen Samples In this manual may be stored in the Quick Start Guide. Symbols and Conventions To make it easier to the...
User Manual
Page 14
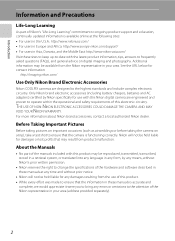
...Taking Important Pictures Before taking the camera on a trip), take a test shot to -date with this product may be held liable for contact information: http://imaging.nikon.com/ Use Only Nikon Brand Electronic Accessories Nikon COOLPIX cameras are engineered and proven to operate ...within the operational and safety requirements of Nikon's "Life-Long Learning" commitment to the attention of the Nikon representative in these manuals is...
...Taking Important Pictures Before taking the camera on a trip), take a test shot to -date with this product may be held liable for contact information: http://imaging.nikon.com/ Use Only Nikon Brand Electronic Accessories Nikon COOLPIX cameras are engineered and proven to operate ...within the operational and safety requirements of Nikon's "Life-Long Learning" commitment to the attention of the Nikon representative in these manuals is...

User Manual
Page 15
...destroying data storage devices. 3 Unless the prior permission of the government was digitally copied or reproduced by means of a scanner, digital camera or other device may be taken to avoid injury or damage to also replace any pictures selected for example, pictures of unused postage... by law. • Items prohibited by public agencies and private groups, ID cards and tickets, such as memory cards or builtin camera memory does not completely erase the original image data. Do not use by the government is the user's responsibility. Introduction Information and Precautions...
...destroying data storage devices. 3 Unless the prior permission of the government was digitally copied or reproduced by means of a scanner, digital camera or other device may be taken to avoid injury or damage to also replace any pictures selected for example, pictures of unused postage... by law. • Items prohibited by public agencies and private groups, ID cards and tickets, such as memory cards or builtin camera memory does not completely erase the original image data. Do not use by the government is the user's responsibility. Introduction Information and Precautions...

User Manual
Page 16
... 3 Self-timer lamp 31 4 Power switch/Power-on lamp 20, 116 5 Speaker 88 6 Built-in microphone 80 7 Eyelet for camera strap 6 8 Flash 7, 28 9 DC input connector (for AC adapter available separately from Nikon) .... 15, 129 10 USB connector and audio/video output 91, 95, 98 11 Pin cover 91, 95, 98 12...
... 3 Self-timer lamp 31 4 Power switch/Power-on lamp 20, 116 5 Speaker 88 6 Built-in microphone 80 7 Eyelet for camera strap 6 8 Flash 7, 28 9 DC input connector (for AC adapter available separately from Nikon) .... 15, 129 10 USB connector and audio/video output 91, 95, 98 11 Pin cover 91, 95, 98 12...

User Manual
Page 17
Introduction Parts of the Camera 1 23 4 5 6 7 8 11 10 9 12 13 14 1 Monitor 8 2 A (shooting mode) button 10 3 Flash lamp 28 4 b (e movie-record) button 10 5 c (playback) button 10, 26 6 Eyelet for camera strap 6 7 Multi selector 11 8 k (apply selection) button 11 9 Battery-chamber/ memory card slot cover 14, 18 10 l (delete) button 27, 88 11 d button 12, 53, 67, 83, 104 12 Tripod socket 142 13 Battery-chamber 14 14 Memory card slot 18 5
Introduction Parts of the Camera 1 23 4 5 6 7 8 11 10 9 12 13 14 1 Monitor 8 2 A (shooting mode) button 10 3 Flash lamp 28 4 b (e movie-record) button 10 5 c (playback) button 10, 26 6 Eyelet for camera strap 6 7 Multi selector 11 8 k (apply selection) button 11 9 Battery-chamber/ memory card slot cover 14, 18 10 l (delete) button 27, 88 11 d button 12, 53, 67, 83, 104 12 Tripod socket 142 13 Battery-chamber 14 14 Memory card slot 18 5

User Manual
Page 18
Introduction Parts of the Camera Attaching the Camera Strap and Lens Cap Attach the lens cap to the camera strap, and then attach the strap to protect the lens. B Lens Cap • Remove the lens cap before you take a picture. • At times when you will not be taking pictures such as when the power is off or while you are 6 carrying the camera, attach the lens cap to the camera to the camera. Attach them at two places.
Introduction Parts of the Camera Attaching the Camera Strap and Lens Cap Attach the lens cap to the camera strap, and then attach the strap to protect the lens. B Lens Cap • Remove the lens cap before you take a picture. • At times when you will not be taking pictures such as when the power is off or while you are 6 carrying the camera, attach the lens cap to the camera to the camera. Attach them at two places.

User Manual
Page 19
Introduction Parts of the Camera Raising and Lowering the Flash Press the m (flash pop-up) button to raise the flash. • See "Using the Flash" (A 28) for more information on setting the flash. • Push the flash down gently to lower the flash until it clicks into place when not in use. 7
Introduction Parts of the Camera Raising and Lowering the Flash Press the m (flash pop-up) button to raise the flash. • See "Using the Flash" (A 28) for more information on setting the flash. • Push the flash down gently to lower the flash until it clicks into place when not in use. 7

User Manual
Page 20
Parts of sport continuous mode ....... 49 28 Self-timer indicator/Pet portrait auto release 31, 43 8 * The icon displayed varies with current camera settings). The indicators and photo info displayed during shooting and playback (actual display varies with the shooting mode. Shooting 4 6 28 5 27 1 23... compensation value 32 24 Color options 60 25 White balance mode 56 26 Continuous shooting mode 58 27 Type of the Camera Introduction The Monitor The following indicators may be displayed in the monitor during shooting and playback will turn off after a few seconds (A...
Parts of sport continuous mode ....... 49 28 Self-timer indicator/Pet portrait auto release 31, 43 8 * The icon displayed varies with current camera settings). The indicators and photo info displayed during shooting and playback (actual display varies with the shooting mode. Shooting 4 6 28 5 27 1 23... compensation value 32 24 Color options 60 25 White balance mode 56 26 Continuous shooting mode 58 27 Type of the Camera Introduction The Monitor The following indicators may be displayed in the monitor during shooting and playback will turn off after a few seconds (A...

User Manual
Page 21
Parts of the Camera Introduction Playback 1 2 3 4 14 13 11 12 15/05/2012 12:00 9999.JPG 10 5 6 999/ 999 98 7 999/ 999 a 9999/9999 1m00s b 1m00s 1 Date of ...
Parts of the Camera Introduction Playback 1 2 3 4 14 13 11 12 15/05/2012 12:00 9999.JPG 10 5 6 999/ 999 98 7 999/ 999 a 9999/9999 1m00s b 1m00s 1 Date of ...
User Manual
Page 22
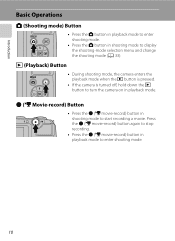
... the playback mode when the c button is pressed. • If the camera is turned off, hold down the c button to turn the camera on in shooting mode to start recording a movie. b (e Movie-record) Button • Press the b (e movie-record) button in playback mode. Press the b (e movie-record) button ...
... the playback mode when the c button is pressed. • If the camera is turned off, hold down the c button to turn the camera on in shooting mode to start recording a movie. b (e Movie-record) Button • Press the b (e movie-record) button in playback mode. Press the b (e movie-record) button ...

User Manual
Page 24
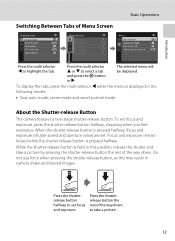
... then press K or the k button. Tab for the menus available in the current shooting mode/ tab for playback menu Tab for the selected mode. The camera exits the menu display. 12 Use the multi selector (A 11) to display the menu for movie menu (during shooting mode)/setup menu (during shooting mode... displayed when previous menu items are one or more menu items to follow. 1 Press the d button. To change tabs, press J (A 13). Introduction Basic Operations Using Camera Menus Press the d button (A 5) to apply settings of each menu item.
... then press K or the k button. Tab for the menus available in the current shooting mode/ tab for playback menu Tab for the selected mode. The camera exits the menu display. 12 Use the multi selector (A 11) to display the menu for movie menu (during shooting mode)/setup menu (during shooting mode... displayed when previous menu items are one or more menu items to follow. 1 Press the d button. To change tabs, press J (A 13). Introduction Basic Operations Using Camera Menus Press the d button (A 5) to apply settings of each menu item.
User Manual
Page 25
... held in this may result in the following modes. • Easy auto mode, scene mode and smart portrait mode About the Shutter-release Button The camera features a two-stage shutter-release button. To set focus and exposure. While the shutter-release button is displayed in... camera shake and blurred images. Press the shutterrelease button halfway to take a picture. 13 The selected menu will be displayed. Press the shutterrelease button the rest ...
... held in this may result in the following modes. • Easy auto mode, scene mode and smart portrait mode About the Shutter-release Button The camera features a two-stage shutter-release button. To set focus and exposure. While the shutter-release button is displayed in... camera shake and blurred images. Press the shutterrelease button halfway to take a picture. 13 The selected menu will be displayed. Press the shutterrelease button the rest ...


