

L22 / L21 User's Manual
Page 4
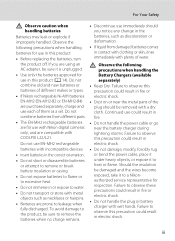
... the precautions listed in this section are indicated by qualified technicians. The consequences that should be read before using this Nikon product, to prevent possible injury. Handle the camera strap with care Never place the strap around the neck of a fall or other small parts into their entirety before... equipment. For Your Safety To prevent damage to your Nikon product or injury to yourself or to others, read the following symbol: This icon marks warnings, information that could result in explosion or fire. Do not use the camera or AC adapter in the event of flammable gas Do...
... the precautions listed in this section are indicated by qualified technicians. The consequences that should be read before using this Nikon product, to prevent possible injury. Handle the camera strap with care Never place the strap around the neck of a fall or other small parts into their entirety before... equipment. For Your Safety To prevent damage to your Nikon product or injury to yourself or to others, read the following symbol: This icon marks warnings, information that could result in explosion or fire. Do not use the camera or AC adapter in the event of flammable gas Do...
L22 / L21 User's Manual
Page 5
... become exposed, take it to observe this precaution could result in or expose to water. • Do not transport or store with COOLPIX L22/L21. Should the insulation be sure to remove the batteries when no charge remains. • Discontinue use immediately should you are prone...the product off. iii Observe the following precautions when handling batteries for use could result in this product (A 14). Continued use with Nikon digital cameras only, and are compatible with metal objects such as necklaces or hairpins. • Batteries are using an AC adapter, be removed ...
... become exposed, take it to observe this precaution could result in or expose to water. • Do not transport or store with COOLPIX L22/L21. Should the insulation be sure to remove the batteries when no charge remains. • Discontinue use immediately should you are prone...the product off. iii Observe the following precautions when handling batteries for use could result in this product (A 14). Continued use with Nikon digital cameras only, and are compatible with metal objects such as necklaces or hairpins. • Batteries are using an AC adapter, be removed ...

L22 / L21 User's Manual
Page 6
...precaution could cause hearing loss or damage the equipment. Observe caution when using the flash Using the flash close to observe this camera may disrupt the electronic systems of the airplane or the instruments of the hospital when using inside an airplane or the hospital Turn... or object Failure to maintain compliance with liquid crystal Should the monitor break, care should not be taken to avoid injury caused by Nikon for the purpose, to observe this precaution could cause temporary visual impairment. Follow the instructions of the hospital. Avoid contact with product ...
...precaution could cause hearing loss or damage the equipment. Observe caution when using the flash Using the flash close to observe this camera may disrupt the electronic systems of the airplane or the instruments of the hospital when using inside an airplane or the hospital Turn... or object Failure to maintain compliance with liquid crystal Should the monitor break, care should not be taken to avoid injury caused by Nikon for the purpose, to observe this precaution could cause temporary visual impairment. Follow the instructions of the hospital. Avoid contact with product ...
L22 / L21 User's Manual
Page 9
Table of Contents For Your Safety...ii WARNINGS...ii Notices ...v Introduction ...1 About This Manual ...1 Information and Precautions...2 Parts of the Camera...4 The Camera Body ...4 The Monitor...8 Basic Operations...10 A (shooting mode) button ...10 c (playback) button...10 The Multi Selector...11 d button ......Language, Date and Time 16 Inserting Memory Cards ...18 Removing Memory Cards...19 G Basic Photography and Playback: Easy Auto Mode 20 Step 1 Turn the Camera On and Select G (Easy Auto) Mode 20 Indicators Displayed in G (Easy auto) Mode 21 Step 2 Frame a Picture ...22 Using the ...
Table of Contents For Your Safety...ii WARNINGS...ii Notices ...v Introduction ...1 About This Manual ...1 Information and Precautions...2 Parts of the Camera...4 The Camera Body ...4 The Monitor...8 Basic Operations...10 A (shooting mode) button ...10 c (playback) button...10 The Multi Selector...11 d button ......Language, Date and Time 16 Inserting Memory Cards ...18 Removing Memory Cards...19 G Basic Photography and Playback: Easy Auto Mode 20 Step 1 Turn the Camera On and Select G (Easy Auto) Mode 20 Indicators Displayed in G (Easy auto) Mode 21 Step 2 Frame a Picture ...22 Using the ...

L22 / L21 User's Manual
Page 11
... Computers and Printers 58 Connecting to a TV...58 Connecting to a Computer...59 Before Connecting the Camera...59 Transferring Pictures from a Camera to a Computer 60 Connecting to a Printer...64 Connecting the Camera and Printer...65 Printing Pictures One at a Time ...66 Printing Multiple Pictures ...67 Creating a... Shooting Menu 72 Displaying the Shooting Menu...73 A Image mode ...74 B White Balance...76 C Continuous ...78 F Color Options ...79 Camera Settings that Cannot Be Set at the Same Time 80 Playback Options: The Playback Menu 81 Displaying the Playback Menu...81 b Slide Show...83...
... Computers and Printers 58 Connecting to a TV...58 Connecting to a Computer...59 Before Connecting the Camera...59 Transferring Pictures from a Camera to a Computer 60 Connecting to a Printer...64 Connecting the Camera and Printer...65 Printing Pictures One at a Time ...66 Printing Multiple Pictures ...67 Creating a... Shooting Menu 72 Displaying the Shooting Menu...73 A Image mode ...74 B White Balance...76 C Continuous ...78 F Color Options ...79 Camera Settings that Cannot Be Set at the Same Time 80 Playback Options: The Playback Menu 81 Displaying the Playback Menu...81 b Slide Show...83...
L22 / L21 User's Manual
Page 12
Table of Contents Basic Camera Setup: The Setup Menu 85 Displaying the Setup Menu...86 a Menus ...87 c Welcome Screen...88 d Date...89 e Monitor Settings ...92 f Date Imprint...94 w Electronic VR.........107 h Copy...108 r Firmware Version ...109 Technical Notes...110 Optional Accessories ...110 Approved Memory Cards ...110 Image File and Folder Names...111 Caring for the Camera ...112 Cleaning ...114 Storage ...115 Error Messages...116 Troubleshooting...119 Specifications ...124 Supported Standards ...128 Index ...129 x
Table of Contents Basic Camera Setup: The Setup Menu 85 Displaying the Setup Menu...86 a Menus ...87 c Welcome Screen...88 d Date...89 e Monitor Settings ...92 f Date Imprint...94 w Electronic VR.........107 h Copy...108 r Firmware Version ...109 Technical Notes...110 Optional Accessories ...110 Approved Memory Cards ...110 Image File and Folder Names...111 Caring for the Camera ...112 Cleaning ...114 Storage ...115 Error Messages...116 Troubleshooting...119 Specifications ...124 Supported Standards ...128 Index ...129 x
L22 / L21 User's Manual
Page 13
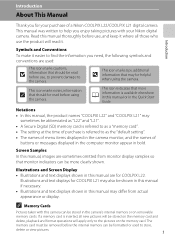
... taken with your purchase of buttons or messages displayed in the computer monitor appear in the camera monitor, and the names of a Nikon COOLPIX L22/COOLPIX L21 digital camera. Illustrations and Screen Display • Illustrations and text displays shown in the camera's internal memory or on the memory card. Read this manual are used to the pictures...
... taken with your purchase of buttons or messages displayed in the computer monitor appear in the camera monitor, and the names of a Nikon COOLPIX L22/COOLPIX L21 digital camera. Illustrations and Screen Display • Illustrations and text displays shown in the camera's internal memory or on the memory card. Read this manual are used to the pictures...
L22 / L21 User's Manual
Page 14
...or translated into any language in any form, by Nikon specifically for use of this product may result from product malfunction. THE USE OF NON-NIKON ELECTRONIC ACCESSORIES COULD DAMAGE THE CAMERA AND MAY VOID YOUR NIKON WARRANTY. About the Manuals • No part ...may be held liable for contact information: http://imaging.nikon.com/ Use Only Nikon Brand Electronic Accessories Nikon COOLPIX cameras are engineered and proven to operate within the operational and safety requirements of this Nikon digital camera are designed to the highest standards and include complex electronic...
...or translated into any language in any form, by Nikon specifically for use of this product may result from product malfunction. THE USE OF NON-NIKON ELECTRONIC ACCESSORIES COULD DAMAGE THE CAMERA AND MAY VOID YOUR NIKON WARRANTY. About the Manuals • No part ...may be held liable for contact information: http://imaging.nikon.com/ Use Only Nikon Brand Electronic Accessories Nikon COOLPIX cameras are engineered and proven to operate within the operational and safety requirements of this Nikon digital camera are designed to the highest standards and include complex electronic...

L22 / L21 User's Manual
Page 15
... Note that simply being in possession of material that deleting images or formatting data storage devices such as memory cards or builtin camera memory does not completely erase the original image data. Unless the prior permission of the government was digitally copied or reproduced by...any pictures selected for example, pictures of Data Storage Devices Please note that was obtained, the copying or reproduction of a scanner, digital camera or other device may be punishable by law. • Items prohibited by law from discarded storage devices using commercial deletion software, or ...
... Note that simply being in possession of material that deleting images or formatting data storage devices such as memory cards or builtin camera memory does not completely erase the original image data. Unless the prior permission of the government was digitally copied or reproduced by...any pictures selected for example, pictures of Data Storage Devices Please note that was obtained, the copying or reproduction of a scanner, digital camera or other device may be punishable by law. • Items prohibited by law from discarded storage devices using commercial deletion software, or ...
L22 / L21 User's Manual
Page 16
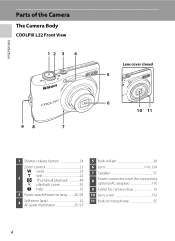
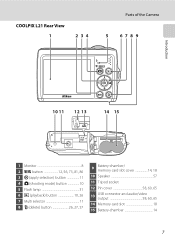
Introduction Parts of the Camera The Camera Body COOLPIX L22 Front View 12 3 4 98 7 Lens cover closed 5 6 10 11 1 Shutter-release button 24 Zoom control 23 f : wide 23 2 g : tele 23 h : Thumbnail playback 48 i : playback zoom 50 j : help 13 3 Power switch/Power-on lamp ....... 20, 99 4 Self-timer lamp 32 AF-assist illuminator 25, 97 5 Built-in flash 30 6 Lens 114, 124 7 Speaker 57 8 Power connector cover (for connecting optional AC adapter 110 9 Eyelet for camera strap 13 10 Lens cover 112 11 Built-in microphone 55 4
Introduction Parts of the Camera The Camera Body COOLPIX L22 Front View 12 3 4 98 7 Lens cover closed 5 6 10 11 1 Shutter-release button 24 Zoom control 23 f : wide 23 2 g : tele 23 h : Thumbnail playback 48 i : playback zoom 50 j : help 13 3 Power switch/Power-on lamp ....... 20, 99 4 Self-timer lamp 32 AF-assist illuminator 25, 97 5 Built-in flash 30 6 Lens 114, 124 7 Speaker 57 8 Power connector cover (for connecting optional AC adapter 110 9 Eyelet for camera strap 13 10 Lens cover 112 11 Built-in microphone 55 4
L22 / L21 User's Manual
Page 17
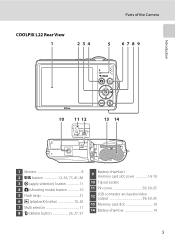
COOLPIX L22 Rear View 1 2 34 Parts of the Camera 5 67 89 Introduction 10 11 12 13 14 1 Monitor 8 2 d button 12, 56, 73, 81, 86 3 k (apply selection) button 11 4 A (shooting mode) button 10 5 Flash lamp 31 6 c (playback) button 10, 26 7 Multi selector 11 8 l (delete) button 26, 27, 57 9 Battery-chamber/ memory card slot cover 14, 18 10 Tripod socket 11 Pin cover 58, 60, 65 12 USB connector and audio/video output 58, 60, 65 13 Memory card slot 18 14 Battery-chamber 14 5
COOLPIX L22 Rear View 1 2 34 Parts of the Camera 5 67 89 Introduction 10 11 12 13 14 1 Monitor 8 2 d button 12, 56, 73, 81, 86 3 k (apply selection) button 11 4 A (shooting mode) button 10 5 Flash lamp 31 6 c (playback) button 10, 26 7 Multi selector 11 8 l (delete) button 26, 27, 57 9 Battery-chamber/ memory card slot cover 14, 18 10 Tripod socket 11 Pin cover 58, 60, 65 12 USB connector and audio/video output 58, 60, 65 13 Memory card slot 18 14 Battery-chamber 14 5
L22 / L21 User's Manual
Page 18
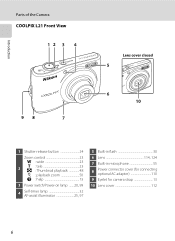
Introduction Parts of the Camera COOLPIX L21 Front View 12 3 4 98 7 Lens cover closed 5 6 10 1 Shutter-release button 24 Zoom control 23 f : wide 23 2 g : tele 23 h : Thumbnail playback 48 i : playback zoom 50 j : help 13 3 Power switch/Power-on lamp ....... 20, 99 4 Self-timer lamp 32 AF-assist illuminator 25, 97 5 Built-in flash 30 6 Lens 114, 124 7 Built-in microphone 55 8 Power connector cover (for connecting optional AC adapter 110 9 Eyelet for camera strap 13 10 Lens cover 112 6
Introduction Parts of the Camera COOLPIX L21 Front View 12 3 4 98 7 Lens cover closed 5 6 10 1 Shutter-release button 24 Zoom control 23 f : wide 23 2 g : tele 23 h : Thumbnail playback 48 i : playback zoom 50 j : help 13 3 Power switch/Power-on lamp ....... 20, 99 4 Self-timer lamp 32 AF-assist illuminator 25, 97 5 Built-in flash 30 6 Lens 114, 124 7 Built-in microphone 55 8 Power connector cover (for connecting optional AC adapter 110 9 Eyelet for camera strap 13 10 Lens cover 112 6
L22 / L21 User's Manual
Page 19
COOLPIX L21 Rear View 1 2 34 Parts of the Camera 5 67 8 9 Introduction 10 11 12 13 14 15 1 Monitor 8 2 d button 12, 56, 73, 81, 86 3 k (apply selection) button 11 4 A (shooting mode) button 10 5 Flash lamp 31 6 c (playback) button 10, 26 7 Multi selector 11 8 l (delete) button 26, 27, 57 9 Battery-chamber/ memory card slot cover 14, 18 10 Speaker 57 11 Tripod socket 12 Pin cover 58, 60, 65 13 USB connector and audio/video output 58, 60, 65 14 Memory card slot 18 15 Battery-chamber 14 7
COOLPIX L21 Rear View 1 2 34 Parts of the Camera 5 67 8 9 Introduction 10 11 12 13 14 15 1 Monitor 8 2 d button 12, 56, 73, 81, 86 3 k (apply selection) button 11 4 A (shooting mode) button 10 5 Flash lamp 31 6 c (playback) button 10, 26 7 Multi selector 11 8 l (delete) button 26, 27, 57 9 Battery-chamber/ memory card slot cover 14, 18 10 Speaker 57 11 Tripod socket 12 Pin cover 58, 60, 65 13 USB connector and audio/video output 58, 60, 65 14 Memory card slot 18 15 Battery-chamber 14 7
L22 / L21 User's Manual
Page 20
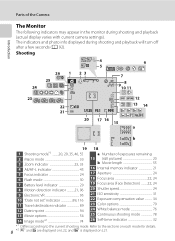
... 76 25 Continuous shooting mode 78 26 Self-timer indicator 32 *1 Differs according to the sections on each mode for details. 8 *2 S and L are displayed on L22, and z is displayed on L21. Shooting 4 6 5 26 1 2 3 25 10 24 7 9 10811 23 12 22 +1.0 21 1/125 F3.1 999 13 14 20 17 16 ...15 999 a 9999 1m00 s b 1m00 s 19 18 1 Shooting mode*1 .........20, 29, 35, 46, 55 a Number of the Camera Introduction The Monitor The following indicators may appear in the monitor during shooting and playback will turn off after a few seconds (A 92). Refer to the...
... 76 25 Continuous shooting mode 78 26 Self-timer indicator 32 *1 Differs according to the sections on each mode for details. 8 *2 S and L are displayed on L22, and z is displayed on L21. Shooting 4 6 5 26 1 2 3 25 10 24 7 9 10811 23 12 22 +1.0 21 1/125 F3.1 999 13 14 20 17 16 ...15 999 a 9999 1m00 s b 1m00 s 19 18 1 Shooting mode*1 .........20, 29, 35, 46, 55 a Number of the Camera Introduction The Monitor The following indicators may appear in the monitor during shooting and playback will turn off after a few seconds (A 92). Refer to the...
L22 / L21 User's Manual
Page 21
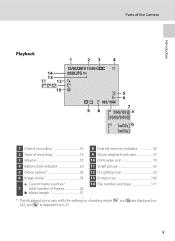
S and L are displayed on L22, and z is displayed on L21. 9 Parts of the Camera Introduction Playback 14 13 11 12 10 1 23 4 15/05/2010 12:00 9999.JPG 5 6 999 999 98 7 999 999 a 9999 9999 1m00s b 1m00s 1 Date ...
S and L are displayed on L22, and z is displayed on L21. 9 Parts of the Camera Introduction Playback 14 13 11 12 10 1 23 4 15/05/2010 12:00 9999.JPG 5 6 999 999 98 7 999 999 a 9999 9999 1m00s b 1m00s 1 Date ...

L22 / L21 User's Manual
Page 22
... allows you to change the shooting mode. c (playback) button • During shooting mode, the camera enters the playback mode when c is pressed. • If the camera is turned off, hold down c to shooting mode without changing the current shooting mode. Shooting-mode Selection... 55) 5 A Auto mode (A 29) 5 * The displayed icons vary depending on in shooting mode, the shooting-mode selection menu is displayed, the camera returns to turn the camera on the last mode selected. Introduction Basic Operations A (shooting mode) button • When A is pressed in playback mode, the...
... allows you to change the shooting mode. c (playback) button • During shooting mode, the camera enters the playback mode when c is pressed. • If the camera is turned off, hold down c to shooting mode without changing the current shooting mode. Shooting-mode Selection... 55) 5 A Auto mode (A 29) 5 * The displayed icons vary depending on in shooting mode, the shooting-mode selection menu is displayed, the camera returns to turn the camera on the last mode selected. Introduction Basic Operations A (shooting mode) button • When A is pressed in playback mode, the...

L22 / L21 User's Manual
Page 25
...control to g (j) when M/j is held in this may result in series), or multi-shot 16. COOLPIX L22 COOLPIX L21 Continuous Choose single frame, continuous mode, BSS (camera chooses sharpest shot in camera shake and blurred pictures. Do not use force when pressing the shutter-release button, as this position. ...Exit Back About the Shutter-release Button The camera features a two-stage shutter-release button. To release the shutter and take picture. To return to the original menu, rotate the ...
...control to g (j) when M/j is held in this may result in series), or multi-shot 16. COOLPIX L22 COOLPIX L21 Continuous Choose single frame, continuous mode, BSS (camera chooses sharpest shot in camera shake and blurred pictures. Do not use force when pressing the shutter-release button, as this position. ...Exit Back About the Shutter-release Button The camera features a two-stage shutter-release button. To release the shutter and take picture. To return to the original menu, rotate the ...
L22 / L21 User's Manual
Page 26
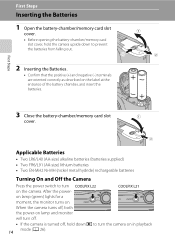
... off, both the power-on lamp and monitor will turn off. • If the camera is turned off, hold the camera upside down c to turn the camera on the camera. First Steps 3 Close the battery-chamber/memory card slot 1 cover. 2 Applicable Batteries • Two LR6/L40 (AA-size) alkaline batteries (... (AA-size) lithium batteries • Two EN-MH2 Ni-MH (nickel metal hydride) rechargeable batteries Turning On and Off the Camera Press the power switch to turn COOLPIX L22 COOLPIX L21 on in playback 14 mode (A 26). on lamp (green) lights for a moment, the monitor turns on the label ...
... off, both the power-on lamp and monitor will turn off. • If the camera is turned off, hold the camera upside down c to turn the camera on the camera. First Steps 3 Close the battery-chamber/memory card slot 1 cover. 2 Applicable Batteries • Two LR6/L40 (AA-size) alkaline batteries (... (AA-size) lithium batteries • Two EN-MH2 Ni-MH (nickel metal hydride) rechargeable batteries Turning On and Off the Camera Press the power switch to turn COOLPIX L22 COOLPIX L21 on in playback 14 mode (A 26). on lamp (green) lights for a moment, the monitor turns on the label ...

L22 / L21 User's Manual
Page 27
... Choose a reliable brand. B Battery Type By setting Battery type (A 105) in the setup menu (A 85) to the camera. C Alternative Power Sources To power the camera continuously for extended periods, use EN-MH1 Ni-MH rechargeable batteries. Batteries with purchase. Do not, under any other type of... make or model of battery supplied with a flat negative terminal B Notes for EN-MH1 Rechargeable Batteries, MH-70/71 Battery Charger This camera can also use an AC Adapter EH-65A (available separately) (A 110). Inserting the Batteries B Removing the Batteries Confirm the power-on again...
... Choose a reliable brand. B Battery Type By setting Battery type (A 105) in the setup menu (A 85) to the camera. C Alternative Power Sources To power the camera continuously for extended periods, use EN-MH1 Ni-MH rechargeable batteries. Batteries with purchase. Do not, under any other type of... make or model of battery supplied with a flat negative terminal B Notes for EN-MH1 Rechargeable Batteries, MH-70/71 Battery Charger This camera can also use an AC Adapter EH-65A (available separately) (A 110). Inserting the Batteries B Removing the Batteries Confirm the power-on again...
L22 / L21 User's Manual
Page 28
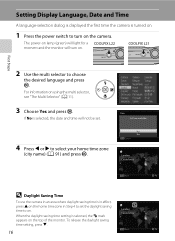
... No Cancel London Casablanca Back D Daylight Saving Time To use the camera in Step 4 to set . To release the daylight saving time setting, press I. 16 London Casablanca Back The power-on lamp (green) will light for a COOLPIX L22 moment and the monitor will not be set the daylight saving time ...to on. For information on . COOLPIX L21 First Steps 2 Use the multi selector to select your home time zone (city name) (A ...
... No Cancel London Casablanca Back D Daylight Saving Time To use the camera in Step 4 to set . To release the daylight saving time setting, press I. 16 London Casablanca Back The power-on lamp (green) will light for a COOLPIX L22 moment and the monitor will not be set the daylight saving time ...to on. For information on . COOLPIX L21 First Steps 2 Use the multi selector to select your home time zone (city name) (A ...


