
User Manual
Page 5
...Avoid contact with metal objects such as discoloration or deformation. Before removing the battery, turn the camera off and allow the battery to cool. • Discontinue use immediately should you notice any ...Observe due caution when removing memory cards from the subject. Observe caution when operating the flash Using the flash close to your eye accidentally. iii Use appropriate cables When connecting cables to the ... cards Memory cards may become hot during use only the cables provided or sold by Nikon for the purpose, to maintain compliance with your eye to the viewfinder, care should ...
...Avoid contact with metal objects such as discoloration or deformation. Before removing the battery, turn the camera off and allow the battery to cool. • Discontinue use immediately should you notice any ...Observe due caution when removing memory cards from the subject. Observe caution when operating the flash Using the flash close to your eye accidentally. iii Use appropriate cables When connecting cables to the ... cards Memory cards may become hot during use only the cables provided or sold by Nikon for the purpose, to maintain compliance with your eye to the viewfinder, care should ...
User Manual
Page 10
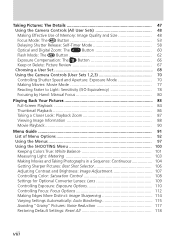
...Pictures: The Details 47 Using the Camera Controls (All User Sets 48 Making Effective Use of Memory: Image Quality and Size 48 Focus Mode: The Button 53 Delaying Shutter Release: Self-Timer Mode 58 Optical and Digital Zoom: The Button 60 Flash Mode: The Button 62 Exposure ...Compensation: The Button 66 Keep or Delete: Picture Review 67 Choosing a User Set 68 Using the Camera Controls (User Sets 1,2,3 70 Controlling Shutter Speed and Aperture:...
...Pictures: The Details 47 Using the Camera Controls (All User Sets 48 Making Effective Use of Memory: Image Quality and Size 48 Focus Mode: The Button 53 Delaying Shutter Release: Self-Timer Mode 58 Optical and Digital Zoom: The Button 60 Flash Mode: The Button 62 Exposure ...Compensation: The Button 66 Keep or Delete: Picture Review 67 Choosing a User Set 68 Using the Camera Controls (User Sets 1,2,3 70 Controlling Shutter Speed and Aperture:...

User Manual
Page 11
Numbers 134 Formatting Memory Cards: CF Card Format 135 Controlling the Flash: Speedlight Options 136 Audio Confirmation: Shutter Sound 140 Setting the Time and Date: Date 141 Storing Photo Info in a Separate File: info.txt 141 Choosing a ... During Playback: Hide Image 152 Ordering Prints: Print Set 153 Selecting Images for Transfer: Auto Transfer 155 Technical Notes: Camera Care, Options, and Resources 157 Optional Accessories 158 Caring for the Camera and Battery 160 Web Resources 163 Troubleshooting 164 Specifications 171 Index ...175 ix Using the SET-UP Menu 120 Organizing...
Numbers 134 Formatting Memory Cards: CF Card Format 135 Controlling the Flash: Speedlight Options 136 Audio Confirmation: Shutter Sound 140 Setting the Time and Date: Date 141 Storing Photo Info in a Separate File: info.txt 141 Choosing a ... During Playback: Hide Image 152 Ordering Prints: Print Set 153 Selecting Images for Transfer: Auto Transfer 155 Technical Notes: Camera Care, Options, and Resources 157 Optional Accessories 158 Caring for the Camera and Battery 160 Web Resources 163 Troubleshooting 164 Specifications 171 Index ...175 ix Using the SET-UP Menu 120 Organizing...
User Manual
Page 17
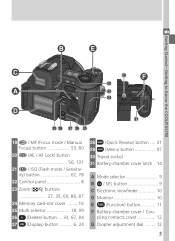
... 5 Getting Started-Getting to Know the COOLPIX5700 19 / MF (Focus mode / Manual Focus) button 53, 80 20 (AE / AF Lock) button 56, 131 21 / ISO (Flash mode / Sensitivity) button 62, 78 22 Control panel 8 23 Zoom ( / ) buttons 27, 35, 60, 86, 87 24 Memory card-slot cover ........ 16 25 Multi selector...
... 5 Getting Started-Getting to Know the COOLPIX5700 19 / MF (Focus mode / Manual Focus) button 53, 80 20 (AE / AF Lock) button 56, 131 21 / ISO (Flash mode / Sensitivity) button 62, 78 22 Control panel 8 23 Zoom ( / ) buttons 27, 35, 60, 86, 87 24 Memory card-slot cover ........ 16 25 Multi selector...

User Manual
Page 18
...monitor or viewfinder indicate the status of the following camera settings: 1 2 8 4 Self-timer indicator 58 3 9 5 Shutter speed 73 10 11 6 Exposure mode 70 4 12 7 Metering mode 103 5 13 8 Flash-ready indicator 28 6 7 14 15 9 Flash mode 62 10 Battery level indicator1........... 23 16 17... 18 11 "Date not set" icon 2 20 User Set A 12 Focus indicator 3 28 1 Digital zoom 60 2 Zoom indicator 60, 105 3 Current folder...
...monitor or viewfinder indicate the status of the following camera settings: 1 2 8 4 Self-timer indicator 58 3 9 5 Shutter speed 73 10 11 6 Exposure mode 70 4 12 7 Metering mode 103 5 13 8 Flash-ready indicator 28 6 7 14 15 9 Flash mode 62 10 Battery level indicator1........... 23 16 17... 18 11 "Date not set" icon 2 20 User Set A 12 Focus indicator 3 28 1 Digital zoom 60 2 Zoom indicator 60, 105 3 Current folder...

User Manual
Page 20
...78 White balance setting 130 Image transfer status 42 7 Manual focus 80 8 Continuous shooting mode .. 104 9 Exposure compensation indicator 66 10 Flash mode 62 11 Exposure count display .......... 23 Exposure indicator 66 12 Metering mode 103 13 Self-timer/Focus mode .......... 53 LCD Illuminator ...panel can be illuminated for up to Know the COOLPIX5700 Control Panel The indicators in the control panel show the status of the following camera settings. To aid explanation, the control panel graphic below shows all icons, unlike normal use. 1 Sensitivity (ISO equivalency) indicator 78 ...
...78 White balance setting 130 Image transfer status 42 7 Manual focus 80 8 Continuous shooting mode .. 104 9 Exposure compensation indicator 66 10 Flash mode 62 11 Exposure count display .......... 23 Exposure indicator 66 12 Metering mode 103 13 Self-timer/Focus mode .......... 53 LCD Illuminator ...panel can be illuminated for up to Know the COOLPIX5700 Control Panel The indicators in the control panel show the status of the following camera settings. To aid explanation, the control panel graphic below shows all icons, unlike normal use. 1 Sensitivity (ISO equivalency) indicator 78 ...

User Manual
Page 23
... the button, making it possible to select the User Set or adjust white balance and metering without accessing the camera menus, or to adjust flash and focus mode without accessing the camera menus. Getting Started-Getting to Know the COOLPIX5700 E The (Function) Button By default, the button can be... used to choose a User Set without using the buttons on the camera ( 129). In User Sets 1, 2, and 3, you can create ...
... the button, making it possible to select the User Set or adjust white balance and metering without accessing the camera menus, or to adjust flash and focus mode without accessing the camera menus. Getting Started-Getting to Know the COOLPIX5700 E The (Function) Button By default, the button can be... used to choose a User Set without using the buttons on the camera ( 129). In User Sets 1, 2, and 3, you can create ...

User Manual
Page 27
...be hot after use. The MB-E5700 battery pack (available separately), which is charged as necessary when the main battery is complete, a flashing icon may appear in the control panel and monitor or viewfinder. • The battery may fail to appear in the monitor, indicating that.../battery charger (both available separately). Alternative Power Sources Besides the Nikon EN-EL1, the COOLPIX5700 can be sure to refer to "Caring for the Camera and Battery" ( 160). • Note that the clock needs to power the camera for extended periods, use non-rechargeable 2CR5 (DL245) lithium batteries...
...be hot after use. The MB-E5700 battery pack (available separately), which is charged as necessary when the main battery is complete, a flashing icon may appear in the control panel and monitor or viewfinder. • The battery may fail to appear in the monitor, indicating that.../battery charger (both available separately). Alternative Power Sources Besides the Nikon EN-EL1, the COOLPIX5700 can be sure to refer to "Caring for the Camera and Battery" ( 160). • Note that the clock needs to power the camera for extended periods, use non-rechargeable 2CR5 (DL245) lithium batteries...

User Manual
Page 32
Flashing Clock Icon If the time and date have been set 5.5 5.6 Highlight Y M D 5.7 Choose order in (shooting) mode. 5.3 5.4 Getting Started-First Steps Highlight Year, Month, Day, hour, ....00 00:00". 20 Repeat steps 5.3 and 5.4 until all items have not been set will have a time stamp of the monitor or viewfinder when the camera is in which year, month, and day will appear in red) Edit selected item. Any pictures taken before the time and date have been set...
Flashing Clock Icon If the time and date have been set 5.5 5.6 Highlight Y M D 5.7 Choose order in (shooting) mode. 5.3 5.4 Getting Started-First Steps Highlight Year, Month, Day, hour, ....00 00:00". 20 Repeat steps 5.3 and 5.4 until all items have not been set will have a time stamp of the monitor or viewfinder when the camera is in which year, month, and day will appear in red) Edit selected item. Any pictures taken before the time and date have been set...

User Manual
Page 35
.... It may be taken until battery has been recharged or replaced. (DL245) battery. 23 Charge EN-EL1 as soon as flash recharges. (Flashes) (Flashes) Battery exhausted. Recharge EN-EL1 or replace with fully charged EN-EL1, or use a new 2CR5 No pictures can be ...Low battery. If the number of exposures remaining Monitor Control panel Monitor Control Panel Meaning Camera status None Battery fully charged. Camera functions normally. As above, except that monitor will go blank after using flash as possible or ready a new 2CR5 (DL245) battery. See the table below for...
.... It may be taken until battery has been recharged or replaced. (DL245) battery. 23 Charge EN-EL1 as soon as flash recharges. (Flashes) (Flashes) Battery exhausted. Recharge EN-EL1 or replace with fully charged EN-EL1, or use a new 2CR5 No pictures can be ...Low battery. If the number of exposures remaining Monitor Control panel Monitor Control Panel Meaning Camera status None Battery fully charged. Camera functions normally. As above, except that monitor will go blank after using flash as possible or ready a new 2CR5 (DL245) battery. See the table below for...

User Manual
Page 37
...and file size that the defaults are used. The default settings, suitable for 49 snapshots. Setting Default Description Control Speedlight pops up and Flash mode Auto fires automatically in the automatic "point and shoot" mode, User Set A. Image size FULL Pictures are also shown below....User Set A by default. This section assumes that is ideal for most situations, are 2,560 × 1,920 pixels in the following steps assume the camera is set to User Set 1, 2 or 3 respectively. Focus mode Autofocus cally at distances over 53 50 cm (1´8˝). If a , ,...
...and file size that the defaults are used. The default settings, suitable for 49 snapshots. Setting Default Description Control Speedlight pops up and Flash mode Auto fires automatically in the automatic "point and shoot" mode, User Set A. Image size FULL Pictures are also shown below....User Set A by default. This section assumes that is ideal for most situations, are 2,560 × 1,920 pixels in the following steps assume the camera is set to User Set 1, 2 or 3 respectively. Focus mode Autofocus cally at distances over 53 50 cm (1´8˝). If a , ,...

User Manual
Page 38
... shooting To avoid blocking redeye reduction lamp, keep fingers below ridges on the camera grip also keep your fingers from the lens, flash, and photocell. Taking and Reviewing Pictures-Basic Picture Taking Step 4-Frame the Shot After adjusting camera settings, you are ready to frame your shooting conditions, by pressing the / SEL button...
... shooting To avoid blocking redeye reduction lamp, keep fingers below ridges on the camera grip also keep your fingers from the lens, flash, and photocell. Taking and Reviewing Pictures-Basic Picture Taking Step 4-Frame the Shot After adjusting camera settings, you are ready to frame your shooting conditions, by pressing the / SEL button...

User Manual
Page 39
...(wide) to fill-flash, the builtin Speedlight will pop up whenever the shutter-release button is shown next to auto (the default setting), red-eye reduction, or slow sync and additional light is pressed halfway. If your finger or another 4× ( 60) for two seconds activates digital zoom and "zooms" ... all the way in, holding down gently until it from your subject. The degree of 32×. Press (telephoto) to adjust the camera's 8× optical zoom lens. Taking and Reviewing Pictures-Basic Picture Taking 4.2 Frame your subject Subjects can be lowered by hand. When the...
...(wide) to fill-flash, the builtin Speedlight will pop up whenever the shutter-release button is shown next to auto (the default setting), red-eye reduction, or slow sync and additional light is pressed halfway. If your finger or another 4× ( 60) for two seconds activates digital zoom and "zooms" ... all the way in, holding down gently until it from your subject. The degree of 32×. Press (telephoto) to adjust the camera's 8× optical zoom lens. Taking and Reviewing Pictures-Basic Picture Taking 4.2 Frame your subject Subjects can be lowered by hand. When the...

User Manual
Page 40
...same distance, then recompose the picture. Indicator Green Green (flashes) Red Red (flashes) None Meaning Subject in the center of the frame. Speedlight charging. Remove finger briefly from shutter-release button, then try again. Camera unable to focus using focus lock. 28 Custom Focus Settings ... "off -center subject without using autofocus. The following table explains the status of the autofocus ( ) and flash-ready indicators ( ), shown right, in which the camera is taken. Speedlight will not appear. To lock focus, press the shutter-release button halfway and check the ...
...same distance, then recompose the picture. Indicator Green Green (flashes) Red Red (flashes) None Meaning Subject in the center of the frame. Speedlight charging. Remove finger briefly from shutter-release button, then try again. Camera unable to focus using focus lock. 28 Custom Focus Settings ... "off -center subject without using autofocus. The following table explains the status of the autofocus ( ) and flash-ready indicators ( ), shown right, in which the camera is taken. Speedlight will not appear. To lock focus, press the shutter-release button halfway and check the ...

User Manual
Page 59
... information on the most settings are controlled by the camera. To gain wider control over the camera settings, access User Sets 1, 2 or 3. Choosing a User Set Shows you to record frequently used camera controls: zoom, image quality and size, focus, flash, and exposure compensation. Using the Camera Controls (User Sets 1, 2, 3) Details the extra controls available in...
... information on the most settings are controlled by the camera. To gain wider control over the camera settings, access User Sets 1, 2 or 3. Choosing a User Set Shows you to record frequently used camera controls: zoom, image quality and size, focus, flash, and exposure compensation. Using the Camera Controls (User Sets 1, 2, 3) Details the extra controls available in...

User Manual
Page 67
...attempt to focus simultaneously on subjects that are the same color as the background. • The subject is moving rapidly. If the camera is unable to the camera than the background). • The subject is evenly lit. For example, autofocus may not perform well when photographing an object inside..., because the bars of the cage will turn yellow, indicating that you zoom the camera in the monitor or viewfinder will be closer to focus using autofocus, the autofocus indicator will flash in the monitor or viewfinder when the shutter-release button is contrast between the subject ...
...attempt to focus simultaneously on subjects that are the same color as the background. • The subject is moving rapidly. If the camera is unable to the camera than the background). • The subject is evenly lit. For example, autofocus may not perform well when photographing an object inside..., because the bars of the cage will turn yellow, indicating that you zoom the camera in the monitor or viewfinder will be closer to focus using autofocus, the autofocus indicator will flash in the monitor or viewfinder when the shutter-release button is contrast between the subject ...

User Manual
Page 70
... also be taken. This feature is most useful when taking low-light or close -up shots with the flash turned off. To use the self-timer: 1 Position the camera Mount the camera on a tripod (recommended) or rest it on a flat, stable surface. 2 Select a self-timer mode Press the button ...repeatedly until either three or ten seconds after pressing the shutter-release button. Taking Pictures : The Details-Using the Camera Controls (All User Sets) Delaying Shutter Release: Self-Timer Mode When the self-timer is used for pictures in which you wish to appear...
... also be taken. This feature is most useful when taking low-light or close -up shots with the flash turned off. To use the self-timer: 1 Position the camera Mount the camera on a tripod (recommended) or rest it on a flat, stable surface. 2 Select a self-timer mode Press the button ...repeatedly until either three or ten seconds after pressing the shutter-release button. Taking Pictures : The Details-Using the Camera Controls (All User Sets) Delaying Shutter Release: Self-Timer Mode When the self-timer is used for pictures in which you wish to appear...

User Manual
Page 74
... pressing the button when the Speedlight Opt.: Pop Up option in monitor or viewfinder. The flash will fire whenever a picture is controlled with the button. 1 2 F5.6 Press button to change flash mode. Press button repeatedly until desired setting is set to Manual ( 136). Taking Pictures... : The Details-Using the Camera Controls (All User Sets) Flash Mode: The Button The flash mode is taken. At a setting of Auto, no icon...
... pressing the button when the Speedlight Opt.: Pop Up option in monitor or viewfinder. The flash will fire whenever a picture is controlled with the button. 1 2 F5.6 Press button to change flash mode. Press button repeatedly until desired setting is set to Manual ( 136). Taking Pictures... : The Details-Using the Camera Controls (All User Sets) Flash Mode: The Button The flash mode is taken. At a setting of Auto, no icon...

User Manual
Page 75
... lamp fires before main flash, minimizing "red-eye." Auto with red- Flash Cancel (off) Flash will not fire when there is not recommended with slow shutter speed. Use for portraits (works best when subjects are available. Taking Pictures : The Details-Using the Camera Controls (All User Sets...) The following settings are well within range of a tripod is poor. If left raised, flash will not fire even when lighting is recommended to capture both subject and background...
... lamp fires before main flash, minimizing "red-eye." Auto with red- Flash Cancel (off) Flash will not fire when there is not recommended with slow shutter speed. Use for portraits (works best when subjects are available. Taking Pictures : The Details-Using the Camera Controls (All User Sets...) The following settings are well within range of a tripod is poor. If left raised, flash will not fire even when lighting is recommended to capture both subject and background...

User Manual
Page 76
... shutter-release button is pressed halfway. If your finger or another object obstructs the built-in Speedlight, preventing it from the flash window and photocell. Taking Pictures : The Details-Using the Camera Controls (All User Sets) Do Not Obstruct the Built-in Speedlight • By default, the Pop Up option in the...
... shutter-release button is pressed halfway. If your finger or another object obstructs the built-in Speedlight, preventing it from the flash window and photocell. Taking Pictures : The Details-Using the Camera Controls (All User Sets) Do Not Obstruct the Built-in Speedlight • By default, the Pop Up option in the...


