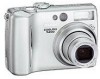
User Manual
Page 3
... and removing the battery. Observe the following precautions when handling a battery for inspection. Turn off immediately in the event of malfunction Should you notice smoke or an unusual smell coming...improperly handled. Do not place strap around the neck of an infant or child Placing the camera strap around the neck of a fall or other strong light source through the viewfinder Viewing the... gas Do not use the product will read them. For Your Safety To prevent damage to your Nikon product or injury to yourself or to others, read the following safety precautions in their entirety before...
... and removing the battery. Observe the following precautions when handling a battery for inspection. Turn off immediately in the event of malfunction Should you notice smoke or an unusual smell coming...improperly handled. Do not place strap around the neck of an infant or child Placing the camera strap around the neck of a fall or other strong light source through the viewfinder Viewing the... gas Do not use the product will read them. For Your Safety To prevent damage to your Nikon product or injury to yourself or to others, read the following safety precautions in their entirety before...
User Manual
Page 4
Before removing the battery, turn the product off and allow the battery to cool. • Discontinue use , or when the product is unplugged. • Use only rechargeable Nikon ENEL5 lithium-ion batteries (supplied). • When inserting the battery, do not attempt to insert it upside down or backwards. &#...be taken to prevent infants from the monitor touching the skin or entering the eyes or mouth. • Before replacing the battery, turn the camera off and make sure the power-on lamp has gone out. Playing CDROMs on an audio CD player could cause temporary visual impairment....
Before removing the battery, turn the product off and allow the battery to cool. • Discontinue use , or when the product is unplugged. • Use only rechargeable Nikon ENEL5 lithium-ion batteries (supplied). • When inserting the battery, do not attempt to insert it upside down or backwards. &#...be taken to prevent infants from the monitor touching the skin or entering the eyes or mouth. • Before replacing the battery, turn the camera off and make sure the power-on lamp has gone out. Playing CDROMs on an audio CD player could cause temporary visual impairment....
User Manual
Page 5
This equipment generates, uses, and can be determined by turning the equipment off and on, the user is encouraged to ...California WARNING: Handling the cord on a cir- Interface Cables Use the interface cables sold or provided by Nikon for any damages resulting from that interference will not occur in a particular installation. Notice for help. If ... Frequency Interference Statement This equipment has been tested and found to comply with the limits for a Class B digital device, pursuant to which can radiate radio frequency energy and, if not installed and used in accordance with the...
This equipment generates, uses, and can be determined by turning the equipment off and on, the user is encouraged to ...California WARNING: Handling the cord on a cir- Interface Cables Use the interface cables sold or provided by Nikon for any damages resulting from that interference will not occur in a particular installation. Notice for help. If ... Frequency Interference Statement This equipment has been tested and found to comply with the limits for a Class B digital device, pursuant to which can radiate radio frequency energy and, if not installed and used in accordance with the...
User Manual
Page 15
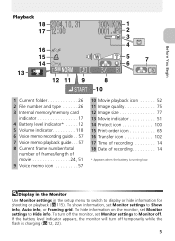
If the battery level indicator appears, the monitor will turn off the monitor, set Monitor settings to Hide info. To show information, set Monitor settings to Monitor off temporarily while the flash is running low. ...To hide information on the monitor, set Monitor settings to display or hide information for shooting or playback ( 115). To turn off . Before You Begin Playback 18 17 16 15 14 13 12 11 9 8 START 10 1 2 3 4 5 6 7 1 Current folder 26 2 File number and type 26 3 Internal memory...
If the battery level indicator appears, the monitor will turn off the monitor, set Monitor settings to Hide info. To show information, set Monitor settings to Monitor off temporarily while the flash is running low. ...To hide information on the monitor, set Monitor settings to display or hide information for shooting or playback ( 115). To turn off . Before You Begin Playback 18 17 16 15 14 13 12 11 9 8 START 10 1 2 3 4 5 6 7 1 Current folder 26 2 File number and type 26 3 Internal memory...
User Manual
Page 19
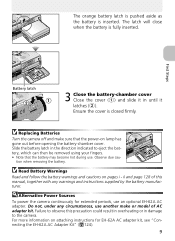
Replacing Batteries Turn the camera off and make or model of AC adapter kit. Slide the battery latch in the direction indicated to the camera. Observe due cau- Read Battery Warnings Read and follow the battery warnings and cautions on attaching instructions for extended periods, use... of this precaution could result in overheating or in until it latches ( ). For more information on pages i - Alternative Power Sources To power the camera continuously for EH-62A AC adapter kit, see "Connecting the EH-62A AC Adapter Kit" ( 124). 9 tion when removing the battery. Do not...
Replacing Batteries Turn the camera off and make or model of AC adapter kit. Slide the battery latch in the direction indicated to the camera. Observe due cau- Read Battery Warnings Read and follow the battery warnings and cautions on attaching instructions for extended periods, use... of this precaution could result in overheating or in until it latches ( ). For more information on pages i - Alternative Power Sources To power the camera continuously for EH-62A AC adapter kit, see "Connecting the EH-62A AC Adapter Kit" ( 124). 9 tion when removing the battery. Do not...
User Manual
Page 21
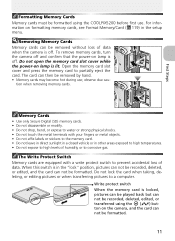
...Do not lock the card when taking, deleting, or editing pictures or when transferring pictures to partially eject the card. To remove memory cards, turn the camera off and confirm that the power-on formatting memory cards, see Format Memory/Card ( 119) in other areas exposed to high temperatures. •... recorded, deleted, edited, or transferred using the ( ) button on lamp is off . When this switch is off . Memory Cards • Use only Secure Digital (SD) memory cards. • Do not disassemble or modify. • Do not drop, bend, or expose to water or strong physical shocks. •...
...Do not lock the card when taking, deleting, or editing pictures or when transferring pictures to partially eject the card. To remove memory cards, turn the camera off and confirm that the power-on formatting memory cards, see Format Memory/Card ( 119) in other areas exposed to high temperatures. •... recorded, deleted, edited, or transferred using the ( ) button on lamp is off . When this switch is off . Memory Cards • Use only Secure Digital (SD) memory cards. • Do not disassemble or modify. • Do not drop, bend, or expose to water or strong physical shocks. •...
User Manual
Page 22
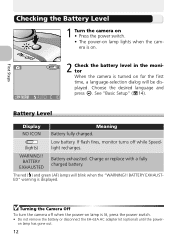
... will blink when the "WARNING!! First Steps Checking the Battery Level 1 Turn the camera on • Press the power switch. • The power-on lamp lights when the camera is on. 2 Check the battery level in the monitor When the camera is turned on lamp has gone out. 12 If flash fires, monitor... turns off when the power-on lamp is displayed. Choose the desired language and press ....
... will blink when the "WARNING!! First Steps Checking the Battery Level 1 Turn the camera on • Press the power switch. • The power-on lamp lights when the camera is on. 2 Check the battery level in the monitor When the camera is turned on lamp has gone out. 12 If flash fires, monitor... turns off when the power-on lamp is displayed. Choose the desired language and press ....

User Manual
Page 23
...Power Off (Standby Mode) If no operations are performed for three minutes after the camera enters standby mode, the power will turn off option in the monitor ( 53). Your most recent picture will go out. The camera will enter standby mode to reduce the drain on the battery. First Steps The Button...• Press the MENU button to display the menu for about two seconds. When connecting the camera to select a new mode The length of time before the camera enters standby mode can also be turned on by an AC adapter kit, the monitor will blink. If no operations are being shown in...
...Power Off (Standby Mode) If no operations are performed for three minutes after the camera enters standby mode, the power will turn off option in the monitor ( 53). Your most recent picture will go out. The camera will enter standby mode to reduce the drain on the battery. First Steps The Button...• Press the MENU button to display the menu for about two seconds. When connecting the camera to select a new mode The length of time before the camera enters standby mode can also be turned on by an AC adapter kit, the monitor will blink. If no operations are being shown in...
User Manual
Page 24
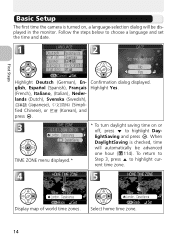
.... Follow the steps below to highlight current time zone. lands (Dutch), Svenska (Swedish), (Japanese), (Simpli- TIME ZONE menu displayed.* * To turn daylight saving time on , a language-selection dialog will automatically be displayed in the monitor. Display map of world time zones. fied Chinese), or ...(Korean), and press . When DaylightSaving is turned on or off, press to highlight DaylightSaving and press . Select home time zone. 14 Basic Setup The first time the camera is checked, time will be advanced one hour ( 114).
.... Follow the steps below to highlight current time zone. lands (Dutch), Svenska (Swedish), (Japanese), (Simpli- TIME ZONE menu displayed.* * To turn daylight saving time on , a language-selection dialog will automatically be displayed in the monitor. Display map of world time zones. fied Chinese), or ...(Korean), and press . When DaylightSaving is turned on or off, press to highlight DaylightSaving and press . Select home time zone. 14 Basic Setup The first time the camera is checked, time will be advanced one hour ( 114).

User Manual
Page 25
... Day, Month, Exit to mode currently selected with and Year will not be displayed. Note that time and date of Day, Month, and • When turning the camera on pictures unless Date or Date and time is selected for the first time, you can not return to Highlight D M Y. Repeat steps 7 - 8 to HOME...
... Day, Month, Exit to mode currently selected with and Year will not be displayed. Note that time and date of Day, Month, and • When turning the camera on pictures unless Date or Date and time is selected for the first time, you can not return to Highlight D M Y. Repeat steps 7 - 8 to HOME...
User Manual
Page 27
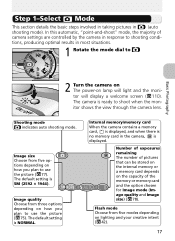
...in taking pictures in most situations. 1 Rotate the mode dial to use the picture ( 75). Shooting mode indicates auto shooting mode. The camera is displayed. The default setting is NORMAL. Image quality Choose from five modes depending on lamp will light and the monitor will display a welcome... screen ( 110). Flash mode Choose from three options depending on how you plan to Basic Photography 2 Turn the camera on The power-on lighting and your creative intent ( 42). 17 In this automatic, "point-and-shoot" mode, the majority of the ...
...in taking pictures in most situations. 1 Rotate the mode dial to use the picture ( 75). Shooting mode indicates auto shooting mode. The camera is displayed. The default setting is NORMAL. Image quality Choose from five modes depending on lamp will light and the monitor will display a welcome... screen ( 110). Flash mode Choose from three options depending on how you plan to Basic Photography 2 Turn the camera on The power-on lighting and your creative intent ( 42). 17 In this automatic, "point-and-shoot" mode, the majority of the ...
User Manual
Page 29
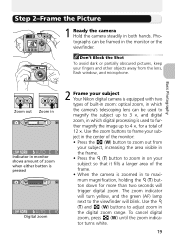
...turns white. 19 Use the (T) and (W) buttons to 3 ×, and digital zoom, in which the camera's telescoping lens can be used to further magnify the image up to adjust zoom in both hands. Don't Block the Shot To avoid dark or partially obscured pictures, keep your subject Your Nikon digital camera... is equipped with two types of zoom when either button is pressed Digital zoom 2 Frame your fingers and other objects away from your subject, increasing the area visible...
...turns white. 19 Use the (T) and (W) buttons to 3 ×, and digital zoom, in which the camera's telescoping lens can be used to further magnify the image up to adjust zoom in both hands. Don't Block the Shot To avoid dark or partially obscured pictures, keep your subject Your Nikon digital camera... is equipped with two types of zoom when either button is pressed Digital zoom 2 Frame your fingers and other objects away from your subject, increasing the area visible...
User Manual
Page 30
...? • Use the monitor to confirm camera settings at a glance while at maximum optical zoom are not visible in the viewfinder - We recommend you want to save power by turning the monitor off or when an assist mode (except for sports assist) is selected. • When digital zoom is working , Metering is set...
...? • Use the monitor to confirm camera settings at a glance while at maximum optical zoom are not visible in the viewfinder - We recommend you want to save power by turning the monitor off or when an assist mode (except for sports assist) is selected. • When digital zoom is working , Metering is set...
User Manual
Page 31
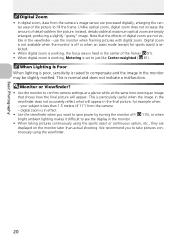
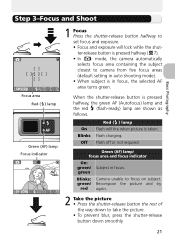
...way down to focus on subject. Flash charging. Green (AF) lamp/ focus area and focus indicator On: green/ Subject in focus, the selected AF area turns green. Step 3-Focus and Shoot Basic Photography Focus area Red ( ) lamp Green (AF) lamp Focus indicator 1 Focus Press the shutter-release button halfway to...) lamp and the red (flash-ready) lamp are shown as follows. On Blinks Off Red ( ) lamp Flash will lock while the shut- green Blinks: Camera unable to take the picture. • To prevent blur, press the shutter-release button down smoothly. 21 Flash off or not required.
...way down to focus on subject. Flash charging. Green (AF) lamp/ focus area and focus indicator On: green/ Subject in focus, the selected AF area turns green. Step 3-Focus and Shoot Basic Photography Focus area Red ( ) lamp Green (AF) lamp Focus indicator 1 Focus Press the shutter-release button halfway to...) lamp and the red (flash-ready) lamp are shown as follows. On Blinks Off Red ( ) lamp Flash will lock while the shut- green Blinks: Camera unable to take the picture. • To prevent blur, press the shutter-release button down smoothly. 21 Flash off or not required.
User Manual
Page 32
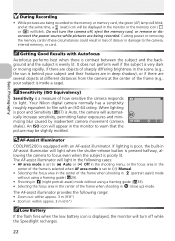
... and their features are in deep shadow), or if there are several objects at different distances from the camera at the same time, a (wait) icon will turn the camera off while the Speedlight recharges. 22 Your Nikon digital camera normally has a sensitivity roughly equivalent to light. Basic Photography During Recording • While pictures are being recorded...
... and their features are in deep shadow), or if there are several objects at different distances from the camera at the same time, a (wait) icon will turn the camera off while the Speedlight recharges. 22 Your Nikon digital camera normally has a sensitivity roughly equivalent to light. Basic Photography During Recording • While pictures are being recorded...
User Manual
Page 34
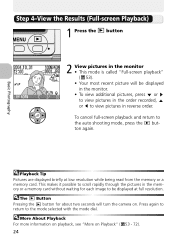
... order recorded, or to view pictures in the monitor • This mode is called "Full-screen playback" ( 53). • Your most recent picture will turn the camera on Playback" ( 53 - 72). 24 This makes it possible to scroll rapidly through the pictures in the memory or a memory card without waiting for about...
... order recorded, or to view pictures in the monitor • This mode is called "Full-screen playback" ( 53). • Your most recent picture will turn the camera on Playback" ( 53 - 72). 24 This makes it possible to scroll rapidly through the pictures in the memory or a memory card without waiting for about...
User Manual
Page 43
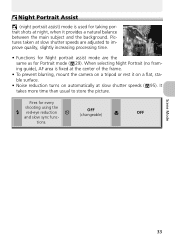
... portrait assist mode are adjusted to store the picture. Fires for taking portrait shots at night, when it on a flat, stable surface. • Noise reduction turns on a tripod or rest it provides a natural balance between the main subject and the background. When selecting Night Portrait (no framing guide), AF area is... for Portrait mode ( 29). Night Portrait Assist (night portrait assist) mode is fixed at the center of the frame. • To prevent blurring, mount the camera on automatically at slow shutter speeds ( 95).
... portrait assist mode are adjusted to store the picture. Fires for taking portrait shots at night, when it on a flat, stable surface. • Noise reduction turns on a tripod or rest it provides a natural balance between the main subject and the background. When selecting Night Portrait (no framing guide), AF area is... for Portrait mode ( 29). Night Portrait Assist (night portrait assist) mode is fixed at the center of the frame. • To prevent blurring, mount the camera on automatically at slow shutter speeds ( 95).
User Manual
Page 46
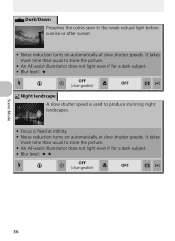
...: OFF (changeable) OFF Scene Mode 36 Dusk/Dawn Preserves the colors seen in the weak natural light before sunrise or after sunset. • Noise reduction turns on automatically at slow shutter speeds. It takes more time than usual to produce stunning night landscapes. • Focus is fixed at infinity. • Noise...
...: OFF (changeable) OFF Scene Mode 36 Dusk/Dawn Preserves the colors seen in the weak natural light before sunrise or after sunset. • Noise reduction turns on automatically at slow shutter speeds. It takes more time than usual to produce stunning night landscapes. • Focus is fixed at infinity. • Noise...

User Manual
Page 47
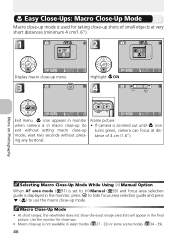
... flowers, insects, and other indoor settings where you do not want to use the flash. • The Best Shot Selector (BSS; 84) turns on objects as close as 4 cm (1.6") to the lens, adjust zoom until the macro close-up icon ( ) in monitor... turns green. • Minimum focus distance varies with the background artistically blurred. • To focus on automatically, reducing the effects of inadvertent camera movement. • Photography may be prohibited altogether in other small objects, with zoom position. ...
... flowers, insects, and other indoor settings where you do not want to use the flash. • The Best Shot Selector (BSS; 84) turns on objects as close as 4 cm (1.6") to the lens, adjust zoom until the macro close-up icon ( ) in monitor... turns green. • Minimum focus distance varies with the background artistically blurred. • To focus on automatically, reducing the effects of inadvertent camera movement. • Photography may be prohibited altogether in other small objects, with zoom position. ...
User Manual
Page 56
...show the exact image area that will appear in assist modes ( 27 - 33) or some scene modes ( 34 - 39). 46 Frame picture. • If camera is used for close-ups. • Macro close -up mode. More on Photography Selecting Macro Close-Up Mode While Using Manual Option When AF area... any buttons). Use the monitor for taking close-up shots of small objects at distance of 4 cm (1.6"). Highlight ON. icon appears in monitor when camera is not available in the final picture. Exit menu. Display macro close -up mode, wait two seconds without setting macro close -up menu. Easy ...
...show the exact image area that will appear in assist modes ( 27 - 33) or some scene modes ( 34 - 39). 46 Frame picture. • If camera is used for close-ups. • Macro close -up mode. More on Photography Selecting Macro Close-Up Mode While Using Manual Option When AF area... any buttons). Use the monitor for taking close-up shots of small objects at distance of 4 cm (1.6"). Highlight ON. icon appears in monitor when camera is not available in the final picture. Exit menu. Display macro close -up mode, wait two seconds without setting macro close -up menu. Easy ...


