
User Manual
Page 1
En The Nikon Guide to Digital Photography with the DIGITAL CAMERA
En The Nikon Guide to Digital Photography with the DIGITAL CAMERA
User Manual
Page 3
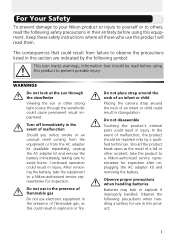
...battery immediately, taking care to avoid burns. The consequences that could result in explosion or fire. After removing the battery, take the product to a Nikon-authorized service representative for inspection after unplugging the AC adapter kit and removing the battery. Do not place strap around the neck of an infant... or child Placing the camera strap around the neck of a fall or other strong light source through the viewfinder Viewing the sun or other accident, take the equipment ...
...battery immediately, taking care to avoid burns. The consequences that could result in explosion or fire. After removing the battery, take the product to a Nikon-authorized service representative for inspection after unplugging the AC adapter kit and removing the battery. Do not place strap around the neck of an infant... or child Placing the camera strap around the neck of a fall or other strong light source through the viewfinder Viewing the sun or other accident, take the equipment ...

User Manual
Page 4
...battery to cool. • Discontinue use immediately should not be taken to remove the battery when no less than one meter (39") from the camera. Particular care should be observed if photographing infants, when the flash should be no charge remains. • Immediately after use, or when the ...glass and to the input and output jacks, use only the cables provided or sold by Nikon for an extended period, the battery may become hot. • Before replacing the battery, turn the camera off and make sure the power-on lamp has gone out. Avoid contact with product regulations....
...battery to cool. • Discontinue use immediately should not be taken to remove the battery when no less than one meter (39") from the camera. Particular care should be observed if photographing infants, when the flash should be no charge remains. • Immediately after use, or when the ...glass and to the input and output jacks, use only the cables provided or sold by Nikon for an extended period, the battery may become hot. • Before replacing the battery, turn the camera off and make sure the power-on lamp has gone out. Avoid contact with product regulations....
User Manual
Page 6
... the government and of certified documents stipulated by law from being in possession of material that has been digitally copied or reproduced by means of a scanner, digital camera or other device may be provided for business use this product for customers in a foreign country is governed...securities, government bonds, or local government bonds, even if such copies or reproductions are circulated in Canada CAUTION ATTENTION This class B digital apparatus meets all Cet appareil numéique de la classe B requirements of the Canadian Interference respecte toutes les exigences du R&#...
... the government and of certified documents stipulated by law from being in possession of material that has been digitally copied or reproduced by means of a scanner, digital camera or other device may be provided for business use this product for customers in a foreign country is governed...securities, government bonds, or local government bonds, even if such copies or reproductions are circulated in Canada CAUTION ATTENTION This class B digital apparatus meets all Cet appareil numéique de la classe B requirements of the Canadian Interference respecte toutes les exigences du R&#...
User Manual
Page 7
... electronic circuitry. Use Only Nikon Brand Electronic Accessories Nikon COOLPIX cameras are engineered and proven to operate within the operational and safety requirements of this Nikon digital camera are designed to the highest standards and include complex electronic circuitry. For more information about Nikon brand accessories, contact a local authorized Nikon dealer. THE USE OF NON-NIKON ELECTRONIC ACCESSORIES COULD DAMAGE...
... electronic circuitry. Use Only Nikon Brand Electronic Accessories Nikon COOLPIX cameras are engineered and proven to operate within the operational and safety requirements of this Nikon digital camera are designed to the highest standards and include complex electronic circuitry. For more information about Nikon brand accessories, contact a local authorized Nikon dealer. THE USE OF NON-NIKON ELECTRONIC ACCESSORIES COULD DAMAGE...

User Manual
Page 8
Table of Contents For Your Safety ...i Notices ...iii Table of Contents ...vi Introduction...1 Before You Begin 2 Parts of the Camera ...2 The Monitor...4 The Mode Dial ...6 Navigating the Menus...7 The Shutter-Release Button 7 First Steps 8 Inserting Batteries ...8 Inserting Memory Cards...10 Checking the Battery Level 12 ...
Table of Contents For Your Safety ...i Notices ...iii Table of Contents ...vi Introduction...1 Before You Begin 2 Parts of the Camera ...2 The Monitor...4 The Mode Dial ...6 Navigating the Menus...7 The Shutter-Release Button 7 First Steps 8 Inserting Batteries ...8 Inserting Memory Cards...10 Checking the Battery Level 12 ...

User Manual
Page 9
More on Playback 53 Viewing Pictures on the Camera 53 Cropping Pictures...56 Voice Memos: Recording and Playback 57 Viewing Pictures on TV...59 Viewing Pictures on a Computer 60 Printing Pictures ...64 Print Set ......
More on Playback 53 Viewing Pictures on the Camera 53 Cropping Pictures...56 Voice Memos: Recording and Playback 57 Viewing Pictures on TV...59 Viewing Pictures on a Computer 60 Printing Pictures ...64 Print Set ......

User Manual
Page 10
The Setup Menu 109 Using the Setup Menu ...109 Welcome Screen ...110 Date ...112 Monitor Settings ...115 Date Imprint ...116 Brightness ...117 Sound Settings ...118 Auto Off ...119 Format Memory/Card...119 Language ...120 USB...121 Video Mode...121 Reset All ...121 Firmware Version...122 Technical Notes 123 Optional Accessories ...123 Caring for Your Camera 126 Error Messages ...129 Troubleshooting...133 Specifications...136 Index ...139 viii
The Setup Menu 109 Using the Setup Menu ...109 Welcome Screen ...110 Date ...112 Monitor Settings ...115 Date Imprint ...116 Brightness ...117 Sound Settings ...118 Auto Off ...119 Format Memory/Card...119 Language ...120 USB...121 Video Mode...121 Reset All ...121 Firmware Version...122 Technical Notes 123 Optional Accessories ...123 Caring for Your Camera 126 Error Messages ...129 Troubleshooting...133 Specifications...136 Index ...139 viii
User Manual
Page 11
.... Introduction Thank you for storing pictures. This icon marks notes, information that should be helpful when using your Nikon digital camera. Symbols Used in this manual thoroughly before use to prevent damage to find the information you enjoy taking pictures with your... camera. This manual has been written to format the internal memory, remove the memory card first. Before You Begin First Steps Basic Photography Scene Mode More on Photography Movies More on the card instead of a Nikon COOLPIX 4200 digital camera.
.... Introduction Thank you for storing pictures. This icon marks notes, information that should be helpful when using your Nikon digital camera. Symbols Used in this manual thoroughly before use to prevent damage to find the information you enjoy taking pictures with your... camera. This manual has been written to format the internal memory, remove the memory card first. Before You Begin First Steps Basic Photography Scene Mode More on Photography Movies More on the card instead of a Nikon COOLPIX 4200 digital camera.

User Manual
Page 12
Before You Begin Before You Begin Parts of the Camera Shutter-release button ( 7) Self-timer lamp ( 44)/ AF-Assist illuminator (LED; 22, 127, 136) Viewfinder Power-on lamp ( 12) Mode dial ( 6) Built-in Speedlight ( 42) Power switch ( 12) Microphone ( 57) Eyelet for camera strap Lens ( 19) Memory card slot cover ( 10) Power connector cover for AC adapter kit ( 124) Lens not extended Lens cover Attaching the Camera Strap 2
Before You Begin Before You Begin Parts of the Camera Shutter-release button ( 7) Self-timer lamp ( 44)/ AF-Assist illuminator (LED; 22, 127, 136) Viewfinder Power-on lamp ( 12) Mode dial ( 6) Built-in Speedlight ( 42) Power switch ( 12) Microphone ( 57) Eyelet for camera strap Lens ( 19) Memory card slot cover ( 10) Power connector cover for AC adapter kit ( 124) Lens not extended Lens cover Attaching the Camera Strap 2

User Manual
Page 14
tures may be blurred. 5) Blinks when the camera clock has not been set. 6) Appears when the new city time zone has been set. 7) Displays the focus area when the shutter-release button is ... mode . . . . . 17, 27, 49 2 Zoom indicator1 19 3 Focus indicator2 21 4 Macro close-up mode 46 5 Battery level indicator3) . . . . . 12 6 Internal memory/memory card indicator 17 7 Camera shake icon4) . . 43, 129 8 "Date not set" icon5 16 9 Time zone indicator6) . . . . . 112 10 Self-timer indicator 44 11 Date imprint indicator . . . . . 116 12 Number...
tures may be blurred. 5) Blinks when the camera clock has not been set. 6) Appears when the new city time zone has been set. 7) Displays the focus area when the shutter-release button is ... mode . . . . . 17, 27, 49 2 Zoom indicator1 19 3 Focus indicator2 21 4 Macro close-up mode 46 5 Battery level indicator3) . . . . . 12 6 Internal memory/memory card indicator 17 7 Camera shake icon4) . . 43, 129 8 "Date not set" icon5 16 9 Time zone indicator6) . . . . . 112 10 Self-timer indicator 44 11 Date imprint indicator . . . . . 116 12 Number...

User Manual
Page 16
... Choose this mode to display the setup menu, where you can select from eleven "scenes" suited to different subjects or shooting conditions and let the camera do the rest. Movie ( 51 - 52) Choose from thirteen shooting menus to achieve the desired effect. You can choose from three movie modes... modes and the setup mode. Before You Begin The Mode Dial Using the mode dial, you can perform such tasks as setting the camera clock and adjusting monitor brightness. 6 Portrait Assist Landscape Assist Sports Assist Night Portrait Assist Use framing assist to help compose pictures suited to...
... Choose this mode to display the setup menu, where you can select from eleven "scenes" suited to different subjects or shooting conditions and let the camera do the rest. Movie ( 51 - 52) Choose from thirteen shooting menus to achieve the desired effect. You can choose from three movie modes... modes and the setup mode. Before You Begin The Mode Dial Using the mode dial, you can perform such tasks as setting the camera clock and adjusting monitor brightness. 6 Portrait Assist Landscape Assist Sports Assist Night Portrait Assist Use framing assist to help compose pictures suited to...

User Manual
Page 17
Press to previous menu, or move cursor right, or make selection. The Shutter-Release Button Your camera has a two stage shutter-release button. Focus and exposure will light when the focus operation is complete. Press the button halfway. Move cursor down . Move ... is pressed halfway. Cancel and return to make selection. Press the button the rest of the way down . Display sub-menu, move cursor left. The camera sets focus and exposure when the button is pressed halfway. The green (AF) lamp next to navigate through the...
Press to previous menu, or move cursor right, or make selection. The Shutter-Release Button Your camera has a two stage shutter-release button. Focus and exposure will light when the focus operation is complete. Press the button halfway. Move cursor down . Move ... is pressed halfway. Cancel and return to make selection. Press the button the rest of the way down . Display sub-menu, move cursor left. The camera sets focus and exposure when the button is pressed halfway. The green (AF) lamp next to navigate through the...
User Manual
Page 18
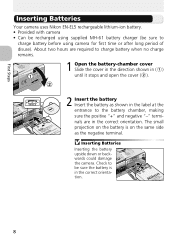
... first time or after long period of disuse). First Steps First Steps Inserting Batteries Your camera uses Nikon EN-EL5 rechargeable lithium-ion battery. • Provided with camera • Can be recharged using supplied MH-61 battery charger (be sure the battery is on the same side as the negative terminal. Inserting Batteries...
... first time or after long period of disuse). First Steps First Steps Inserting Batteries Your camera uses Nikon EN-EL5 rechargeable lithium-ion battery. • Provided with camera • Can be recharged using supplied MH-61 battery charger (be sure the battery is on the same side as the negative terminal. Inserting Batteries...

User Manual
Page 19
... on attaching instructions for extended periods, use . Do not, under any warnings and instructions supplied by the battery manufacturer. Replacing Batteries Turn the camera off and make or model of this precaution could result in overheating or in until it in damage to the...opening the battery-chamber cover. The latch will close when the battery is inserted. For more information on pages i - Alternative Power Sources To power the camera continuously for EH-62A AC adapter kit, see "Connecting the EH-62A AC Adapter Kit" ( 124). 9 Slide the battery latch in the direction ...
... on attaching instructions for extended periods, use . Do not, under any warnings and instructions supplied by the battery manufacturer. Replacing Batteries Turn the camera off and make or model of this precaution could result in overheating or in until it in damage to the...opening the battery-chamber cover. The latch will close when the battery is inserted. For more information on pages i - Alternative Power Sources To power the camera continuously for EH-62A AC adapter kit, see "Connecting the EH-62A AC Adapter Kit" ( 124). 9 Slide the battery latch in the direction ...

User Manual
Page 20
..., and the cover will open automatically ( ). If no memory card has been inserted in the camera, pictures will automatically be stored on Secure Digital (SD) memory card. Ensure the cover is in the camera's internal memory (about 12 MB) or on the card. To store pictures in the... camera's internal memory, and if the camera contains a memory card, then pictures will be stored in the internal ...
..., and the cover will open automatically ( ). If no memory card has been inserted in the camera, pictures will automatically be stored on Secure Digital (SD) memory card. Ensure the cover is in the camera's internal memory (about 12 MB) or on the card. To store pictures in the... camera's internal memory, and if the camera contains a memory card, then pictures will be stored in the internal ...

User Manual
Page 21
... pictures to partially eject the card. Open the memory card slot cover and press the memory card to a computer. Memory Cards • Use only Secure Digital (SD) memory cards. • Do not disassemble or modify. • Do not drop, bend, or expose to water or strong physical shocks. •... transferred using the COOLPIX4200 before first use ; tion when removing memory cards. When this switch is off and confirm that the power-on the camera, and the card can not be formatted. The Write Protect Switch Memory cards are equipped with your fingers or metal objects. • Do not...
... pictures to partially eject the card. Open the memory card slot cover and press the memory card to a computer. Memory Cards • Use only Secure Digital (SD) memory cards. • Do not disassemble or modify. • Do not drop, bend, or expose to water or strong physical shocks. •... transferred using the COOLPIX4200 before first use ; tion when removing memory cards. When this switch is off and confirm that the power-on the camera, and the card can not be formatted. The Write Protect Switch Memory cards are equipped with your fingers or metal objects. • Do not...

User Manual
Page 22
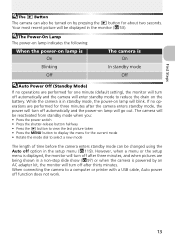
..., a language-selection dialog will blink when the "WARNING!! See "Basic Setup" ( 14). BATTERY EXHAUSTED Battery exhausted. WARNING!! Turning the Camera Off To turn the camera off while Speedlight recharges. BATTERY EXHAUSTED" warning is lit, press the power switch. • Do not remove the battery or disconnect the ... the power- First Steps Checking the Battery Level 1 Turn the camera on • Press the power switch. • The power-on lamp lights when the camera is on. 2 Check the battery level in the monitor When the camera is turned on lamp has gone out. 12 Choose the desired...
..., a language-selection dialog will blink when the "WARNING!! See "Basic Setup" ( 14). BATTERY EXHAUSTED Battery exhausted. WARNING!! Turning the Camera Off To turn the camera off while Speedlight recharges. BATTERY EXHAUSTED" warning is lit, press the power switch. • Do not remove the battery or disconnect the ... the power- First Steps Checking the Battery Level 1 Turn the camera on • Press the power switch. • The power-on lamp lights when the camera is on. 2 Check the battery level in the monitor When the camera is turned on lamp has gone out. 12 Choose the desired...
User Manual
Page 23
...on lamp will turn off after three minutes, and when pictures are being shown in the setup menu ( 119). While the camera is in the monitor ( 53). When connecting the camera to a computer or printer with a USB cable, Auto power off automatically and the power-on lamp will enter standby mode... to select a new mode The length of time before the camera enters standby mode can also be displayed in standby mode, the power-on the battery. If no operations are performed for about two seconds. First...
...on lamp will turn off after three minutes, and when pictures are being shown in the setup menu ( 119). While the camera is in the monitor ( 53). When connecting the camera to a computer or printer with a USB cable, Auto power off automatically and the power-on lamp will enter standby mode... to select a new mode The length of time before the camera enters standby mode can also be displayed in standby mode, the power-on the battery. If no operations are performed for about two seconds. First...

User Manual
Page 24
... time zone. Confirmation dialog displayed. To return to Step 3, press to choose a language and set the time and date. Basic Setup The first time the camera is checked, time will be advanced one hour ( 114). lands (Dutch), Svenska (Swedish), (Japanese), (Simpli-
... time zone. Confirmation dialog displayed. To return to Step 3, press to choose a language and set the time and date. Basic Setup The first time the camera is checked, time will be advanced one hour ( 114). lands (Dutch), Svenska (Swedish), (Japanese), (Simpli-


