
User Manual
Page 8
... 1-Select Mode 17 Step 2-Frame the Picture 19 Step 3-Focus and Shoot...21 Step 4-View the Results (Full-screen Playback 24 Scene Mode 27 Assist and Scene Modes...27 Framing Assist...28 Scene Mode...34 Taking Pictures for a Panorama 40 More on Photography 42 When Lighting Is Poor: Using the Flash 42 Taking a Self-Portrait: Using the Self-Timer 44 Easy Close-Ups: Macro Close-Up Mode 46 Controlling Exposure: Exposure Compensation 47 Movies 49 Selects Movie Types ...49 Recording Movies...51 Viewing Movies ...52...
... 1-Select Mode 17 Step 2-Frame the Picture 19 Step 3-Focus and Shoot...21 Step 4-View the Results (Full-screen Playback 24 Scene Mode 27 Assist and Scene Modes...27 Framing Assist...28 Scene Mode...34 Taking Pictures for a Panorama 40 More on Photography 42 When Lighting Is Poor: Using the Flash 42 Taking a Self-Portrait: Using the Self-Timer 44 Easy Close-Ups: Macro Close-Up Mode 46 Controlling Exposure: Exposure Compensation 47 Movies 49 Selects Movie Types ...49 Recording Movies...51 Viewing Movies ...52...

User Manual
Page 10
The Setup Menu 109 Using the Setup Menu ...109 Welcome Screen ...110 Date ...112 Monitor Settings ...115 Date Imprint ...116 Brightness ...117 Sound Settings ...118 Auto Off ...119 Format Memory/Card...119 Language ...120 USB...121 Video Mode...121 Reset All ...121 Firmware Version...122 Technical Notes 123 Optional Accessories ...123 Caring for Your Camera 126 Error Messages ...129 Troubleshooting...133 Specifications...136 Index ...139 viii
The Setup Menu 109 Using the Setup Menu ...109 Welcome Screen ...110 Date ...112 Monitor Settings ...115 Date Imprint ...116 Brightness ...117 Sound Settings ...118 Auto Off ...119 Format Memory/Card...119 Language ...120 USB...121 Video Mode...121 Reset All ...121 Firmware Version...122 Technical Notes 123 Optional Accessories ...123 Caring for Your Camera 126 Error Messages ...129 Troubleshooting...133 Specifications...136 Index ...139 viii
User Manual
Page 11
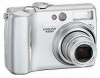
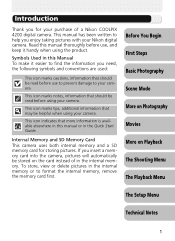
... card instead of a Nikon COOLPIX 4200 digital camera. This icon marks notes, information that may be stored on Playback The Shooting Menu The Playback Menu The Setup Menu Technical Notes 1 If you enjoy taking pictures with your camera. Read this manual or in the internal memory or to format the internal memory, remove the memory card first. This icon marks tips, additional information that should be read before use , and keep it easier to find the information you need...
... card instead of a Nikon COOLPIX 4200 digital camera. This icon marks notes, information that may be stored on Playback The Shooting Menu The Playback Menu The Setup Menu Technical Notes 1 If you enjoy taking pictures with your camera. Read this manual or in the internal memory or to format the internal memory, remove the memory card first. This icon marks tips, additional information that should be read before use , and keep it easier to find the information you need...

User Manual
Page 14
... Self-timer indicator 44 11 Date imprint indicator . . . . . 116 12 Number of exposures remaining/ length of movie. . . . . 17, 18, 51 13 Flash mode 42 14 Focus area7 23, 91 15 Image quality 75 16 Image size 77 17 Exposure compensation . . . . 47 18 Sensitivity (ISO equivalency) . 87 19 Bracketing8 88 20 White balance bracketing9) . 88 21 Best Shot Selector (BSS) . . . . 84 22 Noise reduction 95 23 Continuous shooting mode . . . 82 24 White balance 79 25 Image adjustment...
... Self-timer indicator 44 11 Date imprint indicator . . . . . 116 12 Number of exposures remaining/ length of movie. . . . . 17, 18, 51 13 Flash mode 42 14 Focus area7 23, 91 15 Image quality 75 16 Image size 77 17 Exposure compensation . . . . 47 18 Sensitivity (ISO equivalency) . 87 19 Bracketing8 88 20 White balance bracketing9) . 88 21 Best Shot Selector (BSS) . . . . 84 22 Noise reduction 95 23 Continuous shooting mode . . . 82 24 White balance 79 25 Image adjustment...

User Manual
Page 21
... a write protect switch to corrosive gas. For information on lamp is off . Removing Memory Cards Memory cards can be removed without loss of data. The card can then be formatted. Do not lock the card when taking, deleting, or editing pictures or when transferring pictures to partially eject the card. First Steps Formatting Memory Cards Memory cards must be formatted using the ( ) button on the camera, and the card can not be formatted. 11 Open the memory card slot cover and press the memory card to...
... a write protect switch to corrosive gas. For information on lamp is off . Removing Memory Cards Memory cards can be removed without loss of data. The card can then be formatted. Do not lock the card when taking, deleting, or editing pictures or when transferring pictures to partially eject the card. First Steps Formatting Memory Cards Memory cards must be formatted using the ( ) button on the camera, and the card can not be formatted. 11 Open the memory card slot cover and press the memory card to...
User Manual
Page 23
... operations are being shown in a non-stop slide show ( 97) or when the camera is displayed, the monitor will turn off automatically and the camera will enter standby mode to a computer or printer with a USB cable, Auto power off automatically and the power-on the battery. When connecting the camera to reduce the drain on lamp will go out. Your most recent picture will be changed using the Auto...
... operations are being shown in a non-stop slide show ( 97) or when the camera is displayed, the monitor will turn off automatically and the camera will enter standby mode to a computer or printer with a USB cable, Auto power off automatically and the power-on the battery. When connecting the camera to reduce the drain on lamp will go out. Your most recent picture will be changed using the Auto...
User Manual
Page 27
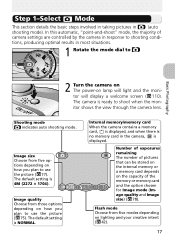
Image size Choose from five options depending on lighting and your creative intent ( 42). 17 Flash mode Choose from three options depending on the capacity of camera settings are controlled by the camera in response to shooting conditions, producing optimal results in most situations. 1 Rotate the mode dial to use the picture ( 77). The camera is 4M (2272 × 1704). Shooting mode indicates auto shooting mode. Internal memory/memory card When the camera contains a memory card, is displayed, and...
Image size Choose from five options depending on lighting and your creative intent ( 42). 17 Flash mode Choose from three options depending on the capacity of camera settings are controlled by the camera in response to shooting conditions, producing optimal results in most situations. 1 Rotate the mode dial to use the picture ( 77). The camera is 4M (2272 × 1704). Shooting mode indicates auto shooting mode. Internal memory/memory card When the camera contains a memory card, is displayed, and...

User Manual
Page 28
See "Using the Shooting Menu" ( 73). Auto Shooting Mode (auto shooting) mode provides thirteen shooting menu options such as White balance, Image sharpening and Continuous. Basic Photography Number of Exposures Remaining If the number of exposures remaining is zero, the message "OUT OF MEMORY" will be taken until you: • Choose a lower image quality or image size setting ( 75) (depending on a memory card. ther pictures may be taken even if you change the setting). • Insert a new memory card ( 10). • Remove the memory card so...
See "Using the Shooting Menu" ( 73). Auto Shooting Mode (auto shooting) mode provides thirteen shooting menu options such as White balance, Image sharpening and Continuous. Basic Photography Number of Exposures Remaining If the number of exposures remaining is zero, the message "OUT OF MEMORY" will be taken until you: • Choose a lower image quality or image size setting ( 75) (depending on a memory card. ther pictures may be taken even if you change the setting). • Insert a new memory card ( 10). • Remove the memory card so...
User Manual
Page 32
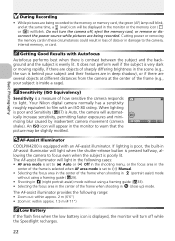
... guide ( 29). • Shooting in (night portrait assist) mode without using a framing guide ( 33). • Selecting the focus area in (close up) mode. When lighting is poor and Sensitivity ( 87) is evenly lit. Do not turn off , eject the memory card, or remove or disconnect the power source while pictures are several objects at different distances from the camera at the same time, a (wait) icon will light when the shutter...
... guide ( 29). • Shooting in (night portrait assist) mode without using a framing guide ( 33). • Selecting the focus area in (close up) mode. When lighting is poor and Sensitivity ( 87) is evenly lit. Do not turn off , eject the memory card, or remove or disconnect the power source while pictures are several objects at different distances from the camera at the same time, a (wait) icon will light when the shutter...

User Manual
Page 33
... picture Keeping the shutter-release button pressed halfway, recompose your picture. Procedures for AF/AE lock are lit. Focus area shows green on the monitor are described below. AF/ AE lock can be used to take pictures of the Autofocus; Basic Photography Autofocus The COOLPIX 4200 has two modes that allow control of off-center subjects or in situations in which the camera is unable to shoot...
... picture Keeping the shutter-release button pressed halfway, recompose your picture. Procedures for AF/AE lock are lit. Focus area shows green on the monitor are described below. AF/ AE lock can be used to take pictures of the Autofocus; Basic Photography Autofocus The COOLPIX 4200 has two modes that allow control of off-center subjects or in situations in which the camera is unable to shoot...

User Manual
Page 50
Take first picture. Pan direction ( ) displayed. Take next shot. icon is shown superimposed on view through lens. About one third of picture is displayed, and White balance and Exposure compensation are locked. Compose next shot to shooting mode. menu, and press . Taking Pictures for a Panorama Scene Mode Select (Panorama assist) in series have been taken. End series. • Shooting will also end if pressing the MENU button, playing pictures, changing mode using the mode dial, or entering standby mode. 40 Repeat steps 4 - 5 until all shots in scene...
Take first picture. Pan direction ( ) displayed. Take next shot. icon is shown superimposed on view through lens. About one third of picture is displayed, and White balance and Exposure compensation are locked. Compose next shot to shooting mode. menu, and press . Taking Pictures for a Panorama Scene Mode Select (Panorama assist) in series have been taken. End series. • Shooting will also end if pressing the MENU button, playing pictures, changing mode using the mode dial, or entering standby mode. 40 Repeat steps 4 - 5 until all shots in scene...

User Manual
Page 66
... dialog displayed. More on a different camera. Also, it as the original picture. Zoom picture in the memory or on the size of the form "RSCNnnnn.JPG," where "nnnn" is a four-digit number assigned automatically by the camera. • Cropped copies have the same recording time and date as a separate file. Cropping Pictures When a picture is displayed in the playback zoom mode ( 55), you can not be cropped. • A cropped copy created using the...
... dialog displayed. More on a different camera. Also, it as the original picture. Zoom picture in the memory or on the size of the form "RSCNnnnn.JPG," where "nnnn" is a four-digit number assigned automatically by the camera. • Cropped copies have the same recording time and date as a separate file. Cropping Pictures When a picture is displayed in the playback zoom mode ( 55), you can not be cropped. • A cropped copy created using the...
User Manual
Page 70
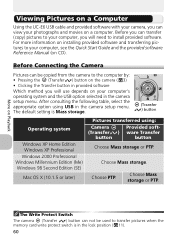
... installing provided software and transferring pictures to your computer, see the Quick Start Guide and the provided software Reference Manual (on your computer's operating system and the USB option selected in the camera setup menu. Choose Mass storage. Choose Mass storage or PTP. Before you can transfer (copy) pictures to your computer, you will need to install provided software. Before Connecting the Camera Pictures can be used to transfer pictures when the memory card write protect switch is Mass storage. (Transfer ) button Operating system Windows...
... installing provided software and transferring pictures to your computer, see the Quick Start Guide and the provided software Reference Manual (on your computer's operating system and the USB option selected in the camera setup menu. Choose Mass storage. Choose Mass storage or PTP. Before you can transfer (copy) pictures to your computer, you will need to install provided software. Before Connecting the Camera Pictures can be used to transfer pictures when the memory card write protect switch is Mass storage. (Transfer ) button Operating system Windows...

User Manual
Page 77
... the setup menu is imprinted on the image. A date is not imprinted on the images, but recorded in More on Print Set No more than 999 pictures can be selected for DPOF ( 65). - The date to make setting before taking pictures. - Print Set If you display the Print set menu after creating a print order, the Date and Info options will appear on pictures printed using a printer that supports date-print configuration for Print set. The Print-Order Icon During the playback mode, a the current print order. icon...
... the setup menu is imprinted on the image. A date is not imprinted on the images, but recorded in More on Print Set No more than 999 pictures can be selected for DPOF ( 65). - The date to make setting before taking pictures. - Print Set If you display the Print set menu after creating a print order, the Date and Info options will appear on pictures printed using a printer that supports date-print configuration for Print set. The Print-Order Icon During the playback mode, a the current print order. icon...

User Manual
Page 109
... the memory card is used to the picture, press in the playback menu. The delete menu contains the following options: Option Description Erase selected images Delete selected pictures. Deleting Selected Pictures (Erase selected images) The Playback Menu Highlight Erase selected images and press . To delete only the voice memo recorded to delete selected pictures or all pictures stored in the memory or on Voice Memo Voice memo can be deleted with Delete in the full-screen playback mode, thumbnail playback mode, or playback zoom mode ( 53...
... the memory card is used to the picture, press in the playback menu. The delete menu contains the following options: Option Description Erase selected images Delete selected pictures. Deleting Selected Pictures (Erase selected images) The Playback Menu Highlight Erase selected images and press . To delete only the voice memo recorded to delete selected pictures or all pictures stored in the memory or on Voice Memo Voice memo can be deleted with Delete in the full-screen playback mode, thumbnail playback mode, or playback zoom mode ( 53...

User Manual
Page 112
... on CD) for details. • The COOLPIX4200 can be used to mark pictures for transfer to a computer and to transfer pictures selected for transfer. See the provided software Reference Manual (on the memory card. All off . Auto Transfer Press MENU button in playback mode to reselect the pictures. 102 The Playback Menu Notes on the memory card are marked for transfer. Use COOLPIX4200 to select Auto transfer ( 96), and then press . Select image(s) Mark selected pictures for transfer.
... on CD) for details. • The COOLPIX4200 can be used to mark pictures for transfer to a computer and to transfer pictures selected for transfer. See the provided software Reference Manual (on the memory card. All off . Auto Transfer Press MENU button in playback mode to reselect the pictures. 102 The Playback Menu Notes on the memory card are marked for transfer. Use COOLPIX4200 to select Auto transfer ( 96), and then press . Select image(s) Mark selected pictures for transfer.

User Manual
Page 131
Option No Reset Description Exit menu, leaving settings unchanged. Your Nikon digital camera supports NTSC and PAL standards. Restore settings to a video device such as a television or VCR ( 59), choose a video mode that matches the video standard used when viewing pictures on the next page to their original state. Before connecting your camera to default settings. Reset All Rotate the mode dial to and then press . The Setup Menu 121 USB Rotate the mode dial to...
Option No Reset Description Exit menu, leaving settings unchanged. Your Nikon digital camera supports NTSC and PAL standards. Restore settings to a video device such as a television or VCR ( 59), choose a video mode that matches the video standard used when viewing pictures on the next page to their original state. Before connecting your camera to default settings. Reset All Rotate the mode dial to and then press . The Setup Menu 121 USB Rotate the mode dial to...
User Manual
Page 141
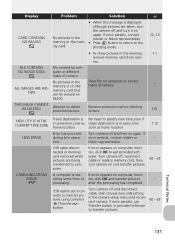
... choose new USB setting in provided software to the ory card. USB option set incorrectly to delete protected picture. THIS IMAGE CANNOT BE DELETED Attempt to transfer pictures using camera's (Transfer ) button. If during lens opera- Display Problem Solution CARD CONTAINS NO IMAGES • When this message is displayed although pictures are being transferred to exit provided software. View file on again. If error persists, use Transfer button in the camera setup menu and reconnect camera. FILE CONTAINS NO IMAGE DATA ALL IMAGES ARE HIDDEN File created by...
... choose new USB setting in provided software to the ory card. USB option set incorrectly to delete protected picture. THIS IMAGE CANNOT BE DELETED Attempt to transfer pictures using camera's (Transfer ) button. If during lens opera- Display Problem Solution CARD CONTAINS NO IMAGES • When this message is displayed although pictures are being transferred to exit provided software. View file on again. If error persists, use Transfer button in the camera setup menu and reconnect camera. FILE CONTAINS NO IMAGE DATA ALL IMAGES ARE HIDDEN File created by...
User Manual
Page 143
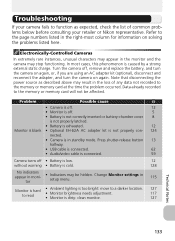
... memory or memory card will not be hidden. Data already recorded to function as described above may stop functioning. Press shutter-release button 13 halfway. • USB cable is connected. 62 • Audio/video cable is connected. 59 Camera turns off , remove and replace the battery, and turn the camera on again, or, if you are using an AC adapter kit (optional), disconnect and reconnect the adapter, and turn the camera on solving the problems listed here. Electronically-Controlled Cameras...
... memory or memory card will not be hidden. Data already recorded to function as described above may stop functioning. Press shutter-release button 13 halfway. • USB cable is connected. 62 • Audio/video cable is connected. 59 Camera turns off , remove and replace the battery, and turn the camera on again, or, if you are using an AC adapter kit (optional), disconnect and reconnect the adapter, and turn the camera on solving the problems listed here. Electronically-Controlled Cameras...

User Manual
Page 150
... Date imprint, Digital Print Order Format Protect, 96, 101 Protected pictures, 100, 101 Q Quality, see Image mode Quick Time, see Movies R Reset all, 109, 121 Resizing pictures, 111, 135 RSCN, 26 S Saturation, 90 Saturation control, 73 (scene) mode, 6, 27, 34 - 41 Secure Digital (SD), see Memory card Self-portraits, 44 Self-timer, 44, 45, 137 Self-timer lamp, 2, 45 Sensitivity, 22, 73, 87 (setup) mode, 6, 109 122 Setup menu, the, 109 - 122 Shade, 79 Shooting menu, the, 73 - 95 Shutter-release button...
... Date imprint, Digital Print Order Format Protect, 96, 101 Protected pictures, 100, 101 Q Quality, see Image mode Quick Time, see Movies R Reset all, 109, 121 Resizing pictures, 111, 135 RSCN, 26 S Saturation, 90 Saturation control, 73 (scene) mode, 6, 27, 34 - 41 Secure Digital (SD), see Memory card Self-portraits, 44 Self-timer, 44, 45, 137 Self-timer lamp, 2, 45 Sensitivity, 22, 73, 87 (setup) mode, 6, 109 122 Setup menu, the, 109 - 122 Shade, 79 Shooting menu, the, 73 - 95 Shutter-release button...


