
WGX102v2 Reference Manual
Page 6
... 5-12 Chapter 6 Maintenance Changing the Administrator Password 6-1 Viewing Access Point Status Information 6-2 Viewing Router Status Information 6-5 Viewing a List of Attached Devices 6-8 Configuration File Management 6-9 Backing Up the Configuration 6-9 Erasing the Configuration 6-10 Upgrading the Wireless Range Extender Software 6-10 Chapter 7 Advanced Configuration of the WGX102 Wireless Range Extender WGX102 Operating Modes 7-1 Default: Access Point Mode 7-2 Advanced Custom Setup: Router Mode 7-3 Router Mode...
... 5-12 Chapter 6 Maintenance Changing the Administrator Password 6-1 Viewing Access Point Status Information 6-2 Viewing Router Status Information 6-5 Viewing a List of Attached Devices 6-8 Configuration File Management 6-9 Backing Up the Configuration 6-9 Erasing the Configuration 6-10 Upgrading the Wireless Range Extender Software 6-10 Chapter 7 Advanced Configuration of the WGX102 Wireless Range Extender WGX102 Operating Modes 7-1 Default: Access Point Mode 7-2 Advanced Custom Setup: Router Mode 7-3 Router Mode...
WGX102v2 Reference Manual
Page 7
...7-23 Router Mode LAN IP Setup Options 7-24 Using the WGX102 in Router Mode as a DHCP server 7-27 Using Address ...Plug and Play (UPnP 7-33 Router Mode Content Filtering Overview 7-34 Router Mode Blocking Access to Internet Sites 7-34 Router Mode Blocking Access to Internet Services 7-36 Configuring a User Defined Service 7-37 Configuring Services Blocking by IP Address Range... NETGEAR Product Registration, Support, and Documentation 8-1 Basic Functioning ...8-1 Power Light Not On 8-2 HomePlug/Internet or Wireless Port Lights Not On 8-2 Troubleshooting the Web Configuration Interface...
...7-23 Router Mode LAN IP Setup Options 7-24 Using the WGX102 in Router Mode as a DHCP server 7-27 Using Address ...Plug and Play (UPnP 7-33 Router Mode Content Filtering Overview 7-34 Router Mode Blocking Access to Internet Sites 7-34 Router Mode Blocking Access to Internet Services 7-36 Configuring a User Defined Service 7-37 Configuring Services Blocking by IP Address Range... NETGEAR Product Registration, Support, and Documentation 8-1 Basic Functioning ...8-1 Power Light Not On 8-2 HomePlug/Internet or Wireless Port Lights Not On 8-2 Troubleshooting the Web Configuration Interface...
WGX102v2 Reference Manual
Page 8
Testing the Path from Your Computer to a Remote Device 8-6 Restoring the Default WGX102 Configuration and Password 8-7 Problems with Router Mode Only Date and Time 8-7 Appendix A Technical Specifications Appendix B Network, Routing, Firewall, ... Twisted Pair Cables B-13 Uplink Switches, Crossover Cables, and MDI/MDIX Switching B-14 Appendix C Wireless Networking Basics Wireless Networking Overview C-1 Infrastructure Mode C-1 Ad Hoc Mode (Peer-to-Peer Workgroup C-2 Network Name: Extended Service Set Identification (ESSID C-2 Authentication and WEP C-3 viii Contents 202-10042-02 v1.1
Testing the Path from Your Computer to a Remote Device 8-6 Restoring the Default WGX102 Configuration and Password 8-7 Problems with Router Mode Only Date and Time 8-7 Appendix A Technical Specifications Appendix B Network, Routing, Firewall, ... Twisted Pair Cables B-13 Uplink Switches, Crossover Cables, and MDI/MDIX Switching B-14 Appendix C Wireless Networking Basics Wireless Networking Overview C-1 Infrastructure Mode C-1 Ad Hoc Mode (Peer-to-Peer Workgroup C-2 Network Name: Extended Service Set Identification (ESSID C-2 Authentication and WEP C-3 viii Contents 202-10042-02 v1.1

WGX102v2 Reference Manual
Page 9
C-16 Changes to Wireless Access Points C-17 Changes to Wireless Network Adapters C-17 Changes to IEEE 802.11i C-10 What are the Key Features of WPA Security C-10 WPA Authentication: Enterprise-level User Authentication via ... Glossary Terms G-1 Index Contents ix 202-10042-02 v1.1 802.11 Authentication C-3 Open System Authentication C-4 Shared Key Authentication C-4 Overview of WEP Parameters C-5 Key Size ...C-6 WEP Configuration Options C-7 Wireless Channels ...C-7 WPA Wireless Security C-8 How Does WPA Compare to WEP C-9 How Does WPA Compare to...
C-16 Changes to Wireless Access Points C-17 Changes to Wireless Network Adapters C-17 Changes to IEEE 802.11i C-10 What are the Key Features of WPA Security C-10 WPA Authentication: Enterprise-level User Authentication via ... Glossary Terms G-1 Index Contents ix 202-10042-02 v1.1 802.11 Authentication C-3 Open System Authentication C-4 Shared Key Authentication C-4 Overview of WEP Parameters C-5 Key Size ...C-6 WEP Configuration Options C-7 Wireless Channels ...C-7 WPA Wireless Security C-8 How Does WPA Compare to WEP C-9 How Does WPA Compare to...
WGX102v2 Reference Manual
Page 14
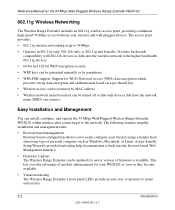
...54 Mbps Wall-Plugged Wireless Range Extender WGX102 802.11g Wireless Networking The Wireless Range Extender includes an 802.11g wireless access point, providing continuous, high-speed 54 Mbps access between your wireless and wall-plugged devices. The following features simplify installation and management tasks: • Browser-based management Browser-based configuration allows you take advantage of product enhancements for your wireless range extender...; WEP keys can install, configure, and operate the 54 Mbps Wall-Plugged Wireless Range Extender WGX102 within minutes after connecting it ...
...54 Mbps Wall-Plugged Wireless Range Extender WGX102 802.11g Wireless Networking The Wireless Range Extender includes an 802.11g wireless access point, providing continuous, high-speed 54 Mbps access between your wireless and wall-plugged devices. The following features simplify installation and management tasks: • Browser-based management Browser-based configuration allows you take advantage of product enhancements for your wireless range extender...; WEP keys can install, configure, and operate the 54 Mbps Wall-Plugged Wireless Range Extender WGX102 within minutes after connecting it ...

WGX102v2 Reference Manual
Page 17
... "Restoring the Default WGX102 Configuration and Password" on the bottom panel of the WGX102 contains the items listed below. • MAC address • Model number • Serial number • Unique device Passcode (PWD) The WGX102 Bottom Panel The factory default reset push button is located on page 8-7. Reference Manual for the 54 Mbps Wall-Plugged Wireless Range Extender WGX102 The Label on...
... "Restoring the Default WGX102 Configuration and Password" on the bottom panel of the WGX102 contains the items listed below. • MAC address • Model number • Serial number • Unique device Passcode (PWD) The WGX102 Bottom Panel The factory default reset push button is located on page 8-7. Reference Manual for the 54 Mbps Wall-Plugged Wireless Range Extender WGX102 The Label on...
WGX102v2 Reference Manual
Page 22
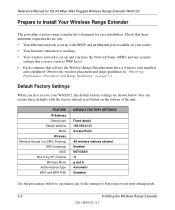
... Access Point All wireless stations allowed Enabled NETGEAR 11 g and b Automatic Disabled Use the procedures below . Default Factory Settings When you first receive your networking needs. 3-2 Installing the Wireless Range Extender 202-10042-02 ...wireless network is designed for the 54 Mbps Wall-Plugged Wireless Range Extender WGX102 Prepare to Install Your Wireless Range Extender The powerline wireless range extender kit is set up and you have a wireless card installed and configured. Observe the wireless placement and range guidelines in "Observing Performance, Placement, and Range ...
... Access Point All wireless stations allowed Enabled NETGEAR 11 g and b Automatic Disabled Use the procedures below . Default Factory Settings When you first receive your networking needs. 3-2 Installing the Wireless Range Extender 202-10042-02 ...wireless network is designed for the 54 Mbps Wall-Plugged Wireless Range Extender WGX102 Prepare to Install Your Wireless Range Extender The powerline wireless range extender kit is set up and you have a wireless card installed and configured. Observe the wireless placement and range guidelines in "Observing Performance, Placement, and Range ...
WGX102v2 Reference Manual
Page 25
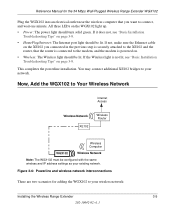
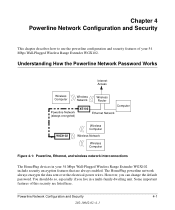
..., and wait one minute. This completes the powerline installation. Figure 3-6: Powerline and wireless network interconnections There are two scenarios for the 54 Mbps Wall-Plugged Wireless Range Extender WGX102 Plug the WGX102 into an electrical outlet near the wireless computer that the router is connected to your wireless network: Installing the Wireless Range Extender 3-5 202-10042-02 v1.1 If not, make sure the Ethernet cable on...
..., and wait one minute. This completes the powerline installation. Figure 3-6: Powerline and wireless network interconnections There are two scenarios for the 54 Mbps Wall-Plugged Wireless Range Extender WGX102 Plug the WGX102 into an electrical outlet near the wireless computer that the router is connected to your wireless network: Installing the Wireless Range Extender 3-5 202-10042-02 v1.1 If not, make sure the Ethernet cable on...
WGX102v2 Reference Manual
Page 26
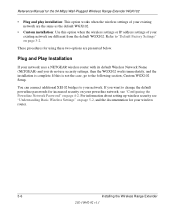
Reference Manual for the 54 Mbps Wall-Plugged Wireless Range Extender WGX102 • Plug and play installation: This option works when the wireless settings of your existing network are the same as the default WGX102. • Custom installation: Use this is complete. Plug and Play Installation If your network. You can connect additional XE102 bridges to your network uses a NETGEAR wireless router with its default...
Reference Manual for the 54 Mbps Wall-Plugged Wireless Range Extender WGX102 • Plug and play installation: This option works when the wireless settings of your existing network are the same as the default WGX102. • Custom installation: Use this is complete. Plug and Play Installation If your network. You can connect additional XE102 bridges to your network uses a NETGEAR wireless router with its default...
WGX102v2 Reference Manual
Page 27
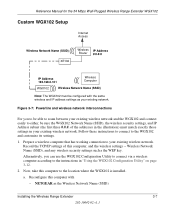
... the 54 Mbps Wall-Plugged Wireless Range Extender WGX102 Custom WGX102 Setup Internet Access Wireless Network Name (SSID) XE102 Wireless IP Address Router #.#.#.# IP Address 192.168.0.101 Wireless Computer WGX102 Wireless Network Name (SSID) Note: The WGX102 must match exactly those settings in your existing wireless network. of this computer, and the wireless settings -- Follow these instructions to connect to the instructions in "Using the WGX102 Configuration Utility...
... the 54 Mbps Wall-Plugged Wireless Range Extender WGX102 Custom WGX102 Setup Internet Access Wireless Network Name (SSID) XE102 Wireless IP Address Router #.#.#.# IP Address 192.168.0.101 Wireless Computer WGX102 Wireless Network Name (SSID) Note: The WGX102 must match exactly those settings in your existing wireless network. of this computer, and the wireless settings -- Follow these instructions to connect to the instructions in "Using the WGX102 Configuration Utility...

WGX102v2 Reference Manual
Page 30
... must be lit if the Ethernet cable from the XE102 to your router is securely plugged into the XE102. Check the status lights to Configure the WGX102 1. Reference Manual for the 54 Mbps Wall-Plugged Wireless Range Extender WGX102 Be sure to restart your network in this . Turn on the CD for the password, both in the address field of your...
... must be lit if the Ethernet cable from the XE102 to your router is securely plugged into the XE102. Check the status lights to Configure the WGX102 1. Reference Manual for the 54 Mbps Wall-Plugged Wireless Range Extender WGX102 Be sure to restart your network in this . Turn on the CD for the password, both in the address field of your...
WGX102v2 Reference Manual
Page 32
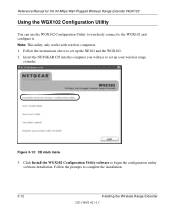
... WGX102 Configuration Utility software to complete the installation. 3-12 Installing the Wireless Range Extender 202-10042-02 v1.1 Note: This utility only works with wireless computers. 1. Follow the instructions above to set up the XE102 and the WGX102. 2. Figure 3-13: CD main menu 3. Reference Manual for the 54 Mbps Wall-Plugged Wireless Range Extender WGX102 Using the WGX102 Configuration Utility You can use to set up your wireless range extender...
... WGX102 Configuration Utility software to complete the installation. 3-12 Installing the Wireless Range Extender 202-10042-02 v1.1 Note: This utility only works with wireless computers. 1. Follow the instructions above to set up the XE102 and the WGX102. 2. Figure 3-13: CD main menu 3. Reference Manual for the 54 Mbps Wall-Plugged Wireless Range Extender WGX102 Using the WGX102 Configuration Utility You can use to set up your wireless range extender...

WGX102v2 Reference Manual
Page 33
Click to highlight the wireless network adapter found in your wireless adapter, and click Next to proceed. Reference Manual for the WGX102. Go to the instructions on the screen regarding the settings of your computer.Then, click Next to ...screen. If it does not find the WGX102, make sure your wireless adapter is set according to the Windows Start menu, programs and locate the NETGEAR WGX102 Configuration Utility program group. The utility will search for the 54 Mbps Wall-Plugged Wireless Range Extender WGX102 4. Installing the Wireless Range Extender 202-10042-02 v1.1 3-13 Run...
Click to highlight the wireless network adapter found in your wireless adapter, and click Next to proceed. Reference Manual for the WGX102. Go to the instructions on the screen regarding the settings of your computer.Then, click Next to ...screen. If it does not find the WGX102, make sure your wireless adapter is set according to the Windows Start menu, programs and locate the NETGEAR WGX102 Configuration Utility program group. The utility will search for the 54 Mbps Wall-Plugged Wireless Range Extender WGX102 4. Installing the Wireless Range Extender 202-10042-02 v1.1 3-13 Run...

WGX102v2 Reference Manual
Page 34
...You will be 192.168.1.101. If you can always use a Fixed IP Address for the 54 Mbps Wall-Plugged Wireless Range Extender WGX102 6. Click Ok. Click Ok to the factory default IP address, password, and wireless settings. 8. You will be informed that the changes you have a problem, you ever have requested... get a confirmation message that the change is complete. 3-14 Installing the Wireless Range Extender 202-10042-02 v1.1 Reference Manual for your WGX102 so that it is easy to log in to make configuration changes. When prompted, enter admin as the user name, and password as...
...You will be 192.168.1.101. If you can always use a Fixed IP Address for the 54 Mbps Wall-Plugged Wireless Range Extender WGX102 6. Click Ok. Click Ok to the factory default IP address, password, and wireless settings. 8. You will be informed that the changes you have a problem, you ever have requested... get a confirmation message that the change is complete. 3-14 Installing the Wireless Range Extender 202-10042-02 v1.1 Reference Manual for your WGX102 so that it is easy to log in to make configuration changes. When prompted, enter admin as the user name, and password as...
WGX102v2 Reference Manual
Page 36
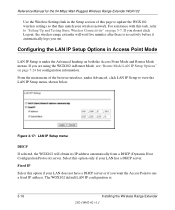
... view the LAN IP Setup menu, shown below. The WGX102 default LAN IP configuration is no activity before it automatically logs you are using the WGX102 in the Setup section of the browser interface, under the Advanced heading on page 7-24 for the 54 Mbps Wall-Plugged Wireless Range Extender WGX102 Use the Wireless Settings link in Router Mode, see "Router Mode...
... view the LAN IP Setup menu, shown below. The WGX102 default LAN IP configuration is no activity before it automatically logs you are using the WGX102 in the Setup section of the browser interface, under the Advanced heading on page 7-24 for the 54 Mbps Wall-Plugged Wireless Range Extender WGX102 Use the Wireless Settings link in Router Mode, see "Router Mode...
WGX102v2 Reference Manual
Page 39
... Security This chapter describes how to use the powerline configuration and security features of this security are always enabled. Some important features of your 54 Mbps Wall-Plugged Wireless Range Extender WGX102 include security encryption features that are listed here. However, you live in your 54 Mbps Wall-Plugged Wireless Range Extender WGX102. The HomePlug powerline network always encrypts the data sent over the electrical power wires...
... Security This chapter describes how to use the powerline configuration and security features of this security are always enabled. Some important features of your 54 Mbps Wall-Plugged Wireless Range Extender WGX102 include security encryption features that are listed here. However, you live in your 54 Mbps Wall-Plugged Wireless Range Extender WGX102. The HomePlug powerline network always encrypts the data sent over the electrical power wires...
WGX102v2 Reference Manual
Page 40
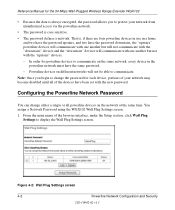
... network. Figure 4-2: Wall Plug Settings screen 4-2 Powerline Network Configuration and Security 202-10042-02 v1.1 Powerline devices on different networks will communicate with one another but not with the new password. You assign a Network Password using the WGX102 Wall Plug Settings screen. 1. Note..." devices will not be able to display the Wall Plug Settings screen. In order for powerline devices to communicate on the network at the same time. Reference Manual for the 54 Mbps Wall-Plugged Wireless Range Extender WGX102 • Because the data is always encrypted, ...
... network. Figure 4-2: Wall Plug Settings screen 4-2 Powerline Network Configuration and Security 202-10042-02 v1.1 Powerline devices on different networks will communicate with one another but not with the new password. You assign a Network Password using the WGX102 Wall Plug Settings screen. 1. Note..." devices will not be able to display the Wall Plug Settings screen. In order for powerline devices to communicate on the network at the same time. Reference Manual for the 54 Mbps Wall-Plugged Wireless Range Extender WGX102 • Because the data is always encrypted, ...
WGX102v2 Reference Manual
Page 41
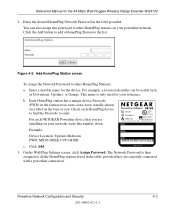
...Configuration and Security 4-3 202-10042-02 v1.1 This name is then assigned to all the HomePlug stations listed in the table, provided they are installing on your network, write this password to enter. For each HomePlug device to find the Passcode to other HomePlug Stations: a. Enter a suitable name for the 54 Mbps Wall-Plugged Wireless Range Extender WGX102...Figure 4-3: Add HomePlug Station screen To assign the Network Password to the list. Check each NETGEAR Powerline device that you are currently connected with a powerline connection. Reference Manual for the device....
...Configuration and Security 4-3 202-10042-02 v1.1 This name is then assigned to all the HomePlug stations listed in the table, provided they are installing on your network, write this password to enter. For each HomePlug device to find the Passcode to other HomePlug Stations: a. Enter a suitable name for the 54 Mbps Wall-Plugged Wireless Range Extender WGX102...Figure 4-3: Add HomePlug Station screen To assign the Network Password to the list. Check each NETGEAR Powerline device that you are currently connected with a powerline connection. Reference Manual for the device....
WGX102v2 Reference Manual
Page 42
Reference Manual for the 54 Mbps Wall-Plugged Wireless Range Extender WGX102 4-4 Powerline Network Configuration and Security 202-10042-02 v1.1
Reference Manual for the 54 Mbps Wall-Plugged Wireless Range Extender WGX102 4-4 Powerline Network Configuration and Security 202-10042-02 v1.1
WGX102v2 Reference Manual
Page 43
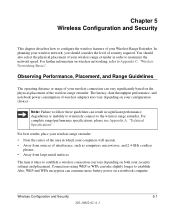
For further information on wireless networking, refer to the wireless range extender. The time it takes to establish a wireless connection can vary significantly based on both your configuration choices. Observing Performance, Placement, and Range Guidelines The operating distance or range of your wireless connection can vary depending on the physical placement of the wireless range extender. Also, WEP and WPA encryption can take...
For further information on wireless networking, refer to the wireless range extender. The time it takes to establish a wireless connection can vary significantly based on both your configuration choices. Observing Performance, Placement, and Range Guidelines The operating distance or range of your wireless connection can vary depending on the physical placement of the wireless range extender. Also, WEP and WPA encryption can take...


