
NP115 : RS232 codes- Projectors
Page 35
... FOCUS 214 D6H 00H 3D REFORM 215 D7H 00H SOURCE (!!) 216 D8H 00H RGB(*5) oggle (!!) 217 D9H 00H VIDEO Toggle (!!) 218 DAH 00H 3D REFORM RESET 221 DDH 00H AUTO (SHORT) 222 DEH 00H AUTO (LONG) 223 DFH 00H PICTURE MANAGEMENT (!!) 225 E1H 00H COMPONENT (!!) 226 E2H 00H ZOOM POS UP...
... FOCUS 214 D6H 00H 3D REFORM 215 D7H 00H SOURCE (!!) 216 D8H 00H RGB(*5) oggle (!!) 217 D9H 00H VIDEO Toggle (!!) 218 DAH 00H 3D REFORM RESET 221 DDH 00H AUTO (SHORT) 222 DEH 00H AUTO (LONG) 223 DFH 00H PICTURE MANAGEMENT (!!) 225 E1H 00H COMPONENT (!!) 226 E2H 00H ZOOM POS UP...
VT49/490/491/590/595/695 UM
Page 8
... 41 ᕥ Menu Descriptions & Functions [Image Options 42 ᕦ Menu Descriptions & Functions [Setup 44 ᕧ Menu Descriptions & Functions [Information 48 ᕨ Menu Descriptions & Functions [Reset 49 6. Using On-Screen Menu 36 ᕡ Using the Menus 36 ᕢ Menu Elements 38 ᕣ List of D-Sub COMPUTER Input Connector 62 ᕥ Compatible... 50 ᕡ Cleaning or Replacing the Filters 50 ᕢ Cleaning the Cabinet and the Lens 51 ᕣ Replacing the Lamp 52 7. Table of the Projector 31 ᕦ Using the Optional Remote Mouse Receiver (NP01MR 34 5.
... 41 ᕥ Menu Descriptions & Functions [Image Options 42 ᕦ Menu Descriptions & Functions [Setup 44 ᕧ Menu Descriptions & Functions [Information 48 ᕨ Menu Descriptions & Functions [Reset 49 6. Using On-Screen Menu 36 ᕡ Using the Menus 36 ᕢ Menu Elements 38 ᕣ List of D-Sub COMPUTER Input Connector 62 ᕥ Compatible... 50 ᕡ Cleaning or Replacing the Filters 50 ᕢ Cleaning the Cabinet and the Lens 51 ᕣ Replacing the Lamp 52 7. Table of the Projector 31 ᕦ Using the Optional Remote Mouse Receiver (NP01MR 34 5.

VT49/490/491/590/595/695 UM
Page 41
... function: 1. Press the MENU button. The keyword confirmation screen will be displayed. 6. When the correct keyword is turned off (by using the [Reset] of 1 second. Your dealer will be cancelled by setting the main power switch to the On position (I). 2. 4. Press the Main Power Switch...minimum of the menu. 33 Convenient Features To turn on and display a message to select [Installation]. 4. Your request code is enabled: 1. The projector will provide you forget your keyword, contact your request code. Use the SELECT ̆ or ̄ button to select [Off] and press the...
... function: 1. Press the MENU button. The keyword confirmation screen will be displayed. 6. When the correct keyword is turned off (by using the [Reset] of 1 second. Your dealer will be cancelled by setting the main power switch to the On position (I). 2. 4. Press the Main Power Switch...minimum of the menu. 33 Convenient Features To turn on and display a message to select [Installation]. 4. Your request code is enabled: 1. The projector will provide you forget your keyword, contact your request code. Use the SELECT ̆ or ̄ button to select [Off] and press the...
VT49/490/491/590/595/695 UM
Page 47
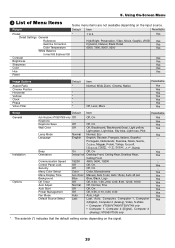
...Default Item Resettable Preset * Detail Settings General Reference Gamma Correction Color Temperature White Balance Contrast RGB, Brightness RGB Contrast Brightness Sharpness Color Hue Reset 1 to 6 Yes High-Bright, Presentation, Video, Movie, Graphic, sRGB Yes Dynamic, Natural, Black Detail Yes 6500, 7800, ...Native Off, Less, More Resettable Yes Yes Yes Yes Yes Yes Yes Setup General Installation Options Default Item Resettable Auto Keystone (VT695/VT595 only) Off Off, On Yes Keystone Keystone Save Wall Color Yes Off Off, On Yes Off Off, Blackboard, Blackboard...
...Default Item Resettable Preset * Detail Settings General Reference Gamma Correction Color Temperature White Balance Contrast RGB, Brightness RGB Contrast Brightness Sharpness Color Hue Reset 1 to 6 Yes High-Bright, Presentation, Video, Movie, Graphic, sRGB Yes Dynamic, Natural, Black Detail Yes 6500, 7800, ...Native Off, Less, More Resettable Yes Yes Yes Yes Yes Yes Yes Setup General Installation Options Default Item Resettable Auto Keystone (VT695/VT595 only) Off Off, On Yes Keystone Keystone Save Wall Color Yes Off Off, On Yes Off Off, Blackboard, Blackboard...
VT49/490/491/590/595/695 UM
Page 48
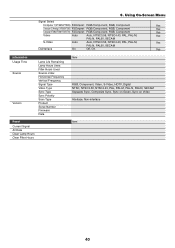
...) RGB/Component RGB/Component, RGB, Component Yes Computer 2 (Analog) (VT695/VT595) RGB/Component RGB/Component, RGB, Component Yes Computer(VT590/VT490/VT59/VT49) RGB/Component RGB/Component, RGB, Component Yes Video Auto Auto, NTSC3.58, ..., HDTV, Digital NTSC, NTSC3.58, NTSC4.43, PAL, PAL-M, PAL-N, PAL60, SECAM Separate Sync, Composite Sync, Sync on Green, Sync on Video Interlace, Non-interlace Reset Item Current Signal All Data Clear Lamp Hours Clear Filter Hours 40
...) RGB/Component RGB/Component, RGB, Component Yes Computer 2 (Analog) (VT695/VT595) RGB/Component RGB/Component, RGB, Component Yes Computer(VT590/VT490/VT59/VT49) RGB/Component RGB/Component, RGB, Component Yes Video Auto Auto, NTSC3.58, ..., HDTV, Digital NTSC, NTSC3.58, NTSC4.43, PAL, PAL-M, PAL-N, PAL60, SECAM Separate Sync, Composite Sync, Sync on Green, Sync on Video Interlace, Non-interlace Reset Item Current Signal All Data Clear Lamp Hours Clear Filter Hours 40
VT49/490/491/590/595/695 UM
Page 50
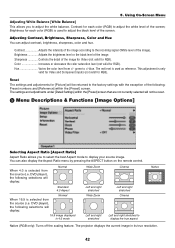
...This adjustment is selected from the source (i.e. Reset The settings and adjustments for RGB). When 4:3 is only valid for Video and Component inputs (not valid for [Picture] will not be returned to display your source image. The projector displays the current image in 4:3 mode Left... image according to adjust the white balance. Preset numbers and [Reference] within the [Preset] screen that are not currently selected will be reset. ´ Menu Descriptions & Functions [Image Options] Selecting Aspect Ratio [Aspect Ratio] Aspect Ratio allows you to the incoming signal (White...
...This adjustment is selected from the source (i.e. Reset The settings and adjustments for RGB). When 4:3 is only valid for Video and Component inputs (not valid for [Picture] will not be returned to display your source image. The projector displays the current image in 4:3 mode Left... image according to adjust the white balance. Preset numbers and [Reference] within the [Preset] screen that are not currently selected will be reset. ´ Menu Descriptions & Functions [Image Options] Selecting Aspect Ratio [Aspect Ratio] Aspect Ratio allows you to the incoming signal (White...
VT49/490/491/590/595/695 UM
Page 53
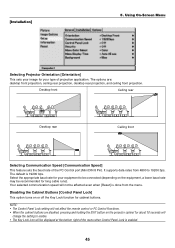
... bottom right of the menu when Control Panel Lock is enabled. 45 Disabling the Cabinet Buttons [Control Panel Lock] This option turns on the projector cabinet for long cable runs). [Installation] 5. The default is done from 4800 to enable. • The Key Lock icon will not be...baud rate for your equipment to be connected (depending on the equipment, a lower baud rate may be affected even when [Reset] is 19200 bps. Using On-Screen Menu Selecting Projector Orientation [Orientation] This sets your type of the PC Control port (Mini DIN 8 Pin). The options are disabled, ...
... bottom right of the menu when Control Panel Lock is enabled. 45 Disabling the Cabinet Buttons [Control Panel Lock] This option turns on the projector cabinet for long cable runs). [Installation] 5. The default is done from 4800 to enable. • The Key Lock icon will not be...baud rate for your equipment to be connected (depending on the equipment, a lower baud rate may be affected even when [Reset] is 19200 bps. Using On-Screen Menu Selecting Projector Orientation [Orientation] This sets your type of the PC Control port (Mini DIN 8 Pin). The options are disabled, ...

VT49/490/491/590/595/695 UM
Page 57
...], [Color], [Hue], [Sharpness], [Aspect Ratio], [Horizontal], [Vertical], [Clock], [Phase] and [Video Filter]. [All Data] Reset all the adjustments and settings for ten seconds to reset the lamp clock back to the factory preset. NOTE: The projector will not be reset except [Language], [Communication Speed], [Security], [Lamp Life Remaining], [Lamp Hours Used] and [Filter Hours...
...], [Color], [Hue], [Sharpness], [Aspect Ratio], [Horizontal], [Vertical], [Clock], [Phase] and [Video Filter]. [All Data] Reset all the adjustments and settings for ten seconds to reset the lamp clock back to the factory preset. NOTE: The projector will not be reset except [Language], [Communication Speed], [Security], [Lamp Life Remaining], [Lamp Hours Used] and [Filter Hours...
VT49/490/491/590/595/695 UM
Page 59
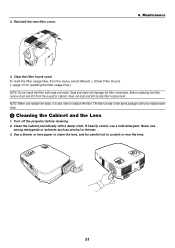
...the filter. ENTER SELECT EXIT MENU ZOOM FOCUS EXIT ON/STAND BY SELECT ENTER MENU POWESRTATULSAMP ZOOM FOCUS 51 To reset the filter usage time, from the projector cabinet. The filter comes in the same package with soap and water. AUTO ADJ. Before replacing the filter, remove...dust and dirt from the menu, select [Reset] → [Clear Filter Hours]. (→page 49 for resetting the filter usage time.) NOTE: Do not wash the filter with your replacement lamp. · Cleaning the Cabinet and the Lens 1. Turn off the projector before cleaning. 2. Clear the filter hours ...
...the filter. ENTER SELECT EXIT MENU ZOOM FOCUS EXIT ON/STAND BY SELECT ENTER MENU POWESRTATULSAMP ZOOM FOCUS 51 To reset the filter usage time, from the projector cabinet. The filter comes in the same package with soap and water. AUTO ADJ. Before replacing the filter, remove...dust and dirt from the menu, select [Reset] → [Clear Filter Hours]. (→page 49 for resetting the filter usage time.) NOTE: Do not wash the filter with your replacement lamp. · Cleaning the Cabinet and the Lens 1. Turn off the projector before cleaning. 2. Clear the filter hours ...
VT49/490/491/590/595/695 UM
Page 62
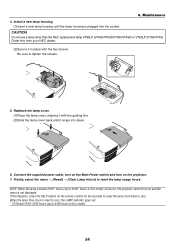
...Order this happens, press the HELP button on the remote control for ten seconds to reset the lamp clock back to tighten the screws. 5. CAUTION Do not use a lamp other than the NEC replacement lamp VT85LP (VT695/VT595/VT590/VT490) or VT80LP (VT59/VT49). Be sure to zero. If this ...from your NEC dealer. (2)Secure it snaps into the socket. Connect the supplied power cable, turn on the Main Power switch and turn on the projector. 7. Finally, select the menu → [Reset] &#...
...Order this happens, press the HELP button on the remote control for ten seconds to reset the lamp clock back to tighten the screws. 5. CAUTION Do not use a lamp other than the NEC replacement lamp VT85LP (VT695/VT595/VT590/VT490) or VT80LP (VT59/VT49). Be sure to zero. If this ...from your NEC dealer. (2)Secure it snaps into the socket. Connect the supplied power cable, turn on the Main Power switch and turn on the projector. 7. Finally, select the menu → [Reset] &#...
VT49/490/491/590/595/695 UM
Page 64
... of the lens. (→ page 11 for VT695, page 11 for VT595/VT590/VT490/VT59 and 12 for VT49) • Condensation may fail to light. If there is insufficient ventilation around the projector or if the room where you and the projector. • Stand within the adjustment range of the... cold, brought into a warm place and is particularly warm, move the projector to a cooler location. • Check to see if the projector has overheated. If so, replace the lamp. After replacing the lamp, reset the lamp hours used. (→ page 49) * VT59 and VT49: 3100 hours (up . * If the screen...
... of the lens. (→ page 11 for VT695, page 11 for VT595/VT590/VT490/VT59 and 12 for VT49) • Condensation may fail to light. If there is insufficient ventilation around the projector or if the room where you and the projector. • Stand within the adjustment range of the... cold, brought into a warm place and is particularly warm, move the projector to a cooler location. • Check to see if the projector has overheated. If so, replace the lamp. After replacing the lamp, reset the lamp hours used. (→ page 49) * VT59 and VT49: 3100 hours (up . * If the screen...
VT49/490/491/590/595/695 UM
Page 74
...and/or the contrast. Still no image even though you carry out [Reset] in the vertical or horizontal direction. Input source's resolution and frequency are lost . Some pixels are supported by the projector. Still unchanged even though you press the AUTO ADJUST button. Remote control...installed correctly . Remains unchanged even though you adjust the brightness and/or the contrast. Image is flickering. Image appears to the projector is fully inserted into the wall outlet. Other Image is correctly connected to your check. Image is distorted. Still unchanged even though...
...and/or the contrast. Still no image even though you carry out [Reset] in the vertical or horizontal direction. Input source's resolution and frequency are lost . Some pixels are supported by the projector. Still unchanged even though you press the AUTO ADJUST button. Remote control...installed correctly . Remains unchanged even though you adjust the brightness and/or the contrast. Image is flickering. Image appears to the projector is fully inserted into the wall outlet. Other Image is correctly connected to your check. Image is distorted. Still unchanged even though...


