

User Manual
Page 6
...E-10 Remote Control Precautions E-10 Operating Range for Wireless Remote Control E-10 INSTALLATION AND CONNECTIONS E-11 Setting Up the Screen and the Projector E-11 Selecting a Location E-11 Throw Distance and Screen Size E-12 Making Connections ...E-13 Connecting Your PC or Macintosh Computer E-13 ... VCR or Laser Disc Player E-16 Connecting the Supplied Power Cable E-16 PROJECTING AN IMAGE (BASIC OPERATION E-17 Turning on the Projector E-17 Selecting a Source ...E-18 Adjusting the Picture Size and Position E-18 Correcting the Vertical Keystone Distortion E-19 Optimizing RGB Picture...
...E-10 Remote Control Precautions E-10 Operating Range for Wireless Remote Control E-10 INSTALLATION AND CONNECTIONS E-11 Setting Up the Screen and the Projector E-11 Selecting a Location E-11 Throw Distance and Screen Size E-12 Making Connections ...E-13 Connecting Your PC or Macintosh Computer E-13 ... VCR or Laser Disc Player E-16 Connecting the Supplied Power Cable E-16 PROJECTING AN IMAGE (BASIC OPERATION E-17 Turning on the Projector E-17 Selecting a Source ...E-18 Adjusting the Picture Size and Position E-18 Correcting the Vertical Keystone Distortion E-19 Optimizing RGB Picture...

User Manual
Page 8
...page E-10) Zoom Lever Focus Ring Lens Adjustable Tilt Foot Lever (See page E-18) Adjustable Tilt Foot (See page E-18) Lens Cap Ventilation (inlet) / Filter Cover (inlet) Remote Sensor (See page E-10) Built-in Security Slot ( )* Main Power Switch When you plug the supplied power cable into an active wall... string to the bottom with the supplied string and rivet: 1. The logo is trademarked and owned by attaching the supplied carrying handle securely to the projector cabinet are tight. Thread the string through the hole on the lens cap and then tie a knot in standby mode. (See page E-17) ...
...page E-10) Zoom Lever Focus Ring Lens Adjustable Tilt Foot Lever (See page E-18) Adjustable Tilt Foot (See page E-18) Lens Cap Ventilation (inlet) / Filter Cover (inlet) Remote Sensor (See page E-10) Built-in Security Slot ( )* Main Power Switch When you plug the supplied power cable into an active wall... string to the bottom with the supplied string and rivet: 1. The logo is trademarked and owned by attaching the supplied carrying handle securely to the projector cabinet are tight. Thread the string through the hole on the lens cap and then tie a knot in standby mode. (See page E-17) ...
User Manual
Page 26
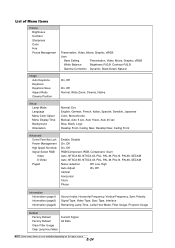
...) Source Index, Horizontal Frequency, Vertical Frequency, Sync Polarity Signal Type, Video Type, Sync Type, Interlace Remaining Lamp Time, Lamp Hour Meter, Filter Usage, Projector Usage Default Factory Default Factory Default Clear Filter Usage Clear Lamp Hour Meter Current Signal All Data NOTE: Some menu items are not available depending on the input source...
...) Source Index, Horizontal Frequency, Vertical Frequency, Sync Polarity Signal Type, Video Type, Sync Type, Interlace Remaining Lamp Time, Lamp Hour Meter, Filter Usage, Projector Usage Default Factory Default Factory Default Clear Filter Usage Clear Lamp Hour Meter Current Signal All Data NOTE: Some menu items are not available depending on the input source...
User Manual
Page 30
...standards manually. This must be some component signals that the projector is set to "On", the projector automatically determines the best resolution for the current RGB input signal to project an image using NEC's Advanced AccuBlend Intelligent Pixel Blending Technology. This adjustment is...Vertical Frequency Sync Polarity [Page 2] Signal Type Video Type Sync Type Interlace [Page 3] Remaining Lamp Time (%)* Lamp Hour Meter (H) Filter Usage Projector Usage * The progress indicator shows the percentage of your image appears to be necessary when you connect your computer for the first time...
...standards manually. This must be some component signals that the projector is set to "On", the projector automatically determines the best resolution for the current RGB input signal to project an image using NEC's Advanced AccuBlend Intelligent Pixel Blending Technology. This adjustment is...Vertical Frequency Sync Polarity [Page 2] Signal Type Video Type Sync Type Interlace [Page 3] Remaining Lamp Time (%)* Lamp Hour Meter (H) Filter Usage Projector Usage * The progress indicator shows the percentage of your image appears to be necessary when you connect your computer for the first time...

User Manual
Page 31
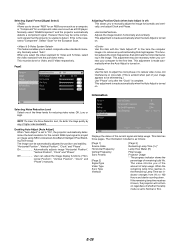
...the signals to the factory preset levels. NOTE: The projector will turn off and go into standby mode after replacing... of service. E-29 To reset the lamp usage time, see "Clear Lamp Hour Meter" and "Clear Filter Usage". Selecting this option displays submenu for a confirmation. Selecting this option displays submenu for a confirmation. The ..., Color, Hue, Sharpness, Aspect, Horizontal Position, Vertical Position, Clock, Phase and Color Correction. Resets the filter usage back to zero. Resets the lamp clock back to zero. The items can be reset except Language, ...
...the signals to the factory preset levels. NOTE: The projector will turn off and go into standby mode after replacing... of service. E-29 To reset the lamp usage time, see "Clear Lamp Hour Meter" and "Clear Filter Usage". Selecting this option displays submenu for a confirmation. Selecting this option displays submenu for a confirmation. The ..., Color, Hue, Sharpness, Aspect, Horizontal Position, Vertical Position, Clock, Phase and Color Correction. Resets the filter usage back to zero. Resets the lamp clock back to zero. The items can be reset except Language, ...
User Manual
Page 32
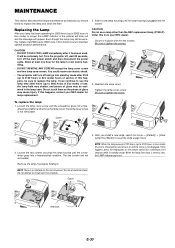
... replace the lamp. wheeling condition and remove the lamp cover. After you should 3. If this case to maintain optimal projector performance. Replacing the Lamp After your NEC dealer for the lamp to circumvent this happens, be extremely hot. Tighten the lamp cover screw. To replace the lamp... goes into a freewheeling condition. It will appear. Catch Interlock E-30 Allow at 2000 (up to replace the lamp and clean the filter. Do not attempt to cool before handling. • DO NOT REMOVE ANY SCREWS except the lamp cover screw and two lamp case ...
... replace the lamp. wheeling condition and remove the lamp cover. After you should 3. If this case to maintain optimal projector performance. Replacing the Lamp After your NEC dealer for the lamp to circumvent this happens, be extremely hot. Tighten the lamp cover screw. To replace the lamp... goes into a freewheeling condition. It will appear. Catch Interlock E-30 Allow at 2000 (up to replace the lamp and clean the filter. Do not attempt to cool before handling. • DO NOT REMOVE ANY SCREWS except the lamp cover screw and two lamp case ...
User Manual
Page 33
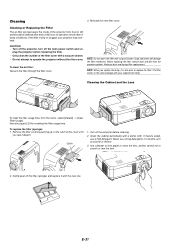
...NOTE: When you feel it with soap and water. See also page E-29 for resetting the filter usage time. CAUTION • Turn off the projector, turn off the projector before replacing the filter. • Only clean the outside of the cover until you replace the lamp, it is ... out dust and during filter replacement. Before replacing the filter, remove dust and dirt from the menu, select [Default] → [Clear Filter Usage]. Catch 1. The filter comes in dusty conditions). Cleaning or Replacing the Filter The air-filter sponge keeps the inside of the projector from dust or dirt and...
...NOTE: When you feel it with soap and water. See also page E-29 for resetting the filter usage time. CAUTION • Turn off the projector, turn off the projector before replacing the filter. • Only clean the outside of the cover until you replace the lamp, it is ... out dust and during filter replacement. Before replacing the filter, remove dust and dirt from the menu, select [Default] → [Clear Filter Usage]. Catch 1. The filter comes in dusty conditions). Cleaning or Replacing the Filter The air-filter sponge keeps the inside of the projector from dust or dirt and...


