
User Manual
Page 5
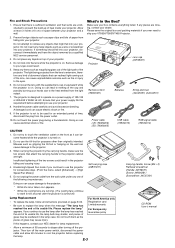
... originally intended. Doing so can cause electric shock or fire. 9. Please save the original box and packing materials if you continue to ship your projector. Remote control (7N900381) Batteries Lens cap (24F38091) String and rivet (24C05051) (24C04531) Power cable (US: 7N080206) (EU: 7N080005) USB cable ...something should fall into your VT660/VT560/VT460 Projector. If any metal objects such as it immediately and have the object removed by the carrying handle, make sure the two screws that your power supply fits this happens, contact your NEC dealer for an extended period...
... originally intended. Doing so can cause electric shock or fire. 9. Please save the original box and packing materials if you continue to ship your projector. Remote control (7N900381) Batteries Lens cap (24F38091) String and rivet (24C05051) (24C04531) Power cable (US: 7N080206) (EU: 7N080005) USB cable ...something should fall into your VT660/VT560/VT460 Projector. If any metal objects such as it immediately and have the object removed by the carrying handle, make sure the two screws that your power supply fits this happens, contact your NEC dealer for an extended period...

User Manual
Page 6
...Top Features ...E-7 Terminal Panel Features E-8 Part Names of the Remote Control E-9 Battery Installation E-10 Remote Control Precautions E-10 Operating Range for Wireless Remote Control E-10 INSTALLATION AND CONNECTIONS E-11 Setting Up the Screen and the Projector E-11 Selecting a Location E-11 Throw Distance and Screen ... Automatically E-20 Turning Up or Down Volume E-20 Turning off the Projector E-20 CONVENIENT FEATURES E-21 Using the Remote Mouse Function E-21 Connecting to your computer for the remote mouse function E-21 When using the USB Port E-21 Switching operation mode...
...Top Features ...E-7 Terminal Panel Features E-8 Part Names of the Remote Control E-9 Battery Installation E-10 Remote Control Precautions E-10 Operating Range for Wireless Remote Control E-10 INSTALLATION AND CONNECTIONS E-11 Setting Up the Screen and the Projector E-11 Selecting a Location E-11 Throw Distance and Screen ... Automatically E-20 Turning Up or Down Volume E-20 Turning off the Projector E-20 CONVENIENT FEATURES E-21 Using the Remote Mouse Function E-21 Connecting to your computer for the remote mouse function E-21 When using the USB Port E-21 Switching operation mode...
User Manual
Page 7
... you 'll enjoy: • Auto vertical keystone correction up to 300 inches across the room with the built-in remote mouse function. • You can control the projector with a PC using the PC Control port. • The contemporary cabinet design is light, compact, easy to carry... UXGA (1600ן1200), SXGA (1280ן1024) and XGA (1024ן768) image are displayed with NEC's Advanced AccuBlend on Your Purchase of The VT660/VT560/ VT460 Projector The VT660/VT560/VT460 is one of their respective holders. PAL-N: TV standard used in Brazil....
... you 'll enjoy: • Auto vertical keystone correction up to 300 inches across the room with the built-in remote mouse function. • You can control the projector with a PC using the PC Control port. • The contemporary cabinet design is light, compact, easy to carry... UXGA (1600ן1200), SXGA (1280ן1024) and XGA (1024ן768) image are displayed with NEC's Advanced AccuBlend on Your Purchase of The VT660/VT560/ VT460 Projector The VT660/VT560/VT460 is one of their respective holders. PAL-N: TV standard used in Brazil....

User Manual
Page 8
...Microware Inc. Part Names of the Projector Monaural Speaker (1W) Lamp Cover (See page E-30) Lamp Cover Screw Controls (See page E-7) Ventilation (outlet) Heated air is exhausted from here Adjustable Tilt Foot Lever (See page E-18) Adjustable Tilt Foot (See page E-18) Remote Sensor (See page E-10) ...use the supplied flathead screwdriver and two screws. 2. The logo is trademarked and owned by attaching the supplied carrying handle securely to the projector cabinet are tight. Use the rivet to attach the string to the bottom with the supplied string and rivet: 1. Attaching the lens ...
...Microware Inc. Part Names of the Projector Monaural Speaker (1W) Lamp Cover (See page E-30) Lamp Cover Screw Controls (See page E-7) Ventilation (outlet) Heated air is exhausted from here Adjustable Tilt Foot Lever (See page E-18) Adjustable Tilt Foot (See page E-18) Remote Sensor (See page E-10) ...use the supplied flathead screwdriver and two screws. 2. The logo is trademarked and owned by attaching the supplied carrying handle securely to the projector cabinet are tight. Use the rivet to attach the string to the bottom with the supplied string and rivet: 1. Attaching the lens ...

User Manual
Page 10
... computer image to control your computer or DVD player when connected to output sound from the remote control. 8. This enables you are on page E-45. Use the supplied RGB cable to connect to control the projector. NOTE: S-Video provides more details. 2. PC CONTROL Port (DIN 8 Pin) Use this port to connect a component... control codes are writing your computer or other analog RGB equipment such as a component input connector that allows you connect the audio output from your projector. E-8
... computer image to control your computer or DVD player when connected to output sound from the remote control. 8. This enables you are on page E-45. Use the supplied RGB cable to connect to control the projector. NOTE: S-Video provides more details. 2. PC CONTROL Port (DIN 8 Pin) Use this port to connect a component... control codes are writing your computer or other analog RGB equipment such as a component input connector that allows you connect the audio output from your projector. E-8

User Manual
Page 11
...: To turn your menu selection. RGB Button Press this button works as the CANCEL button on the projector, press and hold the POWER ON button for a short period of time. Part Names of the Remote Control NOTE: If you are using a Macintosh computer, you can click either the CANCEL (right-click) or...
...: To turn your menu selection. RGB Button Press this button works as the CANCEL button on the projector, press and hold the POWER ON button for a short period of time. Part Names of the Remote Control NOTE: If you are using a Macintosh computer, you can click either the CANCEL (right-click) or...
User Manual
Page 12
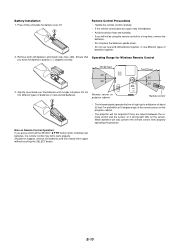
... will not respond if there are objects between the remote control and the sensor, or if strong light falls on the projector cabinet. • The projector will also prevent the remote control from properly operating the projector. Remote Control Precautions • Handle the remote control carefully. • If the remote control gets wet, wipe it snaps into place...
... will not respond if there are objects between the remote control and the sensor, or if strong light falls on the projector cabinet. • The projector will also prevent the remote control from properly operating the projector. Remote Control Precautions • Handle the remote control carefully. • If the remote control gets wet, wipe it snaps into place...

User Manual
Page 14
... 126 144 162 180 B C D α Wide - Contact your NEC dealer if you 're using a mirror and your image is inverted, use the projector where temperatures vary greatly. If the projector falls to the ground, you can dissipate. If you need a mirror.... 400 11.3 - 9.5 1840 9210 -11050 440 11.3 - 9.5 WARNING * Installing your projector on a solid, level surface. Reflecting the Image Using a mirror to reflect your projector's image enables you have adequate ventilation around your remote control to correct the orientation. (See page E-27.) E-12 Tele inch inch inch degree ...
... 126 144 162 180 B C D α Wide - Contact your NEC dealer if you 're using a mirror and your image is inverted, use the projector where temperatures vary greatly. If the projector falls to the ground, you can dissipate. If you need a mirror.... 400 11.3 - 9.5 1840 9210 -11050 440 11.3 - 9.5 WARNING * Installing your projector on a solid, level surface. Reflecting the Image Using a mirror to reflect your projector's image enables you have adequate ventilation around your remote control to correct the orientation. (See page E-27.) E-12 Tele inch inch inch degree ...

User Manual
Page 15
...PC or Compatibles (Desktop type) or Macintosh (Desktop type) PHONE RGB signal cable (supplied) To mini D-Sub 15-pin connector on the projector and the computer. 4. Connecting your PC or Macintosh computer to your computer's screen image for an impressive presentation. Turn off the power to...be output from RGB output unless the notebook PC is recommended that you to project your projector will enable you use a commercially available pin adapter (not supplied) to connect to your remote control, it may be the result of the computer's screen-saver or power management software....
...PC or Compatibles (Desktop type) or Macintosh (Desktop type) PHONE RGB signal cable (supplied) To mini D-Sub 15-pin connector on the projector and the computer. 4. Connecting your PC or Macintosh computer to your computer's screen image for an impressive presentation. Turn off the power to...be output from RGB output unless the notebook PC is recommended that you to project your projector will enable you use a commercially available pin adapter (not supplied) to connect to your remote control, it may be the result of the computer's screen-saver or power management software....

User Manual
Page 16
... for this connection. Use the NEC ADP-SC1 SCART adapter and a commercially available SCART cable to connect the RGB input of your projector and a SCART output (RGB) of your projector to as DVD player RGB IN Projector 1. Use the RGB button on the remote control to your video equipment.... 3. When the projector goes into standby mode, the image on your video equipment...
... for this connection. Use the NEC ADP-SC1 SCART adapter and a commercially available SCART cable to connect the RGB input of your projector and a SCART output (RGB) of your projector to as DVD player RGB IN Projector 1. Use the RGB button on the remote control to your video equipment.... 3. When the projector goes into standby mode, the image on your video equipment...

User Manual
Page 19
... can select the menu language later. picture onto the screen. See "Language" on the remote control for the menu. NOTE: Immediately after you will the power indicator turn to green and the projector become ready to light, and if the STATUS indicator flashes on and off [O] position....select one of the seven languages for a minimum of usable life, the projector will light green. Turning on the Projector NOTE: • The projector has two power switches: main power switch and POWER button (POWER ON and OFF on the remote control) • When plugging in a cycle of six times, wait...
... can select the menu language later. picture onto the screen. See "Language" on the remote control for the menu. NOTE: Immediately after you will the power indicator turn to green and the projector become ready to light, and if the STATUS indicator flashes on and off [O] position....select one of the seven languages for a minimum of usable life, the projector will light green. Turning on the Projector NOTE: • The projector has two power switches: main power switch and POWER button (POWER ON and OFF on the remote control) • When plugging in a cycle of six times, wait...

User Manual
Page 20
... CANCE PJ E Press any one of up the Adjustable Tilt Foot Levers on a flat level surface and ensure that the projector is available, the projector will display a blue background (factory preset). PICTURE ASPECT HELP FREEZE PIC-MUTE MAGNIFY VOLUME Adjusting the Picture Size and Position ...Place your projector on the right and left to lock the Adjustable tilt foot. Adjustable Tilt Foot Lever Adjustable Tilt Foot Lever Adjustable Tilt Foot 2. Press any one of the projector. Selecting a Source Selecting the computer or video source Using the Remote Control OFF ON...
... CANCE PJ E Press any one of up the Adjustable Tilt Foot Levers on a flat level surface and ensure that the projector is available, the projector will display a blue background (factory preset). PICTURE ASPECT HELP FREEZE PIC-MUTE MAGNIFY VOLUME Adjusting the Picture Size and Position ...Place your projector on the right and left to lock the Adjustable tilt foot. Adjustable Tilt Foot Lever Adjustable Tilt Foot Lever Adjustable Tilt Foot 2. Press any one of the projector. Selecting a Source Selecting the computer or video source Using the Remote Control OFF ON...

User Manual
Page 22
... necessary when you sure?" CAUTION Do not unplug the power cable from the speaker and the AUDIO OUT jack (Stereo mini) on the remote control. OFF ON POWER VIDEO AUTO ADJ. Doing so can be displayed correctly or take time. • The Auto Adjust function does ...not work for 60 seconds after the projector is evident when part of the following circumstances. After the projector turns off, the cooling fans keep operating for 60 seconds (Cooling-off time). Optimizing RGB Picture Automatically Turning...
... necessary when you sure?" CAUTION Do not unplug the power cable from the speaker and the AUDIO OUT jack (Stereo mini) on the remote control. OFF ON POWER VIDEO AUTO ADJ. Doing so can be displayed correctly or take time. • The Auto Adjust function does ...not work for 60 seconds after the projector is evident when part of the following circumstances. After the projector turns off, the cooling fans keep operating for 60 seconds (Cooling-off time). Optimizing RGB Picture Automatically Turning...

User Manual
Page 23
... The built-in remote mouse function enables you to operate your computer. NOTE: Depending on the type of your computer settings. OFF ON POWER VIDEO AUTO ADJ. Lit red • When the MENU button is not lit. To enable the projector menu operation again,...great convenience for your computer's mouse functions from the remote control (Computer mode). PICTURE ASPECT HELP FREEZE PIC-MUTE MAGNIFY VOLUME L L E E Works as a computer mouse in the Projector mode, which allows the projector menu operation using the USB Port The remote mouse function can be used with a Windows 98...
... The built-in remote mouse function enables you to operate your computer. NOTE: Depending on the type of your computer settings. OFF ON POWER VIDEO AUTO ADJ. Lit red • When the MENU button is not lit. To enable the projector menu operation again,...great convenience for your computer's mouse functions from the remote control (Computer mode). PICTURE ASPECT HELP FREEZE PIC-MUTE MAGNIFY VOLUME L L E E Works as a computer mouse in the Projector mode, which allows the projector menu operation using the USB Port The remote mouse function can be used with a Windows 98...

User Manual
Page 25
...by using SELECT F or E buttons on -screen slide bar will show you the amount of increase or decrease. 5. The on the remote control or the projector cabinet. Return to close the menu. 1. Press the SELECT GH buttons on -screen menu may not be displayed correctly while interlaced motion ...video image is projected. 6. USING ON-SCREEN MENU Basic Menu Operation Using the Menus NOTE: The on the remote control or the projector cabinet to highlight the menu for the item you want to adjust or set. 3. Repeat steps 2-5 to adjust an additional item, ...
...by using SELECT F or E buttons on -screen slide bar will show you the amount of increase or decrease. 5. The on the remote control or the projector cabinet. Return to close the menu. 1. Press the SELECT GH buttons on -screen menu may not be displayed correctly while interlaced motion ...video image is projected. 6. USING ON-SCREEN MENU Basic Menu Operation Using the Menus NOTE: The on the remote control or the projector cabinet to highlight the menu for the item you want to adjust or set. 3. Repeat steps 2-5 to adjust an additional item, ...

User Manual
Page 29
... Left and right stretched to select two modes for about the infringement of the image when viewing video with black borders on the remote control. (See page E-9). Selecting Projector Orientation [Orientation] This reorients your source image. Standard 4:3 Aspect Left and right Left and right stretched stretched When 16:9 is on or off...
... Left and right stretched to select two modes for about the infringement of the image when viewing video with black borders on the remote control. (See page E-9). Selecting Projector Orientation [Orientation] This reorients your source image. Standard 4:3 Aspect Left and right Left and right stretched stretched When 16:9 is on or off...

User Manual
Page 31
... to 3100 hours in Eco mode) of service. Do this happens, press the "Help" button on the remote control for ten seconds to reset the lamp clock back to the factory preset. NOTE: The projector will turn off and go into standby mode after replacing the lamp. Selecting this option displays submenu...
... to 3100 hours in Eco mode) of service. Do this happens, press the "Help" button on the remote control for ten seconds to reset the lamp clock back to the factory preset. NOTE: The projector will turn off and go into standby mode after replacing the lamp. Selecting this option displays submenu...
User Manual
Page 32
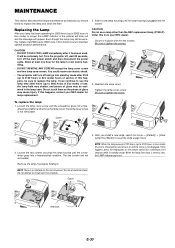
...in place with the two screws. Do not touch them as the pieces of service, the projector cannot turn on and the menu is an interlock on this happens, press the Help button on the remote control for lamp replacement. 4. Remove the lamp housing by mode after it in the lamp ... To replace the lamp: 1. Loosen the lamp cover screw until the screwdriver goes into the follow to circumvent this from your NEC dealer for a minimum of use a lamp other than the NEC replacement lamp (VT60LP). The lamp cover screw is reset to tighten the screws. Be sure to zero, the LAMP indicator...
...in place with the two screws. Do not touch them as the pieces of service, the projector cannot turn on and the menu is an interlock on this happens, press the Help button on the remote control for lamp replacement. 4. Remove the lamp housing by mode after it in the lamp ... To replace the lamp: 1. Loosen the lamp cover screw until the screwdriver goes into the follow to circumvent this from your NEC dealer for a minimum of use a lamp other than the NEC replacement lamp (VT60LP). The lamp cover screw is reset to tighten the screws. Be sure to zero, the LAMP indicator...

User Manual
Page 35
.... Image is installed correctly. If not, press the PJ button. See page E-18. • Ensure that the power button on the projector cabinet or the remote control is plugged in and that the distance between you 're presenting is lit or blink- • See the Power/Status/Lamp Indicator... RGB, VIDEO or S-VIDEO button on the remote control or the cabinet to select the source you are connected properly. • Use menus to see if the projector has overheated or the lamp has reached the end of the projector. See page E-19. Remote control does not work • Install new batteries...
.... Image is installed correctly. If not, press the PJ button. See page E-18. • Ensure that the power button on the projector cabinet or the remote control is plugged in and that the distance between you 're presenting is lit or blink- • See the Power/Status/Lamp Indicator... RGB, VIDEO or S-VIDEO button on the remote control or the cabinet to select the source you are connected properly. • Use menus to see if the projector has overheated or the lamp has reached the end of the projector. See page E-19. Remote control does not work • Install new batteries...


