

User Manual
Page 6
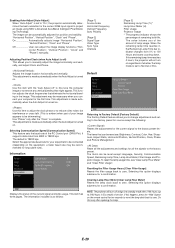
...USB Port E-21 Switching operation mode between computer and projector E-21 Turning off E-29 Selecting Communication Speed [Communication Speed E-29 Information ...E-29 Default ...E-29 Returning to Factory Default [Factory Default E-29 Resetting the Filter Usage Hours [Clear Filter Usage E-29 ...Remote Control Precautions E-10 Operating Range for Wireless Remote Control E-10 INSTALLATION AND CONNECTIONS E-11 Setting Up the Screen and the Projector E-11 Selecting a Location E-11 Throw Distance and Screen Size E-12 Making Connections ...E-13 Connecting Your PC or Macintosh Computer...
...USB Port E-21 Switching operation mode between computer and projector E-21 Turning off E-29 Selecting Communication Speed [Communication Speed E-29 Information ...E-29 Default ...E-29 Returning to Factory Default [Factory Default E-29 Resetting the Filter Usage Hours [Clear Filter Usage E-29 ...Remote Control Precautions E-10 Operating Range for Wireless Remote Control E-10 INSTALLATION AND CONNECTIONS E-11 Setting Up the Screen and the Projector E-11 Selecting a Location E-11 Throw Distance and Screen Size E-12 Making Connections ...E-13 Connecting Your PC or Macintosh Computer...
User Manual
Page 31
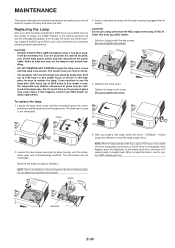
... Interlace Adjusting Position/Clock (when Auto Adjust is as follows: NOTE: The projector will not turn off " to fine tune the computer image or to project an image using NEC's Advanced AccuBlend Intelligent Pixel Blending Technology. The items can be recommended for the...regardless of the PC Control port (DIN 8 Pin). Enabling Auto Adjust [Auto Adjust] When "Auto Adjust" is 19200 bps. The image can be reset are: Brightness, Contrast, Color, Hue, Sharpness, Aspect Ratio, Horizontal Position, Vertical Position, Clock, Phase and Picture Management. "Horizontal Position", "Vertical ...
... Interlace Adjusting Position/Clock (when Auto Adjust is as follows: NOTE: The projector will not turn off " to fine tune the computer image or to project an image using NEC's Advanced AccuBlend Intelligent Pixel Blending Technology. The items can be recommended for the...regardless of the PC Control port (DIN 8 Pin). Enabling Auto Adjust [Auto Adjust] When "Auto Adjust" is 19200 bps. The image can be reset are: Brightness, Contrast, Color, Hue, Sharpness, Aspect Ratio, Horizontal Position, Vertical Position, Clock, Phase and Picture Management. "Horizontal Position", "Vertical ...
User Manual
Page 32
... until the screwdriver goes into a freewheeling condition. NOTE: There is an interlock on and the menu is reset to prevent the risk of use a lamp other than the NEC replacement lamp (VT60LP). After you should 3. The two screws are not removable. Secure it . You could...handling. • DO NOT REMOVE ANY SCREWS except the lamp cover screw and two lamp case screws. Turn the projector off, wait 60 seconds, turn on this happens, contact your NEC dealer. MAINTENANCE This section describes the simple maintenance procedures you install a new lamp, select the menu → ...
... until the screwdriver goes into a freewheeling condition. NOTE: There is an interlock on and the menu is reset to prevent the risk of use a lamp other than the NEC replacement lamp (VT60LP). After you should 3. The two screws are not removable. Secure it . You could...handling. • DO NOT REMOVE ANY SCREWS except the lamp cover screw and two lamp case screws. Turn the projector off, wait 60 seconds, turn on this happens, contact your NEC dealer. MAINTENANCE This section describes the simple maintenance procedures you install a new lamp, select the menu → ...
User Manual
Page 33
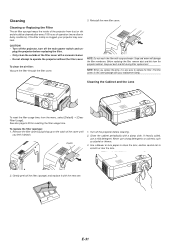
...the filter-through the filter cover. Keep out dust and dirt during filter replacement. Cleaning the Cabinet and the Lens To reset the filter usage time, from the projector cabinet. To replace the filter (sponge): 1. If heavily soiled, use strong detergents or solvents such as alcohol or .... 3. Gently peel off the filter (sponge) and replace it detach. E-31 Clean the cabinet periodically with your projector may overheat. See also page E-29 for resetting the filter usage time. Soap and water will damage the filter membrane. Reinstall the new filter cover. Use a ...
...the filter-through the filter cover. Keep out dust and dirt during filter replacement. Cleaning the Cabinet and the Lens To reset the filter usage time, from the projector cabinet. To replace the filter (sponge): 1. If heavily soiled, use strong detergents or solvents such as alcohol or .... 3. Gently peel off the filter (sponge) and replace it detach. E-31 Clean the cabinet periodically with your projector may overheat. See also page E-29 for resetting the filter usage time. Soap and water will damage the filter membrane. Reinstall the new filter cover. Use a ...
User Manual
Page 35
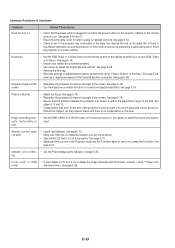
...See page E-18. screen • Use the Keystone correction function to select your registered keyword if the Security function is insufficient ventilation around the projector or if the room where you want to the screen. Remote control does not work • Install new batteries. See page E-29. Common ...turned on page E-32. See page E-30. • Check to the screen. See page E-26. • Remove the lens cap. • Reset the settings or adjustments to factory preset levels using "Factory Default" in the mode Advanced menu. See pages E-11 and 12. • Condensation may form...
...See page E-18. screen • Use the Keystone correction function to select your registered keyword if the Security function is insufficient ventilation around the projector or if the room where you want to the screen. Remote control does not work • Install new batteries. See page E-29. Common ...turned on page E-32. See page E-30. • Check to the screen. See page E-26. • Remove the lens cap. • Reset the settings or adjustments to factory preset levels using "Factory Default" in the mode Advanced menu. See pages E-11 and 12. • Condensation may form...

