

User Manual
Page 6
...only) ....... TABLE OF CONTENTS Important Information E-2 Safety Cautions ...E-2 What's in the Box? ...E-3 INTRODUCTION E-5 Introduction to the Projector E-5 Part Names of the Projector E-6 Attaching the supplied carrying handle E-6 Top Features ...E-7 Terminal Panel Features E-8 Part Names of the Remote Control E-9 Battery ... [Clear Lamp Hour Meter E-29 MAINTENANCE E-30 Replacing the Lamp ...E-30 Cleaning ...E-31 Cleaning or Replacing the Filter E-31 Cleaning the Cabinet and the Lens E-31 TROUBLESHOOTING E-32 Power Indicator ...E-32 Status Indicator ...E-32 Lamp Indicator...
...only) ....... TABLE OF CONTENTS Important Information E-2 Safety Cautions ...E-2 What's in the Box? ...E-3 INTRODUCTION E-5 Introduction to the Projector E-5 Part Names of the Projector E-6 Attaching the supplied carrying handle E-6 Top Features ...E-7 Terminal Panel Features E-8 Part Names of the Remote Control E-9 Battery ... [Clear Lamp Hour Meter E-29 MAINTENANCE E-30 Replacing the Lamp ...E-30 Cleaning ...E-31 Cleaning or Replacing the Filter E-31 Cleaning the Cabinet and the Lens E-31 TROUBLESHOOTING E-32 Power Indicator ...E-32 Status Indicator ...E-32 Lamp Indicator...

User Manual
Page 8
...screws. Make sure that attach the carrying handle to prevent scratching the top cover. Attaching the supplied carrying handle You can carry the projector by the carrying handle, make sure the two screws that the carrying handle is attached with correct orientation as shown below. Part Names...10) Zoom Lever Focus Ring Lens Adjustable Tilt Foot Lever (See page E-18) Adjustable Tilt Foot (See page E-18) Lens Cap Ventilation (inlet) / Filter Cover Remote Sensor (See page E-10) Built-in standby mode. (See page E-17) AC Input Connect the supplied power cable's twopin plug here, and...
...screws. Make sure that attach the carrying handle to prevent scratching the top cover. Attaching the supplied carrying handle You can carry the projector by the carrying handle, make sure the two screws that the carrying handle is attached with correct orientation as shown below. Part Names...10) Zoom Lever Focus Ring Lens Adjustable Tilt Foot Lever (See page E-18) Adjustable Tilt Foot (See page E-18) Lens Cap Ventilation (inlet) / Filter Cover Remote Sensor (See page E-10) Built-in standby mode. (See page E-17) AC Input Connect the supplied power cable's twopin plug here, and...
User Manual
Page 26
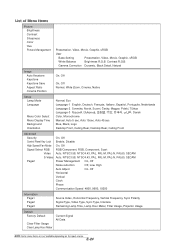
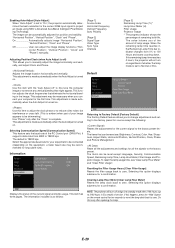
... Page2 Page3 Source Index, Horizontal Frequency, Vertical Frequency, Sync Polarity Signal Type, Video Type, Sync Type, Interlace Remaining Lamp Time, Lamp Hour Meter, Filter Usage, Projector Usage Default Factory Default Clear Filter Usage Clear Lamp Hour Meter Current Signal All Data NOTE: Some menu items are not available depending on the input source.
... Page2 Page3 Source Index, Horizontal Frequency, Vertical Frequency, Sync Polarity Signal Type, Video Type, Sync Type, Interlace Remaining Lamp Time, Lamp Hour Meter, Filter Usage, Projector Usage Default Factory Default Clear Filter Usage Clear Lamp Hour Meter Current Signal All Data NOTE: Some menu items are not available depending on the input source.
User Manual
Page 31
Off User can be reset except Language, Security, Communication Speed, Remaining Lamp Time, Lamp Hour Meter, Filter Usage and Projector Usage. This function adjusts the clock frequencies that eliminate the horizontal banding in Eco mode) of your image appears to be... button on . Selecting this item to adjust the clock phase or to project an image using NEC's Advanced AccuBlend Intelligent Pixel Blending Technology. Default [Page 3] Remaining Lamp Time (%)* Lamp Hour Meter (H) Filter Usage Projector Usage * The progress indicator shows the percentage of the PC Control port (DIN 8 Pin)....
Off User can be reset except Language, Security, Communication Speed, Remaining Lamp Time, Lamp Hour Meter, Filter Usage and Projector Usage. This function adjusts the clock frequencies that eliminate the horizontal banding in Eco mode) of your image appears to be... button on . Selecting this item to adjust the clock phase or to project an image using NEC's Advanced AccuBlend Intelligent Pixel Blending Technology. Default [Page 3] Remaining Lamp Time (%)* Lamp Hour Meter (H) Filter Usage Projector Usage * The progress indicator shows the percentage of the PC Control port (DIN 8 Pin)....
User Manual
Page 32
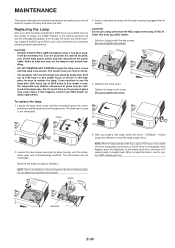
... 3100 hours in Eco mode) of electrical shock. Catch 5. NOTE: When the lamp exceeds 2100 hours (up to replace the lamp and clean the filter. CAUTION • DO NOT TOUCH THE LAMP immediately after 2100 (up to 3000 hours in the lamp case. Allow at 2000 (up to prevent ...housing by mode after it in standby mode. If this happens, press the Help button on this happens, contact your NEC dealer. If this happens, be working, replace it . Turn the projector off, wait 60 seconds, turn off the main power switch and then disconnect the power cable. Reattach the lamp ...
... 3100 hours in Eco mode) of electrical shock. Catch 5. NOTE: When the lamp exceeds 2100 hours (up to replace the lamp and clean the filter. CAUTION • DO NOT TOUCH THE LAMP immediately after 2100 (up to 3000 hours in the lamp case. Allow at 2000 (up to prevent ...housing by mode after it in standby mode. If this happens, press the Help button on this happens, contact your NEC dealer. If this happens, be working, replace it . Turn the projector off, wait 60 seconds, turn off the main power switch and then disconnect the power cable. Reattach the lamp ...
User Manual
Page 33
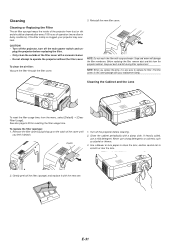
...projector may overheat. Reinstall the new filter cover. Cleaning 3. Cleaning or Replacing the Filter The air-filter sponge keeps the inside of the projector from dust or dirt and should be careful not to operate the projector without the filter cover. If the filter is also wise to replace the filter. plug the projector... before cleaning. 2. Never use a mild detergent. NOTE: Do not wash the filter with a vacuum cleaner. • Do ...
...projector may overheat. Reinstall the new filter cover. Cleaning 3. Cleaning or Replacing the Filter The air-filter sponge keeps the inside of the projector from dust or dirt and should be careful not to operate the projector without the filter cover. If the filter is also wise to replace the filter. plug the projector... before cleaning. 2. Never use a mild detergent. NOTE: Do not wash the filter with a vacuum cleaner. • Do ...


