User Manual
Page 1
MultiSync VT440/VT540 LCD Projector User's Manual English
MultiSync VT440/VT540 LCD Projector User's Manual English

User Manual
Page 3
...dust and moisture. 3. This mes- Doing so may cause damage to install the projector yourself. Do not place heavy objects on a flat, level surface in these images being temporarily sustained on a power supply of the LCD panel. Cleaning 1. Doing so can result in a dry area away from the ...to a steady amber glow). * Immediately after the cooling fan stops working (The cooling fan continues to prevent fire and shock. Ensure that your projector and to work for a prolonged period of bodily injury. Clean the cabinet periodically with the POWER button). * While the POWER and the STATUS ...
...dust and moisture. 3. This mes- Doing so may cause damage to install the projector yourself. Do not place heavy objects on a flat, level surface in these images being temporarily sustained on a power supply of the LCD panel. Cleaning 1. Doing so can result in a dry area away from the ...to a steady amber glow). * Immediately after the cooling fan stops working (The cooling fan continues to prevent fire and shock. Ensure that your projector and to work for a prolonged period of bodily injury. Clean the cabinet periodically with the POWER button). * While the POWER and the STATUS ...
User Manual
Page 24
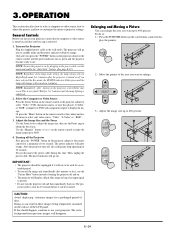
... and the Focus Use the Zoom lever to adjust the image size, then use your lens cap is turned on the remote control or the projector cabinet to select "Video" (VCR, document camera, or laser disc player), S-Video" or "RGB" (computer or DVD with component output) to 400 percent. After the... the image and sound briefly (five minutes or less), use the menu and enable the "Auto Start" feature. (See page E-32.) NOTE: Regardless of the LCD panel. CAUTION Avoid displaying stationary images for 30 seconds. play the pointer. SELECT Vol. 3) Adjust the image size up to display the image. The...
... and the Focus Use the Zoom lever to adjust the image size, then use your lens cap is turned on the remote control or the projector cabinet to select "Video" (VCR, document camera, or laser disc player), S-Video" or "RGB" (computer or DVD with component output) to 400 percent. After the... the image and sound briefly (five minutes or less), use the menu and enable the "Auto Start" feature. (See page E-32.) NOTE: Regardless of the LCD panel. CAUTION Avoid displaying stationary images for 30 seconds. play the pointer. SELECT Vol. 3) Adjust the image size up to display the image. The...
User Manual
Page 36
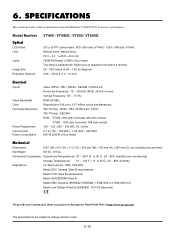
E-36 SPECIFICATIONS This section provides technical information about our projectors through the World Wide Web at http://www.nec-pj.com/ The specifications are subject to change without notice. 6. Model Number Optical LCD Panel Lens Lamp Image Size Projection Distance VT440 / VT440G / VT540 / VT540G 0.9" p-Si TFT active-matrix, 800ן600 .../NZS3548 Class B Meets EMC Directive (EN55022, EN55082-1, EN61000-3-2, EN61000-3-3) Meets Low Voltage Directive (EN60950, TUV GS Approved) We provide more information about the MultiSync VT440/VT540 Projector's performance.
E-36 SPECIFICATIONS This section provides technical information about our projectors through the World Wide Web at http://www.nec-pj.com/ The specifications are subject to change without notice. 6. Model Number Optical LCD Panel Lens Lamp Image Size Projection Distance VT440 / VT440G / VT540 / VT540G 0.9" p-Si TFT active-matrix, 800ן600 .../NZS3548 Class B Meets EMC Directive (EN55022, EN55082-1, EN61000-3-2, EN61000-3-3) Meets Low Voltage Directive (EN60950, TUV GS Approved) We provide more information about the MultiSync VT440/VT540 Projector's performance.


