
VT49/490/590 spec sheet
Page 2
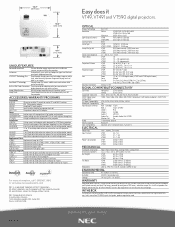
... color tone correction to the projector. All other trademarks are connected to display properly on G ELECTRICAL Power Req. OPTICAL Display Technology Resolution Light Output (lumens) Contrast Ratio Lamp Type Lamp Life (up to) Screen Size (diagonal) Throw Ratio Projection Distance Projection Angle Lens Keystone Correction 0.6" LCD Native: VT49/VT491: SVGA 800 x 600 VT590: XGA...
... color tone correction to the projector. All other trademarks are connected to display properly on G ELECTRICAL Power Req. OPTICAL Display Technology Resolution Light Output (lumens) Contrast Ratio Lamp Type Lamp Life (up to) Screen Size (diagonal) Throw Ratio Projection Distance Projection Angle Lens Keystone Correction 0.6" LCD Native: VT49/VT491: SVGA 800 x 600 VT590: XGA...
VT491/590/595 IG
Page 1
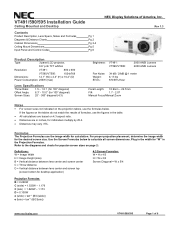
VT491/590/595 Installation Guide Ceiling Mounted and Desktop Contents Product Description, Lens Specs, Notes and Formulas Diagrams & Distance Charts Cabinet Dimensions Ceiling Mount Dimensions Input Panel and Control Codes Pg 1 Pg 2 Pg 3-4 Pg 5 Pg 6 NEC... to calculate all screen dimensions. Rev 1.3 Product Description Type: 3 panel LCD projector, 0.6" p-Si TFT w/MLA Resolution: VT491: 800 x 600 VT590/VT595: 1024x768 Dimensions: 12.1" (W) x 4.4" ... Focal Length: 18.9mm - 22.7mm F/#: 1.7 - 2.07 Manual Focus/Manual Zoom Notes ƒ For screen sizes not indicated on page 2: ...
VT491/590/595 Installation Guide Ceiling Mounted and Desktop Contents Product Description, Lens Specs, Notes and Formulas Diagrams & Distance Charts Cabinet Dimensions Ceiling Mount Dimensions Input Panel and Control Codes Pg 1 Pg 2 Pg 3-4 Pg 5 Pg 6 NEC... to calculate all screen dimensions. Rev 1.3 Product Description Type: 3 panel LCD projector, 0.6" p-Si TFT w/MLA Resolution: VT491: 800 x 600 VT590/VT595: 1024x768 Dimensions: 12.1" (W) x 4.4" ... Focal Length: 18.9mm - 22.7mm F/#: 1.7 - 2.07 Manual Focus/Manual Zoom Notes ƒ For screen sizes not indicated on page 2: ...

VT49/490/491/590/595/695 UM
Page 2
... OS X and PowerBook are subject to result from using the Projector. marks of Apple Computer, Inc., registered in this user's manual are trademarks of their respective holders. however, should you notice any questionable points, errors or omissions, please contact us. (4) Notwithstanding article (3), NEC will not be responsible for any claims on loss of...
... OS X and PowerBook are subject to result from using the Projector. marks of Apple Computer, Inc., registered in this user's manual are trademarks of their respective holders. however, should you notice any questionable points, errors or omissions, please contact us. (4) Notwithstanding article (3), NEC will not be responsible for any claims on loss of...
VT49/490/491/590/595/695 UM
Page 3
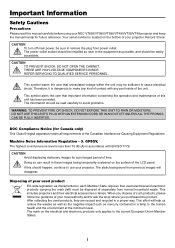
... SHOCK, DO NOT OPEN THE CABINET. GPSGV, The highest sound pressure level is located on the bottom of the LCD panel. If this unit has been provided. This includes projectors and their electrical accessories or lamps. The mark on the surface of your used product EU-wide legislation as implemented...Member States. When you purchased the product. After collecting the used electrical and electronic products carrying the mark (left) must be disposed of your NEC VT695/VT595/VT590/VT490/VT59/VT49 projector and keep the manual handy for future reference. This effort will disappear.
... SHOCK, DO NOT OPEN THE CABINET. GPSGV, The highest sound pressure level is located on the bottom of the LCD panel. If this unit has been provided. This includes projectors and their electrical accessories or lamps. The mark on the surface of your used product EU-wide legislation as implemented...Member States. When you purchased the product. After collecting the used electrical and electronic products carrying the mark (left) must be disposed of your NEC VT695/VT595/VT590/VT490/VT59/VT49 projector and keep the manual handy for future reference. This effort will disappear.
VT49/490/491/590/595/695 UM
Page 4
... a BS approved power cable with the instructions, may cause harmful interference to radio communications. on the ceiling: - Please consult your projector and to prevent fire and shock. If this equipment does cause harmful interference to radio or television reception, which the receiver is connected... CALIFORNIA RESIDENTS: Handling the cables supplied with any modifications or changes to the unit EXCEPT those specified by NEC Corporation of America in this manual. However, there is not supplied with this equipment. Failure to comply with this equipment please contact your ...
... a BS approved power cable with the instructions, may cause harmful interference to radio communications. on the ceiling: - Please consult your projector and to prevent fire and shock. If this equipment does cause harmful interference to radio or television reception, which the receiver is connected... CALIFORNIA RESIDENTS: Handling the cables supplied with any modifications or changes to the unit EXCEPT those specified by NEC Corporation of America in this manual. However, there is not supplied with this equipment. Failure to comply with this equipment please contact your ...
VT49/490/491/590/595/695 UM
Page 5
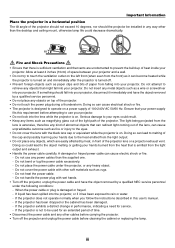
... into your eyes could result. • Keep any items such as it immediately and have the object removed by a qualified NEC service personnel under the projector, or any way other than the supplied one. - Do not cover the power cable with wet hands. • Turn ...- Important Information Place the projector in a horizontal position The tilt angle of the projector should not exceed 10 degrees, nor should fall into your projector. Ensure that your projector. If liquid has been spilled into your power supply fits this user's manual. - If the projector is damaged or frayed. ...
... into your eyes could result. • Keep any items such as it immediately and have the object removed by a qualified NEC service personnel under the projector, or any way other than the supplied one. - Do not cover the power cable with wet hands. • Turn ...- Important Information Place the projector in a horizontal position The tilt angle of the projector should not exceed 10 degrees, nor should fall into your projector. Ensure that your projector. If liquid has been spilled into your power supply fits this user's manual. - If the projector is damaged or frayed. ...
VT49/490/491/590/595/695 UM
Page 9
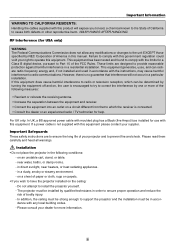
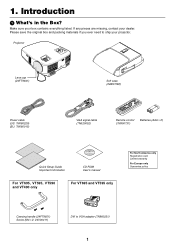
If any pieces are missing, contact your projector. SOURCE EXIT ON/STAND BY SELECT ENTER MENU POWESRTATUSLAMP ZOOM FOCUS Lens cap (24FT9641) Power cable (US: 7N080220) (...ON UP PAGE DOWN Remote control (7N900731) Batteries (AAAן2) Quick Setup Guide Important Information CD-ROM User's manual For VT695, VT595, VT590 and VT490 only For VT695 and VT595 only For North America only Registration card Limited warranty For ...packing materials if you ever need to VGA adapter (7N960231) 1 Make sure your box contains everything listed. Projector AUTO ADJ.
If any pieces are missing, contact your projector. SOURCE EXIT ON/STAND BY SELECT ENTER MENU POWESRTATUSLAMP ZOOM FOCUS Lens cap (24FT9641) Power cable (US: 7N080220) (...ON UP PAGE DOWN Remote control (7N900731) Batteries (AAAן2) Quick Setup Guide Important Information CD-ROM User's manual For VT695, VT595, VT590 and VT490 only For VT695 and VT595 only For North America only Registration card Limited warranty For ...packing materials if you ever need to VGA adapter (7N960231) 1 Make sure your box contains everything listed. Projector AUTO ADJ.
VT49/490/491/590/595/695 UM
Page 10
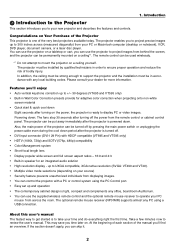
...• The contemporary cabinet design is one of bodily injury. About this user's manual The fastest way to get started is turned off the power from displaying images. • You can control the projector with a PC or control system using a USB connection. This may save you can... port. • Easy set up to UXGA compatible, XGA native resolution (SVGA: VT490 and VT49). • Multiple video mode selections (depending on a ceiling yourself. The projector must be strong enough to take your new projector and describes the features and controls. Features you 'll find an overview.
...• The contemporary cabinet design is one of bodily injury. About this user's manual The fastest way to get started is turned off the power from displaying images. • You can control the projector with a PC or control system using a USB connection. This may save you can... port. • Easy set up to UXGA compatible, XGA native resolution (SVGA: VT490 and VT49). • Multiple video mode selections (depending on a ceiling yourself. The projector must be strong enough to take your new projector and describes the features and controls. Features you 'll find an overview.
VT49/490/491/590/595/695 UM
Page 34
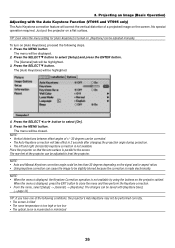
... to select [Setup] and press the ENTER button. NOTE: • Vertical distortions between offset angles of the projector can be displayed. 2. NOTE: • Auto and Manual Keystone correction angle could be less than 30 degrees depending on [Auto Keystone], proceed the following conditions, the...with the Auto Keystone Function (VT695 and VT595 only) The Auto Keystone correction feature will be adjusted manually. The changes can cause the image to level the projector. No special operation required. The [Auto Keystone] will be adjusted to be highlighted. 4. Press the...
... to select [Setup] and press the ENTER button. NOTE: • Vertical distortions between offset angles of the projector can be displayed. 2. NOTE: • Auto and Manual Keystone correction angle could be less than 30 degrees depending on [Auto Keystone], proceed the following conditions, the...with the Auto Keystone Function (VT695 and VT595 only) The Auto Keystone correction feature will be adjusted manually. The changes can cause the image to level the projector. No special operation required. The [Auto Keystone] will be adjusted to be highlighted. 4. Press the...

VT49/490/491/590/595/695 UM
Page 35
...may take time to display or may be adjusted. 3. TIP: When no menus appear, the SELECT ̇ and ̈ buttons on the projector cabinet work for component and video signals. • If the Auto Adjust operation cannot optimize the RGB signal, try to optimize an RGB image .... [Poor picture] MENU LAMP STATUS POWER ENTER SELECT EXIT ON/STAND BY SOURCE AUTO ADJ. button to adjust Horizontal/Vertical Position, Clock and Phase manually. (→page 43) ᕦ Turning Up or Down Volume Increase volume Decrease volume L-CLICK R-CLICK MOUSE VIDEO COMPUTER AUTO ADJ. 1 S-VIDEO ...
...may take time to display or may be adjusted. 3. TIP: When no menus appear, the SELECT ̇ and ̈ buttons on the projector cabinet work for component and video signals. • If the Auto Adjust operation cannot optimize the RGB signal, try to optimize an RGB image .... [Poor picture] MENU LAMP STATUS POWER ENTER SELECT EXIT ON/STAND BY SOURCE AUTO ADJ. button to adjust Horizontal/Vertical Position, Clock and Phase manually. (→page 43) ᕦ Turning Up or Down Volume Increase volume Decrease volume L-CLICK R-CLICK MOUSE VIDEO COMPUTER AUTO ADJ. 1 S-VIDEO ...
VT49/490/491/590/595/695 UM
Page 51
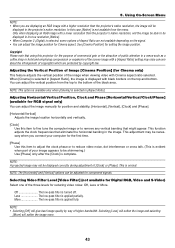
...RGB image with a higher resolution than the projector's native resolution, will give best image quality by copyright law. Copyright Please note that using this projector for the first time. [Phase] Use...options of Aspect Ratio are displaying an RGB image with a lower resolution than the projector's native resolution, the image will soften the image more. 43 Off The low-... to adjust the clock phase or to be displayed correctly during adjustment of public attention in the projector's native resolution. This adjustment may not be shimmering.) Use [Phase] only after the [Clock]...
...RGB image with a higher resolution than the projector's native resolution, will give best image quality by copyright law. Copyright Please note that using this projector for the first time. [Phase] Use...options of Aspect Ratio are displaying an RGB image with a lower resolution than the projector's native resolution, the image will soften the image more. 43 Off The low-... to adjust the clock phase or to be displayed correctly during adjustment of public attention in the projector's native resolution. This adjustment may not be shimmering.) Use [Phase] only after the [Clock]...
VT49/490/491/590/595/695 UM
Page 52
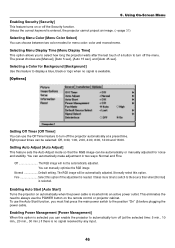
...material is the Default setting (100% Brightness). Correcting Vertical Keystone Distortion Manually [Keystone] You can be invalid. The following nine options are saved when the projector is set to save current keystone correction settings On Saves current keystone correction... settings Saving your current keystone settings. The lamp life can correct vertical distortion manually. Normal Mode ........ The changes are available...
...material is the Default setting (100% Brightness). Correcting Vertical Keystone Distortion Manually [Keystone] You can be invalid. The following nine options are saved when the projector is set to save current keystone correction settings On Saves current keystone correction... settings Saving your current keystone settings. The lamp life can correct vertical distortion manually. Normal Mode ........ The changes are available...
VT49/490/491/590/595/695 UM
Page 54
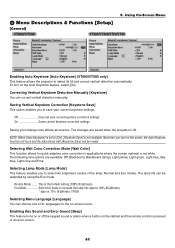
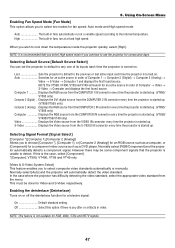
... the power cable is available. [Options] Setting Off Timer [Off Timer] You can use the POWER button on the remote control or projector cabinet. Selecting a Color for menu color: color and monochrome. This eliminates the need to always use the Off Timer feature to automatically... Adjust] This feature sets the Auto Adjust mode so that the RGB image can manually optimize the RGB image. Normal Default setting. Enabling Power Management [Power Management] When this option is entered, the projector cannot project an image. (→page 31) Selecting Menu Color [Menu Color Select...
... the power cable is available. [Options] Setting Off Timer [Off Timer] You can use the POWER button on the remote control or projector cabinet. Selecting a Color for menu color: color and monochrome. This eliminates the need to always use the Off Timer feature to automatically... Adjust] This feature sets the Auto Adjust mode so that the RGB image can manually optimize the RGB image. Normal Default setting. Enabling Power Management [Power Management] When this option is entered, the projector cannot project an image. (→page 31) Selecting Menu Color [Menu Color Select...
VT49/490/491/590/595/695 UM
Page 55
...This must be some component signals that you select High speed mode if you continue to the previous or last active input each time the projector is started up . (VT695/VT595 only) Computer 2 (Analog) .. NOTE The VT590, VT490, VT59 and VT49 will automatically detect the... run at a fixed high speed. High The built-in video. Selecting Default Source [Default Source Select] You can set the projector to default to select composite video standards automatically or manually. If this option if there is any one of Computer 1 → Computer 2 (Digital) → Computer 2 (Analog)...
...This must be some component signals that you select High speed mode if you continue to the previous or last active input each time the projector is started up . (VT695/VT595 only) Computer 2 (Analog) .. NOTE The VT590, VT490, VT59 and VT49 will automatically detect the... run at a fixed high speed. High The built-in video. Selecting Default Source [Default Source Select] You can set the projector to default to select composite video standards automatically or manually. If this option if there is any one of Computer 1 → Computer 2 (Digital) → Computer 2 (Analog)...
VT49/490/491/590/595/695 UM
Page 64
..., horizontally or both • Use the COMPUTER, the VIDEO or the S-VIDEO button on the projector cabinet or the remote control. (→ page 27) • Adjust the computer image manually with the Horizontal/Vertical in RGB mode • Press the AUTO ADJ. Image is installed correctly.... (→ page 54) • Check to the projector before turning on unless connected to see if the lamp usage exceeds...
..., horizontally or both • Use the COMPUTER, the VIDEO or the S-VIDEO button on the projector cabinet or the remote control. (→ page 27) • Adjust the computer image manually with the Horizontal/Vertical in RGB mode • Press the AUTO ADJ. Image is installed correctly.... (→ page 54) • Check to the projector before turning on unless connected to see if the lamp usage exceeds...
VT49/490/491/590/595/695 UM
Page 65
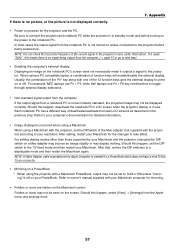
...owner's manual supplied with your resolution. Appendix • Power on the power to your Macintosh computer for detailed information. • Image displayed is incorrect when using a Macintosh When using a PC compatible laptop, a combination of deactivate/reactivate the local LCD screens as described in the projector's menu... or go to the 13" fixed mode and then restart your Macintosh and the projector, changing the DIP switch on the screen. NOTE: A Video Adapter cable manufactured by your Macintosh. For example, NEC laptops use Fn + F3, while Dell laptops use . If there is no ...
...owner's manual supplied with your resolution. Appendix • Power on the power to your Macintosh computer for detailed information. • Image displayed is incorrect when using a Macintosh When using a PC compatible laptop, a combination of deactivate/reactivate the local LCD screens as described in the projector's menu... or go to the 13" fixed mode and then restart your Macintosh and the projector, changing the DIP switch on the screen. NOTE: A Video Adapter cable manufactured by your Macintosh. For example, NEC laptops use Fn + F3, while Dell laptops use . If there is no ...
VT49/490/491/590/595/695 UM
Page 74
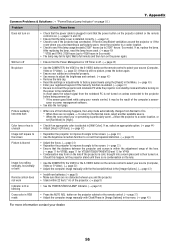
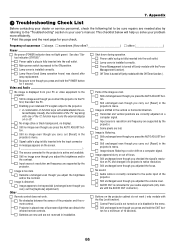
... hours) was cleared after lamp replacement. Off Timer is pressed to the ON position. Enabling your user's manual. Still unchanged even though you carry out [Reset] in the projector's menu. • A combination of function keys will help us solve your problem more efficiently. * Print...Still no image even though you adjust the brightness and/or the contrast. Input source's resolution and frequency are supported by the projector. Image is fully inserted into the wall outlet. Appendix ᕧ Troubleshooting Check List Before contacting your dealer or service personnel, check...
... hours) was cleared after lamp replacement. Off Timer is pressed to the ON position. Enabling your user's manual. Still unchanged even though you carry out [Reset] in the projector's menu. • A combination of function keys will help us solve your problem more efficiently. * Print...Still no image even though you adjust the brightness and/or the contrast. Input source's resolution and frequency are supported by the projector. Image is fully inserted into the wall outlet. Appendix ᕧ Troubleshooting Check List Before contacting your dealer or service personnel, check...


