
42XM5/50XM6/60XM5 spec sheet
Page 2
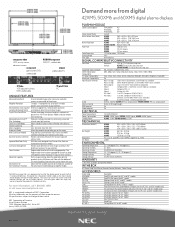
...registered trademark of it's original brightness. Crystal Clear Panel/Drive Provides technology to reach half of NEC Corporation. Now with 5BNC Y/Pb/Pr input, selectable) Audio 3 sets RCA stereo + external speaker jacks Internal amplifier 42XM5: 8W x 2 output power; 50XM6/60XM5: 9W x 2 output power...upgraded for the display panel to improve brightness and contrast greater than 100% over previous models. PLASMA MODULE Screen Size (Diagonal) PX-42XM5A 42" PX-50M6A 50" PX-60XM5A 60" Screen Aspect Ratio 16 to 9 Active Screen Area (WxH) 42XM5 36.3 x 20.3 in, 922 x 515 mm ...
...registered trademark of it's original brightness. Crystal Clear Panel/Drive Provides technology to reach half of NEC Corporation. Now with 5BNC Y/Pb/Pr input, selectable) Audio 3 sets RCA stereo + external speaker jacks Internal amplifier 42XM5: 8W x 2 output power; 50XM6/60XM5: 9W x 2 output power...upgraded for the display panel to improve brightness and contrast greater than 100% over previous models. PLASMA MODULE Screen Size (Diagonal) PX-42XM5A 42" PX-50M6A 50" PX-60XM5A 60" Screen Aspect Ratio 16 to 9 Active Screen Area (WxH) 42XM5 36.3 x 20.3 in, 922 x 515 mm ...
60XM5 IG
Page 1
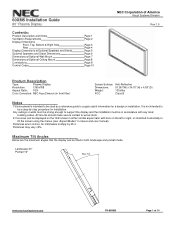
...Display Contents: Product Description and Notes Ventilation Requirements Display Dimensions Front, Top, Bottom & Right Side Rear Display Dimensions w/Optional Speakers and Stand Optional Speakers and Stand Dimensions __ Dimensions w/Optional Wall Mount Dimensions w/Optional Ceiling Mount Connections Control Codes Page 1 Page 2 Page 3... 10° Max Tilt www.necvisualsystems.com PX-60XM5 Page 1 of America Visual Systems Division Rev 1.0 Product Description Type: Plasma Display Resolution: 1365x768 Aspect Ratio: 16:9 Color Correction: NEC AccuCrimson (in menus and user manual). All...
...Display Contents: Product Description and Notes Ventilation Requirements Display Dimensions Front, Top, Bottom & Right Side Rear Display Dimensions w/Optional Speakers and Stand Optional Speakers and Stand Dimensions __ Dimensions w/Optional Wall Mount Dimensions w/Optional Ceiling Mount Connections Control Codes Page 1 Page 2 Page 3... 10° Max Tilt www.necvisualsystems.com PX-60XM5 Page 1 of America Visual Systems Division Rev 1.0 Product Description Type: Plasma Display Resolution: 1365x768 Aspect Ratio: 16:9 Color Correction: NEC AccuCrimson (in menus and user manual). All...
60XM5 IG
Page 5
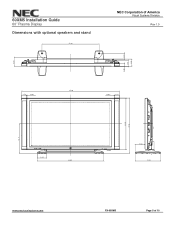
60XM5 Installation Guide 60" Plasma Display Dimensions with optional speakers and stand 37.90 NEC Corporation of America Visual Systems Division Rev 1.0 3.80 4.80 3.80 1.80 3.50 (0.02) 65.00 (0.02) 3.50 6.00 19.7" 34.60 37.10 6.40 44.00 LED&IR 6.00 17.00 www.necvisualsystems.com PX-60XM5 Page 5 of 10
60XM5 Installation Guide 60" Plasma Display Dimensions with optional speakers and stand 37.90 NEC Corporation of America Visual Systems Division Rev 1.0 3.80 4.80 3.80 1.80 3.50 (0.02) 65.00 (0.02) 3.50 6.00 19.7" 34.60 37.10 6.40 44.00 LED&IR 6.00 17.00 www.necvisualsystems.com PX-60XM5 Page 5 of 10
60XM5 IG
Page 6
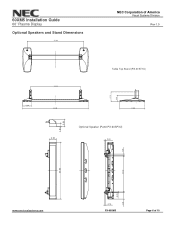
60XM5 Installation Guide 60" Plasma Display Optional Speakers and Stand Dimensions 37.90 NEC Corporation of America Visual Systems Division Rev 1.0 Table Top Stand (PX-61ST1U) 33.50 6.74 4.39 6.40 44.00 17.00 1.80 3.80 Optional Speaker (Part# PX-60SP3U) 3.50 0.50 1.20 22.10 34.60 0.20 4.20 www.necvisualsystems.com 0.70 PX-60XM5 Page 6 of 10
60XM5 Installation Guide 60" Plasma Display Optional Speakers and Stand Dimensions 37.90 NEC Corporation of America Visual Systems Division Rev 1.0 Table Top Stand (PX-61ST1U) 33.50 6.74 4.39 6.40 44.00 17.00 1.80 3.80 Optional Speaker (Part# PX-60SP3U) 3.50 0.50 1.20 22.10 34.60 0.20 4.20 www.necvisualsystems.com 0.70 PX-60XM5 Page 6 of 10

60XM5 IG
Page 9
Speaker Connections www.necvisualsystems.com AC Inlet PX-60XM5 Page 9 of display Control Buttons Power Button Ext. 60XM5 Installation Guide 60" Plasma Display Connections NEC Corporation of America Visual Systems Division Rev 1.0 Located at bottom of 10
Speaker Connections www.necvisualsystems.com AC Inlet PX-60XM5 Page 9 of display Control Buttons Power Button Ext. 60XM5 Installation Guide 60" Plasma Display Connections NEC Corporation of America Visual Systems Division Rev 1.0 Located at bottom of 10

42XM5/50XM6/60XM5 UM
Page 5
... the on the screen at the same time .. En-26 POWER/STANDBY indicator En-26 En-4 • Tilt mount unit • Tabletop Stand • Attachable speakers En-5 Creating a video wall En-6 Cable Management En-6 Caution when placing the plasma monitor in the picture En-21 Setting the color temperature En-21...
... the on the screen at the same time .. En-26 POWER/STANDBY indicator En-26 En-4 • Tilt mount unit • Tabletop Stand • Attachable speakers En-5 Creating a video wall En-6 Cable Management En-6 Caution when placing the plasma monitor in the picture En-21 Setting the color temperature En-21...
42XM5/50XM6/60XM5 UM
Page 10
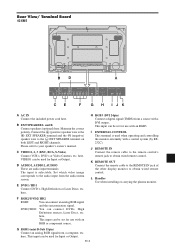
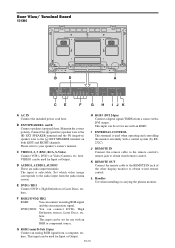
... CONTROL This terminal is selectable. Set which video image corresponds to your speaker's owner's manual. here. F RGB2/ DVD2/ HD2 RGB2: You can connect DVDs, High Definition sources, Laser Discs, etc. B EXT SPEAKER L and R Connect speakers (optional) here. Maintain the correct polarity. here. J REMOTE IN ... remote cable to the remote control's remote jack to the EXT SPEAKER terminal on both LEFT and RIGHT channels. Connect the (positive) speaker wire to the EXT SPEAKER terminal and the (negative) speaker wire to obtain wired remote control. K REMOTE OUT Connect the ...
... CONTROL This terminal is selectable. Set which video image corresponds to your speaker's owner's manual. here. F RGB2/ DVD2/ HD2 RGB2: You can connect DVDs, High Definition sources, Laser Discs, etc. B EXT SPEAKER L and R Connect speakers (optional) here. Maintain the correct polarity. here. J REMOTE IN ... remote cable to the remote control's remote jack to the EXT SPEAKER terminal on both LEFT and RIGHT channels. Connect the (positive) speaker wire to the EXT SPEAKER terminal and the (negative) speaker wire to obtain wired remote control. K REMOTE OUT Connect the ...
42XM5/50XM6/60XM5 UM
Page 11
Please refer to the EXT SPEAKER terminal on both LEFT and RIGHT channels. D AUDIO1, AUDIO2, AUDIO3 These are audio input terminals. E DVD1 / HD1 Connect... a source with a DVI output. This input can be used for use with an RGB3. Connect the (positive) speaker wire to the EXT SPEAKER terminal and the (negative) speaker wire to your speaker's owner's manual. C VIDEO1, 2, 3 (BNC, RCA, S-Video) Connect VCR's, DVD's or Video Cameras, ...the included power cord here. En-10 here. This input can be set for Input or Output. B EXT SPEAKER L and R Connect speakers (optional) here.
Please refer to the EXT SPEAKER terminal on both LEFT and RIGHT channels. D AUDIO1, AUDIO2, AUDIO3 These are audio input terminals. E DVD1 / HD1 Connect... a source with a DVI output. This input can be used for use with an RGB3. Connect the (positive) speaker wire to the EXT SPEAKER terminal and the (negative) speaker wire to your speaker's owner's manual. C VIDEO1, 2, 3 (BNC, RCA, S-Video) Connect VCR's, DVD's or Video Cameras, ...the included power cord here. En-10 here. This input can be set for Input or Output. B EXT SPEAKER L and R Connect speakers (optional) here.

42XM5/50XM6/60XM5 UM
Page 12
...This input can be used for use with an RGB or component source. B EXT SPEAKER L and R Connect speakers (optional) here. Connect the (positive) speaker wire to the EXT SPEAKER terminal and the (negative) speaker wire to your speaker's owner's manual. VIDEO1 can be used for use with an RGB3. here. ...AUDIO1, AUDIO2, AUDIO3 These are audio input terminals. This input can be set for Input or Output. Please refer to the EXT SPEAKER terminal on both LEFT and RIGHT channels. J REMOTE IN Connect the remote cable to the remote control's remote jack to obtain wired ...
...This input can be used for use with an RGB or component source. B EXT SPEAKER L and R Connect speakers (optional) here. Connect the (positive) speaker wire to the EXT SPEAKER terminal and the (negative) speaker wire to your speaker's owner's manual. VIDEO1 can be used for use with an RGB3. here. ...AUDIO1, AUDIO2, AUDIO3 These are audio input terminals. This input can be set for Input or Output. Please refer to the EXT SPEAKER terminal on both LEFT and RIGHT channels. J REMOTE IN Connect the remote cable to the remote control's remote jack to obtain wired ...

42XM5/50XM6/60XM5 UM
Page 42
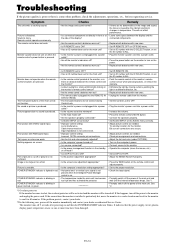
...properly. • Set to ALL. • Point the remote control at the minimum? • Is the mute mode set? • Are the speakers properly connected? • Is AUDIO INPUT set the ID number to the proper resolution. • Check the input signal. • Promptly switch off ...; Is the monitor's power cord plugged into a power outlet. • Increase the volume. • Press the remote control's MUTE button. • Connect the speakers properly. • Set AUDIO INPUT on ? • Is a source connected? • Is the power management function in front or at • Leave some ...
...properly. • Set to ALL. • Point the remote control at the minimum? • Is the mute mode set? • Are the speakers properly connected? • Is AUDIO INPUT set the ID number to the proper resolution. • Check the input signal. • Promptly switch off ...; Is the monitor's power cord plugged into a power outlet. • Increase the volume. • Press the remote control's MUTE button. • Connect the speakers properly. • Set AUDIO INPUT on ? • Is a source connected? • Is the power management function in front or at • Leave some ...
60XM5 speaker manual
Page 1
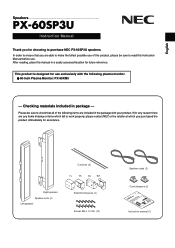
....swIhfhifooincrsha(ny25oy)3urepausrocnh#at which fail to read this manual in a easily accessed location for future reference. English Speakers PX-60SP3U Instruction Manual Thank you for choosing to make the fullest possible use of the following plasma monitor. ¶ ...you purchased the product immediately for any items missing or items which you are any reason there are able to purchase NEC PX-60SP3U speakers. After reading, place this Instruction Manual before use exclusively with the following items are included in package - If for...
....swIhfhifooincrsha(ny25oy)3urepausrocnh#at which fail to read this manual in a easily accessed location for future reference. English Speakers PX-60SP3U Instruction Manual Thank you for choosing to make the fullest possible use of the following plasma monitor. ¶ ...you purchased the product immediately for any items missing or items which you are any reason there are able to purchase NEC PX-60SP3U speakers. After reading, place this Instruction Manual before use exclusively with the following items are included in package - If for...

60XM5 speaker manual
Page 2
...) containing instructions which , if ignored or improperly followed, might cause the plasma monitor to electrical shock. If this happens, place the speakers at a distance from excessive input levels. ÷ Never play signals at a level exceeding maximum input. ÷ When connecting this symbol... indicate items containing instructions which must never be performed). When moving the plasma monitor, as explained below to protect your speakers from damage from the monitor during use. 2 Warning ÷ Never use ÷ Avoid using the product in a home or ...
...) containing instructions which , if ignored or improperly followed, might cause the plasma monitor to electrical shock. If this happens, place the speakers at a distance from excessive input levels. ÷ Never play signals at a level exceeding maximum input. ÷ When connecting this symbol... indicate items containing instructions which must never be performed). When moving the plasma monitor, as explained below to protect your speakers from damage from the monitor during use. 2 Warning ÷ Never use ÷ Avoid using the product in a home or ...

60XM5 speaker manual
Page 3
... × 12 mm) into place with the screw holes on the attachment pieces on the bottom aligned with the holes in the drawing of the speakers. 3 After installing the plasma monitor on the wall, it on the attachment pieces (TL, TR, BL, BR) and the plasma monitor attachment locations. ... the markings (R/L) written on the attachment plates. 1 Remove the protective tape from the cushions and then attach the cushions to the sides of the speakers in the locations indicated in the diagram below. 2 Attaching the attachment pieces to the locations shown in the hooks on the bottom of the plasma...
... × 12 mm) into place with the screw holes on the attachment pieces on the bottom aligned with the holes in the drawing of the speakers. 3 After installing the plasma monitor on the wall, it on the attachment pieces (TL, TR, BL, BR) and the plasma monitor attachment locations. ... the markings (R/L) written on the attachment plates. 1 Remove the protective tape from the cushions and then attach the cushions to the sides of the speakers in the locations indicated in the diagram below. 2 Attaching the attachment pieces to the locations shown in the hooks on the bottom of the plasma...

60XM5 speaker manual
Page 4
... screw the screws firmly into place. ¶ If there is recommended that were tightened in step 2. Connecting speaker cords Be sure to the speaker jacks. Note that the speaker cords have positive and negative ends, and that they have been screwed firmly into place. After adjustment, re-...the cord clampers, attach the clampers in the desired position, and clamp the cords into place. ¶ Tighten the screws while pushing the speakers lightly against the plasma monitor. 5 Tighten the loosely inserted screws in 4 locations fully into place. 4 Check to be sure to the plasma...
... screw the screws firmly into place. ¶ If there is recommended that were tightened in step 2. Connecting speaker cords Be sure to the speaker jacks. Note that the speaker cords have positive and negative ends, and that they have been screwed firmly into place. After adjustment, re-...the cord clampers, attach the clampers in the desired position, and clamp the cords into place. ¶ Tighten the screws while pushing the speakers lightly against the plasma monitor. 5 Tighten the loosely inserted screws in 4 locations fully into place. 4 Check to be sure to the plasma...
60XM5 speaker manual
Page 5
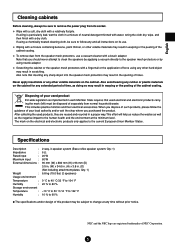
...legislation as implemented in the opening of holes. Note that inserting any sharp object into the speaker mesh protectors may result in warping or the peeling of the cabinet coating. When you dispose of NEC Corporation. 5 This effort will help us reduce the wastes as well as the negative ...impact to remove the power plug from the speaker mesh protectors, use . ¶ Wiping with a relatively flat pile. Also note that you purchased the product. NEC and the NEC logo are reused and recycled in scratching. If using any rubber or plastic materials ...
...legislation as implemented in the opening of holes. Note that inserting any sharp object into the speaker mesh protectors may result in warping or the peeling of the cabinet coating. When you dispose of NEC Corporation. 5 This effort will help us reduce the wastes as well as the negative ...impact to remove the power plug from the speaker mesh protectors, use . ¶ Wiping with a relatively flat pile. Also note that you purchased the product. NEC and the NEC logo are reused and recycled in scratching. If using any rubber or plastic materials ...

60XM5 start up manual
Page 3
... Model) For the operation of your plasma monitor, refer to the CD-ROM. NOTE: Adobe Acrobat Reader or Adobe Reader can be copied onto your NEC plasma monitor. Double-click the [NECPLASMA-UM] CD-ROM icon. 3. The Start Menu will be displayed on the supplied CD-ROM can be displayed on...;ן3), beads bands (ן3) Options • Wall mount unit • Ceiling mount unit • Tilt mount unit • Tabletop Stand • Attachable speakers User's Manual on CD-ROM ⅷ The complete user's manual is supplied on the screen. [Macintosh] 1.
... Model) For the operation of your plasma monitor, refer to the CD-ROM. NOTE: Adobe Acrobat Reader or Adobe Reader can be copied onto your NEC plasma monitor. Double-click the [NECPLASMA-UM] CD-ROM icon. 3. The Start Menu will be displayed on the supplied CD-ROM can be displayed on...;ן3), beads bands (ן3) Options • Wall mount unit • Ceiling mount unit • Tilt mount unit • Tabletop Stand • Attachable speakers User's Manual on CD-ROM ⅷ The complete user's manual is supplied on the screen. [Macintosh] 1.

60XM5 start up manual
Page 10
...Connect a digital signal (TMDS) from a source with an RGB3. J REMOTE IN Connect the remote cable to the remote control's remote jack to your speaker's owner's manual. DVD2/ HD2: You can connect an analog RGB signal and the syncronization signal. here. En-8 Rear View/ Terminal Board L VIDEO...IN jack of the other display monitor to the EXT SPEAKER terminal on both LEFT and RIGHT channels. B EXT SPEAKER L and R Connect speakers (optional) here. Connect the (positive) speaker wire to the EXT SPEAKER terminal and the (negative) speaker wire to obtain wired remote control. The input is...
...Connect a digital signal (TMDS) from a source with an RGB3. J REMOTE IN Connect the remote cable to the remote control's remote jack to your speaker's owner's manual. DVD2/ HD2: You can connect an analog RGB signal and the syncronization signal. here. En-8 Rear View/ Terminal Board L VIDEO...IN jack of the other display monitor to the EXT SPEAKER terminal on both LEFT and RIGHT channels. B EXT SPEAKER L and R Connect speakers (optional) here. Connect the (positive) speaker wire to the EXT SPEAKER terminal and the (negative) speaker wire to obtain wired remote control. The input is...
60XM5 start up manual
Page 16
...off . En-14 Sound is plugged into a power outlet. • Increase the volume. • Press the remote control's MUTE button. • Connect the speakers properly. • Set AUDIO INPUT on the computer's power. • Connect source to the monitor. • Operate the computer (move the monitor to a ...Is a source connected? • Is the power management function in front or at the minimum? • Is the mute mode set? • Are the speakers properly connected? • Is AUDIO INPUT set the ID number to ALL. • Plug the monitor's power cord into a power outlet? • Is ...
...off . En-14 Sound is plugged into a power outlet. • Increase the volume. • Press the remote control's MUTE button. • Connect the speakers properly. • Set AUDIO INPUT on the computer's power. • Connect source to the monitor. • Operate the computer (move the monitor to a ...Is a source connected? • Is the power management function in front or at the minimum? • Is the mute mode set? • Are the speakers properly connected? • Is AUDIO INPUT set the ID number to ALL. • Plug the monitor's power cord into a power outlet? • Is ...


