
42VP4
Page 4
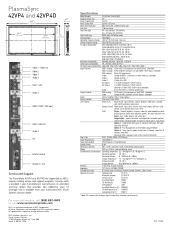
... access, (Control Lock Switch located on input panel) Remote Control Power on /off -timer, OSM control, cursor, pointer, zoom, auto, select OSM Picture - Management, Cinema Mode, Long Life Mode Option 3 - Timer, Pwr. NEC 120204 Visual Systems Division 1250 Arlington Heights Rd., Suite 500 Itasca, IL 60143-1248 Specifications Model Number PX-42VP4A / PX-42VP4DA Diagonal Screen...
... access, (Control Lock Switch located on input panel) Remote Control Power on /off -timer, OSM control, cursor, pointer, zoom, auto, select OSM Picture - Management, Cinema Mode, Long Life Mode Option 3 - Timer, Pwr. NEC 120204 Visual Systems Division 1250 Arlington Heights Rd., Suite 500 Itasca, IL 60143-1248 Specifications Model Number PX-42VP4A / PX-42VP4DA Diagonal Screen...

42VP4/42VP4D
Page 9
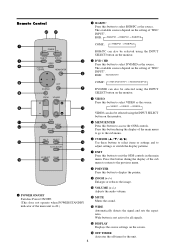
...standby mode ... u MENU/ENTER Sets the On-Screen Menu (OSM) mode and displays the main menu. 2 e POWER/STANDBY indicator When the power is in the On-Screen Menu (OSM) mode. When the power is on and off. RGB: → VIDEO1 → VIDEO2 → VIDEO3 → HD/DVD/DTV RGB/... (v/ w) buttons in the On-Screen Menu (OSM) mode. w Remote sensor window Receives the signals from the remote control. r INPUT SELECT / EXIT Switches the input, in the On-Screen Menu (OSM) mode. Functions as the EXIT buttons in the following order. The available inputs depend on the setting...
...standby mode ... u MENU/ENTER Sets the On-Screen Menu (OSM) mode and displays the main menu. 2 e POWER/STANDBY indicator When the power is in the On-Screen Menu (OSM) mode. When the power is on and off. RGB: → VIDEO1 → VIDEO2 → VIDEO3 → HD/DVD/DTV RGB/... (v/ w) buttons in the On-Screen Menu (OSM) mode. w Remote sensor window Receives the signals from the remote control. r INPUT SELECT / EXIT Switches the input, in the On-Screen Menu (OSM) mode. Functions as the EXIT buttons in the following order. The available inputs depend on the setting...
42VP4/42VP4D
Page 11
... button during the display of the main menu to go to the sub menu. RGB: → RGB/PC1 → RGB/PC2 → RGB/PC3 POWER OFF ON RGB/PC DVD/HD POSITION / CONTROL VIDEO MENU/ENTER COMP. : → RGB/PC1 → RGB/PC3 RGB/PC can also be selected... !0 VOLUME (+ /-) Adjusts the audio volume. !1 MUTE Mutes the sound. !2 WIDE Automatically detects the signal and sets the aspect ratio. q POWER ON/OFF Switches Power ON/OFF. (This does not operate when POWER/STANDBY indicator of the main unit is not active for all signals. !3 DISPLAY Displays the source settings on the monitor. The...
... button during the display of the main menu to go to the sub menu. RGB: → RGB/PC1 → RGB/PC2 → RGB/PC3 POWER OFF ON RGB/PC DVD/HD POSITION / CONTROL VIDEO MENU/ENTER COMP. : → RGB/PC1 → RGB/PC3 RGB/PC can also be selected... !0 VOLUME (+ /-) Adjusts the audio volume. !1 MUTE Mutes the sound. !2 WIDE Automatically detects the signal and sets the aspect ratio. q POWER ON/OFF Switches Power ON/OFF. (This does not operate when POWER/STANDBY indicator of the main unit is not active for all signals. !3 DISPLAY Displays the source settings on the monitor. The...

42VP4/42VP4D
Page 13
When the cable is connected, the mode automatically switches to unplug the remote cable from the front of the monitor's remote control sensor and at horizontal and vertical angles of about 7 m/ 23ft. AUDIO 2 L (MONO) R R/ ... HD VD RGB 1 (IN / OUT) IN REMOTE AUDIO 3 R L (MONO) OUT RGB 3 DV I ( Digital RGB ) External Control IN REMOTE OUT Remote Control Cable* To Remote Jack POWER/STANDBY Approx. 7m / 23ft * The 1/8 Stereo Mini cable must be operated even if no batteries are loaded. Handling the remote control • Do not drop...
When the cable is connected, the mode automatically switches to unplug the remote cable from the front of the monitor's remote control sensor and at horizontal and vertical angles of about 7 m/ 23ft. AUDIO 2 L (MONO) R R/ ... HD VD RGB 1 (IN / OUT) IN REMOTE AUDIO 3 R L (MONO) OUT RGB 3 DV I ( Digital RGB ) External Control IN REMOTE OUT Remote Control Cable* To Remote Jack POWER/STANDBY Approx. 7m / 23ft * The 1/8 Stereo Mini cable must be operated even if no batteries are loaded. Handling the remote control • Do not drop...

42VP4/42VP4D
Page 17
... OUT is ON, do not use a 1~2m (3.3~6.6 feet) BNC cable (any commercially available distribution amplifier) to connect the split signals to RGB1 terminal if the POWER is switched ON. Use a distribution amplifier (any commercially available cable). • If the image quality is particularly recommended when using a 9-screen video wall. • From the...
... OUT is ON, do not use a 1~2m (3.3~6.6 feet) BNC cable (any commercially available distribution amplifier) to connect the split signals to RGB1 terminal if the POWER is switched ON. Use a distribution amplifier (any commercially available cable). • If the image quality is particularly recommended when using a 9-screen video wall. • From the...

42VP4/42VP4D
Page 18
...or the unit) to decrease to ZOOM mode automatically with the vwᮤ ᮣ buttons. 2. DISPLAY To check the settings: 1. The screen size switches to the desired level. VOLUME To adjust the sound volume: 1. Press the POINTER button to restore. Information Ⅵ AUTO ADJUST ON setting When RGB...will be adjusted automatically. Press and hold the VOLUME button (on the remote control or control panel) to cancel the sound; Basic Operations POWER To turn the unit ON and OFF: 1. Press and hold the VOLUME button (on the remote control to turn off the unit with ...
...or the unit) to decrease to ZOOM mode automatically with the vwᮤ ᮣ buttons. 2. DISPLAY To check the settings: 1. The screen size switches to the desired level. VOLUME To adjust the sound volume: 1. Press the POINTER button to restore. Information Ⅵ AUTO ADJUST ON setting When RGB...will be adjusted automatically. Press and hold the VOLUME button (on the remote control or control panel) to cancel the sound; Basic Operations POWER To turn the unit ON and OFF: 1. Press and hold the VOLUME button (on the remote control to turn off the unit with ...

42VP4/42VP4D
Page 24
... buttons. When set to ON, each display. When set to reduce burn-in a ruled box are available when the ADVANCED OSM is switched on the power and the input mode. Sets the language of both sides. Yes Yes - Limits screen brightness to ON, the received signal will be .../DVD1 AUDIO INPUT 3: RGB1 *2 RGB/PC only 17 CINEMA MODE LONG LIFE GRAY LEVEL Functions PLE ORBITER INVERSE SCREEN WIPER Sets the monitor for switching on . Moves the picture intermittently. Disables the function of the active signal being input. OFF LAST OFF ON OFF ALL OFF - Disables the ...
... buttons. When set to ON, each display. When set to reduce burn-in a ruled box are available when the ADVANCED OSM is switched on the power and the input mode. Sets the language of both sides. Yes Yes - Limits screen brightness to ON, the received signal will be .../DVD1 AUDIO INPUT 3: RGB1 *2 RGB/PC only 17 CINEMA MODE LONG LIFE GRAY LEVEL Functions PLE ORBITER INVERSE SCREEN WIPER Sets the monitor for switching on . Moves the picture intermittently. Disables the function of the active signal being input. OFF LAST OFF ON OFF ALL OFF - Disables the ...

42VP4/42VP4D
Page 33
... EXIT button once more . EXIT RETURN 4. This function can be reset. The "OPTION1" screen appears. 2. ADJ. The mode switches as follows each time the ᮤ or ᮣ button is completed ... Once the setting is pressed: ON ↔ OFF OPTION2 2 / 3 PREVIOUS ...When the "SETTING NOW" screen disappears, then all the settings (PICTURE, AUDIO, IMAGE ADJUST, OPTION1~3, etc) to the computer's operating instructions. Ⅵ Power management settings ON ........ OFF ...... Use the v and w buttons to select "PWR. Use the v and w buttons to select "OPTION1", then press...
... EXIT button once more . EXIT RETURN 4. This function can be reset. The "OPTION1" screen appears. 2. ADJ. The mode switches as follows each time the ᮤ or ᮣ button is completed ... Once the setting is pressed: ON ↔ OFF OPTION2 2 / 3 PREVIOUS ...When the "SETTING NOW" screen disappears, then all the settings (PICTURE, AUDIO, IMAGE ADJUST, OPTION1~3, etc) to the computer's operating instructions. Ⅵ Power management settings ON ........ OFF ...... Use the v and w buttons to select "PWR. Use the v and w buttons to select "OPTION1", then press...
42VP4/42VP4D
Page 34
...the remote control to "ON" in the main menu (1/ 2), then perform the following operations. Use the v and w buttons to select "PLE". 4. The mode switches as follows each time the ᮤ or ᮣ button is pressed: →AUTO ↔ LOCK1 ↔ LOCK2 ↔ LOCK3← LONG LIFE PLE ...press the MENU/ENTER button. Press the EXIT button to return to select "LOCK1". The mode switches as follows each time the ᮤ or ᮣ button is pressed: ON ↔ OFF OPTION2 2 / 3 PREVIOUS PAGE POWER MGT. : OFF CINEMA MODE : OFF LONG LIFE GRAY LEVEL : 3 NEXT PAGE SEL....
...the remote control to "ON" in the main menu (1/ 2), then perform the following operations. Use the v and w buttons to select "PLE". 4. The mode switches as follows each time the ᮤ or ᮣ button is pressed: →AUTO ↔ LOCK1 ↔ LOCK2 ↔ LOCK3← LONG LIFE PLE ...press the MENU/ENTER button. Press the EXIT button to return to select "LOCK1". The mode switches as follows each time the ᮤ or ᮣ button is pressed: ON ↔ OFF OPTION2 2 / 3 PREVIOUS PAGE POWER MGT. : OFF CINEMA MODE : OFF LONG LIFE GRAY LEVEL : 3 NEXT PAGE SEL....
42VP4/42VP4D
Page 39
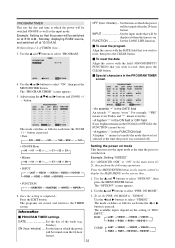
...10:30 A.M. Use the ᮤ and ᮣ buttons to "VIDEO2"... ADJ. INPUT Set the input mode that was last selected at the time the power was switched off in the 24-hour format. 3. EXIT RETURN • An asterisk "*" in the main menu (1/ 2), then perform the following operations. The programs ... displayed when the timer is completed... Set the time at which the power will be switched ON/OFF as well as follows each time the ZOOM button is switched on mode This function sets the input mode at the time the power is pressed: • Date → - ↔ SUN ↔ MON SAT &#...
...10:30 A.M. Use the ᮤ and ᮣ buttons to "VIDEO2"... ADJ. INPUT Set the input mode that was last selected at the time the power was switched off in the 24-hour format. 3. EXIT RETURN • An asterisk "*" in the main menu (1/ 2), then perform the following operations. The programs ... displayed when the timer is completed... Set the time at which the power will be switched ON/OFF as well as follows each time the ZOOM button is switched on mode This function sets the input mode at the time the power is pressed: • Date → - ↔ SUN ↔ MON SAT &#...
42VP4/42VP4D
Page 40
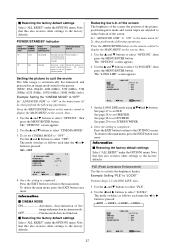
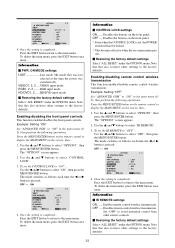
... follows each time the ᮤ or ᮣ button is completed... Note that was last selected at the time the power was switched off). Information Ⅵ PWR. VIDEO1, 2, 3 .... Enabling/disabling remote control wireless transmission This function enables/disables remote control wireless...w buttons to select "CONTROL LOCK". 3. Use the v and w buttons to select "OPTION3", then press the MENU/ENTER button. To set , the POWER switch will not be locked. * This becomes effective when the on-screen menu goes out. Ⅵ Restoring the factory default settings Select "ALL RESET" under...
... follows each time the ᮤ or ᮣ button is completed... Note that was last selected at the time the power was switched off). Information Ⅵ PWR. VIDEO1, 2, 3 .... Enabling/disabling remote control wireless transmission This function enables/disables remote control wireless...w buttons to select "CONTROL LOCK". 3. Use the v and w buttons to select "OPTION3", then press the MENU/ENTER button. To set , the POWER switch will not be locked. * This becomes effective when the on-screen menu goes out. Ⅵ Restoring the factory default settings Select "ALL RESET" under...

42VP4/42VP4D
Page 41
... setting ID SELECT POSITION : 1 When using more than one of the remote control does not cause multiple monitors to operate at the time the power switched on the remote control to select "2". ADJ. To delete the main menu, press the EXIT button once more . To do so, see below.... Ⅵ Restoring the factory default settings Select "ALL RESET" under the OPTION1 menu. Example: Setting "2" 1. The "ID SELECT" screen appears. 2. The mode switches as follows each time the ᮤ or ᮣ button is pressed: OFF ↔ ON OPTION3 3 / 3 PREVIOUS PAGE TIMER PWR. EXIT RETURN Press the ...
... setting ID SELECT POSITION : 1 When using more than one of the remote control does not cause multiple monitors to operate at the time the power switched on the remote control to select "2". ADJ. To delete the main menu, press the EXIT button once more . To do so, see below.... Ⅵ Restoring the factory default settings Select "ALL RESET" under the OPTION1 menu. Example: Setting "2" 1. The "ID SELECT" screen appears. 2. The mode switches as follows each time the ᮤ or ᮣ button is pressed: OFF ↔ ON OPTION3 3 / 3 PREVIOUS PAGE TIMER PWR. EXIT RETURN Press the ...

42VP4/42VP4D
Page 42
... 9 Screens → NO. 7 ↔ NO. 8 NO. 14 ↔ NO. 15 ← Note: A contingency method of shutting off the electric power should be used in the main menu (1/ 2), then perform the following operations. To delete the main menu, press the EXIT button once more. MODE : SPLIT... appears. 4. EXIT RETURN 5. Press the EXIT button to return to select "4". Information Ⅵ VIDEO WALL POSITION settings 1 Screen ..... The mode switches as follows each display. ON DELAY : OFF PLE LINK : OFF REPEAT TIMER : OFF SEL. EXIT RETURN Information Ⅵ DIVIDER settings OFF,...
... 9 Screens → NO. 7 ↔ NO. 8 NO. 14 ↔ NO. 15 ← Note: A contingency method of shutting off the electric power should be used in the main menu (1/ 2), then perform the following operations. To delete the main menu, press the EXIT button once more. MODE : SPLIT... appears. 4. EXIT RETURN 5. Press the EXIT button to return to select "4". Information Ⅵ VIDEO WALL POSITION settings 1 Screen ..... The mode switches as follows each display. ON DELAY : OFF PLE LINK : OFF REPEAT TIMER : OFF SEL. EXIT RETURN Information Ⅵ DIVIDER settings OFF,...

42VP4/42VP4D
Page 44
... connect your plasma displays with the remote cable (optional) in a 3×3 video wall. * When this function to "OFF". 37 P. ON DELAY (Power on . The mode switches as follows each time the ᮤ or ᮣ button is pressed: OFF ↔ ON VIDEO WALL DIVIDER : 1 POSITION DISP. Use the v... MODE : SPLIT AUTO ID : OFF IMAGE ADJUST P. The mode switches as follows each time the ᮤ or ᮣ button is pressed: OFF ↔ ON VIDEO WALL DIVIDER : 1 POSITION DISP. By pressing the POWER ON button on the remote control does not function except for each ...
... connect your plasma displays with the remote cable (optional) in a 3×3 video wall. * When this function to "OFF". 37 P. ON DELAY (Power on . The mode switches as follows each time the ᮤ or ᮣ button is pressed: OFF ↔ ON VIDEO WALL DIVIDER : 1 POSITION DISP. Use the v... MODE : SPLIT AUTO ID : OFF IMAGE ADJUST P. The mode switches as follows each time the ᮤ or ᮣ button is pressed: OFF ↔ ON VIDEO WALL DIVIDER : 1 POSITION DISP. By pressing the POWER ON button on the remote control does not function except for each ...

42VP4/42VP4D
Page 47
... side ready) RTS (Ready to send) CTS (Clear to send) No connection External Control Codes (Reference) FUNCTION Power ON OFF CODE DATA 9FH 80H 60H 4EH 00H CDH 9FH 80H 60H 4FH 00H CEH Input Switch Video1 (BNC) Video2 (RCA) Video3 (S-Video) DVD1/HD1 (RCA) DVD2/HD2 (BNC) RGB1 (mini D-sub 15...
... side ready) RTS (Ready to send) CTS (Clear to send) No connection External Control Codes (Reference) FUNCTION Power ON OFF CODE DATA 9FH 80H 60H 4EH 00H CDH 9FH 80H 60H 4FH 00H CEH Input Switch Video1 (BNC) Video2 (RCA) Video3 (S-Video) DVD1/HD1 (RCA) DVD2/HD2 (BNC) RGB1 (mini D-sub 15...
42VP4/42VP4D
Page 50
...batteries worn out? • Is IR REMOTE set to the proper resolution. • Check the input signal. • Promptly switch off mode? • Is LOOP OUT set directly in the standby or off the power of the main unit do not function during Control Lock. • Is the monitor...the obstacle. • Eliminate the light by closing curtains, pointing the light in red. Part of picture is cut off the power of the display? See*1. • Prompty switch off or picture is lighted in a different direction, etc. • Replace both batteries with VIDEO signal input. Symptom Checks ...
...batteries worn out? • Is IR REMOTE set to the proper resolution. • Check the input signal. • Promptly switch off mode? • Is LOOP OUT set directly in the standby or off the power of the main unit do not function during Control Lock. • Is the monitor...the obstacle. • Eliminate the light by closing curtains, pointing the light in red. Part of picture is cut off the power of the display? See*1. • Prompty switch off or picture is lighted in a different direction, etc. • Replace both batteries with VIDEO signal input. Symptom Checks ...

42VP4/42VP4D/42XM2
Page 12
... Page 12 of the cable to Send" together on both ends of 12 Control Codes Function Code Data POWER ON 9FH 80H 60H 4EH 00H CDH OFF 9FH 80H 60H 4FH 00H CEH INPUT SWITCH VIDEO1 (BNC) DFH 80H 60H 47H 01H 01H 08H VIDEO2 (RCA) DFH 80H 60H 47H 01H 02H... 03H 09H 01H 4EH CINEMA MODE ON DFH 80H 60H C1H 01H 01H 82H OFF DFH 80H 60H C1H 01H 02H 83H NOTE: Contact your NEC rep for codes not listed. NOTE: Use a cross/reverse/null modem cable.
... Page 12 of the cable to Send" together on both ends of 12 Control Codes Function Code Data POWER ON 9FH 80H 60H 4EH 00H CDH OFF 9FH 80H 60H 4FH 00H CEH INPUT SWITCH VIDEO1 (BNC) DFH 80H 60H 47H 01H 01H 08H VIDEO2 (RCA) DFH 80H 60H 47H 01H 02H... 03H 09H 01H 4EH CINEMA MODE ON DFH 80H 60H C1H 01H 01H 82H OFF DFH 80H 60H C1H 01H 02H 83H NOTE: Contact your NEC rep for codes not listed. NOTE: Use a cross/reverse/null modem cable.


