

NP115 : RS232 codes- Projectors
Page 10
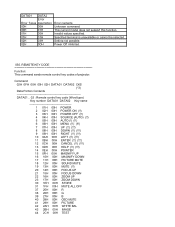
... 037. LAMP INFORMATION REQUEST 3 037-7. LAMP MODE REQUEST 039. PIP/SIDE BY SIDE REQUEST 098-196. WXGA MODE SETTING REQUEST 049. REMOTE KEY CODE 060. BASE MODEL TYPE REQUEST 305-3. PROJECTOR INFORMATION REQUEST 00H 81H 00H 00H 00H 81H 00H C0H 00H 00H 00H C0H 00H 88H 00H 00H 00H 88H 02H...
... 037. LAMP INFORMATION REQUEST 3 037-7. LAMP MODE REQUEST 039. PIP/SIDE BY SIDE REQUEST 098-196. WXGA MODE SETTING REQUEST 049. REMOTE KEY CODE 060. BASE MODEL TYPE REQUEST 305-3. PROJECTOR INFORMATION REQUEST 00H 81H 00H 00H 00H 81H 00H C0H 00H 00H 00H C0H 00H 88H 00H 00H 00H 88H 02H...
NP115 : RS232 codes- Projectors
Page 34
Invalid values specified. Specified terminal is unavailable or cannot be selected. Setting not possible. REMOTE KEY CODE Function: This command sends remote control key codes of projector. DATA01 DATA2 Error Error Types description 00H 00H 00H 01H 01H 00H 01H 01H 02H 03H 02H 0DH Error contents Unknown command. Power Off inhibited. ...
Invalid values specified. Specified terminal is unavailable or cannot be selected. Setting not possible. REMOTE KEY CODE Function: This command sends remote control key codes of projector. DATA01 DATA2 Error Error Types description 00H 00H 00H 01H 01H 00H 01H 01H 02H 03H 02H 0DH Error contents Unknown command. Power Off inhibited. ...

NP1000/NP2000 spec sheet
Page 1
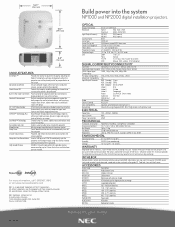
...; Geometric correction tool allows you to the projector remotely. EXTENDING THE LIFE OF THE PROJECTOR. ° Extended lamp life with HDCP, composite video, 2 computer inputs 1-HD15, 1- Build power into the system NP1000 and NP2000 digital installation projectors. Compatible with Windows and MAC operating systems.... the participant's computer image on the most any application: 3500 ANSI (NP1000) and 4000 ANSI (NP2000). ° Vertical and horizontal lens shift enables flexible projector placement. ° Complete line of its useful life. RGBHV and monitor output. ° Advanced ...
...; Geometric correction tool allows you to the projector remotely. EXTENDING THE LIFE OF THE PROJECTOR. ° Extended lamp life with HDCP, composite video, 2 computer inputs 1-HD15, 1- Build power into the system NP1000 and NP2000 digital installation projectors. Compatible with Windows and MAC operating systems.... the participant's computer image on the most any application: 3500 ANSI (NP1000) and 4000 ANSI (NP2000). ° Vertical and horizontal lens shift enables flexible projector placement. ° Complete line of its useful life. RGBHV and monitor output. ° Advanced ...
NP1000/NP2000 spec sheet
Page 2
...Projector and remote feature direct access buttons for source selection Computer Free Presentations Insert a USB drive or PCMCIA card directly into the system NP1000 and NP2000 digital installation projectors. Contrast Enhancement Delivers exceptional picture management control for both progressive and interlaced sources, while making images more vibrant, colors more information, call 1.800.NEC...Projection Angle Lens 0.8 in LCD with extension handle ATA certified ..., 480i Compatibility PC Signal Compatibility VGA, SVGA, XGA, SXGA, SXGA+, UXGA Macintosh Compatibility Yes Input/Output...
...Projector and remote feature direct access buttons for source selection Computer Free Presentations Insert a USB drive or PCMCIA card directly into the system NP1000 and NP2000 digital installation projectors. Contrast Enhancement Delivers exceptional picture management control for both progressive and interlaced sources, while making images more vibrant, colors more information, call 1.800.NEC...Projection Angle Lens 0.8 in LCD with extension handle ATA certified ..., 480i Compatibility PC Signal Compatibility VGA, SVGA, XGA, SXGA, SXGA+, UXGA Macintosh Compatibility Yes Input/Output...

NP1000/2000 network setup guide
Page 7
...The screen saver function is saved to operate a personal computer located in a conference is off the power. NEC assumes no liability for example, a PowerPoint file to the projector in the conference room with User Supportware 3 Office Important • You can be presented in a separate ...room from viewing the screen of a personal computer at a remote location from information leak or system failure while you...
...The screen saver function is saved to operate a personal computer located in a conference is off the power. NEC assumes no liability for example, a PowerPoint file to the projector in the conference room with User Supportware 3 Office Important • You can be presented in a separate ...room from viewing the screen of a personal computer at a remote location from information leak or system failure while you...
NP1000/2000 network setup guide
Page 15
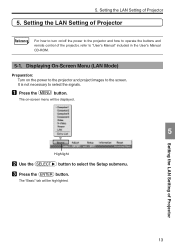
... to select the Setup submenu. 3 Press the button. Setting the LAN Setting of the projector, refer to operate the buttons and remote control of Projector 13 Displaying On-Screen Menu (LAN Mode) Preparation: Turn on /off the power to the projector and how to "User's Manual" included in the User's Manual CD-ROM. 5-1. The...
... to select the Setup submenu. 3 Press the button. Setting the LAN Setting of the projector, refer to operate the buttons and remote control of Projector 13 Displaying On-Screen Menu (LAN Mode) Preparation: Turn on /off the power to the projector and how to "User's Manual" included in the User's Manual CD-ROM. 5-1. The...
NP1000/NP2000 UM
Page 3
...temporarily sustained on the surface of the LCD panel. The information should happen, continue to use your projector. CAUTION This mark is located on and do not point the laser beam at a person. If this manual carefully before using your NEC NP2000/NP1000 projector and keep the manual handy for Germany... only): The sound pressure level is dangerous to make any part inside of the remote control. Record it is on the top of the unit. Use of...
...temporarily sustained on the surface of the LCD panel. The information should happen, continue to use your projector. CAUTION This mark is located on and do not point the laser beam at a person. If this manual carefully before using your NEC NP2000/NP1000 projector and keep the manual handy for Germany... only): The sound pressure level is dangerous to make any part inside of the remote control. Record it is on the top of the unit. Use of...

NP1000/NP2000 UM
Page 7
...heat, take apart, or throw batteries into fire. • If you continue to use the projector for consecutive days. (From the menu, select [Setup - Doing so could be using the remote control for lamp replacement. To lock the carrying handle, see "To lock the carrying handle"...your local regulations. Misuses such as a light source. Remote Control Precautions • Handle the remote control carefully. • If the remote control gets wet, wipe it is powered on and immediately after the projector is under the projector. CAUTION: When removing the lamp from the wall or...
...heat, take apart, or throw batteries into fire. • If you continue to use the projector for consecutive days. (From the menu, select [Setup - Doing so could be using the remote control for lamp replacement. To lock the carrying handle, see "To lock the carrying handle"...your local regulations. Misuses such as a light source. Remote Control Precautions • Handle the remote control carefully. • If the remote control gets wet, wipe it is powered on and immediately after the projector is under the projector. CAUTION: When removing the lamp from the wall or...
NP1000/NP2000 UM
Page 8
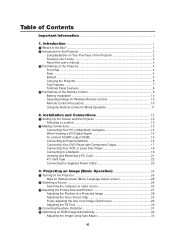
... Connecting an External Monitor 16 Connecting Your DVD Player with Component Output 17 Connecting Your VCR or Laser Disc Player 18 Connecting to the Projector 2 Congratulations on Startup screen (Menu Language Select screen 25 ᕢ Selecting a Source ...26 Selecting the computer or video source 26 ... 31 ᕥ Optimizing an RGB Image Automatically 33 Adjusting the Image Using Auto Adjust 33 vi Table of the Remote Control 9 Battery Installation 10 Operating Range for Wireless Remote Control 10 Remote Control Precautions 10 Using the Remote Control in Wired Operation 11 2.
... Connecting an External Monitor 16 Connecting Your DVD Player with Component Output 17 Connecting Your VCR or Laser Disc Player 18 Connecting to the Projector 2 Congratulations on Startup screen (Menu Language Select screen 25 ᕢ Selecting a Source ...26 Selecting the computer or video source 26 ... 31 ᕥ Optimizing an RGB Image Automatically 33 Adjusting the Image Using Auto Adjust 33 vi Table of the Remote Control 9 Battery Installation 10 Operating Range for Wireless Remote Control 10 Remote Control Precautions 10 Using the Remote Control in Wired Operation 11 2.

NP1000/NP2000 UM
Page 9
... LAN ...69 [Entry List] ...70 vii Table of the Projector 45 ¸ Operation Using an HTTP Browser 50 ¹ Using the Projector to save files 59 ᕣ Operating the Viewer Function from the Projector (playback 60 Projecting slides (Viewer 60 Operating Viewer Menu 60 ... Picture 36 ᕤ Changing Lamp Mode 36 ᕥ Getting Integrated Help 37 ᕦ Using a USB Mouse 38 ᕧ Using the Optional Remote Mouse Receiver 39 ᕨ Correcting Horizontal and Vertical Keystone Distortion (Cornerstone 41 ᕩ Making Freehand Drawings on a Network (Desktop Control Utility 1.0 53...
... LAN ...69 [Entry List] ...70 vii Table of the Projector 45 ¸ Operation Using an HTTP Browser 50 ¹ Using the Projector to save files 59 ᕣ Operating the Viewer Function from the Projector (playback 60 Projecting slides (Viewer 60 Operating Viewer Menu 60 ... Picture 36 ᕤ Changing Lamp Mode 36 ᕥ Getting Integrated Help 37 ᕦ Using a USB Mouse 38 ᕧ Using the Optional Remote Mouse Receiver 39 ᕨ Correcting Horizontal and Vertical Keystone Distortion (Cornerstone 41 ᕩ Making Freehand Drawings on a Network (Desktop Control Utility 1.0 53...

NP1000/NP2000 UM
Page 11
.... Lens cap (24FT9741) DOWN UP LEFT RIGHT POWSETRATLAUSMPPC CARD ON/STAND BY SOURCE AUTO ADJUST 3D REFORM SELECT Projector SELECT S-VIDEO OFPFOWER VIDEO COMPONENT 1 COMPUTER 2 3 VIEWER LAN OPNOWER PICTURE PIC-MUTE L-CLICK LASER VOLUMEASPMEACGTNIFLYAMP FREEMZOEUSE... MODE AUTO ADJ. UP PAGE R-CLICK 3D DOWN REFORM HELP Remote control (7N900692) Batteries (AA x 2) Remote Cable (7N520019) Power cable (7N080204) US (7N080008) EU VGA signal cable (7N520054) • Important Infomation...
.... Lens cap (24FT9741) DOWN UP LEFT RIGHT POWSETRATLAUSMPPC CARD ON/STAND BY SOURCE AUTO ADJUST 3D REFORM SELECT Projector SELECT S-VIDEO OFPFOWER VIDEO COMPONENT 1 COMPUTER 2 3 VIEWER LAN OPNOWER PICTURE PIC-MUTE L-CLICK LASER VOLUMEASPMEACGTNIFLYAMP FREEMZOEUSE... MODE AUTO ADJ. UP PAGE R-CLICK 3D DOWN REFORM HELP Remote control (7N900692) Batteries (AA x 2) Remote Cable (7N520019) Power cable (7N080204) US (7N080008) EU VGA signal cable (7N520054) • Important Infomation...
NP1000/NP2000 UM
Page 12
...or USB storage device. With the NP2000/NP1000 you 'll enjoy : • LCD projector with a switch and a breaker. The NP2000/NP1000 provides for full projector control through the PC control port...• Preventing unauthorized use the POWER (ON/STANDBY) button on the remote control or projector cabinet. • Integrated RJ-45 connector for wired networking capability and ...The NEC optional wireless LAN card is a sophisticated XGA projector that can be able to project images up to help deter projector theft and provides for enhanced security options to the NP2000/NP1000 projector ...
...or USB storage device. With the NP2000/NP1000 you 'll enjoy : • LCD projector with a switch and a breaker. The NP2000/NP1000 provides for full projector control through the PC control port...• Preventing unauthorized use the POWER (ON/STANDBY) button on the remote control or projector cabinet. • Integrated RJ-45 connector for wired networking capability and ...The NEC optional wireless LAN card is a sophisticated XGA projector that can be able to project images up to help deter projector theft and provides for enhanced security options to the NP2000/NP1000 projector ...

NP1000/NP2000 UM
Page 14
... page 115) Lens Zoom Lever (→ page 29) Lens Cap Built-in standby mode. (→ page 24) Lamp Cover (→ page 110) Remote Sensor (→ page 10) Ventilation (outlet) Heated air is trademarked and owned by Kensington Microware Inc. AC Input Connect the supplied power cable's three... here, and plug the other end into an active wall outlet and turn on the Main Power switch, the POWER indicator turns orange and the projector is in Security Slot ( )* Ventilation (inlet) / Filter (→ page 108) Adjustable Tilt Foot Lever (→ page 30) Adjustable Tilt Foot (→ ...
... page 115) Lens Zoom Lever (→ page 29) Lens Cap Built-in standby mode. (→ page 24) Lamp Cover (→ page 110) Remote Sensor (→ page 10) Ventilation (outlet) Heated air is trademarked and owned by Kensington Microware Inc. AC Input Connect the supplied power cable's three... here, and plug the other end into an active wall outlet and turn on the Main Power switch, the POWER indicator turns orange and the projector is in Security Slot ( )* Ventilation (inlet) / Filter (→ page 108) Adjustable Tilt Foot Lever (→ page 30) Adjustable Tilt Foot (→ ...

NP1000/NP2000 UM
Page 18
...page 18) 7. MONITOR OUT Connector (Mini D-Sub 15 Pin) (→page 16) 9. First remove the dummy cards before use this does not affect the projector's performance. 1. COMPONENT IN (Y, Cb/Pb, Cr/Pr) Connectors (RCA) (→page 17) AUDIO L/MONO, R (RCA) (→page 17) ...this port to connect your PC or control system to control the projector using PC Control Utility 3.0 contained on the terminal panel will make the wireless operation unavailable. 12. Remote Jack (Stereo Mini Jack) (→page 11) NOTE: Connecting the remote cable to use . 8 COMPUTER 2 IN/Component (R/cr, ...
...page 18) 7. MONITOR OUT Connector (Mini D-Sub 15 Pin) (→page 16) 9. First remove the dummy cards before use this does not affect the projector's performance. 1. COMPONENT IN (Y, Cb/Pb, Cr/Pr) Connectors (RCA) (→page 17) AUDIO L/MONO, R (RCA) (→page 17) ...this port to connect your PC or control system to control the projector using PC Control Utility 3.0 contained on the terminal panel will make the wireless operation unavailable. 12. Remote Jack (Stereo Mini Jack) (→page 11) NOTE: Connecting the remote cable to use . 8 COMPUTER 2 IN/Component (R/cr, ...

NP1000/NP2000 UM
Page 19
...8594; page 34) 20. ASPECT Button (→ page 77) 24. LED Flashes when any button is on the projector, press and hold the POWER ON button for a minimum of the Remote Control 1. PIC-MUTE Button (→ page 36) 27. ¿ Part Names of two seconds. 6. Infrared Transmitter... R OPNOWER COMPUTER 2 VIEWER OFPFOWER 3 1 2 LAN VIDEO COMPONENT 1 3 S-VIDEO SELECT 4. POWER ON Button (→ page 24) NOTE: To turn off the projector, press the POWER OFF button twice. 1. EXIT Button 19. POWER OFF Button (→ page 35) NOTE: To turn on . * Do not point the laser ...
...8594; page 34) 20. ASPECT Button (→ page 77) 24. LED Flashes when any button is on the projector, press and hold the POWER ON button for a minimum of the Remote Control 1. PIC-MUTE Button (→ page 36) 27. ¿ Part Names of two seconds. 6. Infrared Transmitter... R OPNOWER COMPUTER 2 VIEWER OFPFOWER 3 1 2 LAN VIDEO COMPONENT 1 3 S-VIDEO SELECT 4. POWER ON Button (→ page 24) NOTE: To turn off the projector, press the POWER OFF button twice. 1. EXIT Button 19. POWER OFF Button (→ page 35) NOTE: To turn on . * Do not point the laser ...

NP1000/NP2000 UM
Page 20
...Dispose of used batteries according to a distance of about 22 feet/7 m and within a 60-degree angle of the remote sensor on the projector cabinet. • The projector will not respond if there are : front, rear or both. (→ page 96) • The infrared signal ...may differ slightly from properly operating the projector. Weak batteries will not be using the remote control for Wireless Remote Control Remote sensor on the projector is enabled in the drawing. Remote Control Precautions • Handle the remote control carefully. • If the remote control gets wet, wipe it snaps...
...Dispose of used batteries according to a distance of about 22 feet/7 m and within a 60-degree angle of the remote sensor on the projector cabinet. • The projector will not respond if there are : front, rear or both. (→ page 96) • The infrared signal ...may differ slightly from properly operating the projector. Weak batteries will not be using the remote control for Wireless Remote Control Remote sensor on the projector is enabled in the drawing. Remote Control Precautions • Handle the remote control carefully. • If the remote control gets wet, wipe it snaps...

NP1000/NP2000 UM
Page 21
Introduction Using the Remote Control in Wired Operation Connect one end of the supplied remote cable to the REMOTE mini jack and the other end to the REMOTE mini jack on the remote control. REMOTE 11 NOTE: Connecting the remote cable to the remote jack on the terminal panel will make the wireless operation unavailable. POWER OFF VIDEO S-VIDEO 1 COMPONENT ENTER L-CLICK COMPUTER MENU SELECT LASER MOUSE FREEZE ASPECT LAMP MODE AUTO ADJ. VOLUME MAGNIFY PICTURE PIC-MUTE 2 3 EXIT R-CLICK PAGE UP DOWN 3D REFORM HELP POWER ON VIEWER LAN 1.
Introduction Using the Remote Control in Wired Operation Connect one end of the supplied remote cable to the REMOTE mini jack and the other end to the REMOTE mini jack on the remote control. REMOTE 11 NOTE: Connecting the remote cable to the remote jack on the terminal panel will make the wireless operation unavailable. POWER OFF VIDEO S-VIDEO 1 COMPONENT ENTER L-CLICK COMPUTER MENU SELECT LASER MOUSE FREEZE ASPECT LAMP MODE AUTO ADJ. VOLUME MAGNIFY PICTURE PIC-MUTE 2 3 EXIT R-CLICK PAGE UP DOWN 3D REFORM HELP POWER ON VIEWER LAN 1.

NP1000/NP2000 UM
Page 23
... up. * If the screen goes blank while using your remote control, it outputs a signal to the notebook PC. NOTE: The NP2000/NP1000 is not compatible with a notebook PC, be displayed correctly when a Video or S-Video source is because the projector will enable/disable the external display. COMPUTER 2 IN COMPUTER ...most cases the output signal from the notebook PC is in standby mode and before connecting an audio cable the headphone jack of either the NEC ISS-6020 and ISS-6010 switchers. NOTE: The COMPUTER 1 IN connector supports Plug & Play (DDC2). In that you can adjust ...
... up. * If the screen goes blank while using your remote control, it outputs a signal to the notebook PC. NOTE: The NP2000/NP1000 is not compatible with a notebook PC, be displayed correctly when a Video or S-Video source is because the projector will enable/disable the external display. COMPUTER 2 IN COMPUTER ...most cases the output signal from the notebook PC is in standby mode and before connecting an audio cable the headphone jack of either the NEC ISS-6020 and ISS-6010 switchers. NOTE: The COMPUTER 1 IN connector supports Plug & Play (DDC2). In that you can adjust ...

NP1000/NP2000 UM
Page 34
... REFORM AUTO ADJUST SOURCE ON/STAND BY POWSETRATLUASMPPC CARD PC CARD LAMP STATUS POWER 3. When the POWER indicator turns a steady green, and the projector is ready to the off and the POWER indicator starts blinking. Steady green light (→ page 117) NOTE: When no signal is available... a minimum of 2 seconds when the STATUS indicator goes off (⅜) position. After making sure that your projector, ensure that the computer or video source is turned on the remote control). • When plugging in or unplugging the supplied power cable, make sure that the main power switch...
... REFORM AUTO ADJUST SOURCE ON/STAND BY POWSETRATLUASMPPC CARD PC CARD LAMP STATUS POWER 3. When the POWER indicator turns a steady green, and the projector is ready to the off and the POWER indicator starts blinking. Steady green light (→ page 117) NOTE: When no signal is available... a minimum of 2 seconds when the STATUS indicator goes off (⅜) position. After making sure that your projector, ensure that the computer or video source is turned on the remote control). • When plugging in or unplugging the supplied power cable, make sure that the main power switch...

NP1000/NP2000 UM
Page 36
Using the Remote Control Press any one of 1 second, the projector will change as follows: Computer1 → Computer2 → Computer3 → Component → Video → S-Video → Viewer → Computer1 → ... SELECT 3D REFORM AUTO ADJUST .... If no input signal is present, the input will change as follows: "Computer 1/2/3", "Component", "Video" (VCR or laser disc player), "S-Video", "Viewer" (slides on the projector cabinet to project is pressed, the input source will be skipped. 3. Each time the SOURCE button is displayed, release the button.
Using the Remote Control Press any one of 1 second, the projector will change as follows: Computer1 → Computer2 → Computer3 → Component → Video → S-Video → Viewer → Computer1 → ... SELECT 3D REFORM AUTO ADJUST .... If no input signal is present, the input will change as follows: "Computer 1/2/3", "Component", "Video" (VCR or laser disc player), "S-Video", "Viewer" (slides on the projector cabinet to project is pressed, the input source will be skipped. 3. Each time the SOURCE button is displayed, release the button.


