
RS232 codes- Projectors
Page 2
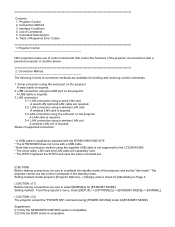
...LAN cable are separately sold. * The WT610 replaced the WT610 and uses the same command set the "idle mode". Interface Conditions 4. Table of Commands 5. Contents 1. Connection Method 3. Setting method: Under projector [Projector Options] --> [Setup], enter a check for sending and receiving control commands. 1. Projector Control NEC projectors make use the control commands in the standby mode. The projector cannot use of control commands that a connection method using a wireless LAN unit A wireless LAN unit is required Status of supported connection * A USB cable is supplied...
...LAN cable are separately sold. * The WT610 replaced the WT610 and uses the same command set the "idle mode". Interface Conditions 4. Table of Commands 5. Contents 1. Connection Method 3. Setting method: Under projector [Projector Options] --> [Setup], enter a check for sending and receiving control commands. 1. Projector Control NEC projectors make use the control commands in the standby mode. The projector cannot use of control commands that a connection method using a wireless LAN unit A wireless LAN unit is required Status of supported connection * A USB cable is supplied...

RS232 codes- Projectors
Page 35
Table of projector. Setting not possible. Command: 02H 0FH 00H 00H 02H DATA01 DATA02 CKS (*3) Data Portion Contents This current model does not support this function. Invalid values specified. Power Off inhibited. 050. REMOTE KEY CODE Function: This command sends remote control key codes of Response Error Codes DATA01 DATA2 Error Error Types description 00H 00H 00H 01H 01H 00H 01H 01H 02H 03H 02H 0DH Error contents Unknown...
Table of projector. Setting not possible. Command: 02H 0FH 00H 00H 02H DATA01 DATA02 CKS (*3) Data Portion Contents This current model does not support this function. Invalid values specified. Power Off inhibited. 050. REMOTE KEY CODE Function: This command sends remote control key codes of Response Error Codes DATA01 DATA2 Error Error Types description 00H 00H 00H 01H 01H 00H 01H 01H 02H 03H 02H 0DH Error contents Unknown...

PJ control command reference manual appendixes
Page 1
Standby Mode setting for receiving commands 3 3. ASPECT ADJUST] Eco mode 7 [097-8. ECO MODE REQUEST] [098-8. Connecting an External Device 2 2. INPUT SW CHANGE] Aspect 6 [030-12. PIP/PICTURE BY PICTURE REQUEST] [098-198. Supported Command List 4 4. BASE MODEL TYPE REQUEST] Selection signal type 9 [078-3. INPUT STATUS REQUEST] [305-3. NP-M402W / NP-M362W / NP-M402X / NP-M362X / NP-M322X / NP-M282X / NP-M322W / NP-M352WS / NP-M302WS / NP-M332XS NP-PA622U / NP-PA522U / NP-PA672W / NP-PA572W / NP-PA722X / NP-PA622X / NP-PA621U / NP-PA521U / NP-PA671W / NP-...
Standby Mode setting for receiving commands 3 3. ASPECT ADJUST] Eco mode 7 [097-8. ECO MODE REQUEST] [098-8. Connecting an External Device 2 2. INPUT SW CHANGE] Aspect 6 [030-12. PIP/PICTURE BY PICTURE REQUEST] [098-198. Supported Command List 4 4. BASE MODEL TYPE REQUEST] Selection signal type 9 [078-3. INPUT STATUS REQUEST] [305-3. NP-M402W / NP-M362W / NP-M402X / NP-M362X / NP-M322X / NP-M282X / NP-M322W / NP-M352WS / NP-M302WS / NP-M332XS NP-PA622U / NP-PA522U / NP-PA672W / NP-PA572W / NP-PA722X / NP-PA622X / NP-PA621U / NP-PA521U / NP-PA671W / NP-...
Specification Brochure
Page 4
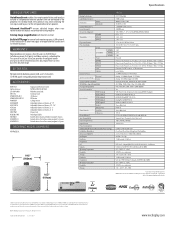
...ORDERING MODEL NUMBERS NP-PA653UL 19.5" (503mm) 16.2" (411mm) Specifications Display Technology Light Output (lumens) Resolution Native Maximum Contrast Ratio (up to) Laser Life (up to) Screen Size (diagonal) NP40ZL Throw Ratio NP41ZL NP43ZL Projection Distance Projection Angle Zoom NP40ZL Zoom Ratio NP41ZL NP43ZL Focus Lens NP40ZL NP41ZL NP43ZL Shift Shutter Keystone Correction Horizontal Synchronization Range Vertical Supported Video Standards SD/HD Video Signal Compatibility PC Signal Compatibility Macintosh Compatibility RGB1 (analog) RGB2 (digital) Input...
...ORDERING MODEL NUMBERS NP-PA653UL 19.5" (503mm) 16.2" (411mm) Specifications Display Technology Light Output (lumens) Resolution Native Maximum Contrast Ratio (up to) Laser Life (up to) Screen Size (diagonal) NP40ZL Throw Ratio NP41ZL NP43ZL Projection Distance Projection Angle Zoom NP40ZL Zoom Ratio NP41ZL NP43ZL Focus Lens NP40ZL NP41ZL NP43ZL Shift Shutter Keystone Correction Horizontal Synchronization Range Vertical Supported Video Standards SD/HD Video Signal Compatibility PC Signal Compatibility Macintosh Compatibility RGB1 (analog) RGB2 (digital) Input...
Users Manual
Page 6
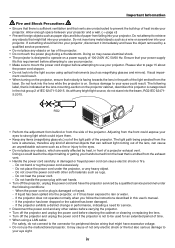
... the power cord excessively. - Do not cover the power cord with wet hands. • Turn off the projector and unplug the power cord if the projector is not to be used for peripheral device wiring that your power supply fits this requirement before attempting to use your projector. • Make sure to mount the power cord stopper before cleaning the cabinet or cleaning or replacing the lens. • Turn off the projector, unplug the power cord...
... the power cord excessively. - Do not cover the power cord with wet hands. • Turn off the projector and unplug the power cord if the projector is not to be used for peripheral device wiring that your power supply fits this requirement before attempting to use your projector. • Make sure to mount the power cord stopper before cleaning the cabinet or cleaning or replacing the lens. • Turn off the projector, unplug the power cord...
Users Manual
Page 14
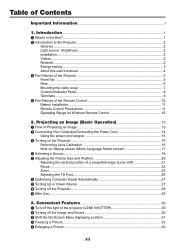
...and Sound 30 ❸ Shift the On-Screen Menu displaying position 31 ❹ Freezing a Picture...32 ❺ Enlarging a Picture...32 xii Introduction...1 ❶ What's in the Box?...1 ❷ Introduction to the Projector 2 General...2 Light source · Brightness 2 Installation...2 Videos...2 Network...3 Energy-saving...3 About this user's manual 4 ❸ Part Names of the Projector 5 Front/Top...5 Rear...6 Mounting the cable cover 7 Controls/Indicator Panel 8 Terminals...9 ❹ Part Names of Contents Important Information i 1. Projecting an Image (Basic Operation 13...
...and Sound 30 ❸ Shift the On-Screen Menu displaying position 31 ❹ Freezing a Picture...32 ❺ Enlarging a Picture...32 xii Introduction...1 ❶ What's in the Box?...1 ❷ Introduction to the Projector 2 General...2 Light source · Brightness 2 Installation...2 Videos...2 Network...3 Energy-saving...3 About this user's manual 4 ❸ Part Names of the Projector 5 Front/Top...5 Rear...6 Mounting the cable cover 7 Controls/Indicator Panel 8 Terminals...9 ❹ Part Names of Contents Important Information i 1. Projecting an Image (Basic Operation 13...

Users Manual
Page 16
... throw distance 152 Tables of screen sizes and dimensions 153 Lens shifting range 153 ❷ Compatible Input Signal List 155 ❸ Specifications...158 ❹ Cabinet Dimensions...161 ❺ Pin assignments and signal names of Contents ❼ Menu Descriptions & Functions [SETUP 109 [MENU(1)]...109 [MENU(2)]...110 [INSTALLATION(1 111 [INSTALLATION(2 115 [CONTROL]...116 [NETWORK SETTINGS 123 [SOURCE OPTIONS 128 [POWER OPTIONS 130 Returning to a Wired LAN 150 7. Connecting to Other Equipment 138 ❶ Mounting a lens...
... throw distance 152 Tables of screen sizes and dimensions 153 Lens shifting range 153 ❷ Compatible Input Signal List 155 ❸ Specifications...158 ❹ Cabinet Dimensions...161 ❺ Pin assignments and signal names of Contents ❼ Menu Descriptions & Functions [SETUP 109 [MENU(1)]...109 [MENU(2)]...110 [INSTALLATION(1 111 [INSTALLATION(2 115 [CONTROL]...116 [NETWORK SETTINGS 123 [SOURCE OPTIONS 128 [POWER OPTIONS 130 Returning to a Wired LAN 150 7. Connecting to Other Equipment 138 ❶ Mounting a lens...

Users Manual
Page 33
... message "PROJECTOR IS LOCKED! is displayed, it means that the computer or video source is not performed, you may not be projected onto the screen. ENTER YOUR PASSWORD." Performing Lens Calibration After mounting the separately available lens unit or replacing a lens unit, perform [LENS CALIBRATION] by factory default menu settings). Press the (POWER) button on the projector cabinet or the POWER ON button on the cabinet over two seconds. Blinking Power On Blinking blue light Steady blue light 16 Projecting an Image (Basic Operation) 2. WARNING...
... message "PROJECTOR IS LOCKED! is displayed, it means that the computer or video source is not performed, you may not be projected onto the screen. ENTER YOUR PASSWORD." Performing Lens Calibration After mounting the separately available lens unit or replacing a lens unit, perform [LENS CALIBRATION] by factory default menu settings). Press the (POWER) button on the projector cabinet or the POWER ON button on the cabinet over two seconds. Blinking Power On Blinking blue light Steady blue light 16 Projecting an Image (Basic Operation) 2. WARNING...

Users Manual
Page 52
... factor.* Setting the [LIGHT MODE] to [ECO1], [ECO2], or [LONG LIFE] increases CO2 emissions savings. * Calculation for amount of CO2 emission reduction is based on an OECD publication "CO2 Emissions from the time of CO2 emission reduction (kg) when the projector's [LIGHT MODE] is turned on savings recorded in terms of shipment up to LIGHT MODE immediately after the time of power-on...
... factor.* Setting the [LIGHT MODE] to [ECO1], [ECO2], or [LONG LIFE] increases CO2 emissions savings. * Calculation for amount of CO2 emission reduction is based on an OECD publication "CO2 Emissions from the time of CO2 emission reduction (kg) when the projector's [LIGHT MODE] is turned on savings recorded in terms of shipment up to LIGHT MODE immediately after the time of power-on...

Users Manual
Page 93
... 5:HDBaseT ENTRY LIST TEST PATTERN MODE PRESET PICTURE DETAIL SETTINGS ADJUST IMAGE OPTIONS CONTRAST BRIGHTNESS SHARPNESS COLOR HUE VOLUME RESET CLOCK PHASE HORIZONTAL VERTICAL BLANKING OVERSCAN ASPECT RATIO GENERAL REFERENCE GAMMA CORRECTION*1 SCREEN SIZE*2 COLOR TEMPERATURE*3 DYNAMIC CONTRAST LIGHT ADJUST WHITE BALANCE CONTRAST R CONTRAST G CONTRAST B BRIGHTNESS R BRIGHTNESS G BRIGHTNESS B COLOR CORRECTION RED GREEN BLUE YELLOW MAGENTA CYAN VIDEO INPUT RESOLUTION*4 NOISE REDUCTION DEINTERLACE CONTRAST ENHANCEMENT SIGNAL TYPE VIDEO LEVEL HDR MODE*5 RANDOM NR MOSQUITO NR BLOCK...
... 5:HDBaseT ENTRY LIST TEST PATTERN MODE PRESET PICTURE DETAIL SETTINGS ADJUST IMAGE OPTIONS CONTRAST BRIGHTNESS SHARPNESS COLOR HUE VOLUME RESET CLOCK PHASE HORIZONTAL VERTICAL BLANKING OVERSCAN ASPECT RATIO GENERAL REFERENCE GAMMA CORRECTION*1 SCREEN SIZE*2 COLOR TEMPERATURE*3 DYNAMIC CONTRAST LIGHT ADJUST WHITE BALANCE CONTRAST R CONTRAST G CONTRAST B BRIGHTNESS R BRIGHTNESS G BRIGHTNESS B COLOR CORRECTION RED GREEN BLUE YELLOW MAGENTA CYAN VIDEO INPUT RESOLUTION*4 NOISE REDUCTION DEINTERLACE CONTRAST ENHANCEMENT SIGNAL TYPE VIDEO LEVEL HDR MODE*5 RANDOM NR MOSQUITO NR BLOCK...
Users Manual
Page 97
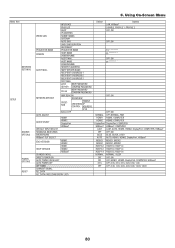
Using On-Screen Menu Menu Item NETWORK SETTINGS SETUP SOURCE OPTIONS POWER OPTIONS RESET INTERFACE PROFILES DHCP IP ADDRESS WIRED LAN SUBNET MASK GATEWAY AUTO DNS DNS CONFIGURATION RECONNECT PROJECTOR NAME PROJECTOR NAME DOMAIN HOST NAME DOMAIN NAME ALERT MAIL HOST NAME DOMAIN NAME SENDER'S ADDRESS ALERT MAIL SMTP SERVER NAME RECIPIENT'S ADDRESS 1 RECIPIENT'S ADDRESS 2 RECIPIENT'S ADDRESS 3 TEST MAIL HTTP NEW PASSWORD SERVER CONFIRM PASSWORD PJLink NEW PASSWORD CONFIRM PASSWORD AMX BEACON NETWORK SERVICE ROOMVIEW CRESTRON ENABLE CRESTRON...
Using On-Screen Menu Menu Item NETWORK SETTINGS SETUP SOURCE OPTIONS POWER OPTIONS RESET INTERFACE PROFILES DHCP IP ADDRESS WIRED LAN SUBNET MASK GATEWAY AUTO DNS DNS CONFIGURATION RECONNECT PROJECTOR NAME PROJECTOR NAME DOMAIN HOST NAME DOMAIN NAME ALERT MAIL HOST NAME DOMAIN NAME SENDER'S ADDRESS ALERT MAIL SMTP SERVER NAME RECIPIENT'S ADDRESS 1 RECIPIENT'S ADDRESS 2 RECIPIENT'S ADDRESS 3 TEST MAIL HTTP NEW PASSWORD SERVER CONFIRM PASSWORD PJLink NEW PASSWORD CONFIRM PASSWORD AMX BEACON NETWORK SERVICE ROOMVIEW CRESTRON ENABLE CRESTRON...

Users Manual
Page 137
... keyword is entered, the projector cannot project an image. (→ page 41) NOTE: Your setting will be displayed at the time of the menu. • This CONTROL PANEL LOCK does not affect the remote control functions. NOTE: • Your selected communication speed will not cease while in clock ceases, set to [ON], press the INPUT button on this projector. If the main power is off for about...
... keyword is entered, the projector cannot project an image. (→ page 41) NOTE: Your setting will be displayed at the time of the menu. • This CONTROL PANEL LOCK does not affect the remote control functions. NOTE: • Your selected communication speed will not cease while in clock ceases, set to [ON], press the INPUT button on this projector. If the main power is off for about...

Users Manual
Page 145
... time to switch to display a blue/black screen or logo when no signal. 128 Selecting Default Source [DEFAULT INPUT SELECT] You can automatically make adjustment in [PIP/PICTURE BY PICTURE] mode, the blue background is displayed without a break due to the previous or last active input each time the projector is turned on . HDMI1 Displays the digital source from the HDMI 1 IN connector every time the projector is [NORMAL]. • When the AUTO ADJ. OFF The computer signal...
... time to switch to display a blue/black screen or logo when no signal. 128 Selecting Default Source [DEFAULT INPUT SELECT] You can automatically make adjustment in [PIP/PICTURE BY PICTURE] mode, the blue background is displayed without a break due to the previous or last active input each time the projector is turned on . HDMI1 Displays the digital source from the HDMI 1 IN connector every time the projector is [NORMAL]. • When the AUTO ADJ. OFF The computer signal...

Users Manual
Page 147
... using the USB-A port constantly. [EXAMPLE] - For connecting to always use the POWER button on automatically when the power cord is excluded from the calculation for over 3 seconds and then input signal from the selected terminals among Computer, HDMI1/2, DisplayPort, and HDBaseT by Detecting Input Signal [AUTO POWER ON SELECT] Under the state of NORMAL. Enabling Direct Power On [DIRECT POWER ON] Turns the projector on the remote control or projector cabinet. Turning...
... using the USB-A port constantly. [EXAMPLE] - For connecting to always use the POWER button on automatically when the power cord is excluded from the calculation for over 3 seconds and then input signal from the selected terminals among Computer, HDMI1/2, DisplayPort, and HDBaseT by Detecting Input Signal [AUTO POWER ON SELECT] Under the state of NORMAL. Enabling Direct Power On [DIRECT POWER ON] Turns the projector on the remote control or projector cabinet. Turning...

Users Manual
Page 160
... support Windows Plug and Play. • A Mac signal adapter (commercially available) may be correct during fast-forwarding and rewinding. • Use a DVI-to connect a Mac computer. If the signal cable has been disconnected and then reconnected, an image may not be required to -HDMI cable compliant with DDWG (Digital Display Working Group) DVI (Digital Visual Interface) revision 1.0 stan- Should this case, switch the HDMI1 or HDMI2 setting at on-screen menu's audio...
... support Windows Plug and Play. • A Mac signal adapter (commercially available) may be correct during fast-forwarding and rewinding. • Use a DVI-to connect a Mac computer. If the signal cable has been disconnected and then reconnected, an image may not be required to -HDMI cable compliant with DDWG (Digital Display Working Group) DVI (Digital Visual Interface) revision 1.0 stan- Should this case, switch the HDMI1 or HDMI2 setting at on-screen menu's audio...
Users Manual
Page 187
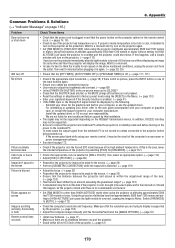
..., lower the internal temperature of the projector. (→ page 12) 170 8. We are not pressed. • Reset the settings or adjustments to factory preset levels using your remote control, it disabled to turn on the projector again. • Set [FAN MODE] to [AUTO]. (→ page 112) • Check the computer's resolution and frequency. Install the updated driver or OS on the above mentioned conditions, unplug the power cord from the notebook PC...
..., lower the internal temperature of the projector. (→ page 12) 170 8. We are not pressed. • Reset the settings or adjustments to factory preset levels using your remote control, it disabled to turn on the projector again. • Set [FAN MODE] to [AUTO]. (→ page 112) • Check the computer's resolution and frequency. Install the updated driver or OS on the above mentioned conditions, unplug the power cord from the notebook PC...

Users Manual
Page 189
... the screen. Refer to owner's manual supplied with the projector, set the DIP switch to your Mac and the projector, changing the DIP switch on the power to take affect. When using a Mac with your Mac. Displaying an image on the notebook PC's screen does not necessarily mean it reads "0kHz", this happen, select [View] → [Arrange] from the notebook PC is not turned on unless connected to the projector before turning on a Mac adapter...
... the screen. Refer to owner's manual supplied with the projector, set the DIP switch to your Mac and the projector, changing the DIP switch on the power to take affect. When using a Mac with your Mac. Displaying an image on the notebook PC's screen does not necessarily mean it reads "0kHz", this happen, select [View] → [Arrange] from the notebook PC is not turned on unless connected to the projector before turning on a Mac adapter...

Users Manual
Page 191
... network Communication Protocol (Connection via HDBaseT) Item Communication speed Supported standard Information 100 Mbps IEEE802.3u (100BASE-TX, Auto-Negotiation) Use the TCP port number 7142 for transmitting and receiving command. PARAMETERS FOR THIS DEVICE Input command Input terminal HDMI1 HDMI2 DisplayPort COMPUTER HDBaseT Response hdmi1 hdmi2 displayport computer hdbaset Parameter hdmi1 or hdmi hdmi2 displayport or displayport1 One among computer, computer1, vga...
... network Communication Protocol (Connection via HDBaseT) Item Communication speed Supported standard Information 100 Mbps IEEE802.3u (100BASE-TX, Auto-Negotiation) Use the TCP port number 7142 for transmitting and receiving command. PARAMETERS FOR THIS DEVICE Input command Input terminal HDMI1 HDMI2 DisplayPort COMPUTER HDBaseT Response hdmi1 hdmi2 displayport computer hdbaset Parameter hdmi1 or hdmi hdmi2 displayport or displayport1 One among computer, computer1, vga...

Users Manual
Page 193
... "Status Indicator (STATUS)". □ Power cord's plug is displayed from [HIGH ALTITUDE] to [AUTO]. □ Image appears blurry or out of focus. □ Still unchanged even though you checked the signal's resolution on a computer signal. □ Input source's resolution and frequency are supported by the projector. □ Some pixels are correctly adjusted on PC and changed it to projector's native resolution. □ Still unchanged even though you adjusted the focus. □ No sound. □ Audio cable is correctly connected...
... "Status Indicator (STATUS)". □ Power cord's plug is displayed from [HIGH ALTITUDE] to [AUTO]. □ Image appears blurry or out of focus. □ Still unchanged even though you checked the signal's resolution on a computer signal. □ Input source's resolution and frequency are supported by the projector. □ Some pixels are correctly adjusted on PC and changed it to projector's native resolution. □ Still unchanged even though you adjusted the focus. □ No sound. □ Audio cable is correctly connected...

Users Manual
Page 194
...: Light operating time (hours): LIGHT MODE: □ NORMAL □ ECO1 □ ECO2 □ LONG LIFE Information on input signal: Horizontal synch frequency [ ] kHz Vertical synch frequency [ ] Hz Synch polarity H V Synch type □ Separate □ Composite □ Sync on application and environment where your problem in □ Blue □ Green □ Orange □ Red Remote control model number: Signal cable NEC standard or other Manufacturer: Model number: 177 In the space below please describe your projector...
...: Light operating time (hours): LIGHT MODE: □ NORMAL □ ECO1 □ ECO2 □ LONG LIFE Information on input signal: Horizontal synch frequency [ ] kHz Vertical synch frequency [ ] Hz Synch polarity H V Synch type □ Separate □ Composite □ Sync on application and environment where your problem in □ Blue □ Green □ Orange □ Red Remote control model number: Signal cable NEC standard or other Manufacturer: Model number: 177 In the space below please describe your projector...

