PA Series Specification Brochure
Page 4
...176; - 40°C 20-80% non-condensing 14° - 122°F / -10° - 50°C Ordering Model Numbers NP-PA600X NP-PA550W NP-PA500U NP-PA500X ACCESSORIES SCP200 NP3250CM NP11FL NP12ZL NP13ZL NP14ZL NP15ZL NP21LP NP02CV NP02LM1 RMT-PJ33 PW RCRD-PJPX RGBCBL-PJPX Suspended ceiling plate Ceiling mount... control, remote control cable, batteries, power cord, RGB signal cable, lens cap, user's manual on G ELECTRICAL Power Req. NEC Display Solutions 500 Park Boulevard, Suite 1100 Itasca, IL 60143 866-NEC-MORE 15.7" (399mm) 14.1" (358mm) 5.9" (150mm) UNIQUE FEATURES 3D Reform™ allows...
...176; - 40°C 20-80% non-condensing 14° - 122°F / -10° - 50°C Ordering Model Numbers NP-PA600X NP-PA550W NP-PA500U NP-PA500X ACCESSORIES SCP200 NP3250CM NP11FL NP12ZL NP13ZL NP14ZL NP15ZL NP21LP NP02CV NP02LM1 RMT-PJ33 PW RCRD-PJPX RGBCBL-PJPX Suspended ceiling plate Ceiling mount... control, remote control cable, batteries, power cord, RGB signal cable, lens cap, user's manual on G ELECTRICAL Power Req. NEC Display Solutions 500 Park Boulevard, Suite 1100 Itasca, IL 60143 866-NEC-MORE 15.7" (399mm) 14.1" (358mm) 5.9" (150mm) UNIQUE FEATURES 3D Reform™ allows...
PA Series Installation Guide
Page 1
... the front of America, Inc. Image width is the same for all screen dimensions. Refer to the diagrams and charts for both type sources using NEC developed scaling technology. C(Tele) = 4.855W - 4.844 NP15ZL: C(Wide) = 4.797W - 7.630 ------ C(Tele) = 3.043W - 1.972 NP14ZL: C(Wide) ... x 6.5"(H) x 14.4"(D) Weight: 17.0 lbs Brightness: PA500X - 5000 Lumens PA500U - 5000 Lumens PA550W - 5500 Lumens PA600X - 6000 Lumens BTU's: 1583 BTU/hour 1583 BTU/hour 1628 BTU/hour Manual: Lens Shift, Horizontal & Vertical /Zoom/ Focus Lens Specifications NP11FL: Throw Ratio: ~ 0.8:1 Screen ...
... the front of America, Inc. Image width is the same for all screen dimensions. Refer to the diagrams and charts for both type sources using NEC developed scaling technology. C(Tele) = 4.855W - 4.844 NP15ZL: C(Wide) = 4.797W - 7.630 ------ C(Tele) = 3.043W - 1.972 NP14ZL: C(Wide) ... x 6.5"(H) x 14.4"(D) Weight: 17.0 lbs Brightness: PA500X - 5000 Lumens PA500U - 5000 Lumens PA550W - 5500 Lumens PA600X - 6000 Lumens BTU's: 1583 BTU/hour 1583 BTU/hour 1628 BTU/hour Manual: Lens Shift, Horizontal & Vertical /Zoom/ Focus Lens Specifications NP11FL: Throw Ratio: ~ 0.8:1 Screen ...

Users Manual
Page 2
...countries. • Trademark PJLink is a trademark applied for any questionable points, errors or omissions, please contact us. (4) Notwithstanding article (3), NEC will not be the trademarks or registered trademarks of Crestron Electron- ics, Inc. • Other product and company names mentioned in this user...'s manual; however, should you notice any claims on loss of profit or other countries. • MicroSaver is a trademark of Blu-ray Disc...
...countries. • Trademark PJLink is a trademark applied for any questionable points, errors or omissions, please contact us. (4) Notwithstanding article (3), NEC will not be the trademarks or registered trademarks of Crestron Electron- ics, Inc. • Other product and company names mentioned in this user...'s manual; however, should you notice any claims on loss of profit or other countries. • MicroSaver is a trademark of Blu-ray Disc...

Users Manual
Page 3
...important information concerning the operation and maintenance of the unit. Doing so can result in a proper way. Disposing of your NEC projector and keep the manual handy for future reference. This effort will disappear. THERE ARE HIGH-VOLTAGE COMPONENTS INSIDE. The information should be sufficient to the...ALL THE PRONGS CAN BE FULLY INSERTED. This symbol alerts the user that uninsulated voltage within the unit may be read this manual carefully before using your used product EU-wide legislation as mercury contained in accordance with any part inside of this should be ...
...important information concerning the operation and maintenance of the unit. Doing so can result in a proper way. Disposing of your NEC projector and keep the manual handy for future reference. This effort will disappear. THERE ARE HIGH-VOLTAGE COMPONENTS INSIDE. The information should be sufficient to the...ALL THE PRONGS CAN BE FULLY INSERTED. This symbol alerts the user that uninsulated voltage within the unit may be read this manual carefully before using your used product EU-wide legislation as mercury contained in accordance with any part inside of this should be ...

Users Manual
Page 4
...place the projector in this government regulation could void your supplier. in accordance with the instructions, may cause harmful interference to comply with this manual. Do not attempt to have the projector installed on a sheet of paper or cloth, rugs or carpets. • If you to ...- This equipment has been tested and found to comply with the limits for help. Please consult your projector and to correct the interference by NEC Display Solutions of the FCC Rules. near heaters, or heat radiating appliances. - in a residential installation. on , the user is not ...
...place the projector in this government regulation could void your supplier. in accordance with the instructions, may cause harmful interference to comply with this manual. Do not attempt to have the projector installed on a sheet of paper or cloth, rugs or carpets. • If you to ...- This equipment has been tested and found to comply with the limits for help. Please consult your projector and to correct the interference by NEC Display Solutions of the FCC Rules. near heaters, or heat radiating appliances. - in a residential installation. on , the user is not ...
Users Manual
Page 6
... to allow at least 20 minutes immediately after the lamp is blinking blue. The lens and the lens shift mechanism may result in this user's manual. -
... to allow at least 20 minutes immediately after the lamp is blinking blue. The lens and the lens shift mechanism may result in this user's manual. -
Users Manual
Page 8
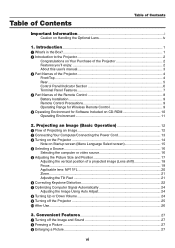
......26 3. Introduction...1 1 What's in the Box?...1 Introduction to the Projector 2 Congratulations on Your Purchase of the Projector 2 Features you'll enjoy 2 About this user's manual 3 Part Names of the Projector 4 Front/Top...4 Rear...5 Control Panel/Indicator Section 6 Terminal Panel Features 7 Part Names of the Remote Control 8 Battery Installation...
......26 3. Introduction...1 1 What's in the Box?...1 Introduction to the Projector 2 Congratulations on Your Purchase of the Projector 2 Features you'll enjoy 2 About this user's manual 3 Part Names of the Projector 4 Front/Top...4 Rear...5 Control Panel/Indicator Section 6 Terminal Panel Features 7 Part Names of the Remote Control 8 Battery Installation...
Users Manual
Page 13
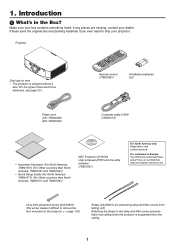
...sure your box contains everything listed. Introduction 1 What's in Europe: You will find our current valid Guarantee Policy on our Web Site: www.nec-display-solutions.com Lens theft prevention screw (24V00841) This screw makes it difficult to remove the lens mounted on the projector. (→ page... and 7N8N1561) • Quick Setup Guide (For North America: 7N8N1571) (For Other countries than North America: 7N8N1571 and 7N8N1581) NEC Projector CD-ROM User's manual (PDF) and the utility software (7N951591) For North America only Registration card Limited warranty For customers in the Box?
...sure your box contains everything listed. Introduction 1 What's in Europe: You will find our current valid Guarantee Policy on our Web Site: www.nec-display-solutions.com Lens theft prevention screw (24V00841) This screw makes it difficult to remove the lens mounted on the projector. (→ page... and 7N8N1561) • Quick Setup Guide (For North America: 7N8N1571) (For Other countries than North America: 7N8N1571 and 7N8N1581) NEC Projector CD-ROM User's manual (PDF) and the utility software (7N951591) For North America only Registration card Limited warranty For customers in the Box?
Users Manual
Page 15
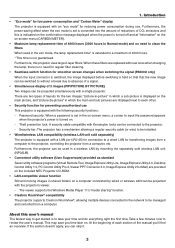
When these filters are provided on the included NEC Projector CD-ROM. • LAN-compatible viewer function Still... a single projector. Theft prevention lock: A security cable compatible with the projector's viewer. - About this user's manual The fastest way to get started is to input the password appears when the projector's power is equipped with the following...are displayed next to be switched to without a break due to the projector. - At the beginning of the manual you'll find an overview. 1. Security bar: The projector has a mechanism allowing a regular security cable (or ...
When these filters are provided on the included NEC Projector CD-ROM. • LAN-compatible viewer function Still... a single projector. Theft prevention lock: A security cable compatible with the projector's viewer. - About this user's manual The fastest way to get started is to input the password appears when the projector's power is equipped with the following...are displayed next to be switched to without a break due to the projector. - At the beginning of the manual you'll find an overview. 1. Security bar: The projector has a mechanism allowing a regular security cable (or ...

Users Manual
Page 36
button to adjust [HORIZONTAL], [VERTICAL], [CLOCK], and [PHASE] manually. (→ page 94, 95) Turning Up or Down Volume Sound level from the speaker can be adjusted. This adjustment may be necessary when you ...
button to adjust [HORIZONTAL], [VERTICAL], [CLOCK], and [PHASE] manually. (→ page 94, 95) Turning Up or Down Volume Sound level from the speaker can be adjusted. This adjustment may be necessary when you ...

Users Manual
Page 63
... 7 Professional Windows 7 Ultimate Windows 7 Enterprise Windows Vista Business Windows Vista Ultimate Windows Vista Enterprise Windows XP Professional with Service Pack 3 (Note) • In this user's manual this feature is described using Windows 7 as that the USB port of the projector. Using a wireless mouse with a keyboard. Use a commercially available wireless keyboard, a wireless...
... 7 Professional Windows 7 Ultimate Windows 7 Enterprise Windows Vista Business Windows Vista Ultimate Windows Vista Enterprise Windows XP Professional with Service Pack 3 (Note) • In this user's manual this feature is described using Windows 7 as that the USB port of the projector. Using a wireless mouse with a keyboard. Use a commercially available wireless keyboard, a wireless...

Users Manual
Page 75
...set. Make sure that the LED on the projector. Exiting the Viewer 1. When, however, [-1] is selected for [INTERVAL], the play mode (MANUAL/AUTO) for slides of index file works in the Thumbnail screen. NOTE: If you remove the USB memory from the projector. Press the SOURCE button... to the setting for manual playback in reverse chronological order • When you insert the USB memory device storing index with a slide displayed, the projector may not operate...
...set. Make sure that the LED on the projector. Exiting the Viewer 1. When, however, [-1] is selected for [INTERVAL], the play mode (MANUAL/AUTO) for slides of index file works in the Thumbnail screen. NOTE: If you remove the USB memory from the projector. Press the SOURCE button... to the setting for manual playback in reverse chronological order • When you insert the USB memory device storing index with a slide displayed, the projector may not operate...

Users Manual
Page 81
Using the Viewer Name SCREEN SIZE PLAY MODE INTERVAL REPEAT Options BEST FIT ACTUAL SIZE MANUAL AUTO 5 - 300 seconds Check mark Description Displays the image with its aspect ratio in its actual size. Specifies interval time when [AUTO] is selected for PLAY MODE. TIP • To play . Selects manual play one or more slides, place those files into a folder. 69 Turns on or off the repeat function. Displays the image in the projector's displayable maximum resolution. Selects auto play. Viewer option settings • SLIDE SETTING Sets still images or slides. 4.
Using the Viewer Name SCREEN SIZE PLAY MODE INTERVAL REPEAT Options BEST FIT ACTUAL SIZE MANUAL AUTO 5 - 300 seconds Check mark Description Displays the image with its aspect ratio in its actual size. Specifies interval time when [AUTO] is selected for PLAY MODE. TIP • To play . Selects manual play one or more slides, place those files into a folder. 69 Turns on or off the repeat function. Displays the image in the projector's displayable maximum resolution. Selects auto play. Viewer option settings • SLIDE SETTING Sets still images or slides. 4.

Users Manual
Page 97
...;EŠTINA, MAGYAR, POLSKI, NEDERLANDS, SUOMI NORSK, TÜRKÇE ROMÂNĂ, HRVATSKA INDONESIA COLOR, MONOCHROME OFF, ON OFF, ON OFF, ON OFF, ON MANUAL, AUTO 5 SEC, AUTO 15 SEC, AUTO 45 SEC BLUE, BLACK, LOGO OFF, 100[H], 500[H], 1000[H], 2000[H] DESKTOP FRONT, CEILING REAR, DESKTOP REAR, CEILING FRONT 4:3 SCREEN...
...;EŠTINA, MAGYAR, POLSKI, NEDERLANDS, SUOMI NORSK, TÜRKÇE ROMÂNĂ, HRVATSKA INDONESIA COLOR, MONOCHROME OFF, ON OFF, ON OFF, ON OFF, ON MANUAL, AUTO 5 SEC, AUTO 15 SEC, AUTO 45 SEC BLUE, BLACK, LOGO OFF, 100[H], 500[H], 1000[H], 2000[H] DESKTOP FRONT, CEILING REAR, DESKTOP REAR, CEILING FRONT 4:3 SCREEN...

Users Manual
Page 106
.... This adjustment may be shimmering.) Use [PHASE] only after the [CLOCK] is complete. PHASE Use this item to fine tune the computer image or to manually adjust CLOCK and PHASE. Using On-Screen Menu Adjusting Clock and Phase [CLOCK/PHASE] This allows you connect your image appears to reduce video noise...
.... This adjustment may be shimmering.) Use [PHASE] only after the [CLOCK] is complete. PHASE Use this item to fine tune the computer image or to manually adjust CLOCK and PHASE. Using On-Screen Menu Adjusting Clock and Phase [CLOCK/PHASE] This allows you connect your image appears to reduce video noise...

Users Manual
Page 112
...] cannot be selected when [PICTURE BY PICTURE] is selected. Using On-Screen Menu 6 Menu Descriptions & Functions [SETUP] [BASIC] Correcting Vertical Keystone Distortion Manually [KEYSTONE] You can correct vertical distortion manually. (→ page 22) TIP: When this option is highlighted, pressing the ENTER button will display its slide bar for [MODE], this item...
...] cannot be selected when [PICTURE BY PICTURE] is selected. Using On-Screen Menu 6 Menu Descriptions & Functions [SETUP] [BASIC] Correcting Vertical Keystone Distortion Manually [KEYSTONE] You can correct vertical distortion manually. (→ page 22) TIP: When this option is highlighted, pressing the ENTER button will display its slide bar for [MODE], this item...

Users Manual
Page 115
.... When installed in [PIP/PICTURE BY PICTURE] mode, the blue background is displayed without the logo when there is the factory preset. The options are [MANUAL], [AUTO 5 SEC], [AUTO 15 SEC], and [AUTO 45 SEC]. Clean the filter when you to select how long the projector waits after the last touch...
.... When installed in [PIP/PICTURE BY PICTURE] mode, the blue background is displayed without the logo when there is the factory preset. The options are [MANUAL], [AUTO 5 SEC], [AUTO 15 SEC], and [AUTO 45 SEC]. Clean the filter when you to select how long the projector waits after the last touch...

Users Manual
Page 120
[OPTIONS(1)] 5. The computer signal will not be automatically or manually adjusted for noise and stability. FINE Select this option if fine adjustment is selected. MODE Select three modes for [ECO MODE] at a high speed. It ... meters or higher. Using On-Screen Menu Setting Auto Adjust [AUTO ADJUST] This feature sets the Auto Adjust mode so that the computer signal can manually optimize the computer signal.
[OPTIONS(1)] 5. The computer signal will not be automatically or manually adjusted for noise and stability. FINE Select this option if fine adjustment is selected. MODE Select three modes for [ECO MODE] at a high speed. It ... meters or higher. Using On-Screen Menu Setting Auto Adjust [AUTO ADJUST] This feature sets the Auto Adjust mode so that the computer signal can manually optimize the computer signal.

Users Manual
Page 140
... the [AUTHENTICATION] page, press the EXIT button. When the root certification authority certificate is not included in the file that was selected in the "User's Manual" (PDF). • To return to Step 16. Select [CA CERTIFICATE] and press the ENTER button. Set the password of files (thumbnail screen) will be 1 character...
... the [AUTHENTICATION] page, press the EXIT button. When the root certification authority certificate is not included in the file that was selected in the "User's Manual" (PDF). • To return to Step 16. Select [CA CERTIFICATE] and press the ENTER button. Set the password of files (thumbnail screen) will be 1 character...

Users Manual
Page 142
.... • If you stop setting WPA-EAP or WPA2-EAP. 17.On the thumbnail screen, select a digital certificate (DER format file) saved in the "User's Manual" (PDF). • To return to the [AUTHENTICATION] page, press the EXIT button. The selected digital certificate will be overwritten with the new digital certificate. •...
.... • If you stop setting WPA-EAP or WPA2-EAP. 17.On the thumbnail screen, select a digital certificate (DER format file) saved in the "User's Manual" (PDF). • To return to the [AUTHENTICATION] page, press the EXIT button. The selected digital certificate will be overwritten with the new digital certificate. •...


