

P350W : spec brochure
Page 2
... the projector 5000-hour filter life NEC is required, thereby decreasing your total cost of time. Geometric correction allows these models to the screen. Virtual Remote™ (DDC/CI) Used over the VGA cable, you begin presenting in seconds while quick shutdown (immediate power off with the NEC P Series. Cornerstone Enhanced keystone correction allows for horizontal, vertical and diagonal image correction for additional control cables. This virtually maintenance-free filter...
... the projector 5000-hour filter life NEC is required, thereby decreasing your total cost of time. Geometric correction allows these models to the screen. Virtual Remote™ (DDC/CI) Used over the VGA cable, you begin presenting in seconds while quick shutdown (immediate power off with the NEC P Series. Cornerstone Enhanced keystone correction allows for horizontal, vertical and diagonal image correction for additional control cables. This virtually maintenance-free filter...
P350W : spec brochure
Page 4
... connected to ) P350X: 4000 hours normal / 5000 hours eco P350W/P420X: 3000 hours normal / 3500 hours eco Screen Size (diagonal) 25 - 300 in lens cover, user's manual on G ELECTRICAL Power Req. whichever comes first. 15.7" (398mm) 11.1" (282mm) 4.5" (115mm) UNIQUE FEATURES Advanced AccuBlend ensures detailed images when non-native resolution sources are trademarks of NEC Display Solutions. IN THE BOX Remote control, batteries, power cord, RGB signal cable, built-in ., 0.64 - 7.6m Throw Ratio 1.3 - 2.2 Projection Distance...
... connected to ) P350X: 4000 hours normal / 5000 hours eco P350W/P420X: 3000 hours normal / 3500 hours eco Screen Size (diagonal) 25 - 300 in lens cover, user's manual on G ELECTRICAL Power Req. whichever comes first. 15.7" (398mm) 11.1" (282mm) 4.5" (115mm) UNIQUE FEATURES Advanced AccuBlend ensures detailed images when non-native resolution sources are trademarks of NEC Display Solutions. IN THE BOX Remote control, batteries, power cord, RGB signal cable, built-in ., 0.64 - 7.6m Throw Ratio 1.3 - 2.2 Projection Distance...

P350W : user's manual
Page 5
... the lens is on a power supply of the projector. Allow at least 4 inches (10cm) of the projector. • Do not touch the power plug during normal projector operation. The light path being projected from the front) as a fire or injury to cover the lens while the projector is extensive, therefore any way other object than the desktop and ceiling mount, otherwise lamp life could result. • Keep any...
... the lens is on a power supply of the projector. Allow at least 4 inches (10cm) of the projector. • Do not touch the power plug during normal projector operation. The light path being projected from the front) as a fire or injury to cover the lens while the projector is extensive, therefore any way other object than the desktop and ceiling mount, otherwise lamp life could result. • Keep any...
P350W : user's manual
Page 15
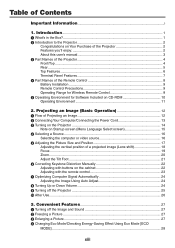
...Power Cord 13 Turning on the Projector 14 Note on Startup screen (Menu Language Select screen 15 Selecting a Source...16 Selecting the computer or video source 16 Adjusting the Picture Size and Position 17 Adjusting the vertical position of the Remote Control 8 Battery Installation...9 Remote Control Precautions 9 Operating Range for Wireless Remote Control 9 Operating Environment for Software Included on the cabinet 22 Adjusting with the remote control 23 Optimizing Computer Signal Automatically 24 Adjusting the Image Using Auto Adjust...
...Power Cord 13 Turning on the Projector 14 Note on Startup screen (Menu Language Select screen 15 Selecting a Source...16 Selecting the computer or video source 16 Adjusting the Picture Size and Position 17 Adjusting the vertical position of the Remote Control 8 Battery Installation...9 Remote Control Precautions 9 Operating Range for Wireless Remote Control 9 Operating Environment for Software Included on the cabinet 22 Adjusting with the remote control 23 Optimizing Computer Signal Automatically 24 Adjusting the Image Using Auto Adjust...

P350W : user's manual
Page 20
... remote control or cabinet control panel. No cool down . The projector enables you to project precise images up to [AUTO ECO], [ECO1], or [ECO2]*2. Features you to prolong the projector's lamp life up to 5000 hours (up to 5000 hours (P350X)/3500 hours (P420X/P350W) without cleaning the filters regularly Using in Eco Mode allows you 'll enjoy: • Quick start time is only when [STANDBY MODE] is set to 3000 hours in NORMAL Mode (ECO Mode...
... remote control or cabinet control panel. No cool down . The projector enables you to project precise images up to [AUTO ECO], [ECO1], or [ECO2]*2. Features you to prolong the projector's lamp life up to 5000 hours (up to 5000 hours (P350X)/3500 hours (P420X/P350W) without cleaning the filters regularly Using in Eco Mode allows you 'll enjoy: • Quick start time is only when [STANDBY MODE] is set to 3000 hours in NORMAL Mode (ECO Mode...

P350W : user's manual
Page 21
...), AUTO POWER OFF, and OFF TIMER features eliminate the need of the manual you can be operated separately and independently with the same single remote control by assigning an ID number to each projector. • Vertical keystone correction Keystone feature allows the projector to correct vertical distortion. • USB Display Using a commercially available USB cable (compatible with USB 2.0 specifications) to review the user's manual. Take a few minutes now to connect the computer with wireless networking...
...), AUTO POWER OFF, and OFF TIMER features eliminate the need of the manual you can be operated separately and independently with the same single remote control by assigning an ID number to each projector. • Vertical keystone correction Keystone feature allows the projector to correct vertical distortion. • USB Display Using a commercially available USB cable (compatible with USB 2.0 specifications) to review the user's manual. Take a few minutes now to connect the computer with wireless networking...

P350W : user's manual
Page 31
... outlet ← CAUTION: Parts of the supplied power cord in the wall outlet. Projecting an Image (Basic Operation) Connecting Your Computer/Connecting the Power Cord 1. Use caution when picking up the projector. 13 For information about other plug of the projector may become temporarily heated if the projector is turned off with the POWER button or if the AC power supply is selected for [STANDBY MODE]. See the Power Indicator section.(→ page...
... outlet ← CAUTION: Parts of the supplied power cord in the wall outlet. Projecting an Image (Basic Operation) Connecting Your Computer/Connecting the Power Cord 1. Use caution when picking up the projector. 13 For information about other plug of the projector may become temporarily heated if the projector is turned off with the POWER button or if the AC power supply is selected for [STANDBY MODE]. See the Power Indicator section.(→ page...

P350W : user's manual
Page 33
... internal system. Wait 3 to 5 minutes until the lamp lighting is stabilized. • When the projector is blinking blue in a cycle of usable life, the projector will display the image. 15 2. Failing to do so could result in again. If this happens, replace the lamp. • If the STATUS indicator lights orange with the power button pressed, it in no stand-by turning it off. (→ page 95) •...
... internal system. Wait 3 to 5 minutes until the lamp lighting is stabilized. • When the projector is blinking blue in a cycle of usable life, the projector will display the image. 15 2. Failing to do so could result in again. If this happens, replace the lamp. • If the STATUS indicator lights orange with the power button pressed, it in no stand-by turning it off. (→ page 95) •...

P350W : user's manual
Page 46
.... Changing Eco Mode/Checking Energy-Saving Effect Using Eco Mode [ECO MODE] The ECO MODE (ECO1 and ECO2) increases lamp life, while lowering power consumption and cutting down on the image. Press the D-ZOOM (−) button. Status of the screen. • Displaying the menu will be selected: [OFF], [AUTO ECO], [ECO1] and [ECO2] modes. [ECO MODE] [OFF] Description This is the default setting (100% Brightness). Steady Green light 28 Each time the D-ZOOM (−) button is...
.... Changing Eco Mode/Checking Energy-Saving Effect Using Eco Mode [ECO MODE] The ECO MODE (ECO1 and ECO2) increases lamp life, while lowering power consumption and cutting down on the image. Press the D-ZOOM (−) button. Status of the screen. • Displaying the menu will be selected: [OFF], [AUTO ECO], [ECO1] and [ECO2] modes. [ECO MODE] [OFF] Description This is the default setting (100% Brightness). Steady Green light 28 Each time the D-ZOOM (−) button is...

P350W : user's manual
Page 54
... USB Wireless LAN Unit is connected to a wired/wireless network, lamp replace time or error messages will be sent via the network connected to the computer with a commercially available LAN cable. (→ page 138) 2. Operating the projector Power on the computer via e-mail. 3. Setting Alert Mail (ALERT MAIL) When the projector is required. (→ page 139) (The North American models are available: • Start the Web browser on /off, selecting input, volume control and picture adjustments...
... USB Wireless LAN Unit is connected to a wired/wireless network, lamp replace time or error messages will be sent via the network connected to the computer with a commercially available LAN cable. (→ page 138) 2. Operating the projector Power on the computer via e-mail. 3. Setting Alert Mail (ALERT MAIL) When the projector is required. (→ page 139) (The North American models are available: • Start the Web browser on /off, selecting input, volume control and picture adjustments...

P350W : user's manual
Page 59
... This option will turn off the Alert Mail feature. A domain name must be 15 or less. Should this happen, check if network settings are at the end of its usable life. RECIPIENT'S ADDRESS Enter your computer of a message to the projector. Enter the hostname of the network connected to the projector. Sample of lamp replace time or error messages via e-mail when using wireless or wired LAN. Placing a checkmark...
... This option will turn off the Alert Mail feature. A domain name must be 15 or less. Should this happen, check if network settings are at the end of its usable life. RECIPIENT'S ADDRESS Enter your computer of a message to the projector. Enter the hostname of the network connected to the projector. Sample of lamp replace time or error messages via e-mail when using wireless or wired LAN. Placing a checkmark...

P350W : user's manual
Page 99
... DISPLAY * The asterisk (*) indicates that the default setting varies depending on the signal. 81 RESET ORIENTATION INSTALLATION CONTROL PANEL LOCK SECURITY COMMUNICATION SPEED REMOTE SENSOR CONTROL ID CONTROL ID NUMBER CONTROL ID TEST PATTERN NETWORK SETTINGS AUTO ADJUST FAN MODE COMPUTER1 COMPUTER2 SIGNAL SELECT VIDEO OPTIONS(1) S-VIDEO WXGA MODE DEINTERLACE HDMI SETTINGS VIDEO LEVEL AUDIO SELECT BEEP TOOLS OPTIONS(2) STANDBY MODE AUTO POWER ON(AC) AUTO POWER ON(COMP1) AUTO POWER OFF DEFAULT SOURCE SELECT LAMP LIFE REMAINING USAGE TIME LAMP HOURS USED FILTER HOURS...
... DISPLAY * The asterisk (*) indicates that the default setting varies depending on the signal. 81 RESET ORIENTATION INSTALLATION CONTROL PANEL LOCK SECURITY COMMUNICATION SPEED REMOTE SENSOR CONTROL ID CONTROL ID NUMBER CONTROL ID TEST PATTERN NETWORK SETTINGS AUTO ADJUST FAN MODE COMPUTER1 COMPUTER2 SIGNAL SELECT VIDEO OPTIONS(1) S-VIDEO WXGA MODE DEINTERLACE HDMI SETTINGS VIDEO LEVEL AUDIO SELECT BEEP TOOLS OPTIONS(2) STANDBY MODE AUTO POWER ON(AC) AUTO POWER ON(COMP1) AUTO POWER OFF DEFAULT SOURCE SELECT LAMP LIFE REMAINING USAGE TIME LAMP HOURS USED FILTER HOURS...

P350W : user's manual
Page 150
... pin adapter (not supplied) to connect to your remote control, it outputs a signal to the projector. Enabling the computer's external display Displaying an image on the power to the projector before turning on the notebook PC's screen does not necessarily mean it may be the result of the "Fn" key along with USB 2.0 specifications) HDMI cable (not supplied) Use High Speed HDMI® Cable. NOTE: • When [VIEWER], [NETWORK], or [USB DISPLAY] is selected for [SOURCE], sound from...
... pin adapter (not supplied) to connect to your remote control, it outputs a signal to the projector. Enabling the computer's external display Displaying an image on the power to the projector before turning on the notebook PC's screen does not necessarily mean it may be the result of the "Fn" key along with USB 2.0 specifications) HDMI cable (not supplied) Use High Speed HDMI® Cable. NOTE: • When [VIEWER], [NETWORK], or [USB DISPLAY] is selected for [SOURCE], sound from...
P350W : user's manual
Page 173
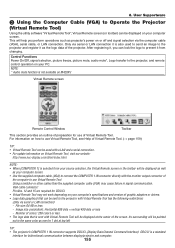
... screen. • Use the supplied computer cable (VGA) to the projector and register it , you perform operations such as the logo data of Virtual Remote Tool. (→ page 159) TIP: • Virtual Remote Tool can be sent to use Virtual Remote Tool. Control Functions Power On/Off, signal selection, picture freeze, picture mute, audio mute*, Logo transfer to use of preparation for bidirectional communication between display/projector and computer. 155 Virtual Remote screen Remote Control Window...
... screen. • Use the supplied computer cable (VGA) to the projector and register it , you perform operations such as the logo data of Virtual Remote Tool. (→ page 159) TIP: • Virtual Remote Tool can be sent to use Virtual Remote Tool. Control Functions Power On/Off, signal selection, picture freeze, picture mute, audio mute*, Logo transfer to use of preparation for bidirectional communication between display/projector and computer. 155 Virtual Remote screen Remote Control Window...

P350W : user's manual
Page 196
This displays a list of Windows 7/Windows Vista, the User Account Control Window is started on computer 1 Click Windows [Start] → [All Programs] → [NEC Projector User Supportware] → [Desktop Control Utility 1.0] → [Desktop Control], in case you are using. 2 Select the network device to use and click [OK]. Click "Unblock" if this is displayed. Click [OK] or input the administrator password. Screen when Desktop Control Utility 1.0 is started first time Screen if starting password has been set already IMPORTANT...
This displays a list of Windows 7/Windows Vista, the User Account Control Window is started on computer 1 Click Windows [Start] → [All Programs] → [NEC Projector User Supportware] → [Desktop Control Utility 1.0] → [Desktop Control], in case you are using. 2 Select the network device to use and click [OK]. Click "Unblock" if this is displayed. Click [OK] or input the administrator password. Screen when Desktop Control Utility 1.0 is started first time Screen if starting password has been set already IMPORTANT...

P350W : user's manual
Page 210
... displayed. Orange CONTROL PANEL LOCK is on . You have pressed cabinet button when Control Panel Lock is on . Lamp replace- Appendix Troubleshooting This section helps you resolve problems you are presenting is getting ready to a cooler location if the room where you may encounter while setting up or using the projector. Off Timer is set to [AUTO ECO], [ECO1], or - [ECO2] Note Over-Temperature Protection If the temperature inside of life. Indicator Messages Power Indicator Indicator Condition Blinking light Steady light...
... displayed. Orange CONTROL PANEL LOCK is on . You have pressed cabinet button when Control Panel Lock is on . Lamp replace- Appendix Troubleshooting This section helps you resolve problems you are presenting is getting ready to a cooler location if the room where you may encounter while setting up or using the projector. Off Timer is set to [AUTO ECO], [ECO1], or - [ECO2] Note Over-Temperature Protection If the temperature inside of life. Indicator Messages Power Indicator Indicator Condition Blinking light Steady light...

P350W : user's manual
Page 211
... screen Picture is blurred Flicker appears on screen Image is scrolling vertically, horizontally or both Remote control does not work Indicator is lit or blinking Cross color in RGB mode Check These Items • Check that the power cord is plugged in and that the power button on the projector cabinet or the remote control is on. (→ pages 13, 14) • Ensure that the lens cover is open. (→ page 5) • Reset the settings or adjustments...
... screen Picture is blurred Flicker appears on screen Image is scrolling vertically, horizontally or both Remote control does not work Indicator is lit or blinking Cross color in RGB mode Check These Items • Check that the power cord is plugged in and that the power button on the projector cabinet or the remote control is on. (→ pages 13, 14) • Ensure that the lens cover is open. (→ page 5) • Reset the settings or adjustments...

P350W : user's manual
Page 212
... Macintosh and the projector, changing the DIP switch on the power to connect the projector and notebook PC while the projector is not displayed correctly. 9. Be sure to the notebook PC. Displaying an image on process for detailed information. • Image displayed is not an industry standard, the projected image may not be displayed correctly. When using a PC compatible laptop, a combination of the Mac adapter (not supplied with a Macintosh PowerBook...
... Macintosh and the projector, changing the DIP switch on the power to connect the projector and notebook PC while the projector is not displayed correctly. 9. Be sure to the notebook PC. Displaying an image on process for detailed information. • Image displayed is not an industry standard, the projected image may not be displayed correctly. When using a PC compatible laptop, a combination of the Mac adapter (not supplied with a Macintosh PowerBook...

P350W : user's manual
Page 218
... Control Codes and Cable Connection PC Control Codes Function POWER ON POWER OFF INPUT SELECT COMPUTER 1 INPUT SELECT COMPUTER 2 INPUT SELECT HDMI INPUT SELECT VIDEO INPUT SELECT S-VIDEO INPUT SELECT VIEWER INPUT SELECT NETWORK INPUT SELECT USB DISPLAY PICTURE MUTE ON PICTURE MUTE OFF SOUND MUTE ON SOUND MUTE OFF Code Data ...cable to simplify cable connection. NOTE 3: For long cable runs it is recommended to set communication speed within projector menus to Send" together on the equipment, a lower baud rate may be recommended for a full list of PC NOTE 1: Pins 1, 4, 6 and 9 are no used...
... Control Codes and Cable Connection PC Control Codes Function POWER ON POWER OFF INPUT SELECT COMPUTER 1 INPUT SELECT COMPUTER 2 INPUT SELECT HDMI INPUT SELECT VIDEO INPUT SELECT S-VIDEO INPUT SELECT VIEWER INPUT SELECT NETWORK INPUT SELECT USB DISPLAY PICTURE MUTE ON PICTURE MUTE OFF SOUND MUTE ON SOUND MUTE OFF Code Data ...cable to simplify cable connection. NOTE 3: For long cable runs it is recommended to set communication speed within projector menus to Send" together on the equipment, a lower baud rate may be recommended for a full list of PC NOTE 1: Pins 1, 4, 6 and 9 are no used...

P350W : user's manual
Page 219
... AUTO ADJUST button. Still unchanged even though you press the AUTO ADJUST button. No obstacles between the sensor of focus. Batteries are new and are correctly adjusted on or is shifted in the projector's menu. Still unchanged even though you change [FAN MODE] from your check. 9. Lamp cover is too dark. Lamp Hours Used (lamp operation hours) was cleared after lamp replacement. [OFF TIMER] is turned off (only models with the [CONTROL PANEL LOCK] function) [CONTROL PANEL LOCK] is not turned on a computer signal. Still no image...
... AUTO ADJUST button. Still unchanged even though you press the AUTO ADJUST button. No obstacles between the sensor of focus. Batteries are new and are correctly adjusted on or is shifted in the projector's menu. Still unchanged even though you change [FAN MODE] from your check. 9. Lamp cover is too dark. Lamp Hours Used (lamp operation hours) was cleared after lamp replacement. [OFF TIMER] is turned off (only models with the [CONTROL PANEL LOCK] function) [CONTROL PANEL LOCK] is not turned on a computer signal. Still no image...


