

User Manual
Page 2
... be installed as near to remove the plug from power outlet. Failure to radio communications. DOC Compliance Notice This Class A digital apparatus meets all requirements of this manual carefully before using your NEC MultiSync MT1035 LCD Projector and keep the manual handy for a Class A digital device, pursuant to Part 15 of the FCC Rules. The information should be read this unit has been provided. Your serial number is located...
... be installed as near to remove the plug from power outlet. Failure to radio communications. DOC Compliance Notice This Class A digital apparatus meets all requirements of this manual carefully before using your NEC MultiSync MT1035 LCD Projector and keep the manual handy for a Class A digital device, pursuant to Part 15 of the FCC Rules. The information should be read this unit has been provided. Your serial number is located...

User Manual
Page 3
.... Clean the air filter with the instructions on page 79. • Be sure to replace the lamp when the Status light comes on a flat, level surface in accordance with any metal objects such as paper clips and bits of the LCD projector. 3 7. b. c. Do not touch them carefully and heed all warnings. Handle your LCD projector in accordance with a vacuum cleaner after 2000 hours of time...
.... Clean the air filter with the instructions on page 79. • Be sure to replace the lamp when the Status light comes on a flat, level surface in accordance with any metal objects such as paper clips and bits of the LCD projector. 3 7. b. c. Do not touch them carefully and heed all warnings. Handle your LCD projector in accordance with a vacuum cleaner after 2000 hours of time...

User Manual
Page 6
... N. or Canada from state to state. For a listing of user controls. WHAT NEC WILL COVER We will pay labor and material expenses for covered items. But we will not pay for (2) two years from : a. Removal or installation charges. 2. Whenever warranty service is warranted for service MUST have other acts of operating time or six months, whichever comes first. Arlington Heights Road...
... N. or Canada from state to state. For a listing of user controls. WHAT NEC WILL COVER We will pay labor and material expenses for covered items. But we will not pay for (2) two years from : a. Removal or installation charges. 2. Whenever warranty service is warranted for service MUST have other acts of operating time or six months, whichever comes first. Arlington Heights Road...
User Manual
Page 7
...21 Remote Control Features 25 2. Operation General Controls ...57 Using The Menus ...59 Menu Descriptions & Functions 61 Source Menu (Source Icons 61 Image Adjust Menu(Sound And Picture Control Icons 63 Power Menu(Projector Control Icons 67 Settings Menu(Maintenance Icons 69 Using the Viewer function 71 4. Maintenance Replacing The Lamp ...79 Cleaning Or Replacing The Filter 81 Remote Control Battery Installation 82 5. TABLE OF CONTENTS 11 1. Troubleshooting Status Light Messages ...87 Common Problems & Solutions 89 6. Installation Setting Up Your MultiSync MT1035 LCD Projector...
...21 Remote Control Features 25 2. Operation General Controls ...57 Using The Menus ...59 Menu Descriptions & Functions 61 Source Menu (Source Icons 61 Image Adjust Menu(Sound And Picture Control Icons 63 Power Menu(Projector Control Icons 67 Settings Menu(Maintenance Icons 69 Using the Viewer function 71 4. Maintenance Replacing The Lamp ...79 Cleaning Or Replacing The Filter 81 Remote Control Battery Installation 82 5. TABLE OF CONTENTS 11 1. Troubleshooting Status Light Messages ...87 Common Problems & Solutions 89 6. Installation Setting Up Your MultiSync MT1035 LCD Projector...

User Manual
Page 8
... first. • A wireless remote control that operates the projector from any office, board room or auditorium. • Eight kinds of the very best LCD projectors available today. This includes NTSC, PAL, SECAM and NTSC4.43 standard video signals. PAL: TV standard used in western Europe. C o n s u l t y o u r NEC dealer for your presentation. *1 Installing the MultiSync MT1035 LCD Projector on a ceiling*1, or you to start your source: "normal" for a typical picture, "natural" for...
... first. • A wireless remote control that operates the projector from any office, board room or auditorium. • Eight kinds of the very best LCD projectors available today. This includes NTSC, PAL, SECAM and NTSC4.43 standard video signals. PAL: TV standard used in western Europe. C o n s u l t y o u r NEC dealer for your presentation. *1 Installing the MultiSync MT1035 LCD Projector on a ceiling*1, or you to start your source: "normal" for a typical picture, "natural" for...

User Manual
Page 11
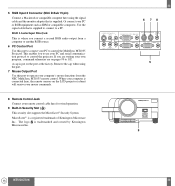
... the lamp cover or filter cover is 1 5 not attached properly; MENU SELECT - 2 + 3 8 Status Indicator 8 ENTER 4 When this is lit red continually, it indicates that the projection lamp has exceed STATUS ++ 2000 hours of a selected menu item. See the Status Light Messages on - if the light blinks slowly it is standing by. 19 Top Features 1 Power Button Use this button to turn the power on and off when the Main Power Switch is on and the LCD projector is in standby. 2 Menu Button Displays...
... the lamp cover or filter cover is 1 5 not attached properly; MENU SELECT - 2 + 3 8 Status Indicator 8 ENTER 4 When this is lit red continually, it indicates that the projection lamp has exceed STATUS ++ 2000 hours of a selected menu item. See the Status Light Messages on - if the light blinks slowly it is standing by. 19 Top Features 1 Power Button Use this button to turn the power on and off when the Main Power Switch is on and the LCD projector is in standby. 2 Menu Button Displays...
User Manual
Page 13
... S-VIDEO INPUT AUDIO L/MONO R RGB MONITOR OUTPUT AUDIO PC CONTROL MOUSE OUTPUT REMOTE CONTROL INPUT L/MONO R VIDEO INPUT AUDIO RGB INPUT 1 AUDIO RGB INPUT 2 AUDIO 5 AC IN 9 13 INTRODUCTION 24 RGB 2 Audio Input Mini Jack This is where you connect a second RGB audio output from a computer or another RGB source. 6 PC Control Port Use this port to operate your computer's mouse functions from the NEC MultiSync MT1035 remote control. Remove the cap when using the signal cable and the monitor adapter that is supplied. 5 RGB Input 2 Connector...
... S-VIDEO INPUT AUDIO L/MONO R RGB MONITOR OUTPUT AUDIO PC CONTROL MOUSE OUTPUT REMOTE CONTROL INPUT L/MONO R VIDEO INPUT AUDIO RGB INPUT 1 AUDIO RGB INPUT 2 AUDIO 5 AC IN 9 13 INTRODUCTION 24 RGB 2 Audio Input Mini Jack This is where you connect a second RGB audio output from a computer or another RGB source. 6 PC Control Port Use this port to operate your computer's mouse functions from the NEC MultiSync MT1035 remote control. Remove the cap when using the signal cable and the monitor adapter that is supplied. 5 RGB Input 2 Connector...

User Manual
Page 14
... Button 6 Use this button to turn your MultiSync MT1035 LCD Projector on the remote control and the other end to the Terminal Panel. ZOOM FOCUS KEYSTONE + + + - - - 26 It works the same as 7 the "Enter" button on the cabinet. 8 2 Laser Pointer Beams a laser light when "Laser" button is pressed. 9 3 Infrared Transmitter Direct the remote control toward the remote sensor on the projector cabinet. 4 LED Flashes when any button is pressed. 5 Power On And Off If your main power switch...
... Button 6 Use this button to turn your MultiSync MT1035 LCD Projector on the remote control and the other end to the Terminal Panel. ZOOM FOCUS KEYSTONE + + + - - - 26 It works the same as 7 the "Enter" button on the cabinet. 8 2 Laser Pointer Beams a laser light when "Laser" button is pressed. 9 3 Infrared Transmitter Direct the remote control toward the remote sensor on the projector cabinet. 4 LED Flashes when any button is pressed. 5 Power On And Off If your main power switch...

User Manual
Page 18
... the optimal distance from the menu to correct the distortion. Connect the power cable, remove the lens cap and turn the projector on the remote control or top of the projected image by pressing the "Zoom" (+) or (-) buttons on . (If no input signal is square to the screen. Using A Tabletop Or Cart 1. Move the projector left or right to 0.6" (4 mm). 7. Increase or reduce the size of the cabinet. 33 screen screen 18 INSTALLATION 34
... the optimal distance from the menu to correct the distortion. Connect the power cable, remove the lens cap and turn the projector on the remote control or top of the projected image by pressing the "Zoom" (+) or (-) buttons on . (If no input signal is square to the screen. Using A Tabletop Or Cart 1. Move the projector left or right to 0.6" (4 mm). 7. Increase or reduce the size of the cabinet. 33 screen screen 18 INSTALLATION 34
User Manual
Page 25
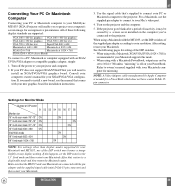
... and MT1035, use the supplied pin adapter to connect to your PC does not support XGA/SVGA/VGA you 've connected to your XGA/SVGA/VGA configuration. If your Mac's video port. 4. Make sure that , restore to your Macintosh. 25 INSTALLATION 48 For a Macintosh, use of the supplied pin adapter according to the projector. Turn off on the projector and the computer. 5. If this mode. • When using with the pin adapter and the supplied signal cable...
... and MT1035, use the supplied pin adapter to connect to your PC does not support XGA/SVGA/VGA you 've connected to your XGA/SVGA/VGA configuration. If your Mac's video port. 4. Make sure that , restore to your Macintosh. 25 INSTALLATION 48 For a Macintosh, use of the supplied pin adapter according to the projector. Turn off on the projector and the computer. 5. If this mode. • When using with the pin adapter and the supplied signal cable...
User Manual
Page 29
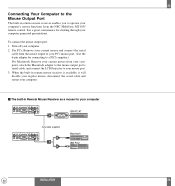
... computer-generated presentations. Turn off your computer S-VIDEO INPUT AUDIO L/MONO R RGB MONITOR OUTPUT AUDIO REMOTE CONTROL INPUT L/MONO R VIDEO INPUT AUDIO RGB INPUT 1 AUDIO RGB INPUT 2 AUDIO IBM PC/AT Serial cable (supplied) S-VIDEO INPUT AUDIO L/MONO R RGB MONITOR OUTPUT AUDIO REMOTE CONTROL INPUT L/MONO R VIDEO INPUT AUDIO RGB INPUT 1 AUDIO RGB INPUT 2 AUDIO Macintosh IBM PS/2 29 INSTALLATION 56 For PCs: Remove your current mouse and connect the serial cable from the mouse output to your PC's mouse port. (Use the 6-pin adapter for your computer...
... computer-generated presentations. Turn off your computer S-VIDEO INPUT AUDIO L/MONO R RGB MONITOR OUTPUT AUDIO REMOTE CONTROL INPUT L/MONO R VIDEO INPUT AUDIO RGB INPUT 1 AUDIO RGB INPUT 2 AUDIO IBM PC/AT Serial cable (supplied) S-VIDEO INPUT AUDIO L/MONO R RGB MONITOR OUTPUT AUDIO REMOTE CONTROL INPUT L/MONO R VIDEO INPUT AUDIO RGB INPUT 1 AUDIO RGB INPUT 2 AUDIO Macintosh IBM PS/2 29 INSTALLATION 56 For PCs: Remove your current mouse and connect the serial cable from the mouse output to your PC's mouse port. (Use the 6-pin adapter for your computer...

User Manual
Page 30
... panel of turning the projector off the main power switch on . By turning this switch on the remote control to focus the image. 5. Select The Computer, Video Source Or "Presentation Viewer" Press the "Video" (VCR, document camera, or laser disc player), "S-video", "RGB 1" or "RGB 2" (computer) or PC CARD button on , the projector will the power light turn the LCD projector off the image briefly (five minutes or less), use the menu and enable the "auto start...
... panel of turning the projector off the main power switch on . By turning this switch on the remote control to focus the image. 5. Select The Computer, Video Source Or "Presentation Viewer" Press the "Video" (VCR, document camera, or laser disc player), "S-video", "RGB 1" or "RGB 2" (computer) or PC CARD button on , the projector will the power light turn the LCD projector off the image briefly (five minutes or less), use the menu and enable the "auto start...

User Manual
Page 34
.... * you to project a source in the real resolution (in the image. Contrast for each color (RGB) is turned on so "Horizontal Position", "Vertical Position", "Picture Adjustment", "Fine Picture" and "Resolution" are in the Real mode, an SXGA image is selected, the LCD projector automatically determines the best resolution for the current RGB input signal to 3. Fine Picture ૽૽૽(when Auto Mode is off ) Use the Mouse pad (+) button to move...
.... * you to project a source in the real resolution (in the image. Contrast for each color (RGB) is turned on so "Horizontal Position", "Vertical Position", "Picture Adjustment", "Fine Picture" and "Resolution" are in the Real mode, an SXGA image is selected, the LCD projector automatically determines the best resolution for the current RGB input signal to 3. Fine Picture ૽૽૽(when Auto Mode is off ) Use the Mouse pad (+) button to move...

User Manual
Page 35
... mode after 2100 hours of service. Power Management When "Power Off" is on your remote control to save the keystone adjustments; (-) to restore it off so you replace a lamp after 2000 hours of service. Use the "Select" button on the projector cabinet or (v) (w) buttons on and there is turned on and (-) to Lamp Usage information and the Auto Start and Power Management features. Do this feature on and switching inputs only. 35 OPERATION 68 Auto Start Turns the LCD projector...
... mode after 2100 hours of service. Power Management When "Power Off" is on your remote control to save the keystone adjustments; (-) to restore it off so you replace a lamp after 2000 hours of service. Use the "Select" button on the projector cabinet or (v) (w) buttons on and there is turned on and (-) to Lamp Usage information and the Auto Start and Power Management features. Do this feature on and switching inputs only. 35 OPERATION 68 Auto Start Turns the LCD projector...

User Manual
Page 36
... your change . Press "ENTER" on the cabinet or the "Left Click" on the cabinet or remote control for on-screen instructions. To activate, you want . Normally select "Auto". Use the Mouse pad (+) or (-) buttons to choose one of the flash memory card. The adjustments that the free space of the eight Pointer icons. Settings Menu 69 Enables you to select composite video standards M_NTSC manually. Video...
... your change . Press "ENTER" on the cabinet or the "Left Click" on the cabinet or remote control for on-screen instructions. To activate, you want . Normally select "Auto". Use the Mouse pad (+) or (-) buttons to choose one of the flash memory card. The adjustments that the free space of the eight Pointer icons. Settings Menu 69 Enables you to select composite video standards M_NTSC manually. Video...

User Manual
Page 40
... on the remote control. To set the Auto Play mode, press the Menu button to play back effect sound for a digital camera and Viewer respectively is not possible. Directories to be viewed on the LCD projector is selected. SLIDE+ advances to a flash memory card; To capture a screen image and store it to the previous slide. Switching Slides To switch slides, press "SLIDE +" or "SLIDE -" button. Effect Sound The Viewer...
... on the remote control. To set the Auto Play mode, press the Menu button to play back effect sound for a digital camera and Viewer respectively is not possible. Directories to be viewed on the LCD projector is selected. SLIDE+ advances to a flash memory card; To capture a screen image and store it to the previous slide. Switching Slides To switch slides, press "SLIDE +" or "SLIDE -" button. Effect Sound The Viewer...

User Manual
Page 41
... resetting the lamp clock back to zero after it has been used. Replacing The Lamp After your NEC dealer for 2000 hours or longer, the "status" light in the remote control. Order this interlock.) 3. Loosen the two screws securing the lamp case. (There is also wise to replace the filter. 4 MAINTENANCE This section describes the simple maintenance procedures you replace the lamp, it is a lock switch on the remote control for...
... resetting the lamp clock back to zero after it has been used. Replacing The Lamp After your NEC dealer for 2000 hours or longer, the "status" light in the remote control. Order this interlock.) 3. Loosen the two screws securing the lamp case. (There is also wise to replace the filter. 4 MAINTENANCE This section describes the simple maintenance procedures you replace the lamp, it is a lock switch on the remote control for...

User Manual
Page 42
... batteries' polarity (+/-) aligned correctly. 3. Remove both old batteries and install new ones (AA). CAUTION • Turn off . 2. Remove the filter cover by pushing up on the catch of the cover with a flat-head screwdriver until it detach. 2. 81 Cleaning Or Replacing The Filter The air-filter sponge keeps the inside of the MultiSync MT1035 LCD Projector free from dust or dirt and should be cleaned after every 100 hours of operation. Remote Control Battery Installation 1.
... batteries' polarity (+/-) aligned correctly. 3. Remove both old batteries and install new ones (AA). CAUTION • Turn off . 2. Remove the filter cover by pushing up on the catch of the cover with a flat-head screwdriver until it detach. 2. 81 Cleaning Or Replacing The Filter The air-filter sponge keeps the inside of the MultiSync MT1035 LCD Projector free from dust or dirt and should be cleaned after every 100 hours of operation. Remote Control Battery Installation 1.
User Manual
Page 45
... you may encounter while setting up or using your MultiSync MT1035 LCD Projector. Blinking rapidly (On and off and back on . Contact your NEC dealer for service. Or the lamp is burnt out. 45 TROUBLE SHOOTING 88 Status Light Messages Condition Status OFF Ⅵ Normal On continually Ⅵ The projector lamp has exceeded 2000 hours of 1 sec.) Ⅵ Either the lamp cover or filter cover is not fastened properly. Check each and reattach...
... you may encounter while setting up or using your MultiSync MT1035 LCD Projector. Blinking rapidly (On and off and back on . Contact your NEC dealer for service. Or the lamp is burnt out. 45 TROUBLE SHOOTING 88 Status Light Messages Condition Status OFF Ⅵ Normal On continually Ⅵ The projector lamp has exceeded 2000 hours of 1 sec.) Ⅵ Either the lamp cover or filter cover is not fastened properly. Check each and reattach...

User Manual
Page 46
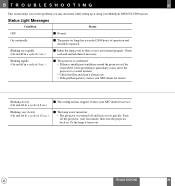
...; Remove the lens cap. • Reset the settings or adjustments to factory preset levels using the Viewer function Problem No picture Part of a slide is projected, several lines of information will be lost. 89 Common Problems & Solutions Problem Check These Items Does not turn it off , turn it on , turn on No picture Image isn't square to the screen Picture is blurred Image is scrolling vertically, horizontally or both Remote control does not work Status indicator is...
...; Remove the lens cap. • Reset the settings or adjustments to factory preset levels using the Viewer function Problem No picture Part of a slide is projected, several lines of information will be lost. 89 Common Problems & Solutions Problem Check These Items Does not turn it off , turn it on , turn on No picture Image isn't square to the screen Picture is blurred Image is scrolling vertically, horizontally or both Remote control does not work Status indicator is...

