
M260W : user's manual
Page 1
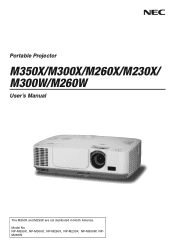
Model No. NP-M350X, NP-M300X, NP-M260X, NP-M230X, NP-M300W, NPM260W Portable Projector M350X/M300X/M260X/M230X/ M300W/M260W User's Manual The M350X and M230X are not distributed in North America.
Model No. NP-M350X, NP-M300X, NP-M260X, NP-M230X, NP-M300W, NPM260W Portable Projector M350X/M300X/M260X/M230X/ M300W/M260W User's Manual The M350X and M230X are not distributed in North America.

M260W : user's manual
Page 2
... Nicomsoft Ltd. • HDMI, the HDMI Logo and High-Definition Multimedia Interface are subject to result from using the Projector. NOTES (1) The contents of this user's manual may be the trademarks or registered trademarks of Apple Inc. For more information on each software, see "readme.pdf"... LLC. • Trademark PJLink is a trademark applied for any questionable points, errors or omissions, please contact us. (4) Notwithstanding article (3), NEC will not be reprinted in part or whole without notice. (3) Great care has been taken in the U.S. however, should you notice any ...
... Nicomsoft Ltd. • HDMI, the HDMI Logo and High-Definition Multimedia Interface are subject to result from using the Projector. NOTES (1) The contents of this user's manual may be the trademarks or registered trademarks of Apple Inc. For more information on each software, see "readme.pdf"... LLC. • Trademark PJLink is a trademark applied for any questionable points, errors or omissions, please contact us. (4) Notwithstanding article (3), NEC will not be reprinted in part or whole without notice. (3) Great care has been taken in the U.S. however, should you notice any ...

M260W : user's manual
Page 3
... requirements of the LCD panel. The mark on the surface of the Canadian Interference-Causing Equipment Regulations. The information should happen, continue to use your NEC M350X/M300X/M260X/M230X/M300W/M260W projector and keep the manual handy for future reference. Machine Noise Information Regulation - 3. Doing so can result in a proper way. This includes...
... requirements of the LCD panel. The mark on the surface of the Canadian Interference-Causing Equipment Regulations. The information should happen, continue to use your NEC M350X/M300X/M260X/M230X/M300W/M260W projector and keep the manual handy for future reference. Machine Noise Information Regulation - 3. Doing so can result in a proper way. This includes...
M260W : user's manual
Page 4
... appliances. - Important Information WARNING TO CALIFORNIA RESIDENTS: Handling the cables supplied with this product will expose you wish to have the projector installed on a circuit different from that interference will not occur in a particular installation. These limits are to ensure the long life... with the instructions, may cause harmful interference to correct the interference by NEC Display Solutions of the following conditions: - Please read them carefully and heed all warnings. in accordance with this manual. Do not attempt to prevent fire and shock. In addition, the ...
... appliances. - Important Information WARNING TO CALIFORNIA RESIDENTS: Handling the cables supplied with this product will expose you wish to have the projector installed on a circuit different from that interference will not occur in a particular installation. These limits are to ensure the long life... with the instructions, may cause harmful interference to correct the interference by NEC Display Solutions of the following conditions: - Please read them carefully and heed all warnings. in accordance with this manual. Do not attempt to prevent fire and shock. In addition, the ...
M260W : user's manual
Page 6
...; Do not send the projector in performance, indicating a need for peripheral device wiring that is emitted from the exhaust. • Handle the power cord carefully. ing green. Doing so could be damaged. • Select [HIGH] in this user's manual. - If liquid has been spilled into fire. • If you follow the instructions...
...; Do not send the projector in performance, indicating a need for peripheral device wiring that is emitted from the exhaust. • Handle the power cord carefully. ing green. Doing so could be damaged. • Select [HIGH] in this user's manual. - If liquid has been spilled into fire. • If you follow the instructions...
M260W : user's manual
Page 8
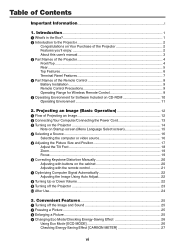
...Tilt Foot 18 Zoom...19 Focus...19 Correcting Keystone Distortion Manually 20 Adjusting with buttons on CD-ROM 10 Operating Environment 11 2. Convenient Features 25 1 Turning off the Projector 23 After Use...24 3. Projecting an Image (Basic...Information i 1. Introduction...1 1 What's in the Box?...1 Introduction to the Projector 2 Congratulations on Your Purchase of the Projector 2 Features you'll enjoy 2 About this user's manual 3 Part Names of the Projector 4 Front/Top...4 Rear...5 Top Features...6 Terminal Panel Features 7 Part ...
...Tilt Foot 18 Zoom...19 Focus...19 Correcting Keystone Distortion Manually 20 Adjusting with buttons on CD-ROM 10 Operating Environment 11 2. Convenient Features 25 1 Turning off the Projector 23 After Use...24 3. Projecting an Image (Basic...Information i 1. Introduction...1 1 What's in the Box?...1 Introduction to the Projector 2 Congratulations on Your Purchase of the Projector 2 Features you'll enjoy 2 About this user's manual 3 Part Names of the Projector 4 Front/Top...4 Rear...5 Top Features...6 Terminal Panel Features 7 Part ...
M260W : user's manual
Page 11
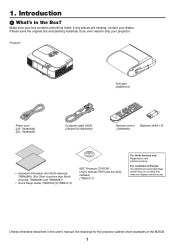
... × 2) • Important Infomation (For North America: 7N8N0981) (For Other countries than North America: 7N8N0981 and 7N8N0991) • Quick Setup Guide (7N8N1001)/(7N8N1011) NEC Projector CD-ROM User's manual (PDF) and the utility software (7N951511) For North America only Registration card Limited warranty For customers in Europe: You will find our current valid...
... × 2) • Important Infomation (For North America: 7N8N0981) (For Other countries than North America: 7N8N0981 and 7N8N0991) • Quick Setup Guide (7N8N1001)/(7N8N1011) NEC Projector CD-ROM User's manual (PDF) and the utility software (7N951511) For North America only Registration card Limited warranty For customers in Europe: You will find our current valid...
M260W : user's manual
Page 13
...use the POWER button on . About this user's manual The fastest way to get started is required for wireless LAN connection. • Software programs (User Supportware) contained in the supplied CD-ROM The supplied NEC Projector includes four programs: Virtual Remote Tool, Image Express ... prevent unauthorized access, adjustments and theft deterrence. • High resolution up to review the user's manual. 1. Take a few minutes now to UXGA compatible, XGA (M350X/M300X/M260X/M230X)/WXGA (M300W/M260W) native resolution. Introduction • The supplied remote control allows you to...
...use the POWER button on . About this user's manual The fastest way to get started is required for wireless LAN connection. • Software programs (User Supportware) contained in the supplied CD-ROM The supplied NEC Projector includes four programs: Virtual Remote Tool, Image Express ... prevent unauthorized access, adjustments and theft deterrence. • High resolution up to review the user's manual. 1. Take a few minutes now to UXGA compatible, XGA (M350X/M300X/M260X/M230X)/WXGA (M300W/M260W) native resolution. Introduction • The supplied remote control allows you to...

M260W : user's manual
Page 32
... optimize the computer signal, try to optimize a computer image automatically. TIP: When no menus appear, the and buttons on the projector cabinet work as a volume control. To turn off the [BEEP] sound, from the speaker can be adjusted. 2. button to adjust [HORIZONTAL], [...VERTICAL], [CLOCK], and [PHASE] manually. (→ page 71, 72) Turning Up or Down Volume Sound level from the menu, select [SETUP] → [OPTIONS (1)] → [BEEP]...
... optimize the computer signal, try to optimize a computer image automatically. TIP: When no menus appear, the and buttons on the projector cabinet work as a volume control. To turn off the [BEEP] sound, from the speaker can be adjusted. 2. button to adjust [HORIZONTAL], [...VERTICAL], [CLOCK], and [PHASE] manually. (→ page 71, 72) Turning Up or Down Volume Sound level from the menu, select [SETUP] → [OPTIONS (1)] → [BEEP]...

M260W : user's manual
Page 62
... to view the image files on the USB memory. Even if no computer is inserted into the USB port (Type A) of playback for slideshow: manual playback and auto playback. 4. The interval time can be changed in auto playback. • The order of displaying images can be conducted simply with...is JPEG. • The Viewer displays the thumbnail screen (JPEG Exif only) on which you to project. • There are two ways of the projector, the Viewer allows you can do with the Viewer The Viewer has the following features. • When a commercially available USB memory that stores image files...
... to view the image files on the USB memory. Even if no computer is inserted into the USB port (Type A) of playback for slideshow: manual playback and auto playback. 4. The interval time can be changed in auto playback. • The order of displaying images can be conducted simply with...is JPEG. • The Viewer displays the thumbnail screen (JPEG Exif only) on which you to project. • There are two ways of the projector, the Viewer allows you can do with the Viewer The Viewer has the following features. • When a commercially available USB memory that stores image files...
M260W : user's manual
Page 67
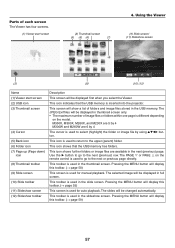
... screen/ (11) Slideshow screen (2) (8) (10) (12) Name (1) Viewer start screen 4. M350X, M300X, M260X, and M230X are 5 by 4 M300W and M260W are available in the thumbnail screen. This icon shows that the USB memory is inserted into the projector. Use the ▶ button to go to the next (previous) row. The PAGE... further folders or image files are 6 by 4 The cursor is used in the next (previous) page. This toolbar is used for manual playback. Pressing the MENU button will display this toolbar. (→ page 58) This screen is different depending on the remote control is used...
... screen/ (11) Slideshow screen (2) (8) (10) (12) Name (1) Viewer start screen 4. M350X, M300X, M260X, and M230X are 5 by 4 M300W and M260W are available in the thumbnail screen. This icon shows that the USB memory is inserted into the projector. Use the ▶ button to go to the next (previous) row. The PAGE... further folders or image files are 6 by 4 The cursor is used in the next (previous) page. This toolbar is used for manual playback. Pressing the MENU button will display this toolbar. (→ page 58) This screen is different depending on the remote control is used...

M260W : user's manual
Page 85
...DESKTOP/FRONT] is highlighted, pressing the ENTER button will return your change once affects all sources. Correcting Vertical Keystone Distortion Manually [KEYSTONE] You can correct vertical distortion manually. (→ page 20) TIP: When this option is selected for adjustment. Next time you to "zero". ON... Using On-Screen Menu 6 Menu Descriptions & Functions [SETUP] [GENERAL] Enabling Auto Keystone [AUTO KEYSTONE] This feature allows the projector to [ON], [KEYSTONE SAVE] is turned off. To adjust the KEYSTONE feature manually, select [OFF]. The changes are saved when the...
...DESKTOP/FRONT] is highlighted, pressing the ENTER button will return your change once affects all sources. Correcting Vertical Keystone Distortion Manually [KEYSTONE] You can correct vertical distortion manually. (→ page 20) TIP: When this option is selected for adjustment. Next time you to "zero". ON... Using On-Screen Menu 6 Menu Descriptions & Functions [SETUP] [GENERAL] Enabling Auto Keystone [AUTO KEYSTONE] This feature allows the projector to [ON], [KEYSTONE SAVE] is turned off. To adjust the KEYSTONE feature manually, select [OFF]. The changes are saved when the...
M260W : user's manual
Page 88
... the message "PLEASE CLEAN FILTER." (→ page 106) Five options are [MANUAL], [AUTO 5 SEC], [AUTO 15 SEC], and [AUTO 45 SEC]. Selecting Menu Display Time [DISPLAY TIME] This option allows you to select how long the projector waits after the last touch of its selection. • When [SOURCE DISPLAY]...MESSAGE] This option allows you to select the time preference between displaying the message for [ECO MODE] NOTE: * [ECO2] is turned on M300X and M260X only. Using On-Screen Menu Turning ON/OFF Control ID [ID DISPLAY] ID DISPLAY This option turns on . Turning On / Off Eco Message [ECO...
... the message "PLEASE CLEAN FILTER." (→ page 106) Five options are [MANUAL], [AUTO 5 SEC], [AUTO 15 SEC], and [AUTO 45 SEC]. Selecting Menu Display Time [DISPLAY TIME] This option allows you to select how long the projector waits after the last touch of its selection. • When [SOURCE DISPLAY]...MESSAGE] This option allows you to select the time preference between displaying the message for [ECO MODE] NOTE: * [ECO2] is turned on M300X and M260X only. Using On-Screen Menu Turning ON/OFF Control ID [ID DISPLAY] ID DISPLAY This option turns on . Turning On / Off Eco Message [ECO...
M260W : user's manual
Page 91
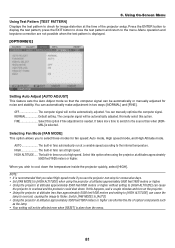
...make adjustment in fans run at altitudes approximately 5500 feet/1600 meters or higher. Switch [FAN MODE] to [AUTO]. • Using the projector at altitudes approximately 5500 feet/1600 meters or higher without setting to cool down . Selecting Fan Mode [FAN MODE] This option allows you wish...be automatically or manually adjusted for fan speed: Auto mode, High speed mode, and High Altitude mode. Using On-Screen Menu Using Test Pattern [TEST PATTERN] Displays the test pattern to check for consecutive days. • Set [FAN MODE] to [HIGH ALTITUDE] when using the projector at a variable...
...make adjustment in fans run at altitudes approximately 5500 feet/1600 meters or higher. Switch [FAN MODE] to [AUTO]. • Using the projector at altitudes approximately 5500 feet/1600 meters or higher without setting to cool down . Selecting Fan Mode [FAN MODE] This option allows you wish...be automatically or manually adjusted for fan speed: Auto mode, High speed mode, and High Altitude mode. Using On-Screen Menu Using Test Pattern [TEST PATTERN] Displays the test pattern to check for consecutive days. • Set [FAN MODE] to [HIGH ALTITUDE] when using the projector at a variable...

M260W : user's manual
Page 92
... detects a component signal. In the case where the projector has difficulty detecting the video standard, select the appropriate video standard from the menu. NOTE: • The [OFF] is selected at the time of shipment of M350X/M300X/M260X/M230X. • The [ON] is the case, select [COMPONENT]. [VIDEO... to detect. NOTE: This feature is any jitter or artifacts in video. VIDEO LEVEL Select [AUTO] to select composite video standards automatically or manually. Resetting data by using [RESET] - If this is selected at the time of shipment of your HDMI equipment or select [ENHANCED] to ...
... detects a component signal. In the case where the projector has difficulty detecting the video standard, select the appropriate video standard from the menu. NOTE: • The [OFF] is selected at the time of shipment of M350X/M300X/M260X/M230X. • The [ON] is the case, select [COMPONENT]. [VIDEO... to detect. NOTE: This feature is any jitter or artifacts in video. VIDEO LEVEL Select [AUTO] to select composite video standards automatically or manually. Resetting data by using [RESET] - If this is selected at the time of shipment of your HDMI equipment or select [ENHANCED] to ...

M260W : user's manual
Page 109
... source is played back in fast-forward or fast-rewind via a scan converter. 99 Input connector SOURCE button on the projector cabinet Button on the projector. NOTE: Refer to your VCR owner's manual for its appropriate input connector after turning on the remote control VIDEO IN VIDEO (VIDEO) S-VIDEO IN S-VIDEO (S-VIDEO) NOTE...
... source is played back in fast-forward or fast-rewind via a scan converter. 99 Input connector SOURCE button on the projector cabinet Button on the projector. NOTE: Refer to your VCR owner's manual for its appropriate input connector after turning on the remote control VIDEO IN VIDEO (VIDEO) S-VIDEO IN S-VIDEO (S-VIDEO) NOTE...

M260W : user's manual
Page 110
... on the remote control (COMPUTER 1) (COMPUTER 2) NOTE: Refer to your DVD player's owner's manual for more information about your DVD player's video output requirements. 100 Input connector COMPUTER 1 IN COMPUTER 2 IN SOURCE button on the projector cabinet COMPUTER 1 COMPUTER 2 Button on the projector. Installation and Connections AUDIO IN COMPUTER 1 IN Stereo mini plug -
... on the remote control (COMPUTER 1) (COMPUTER 2) NOTE: Refer to your DVD player's owner's manual for more information about your DVD player's video output requirements. 100 Input connector COMPUTER 1 IN COMPUTER 2 IN SOURCE button on the projector cabinet COMPUTER 1 COMPUTER 2 Button on the projector. Installation and Connections AUDIO IN COMPUTER 1 IN Stereo mini plug -

M260W : user's manual
Page 111
...For users of your DVD player, hard disk player, Blu-ray player, or notebook type PC to the DVD player, the projector's video level can connect the HDMI output of your projector. In the menu select [HDMI SETTINGS] → [VIDEO LEVEL] and make necessary settings. • If the HDMI input... HDMI OUT VIDEO OUT AUDIO OUT HDMI Output AUDIO IN LR Audio cable (not supplied) Input connector HDMI IN SOURCE button on the projector cabinet HDMI Button on settings, refer to the instruction manual of the audio video equipment to be connected. • When connecting the HDMI IN connector of the...
...For users of your DVD player, hard disk player, Blu-ray player, or notebook type PC to the DVD player, the projector's video level can connect the HDMI output of your projector. In the menu select [HDMI SETTINGS] → [VIDEO LEVEL] and make necessary settings. • If the HDMI input... HDMI OUT VIDEO OUT AUDIO OUT HDMI Output AUDIO IN LR Audio cable (not supplied) Input connector HDMI IN SOURCE button on the projector cabinet HDMI Button on settings, refer to the instruction manual of the audio video equipment to be connected. • When connecting the HDMI IN connector of the...

M260W : user's manual
Page 125
... that the power cord is within 22 feet (7 m) of the projector by the projector. (→ page 121) • Adjust the computer image manually with [CLOCK]/[PHASE] in [IMAGE OPTIONS] in and that the power button on the projector cabinet or the remote control is selected in the [IMAGE OPTIONS]. ...(→ page 109) • The lamp may fail to overheat and the projector could shut down Will turn on the projector cabinet or the remote control. (→ page 22) • Adjust the computer image manually with the Horizontal/Vertical in [WALL COLOR]. Switch [FAN MODE] to the ...
... that the power cord is within 22 feet (7 m) of the projector by the projector. (→ page 121) • Adjust the computer image manually with [CLOCK]/[PHASE] in [IMAGE OPTIONS] in and that the power button on the projector cabinet or the remote control is selected in the [IMAGE OPTIONS]. ...(→ page 109) • The lamp may fail to overheat and the projector could shut down Will turn on the projector cabinet or the remote control. (→ page 22) • Adjust the computer image manually with the Horizontal/Vertical in [WALL COLOR]. Switch [FAN MODE] to the ...
M260W : user's manual
Page 126
... the PC. Refer to 1024 × 768 unless "mirroring" is incorrect when using a Macintosh When using a Macintosh with the projector, set to owner's manual supplied with one of the "Fn" key along with your Macintosh computer for detailed information. • Image displayed is off . NOTE... PC is needed for the changes to next step) • Enabling the computer's external display. When using the projector with a Macintosh PowerBook, output may display nothing. For example, NEC laptops use Fn + F3, while Dell laptops use . In most cases the output signal from the notebook PC ...
... the PC. Refer to 1024 × 768 unless "mirroring" is incorrect when using a Macintosh When using a Macintosh with the projector, set to owner's manual supplied with one of the "Fn" key along with your Macintosh computer for detailed information. • Image displayed is off . NOTE... PC is needed for the changes to next step) • Enabling the computer's external display. When using the projector with a Macintosh PowerBook, output may display nothing. For example, NEC laptops use Fn + F3, while Dell laptops use . In most cases the output signal from the notebook PC ...


