
User Manual
Page 5
...the build-up of heat inside your projector. Do not place heavy objects on page E-48. • Be sure to your projector. This message will be installed by a qualified NEC service personnel. 3. Serious damage to replace the lamp when the message "The Lamp has reached the end of its ...side when the lamp is plugged into the lens while the projector is on a flat, level surface in...
...the build-up of heat inside your projector. Do not place heavy objects on page E-48. • Be sure to your projector. This message will be installed by a qualified NEC service personnel. 3. Serious damage to replace the lamp when the message "The Lamp has reached the end of its ...side when the lamp is plugged into the lens while the projector is on a flat, level surface in...
User Manual
Page 6
...37 Auto Adjust (RGB only E-38 Auto Start E-38 Power Management E-38 Power Off Confirmation E-38 Keystone Save E-38 Clear Lamp Hour Meter E-38 Clear Filter Usage E-38 Communication Speed E-38 Default Source Select E-38 Control Panel Key Lock E-38 Tools ... Codes E-56 Cable Connection E-56 CompactFlash is trademark of San Disk Corporation. INTRODUCTION Introduction to the LT158/LT157 Projector E-5 Getting Started E-5 What's in the Box E-6 Getting to Know Your LT158/LT157 Projector E-7 Front / Side Features E-7 Attaching the lens cap E-7 Rear / Side Features E-8 Top Features...
...37 Auto Adjust (RGB only E-38 Auto Start E-38 Power Management E-38 Power Off Confirmation E-38 Keystone Save E-38 Clear Lamp Hour Meter E-38 Clear Filter Usage E-38 Communication Speed E-38 Default Source Select E-38 Control Panel Key Lock E-38 Tools ... Codes E-56 Cable Connection E-56 CompactFlash is trademark of San Disk Corporation. INTRODUCTION Introduction to the LT158/LT157 Projector E-5 Getting Started E-5 What's in the Box E-6 Getting to Know Your LT158/LT157 Projector E-7 Front / Side Features E-7 Attaching the lens cap E-7 Rear / Side Features E-8 Top Features...

User Manual
Page 7
... LT158/LT157 enables you to project precise images up and operation. • A high-performance 130 watt NSH lamp. • The supplied wireless remote control operates the projector ... or behind the screen, and the projector can use the remote control and mouse adapter to take your new LT158 (XGA/DVI) / LT157 (XGA) Projector and describes the features and controls. Congratulations...must be strong enough to support the projector and the installation must be projected between video modes depending on the ceiling. • NEC Technologies' exclusive Advanced AccuBlend intelligent pixel ...
... LT158/LT157 enables you to project precise images up and operation. • A high-performance 130 watt NSH lamp. • The supplied wireless remote control operates the projector ... or behind the screen, and the projector can use the remote control and mouse adapter to take your new LT158 (XGA/DVI) / LT157 (XGA) Projector and describes the features and controls. Congratulations...must be strong enough to support the projector and the installation must be projected between video modes depending on the ceiling. • NEC Technologies' exclusive Advanced AccuBlend intelligent pixel ...

User Manual
Page 10
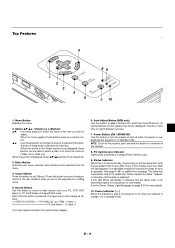
Terminal Panel AC IN C CARD MENU SELECT ENTER USB PC CONTROL VIDEO S-VIDEO RGB CANCEL SOURCE AUATDOJUST ONS/TAND BY PCACCCASRETSDASTPUOSWER AUDIO Slot for Kensington Micro saver Security System Bottom Ventilation (inlet) Remote Sensor Ventilation (outlet) Rear Foot Rear Foot Rotate to fine-adjust horizontally position Lamp cover Lamp cover screw E - 8 Spacer (black rubber) To fine-adjust the height of the rear foot, remove the spacer and rotate the rear foot to the desired height. Rear/Side Features AC Input Connect the supplied power cable's threepin plug here.
Terminal Panel AC IN C CARD MENU SELECT ENTER USB PC CONTROL VIDEO S-VIDEO RGB CANCEL SOURCE AUATDOJUST ONS/TAND BY PCACCCASRETSDASTPUOSWER AUDIO Slot for Kensington Micro saver Security System Bottom Ventilation (inlet) Remote Sensor Ventilation (outlet) Rear Foot Rear Foot Rotate to fine-adjust horizontally position Lamp cover Lamp cover screw E - 8 Spacer (black rubber) To fine-adjust the height of the rear foot, remove the spacer and rotate the rear foot to the desired height. Rear/Side Features AC Input Connect the supplied power cable's threepin plug here.
User Manual
Page 11
... ONS/ TAND BY 6 7 10 1. Some signals may not be skipped. 6. E - 9 Press this indicator is green, the projector is replaced. appears continually until the lamp is on; When no input signal is displayed, these buttons to exit "Menus". A press of its usable life. Cancel Button Press ... the Power / Status Light Messages on LT158] → Video PC Card Viewer ← S-Video ← If no menus appear, these buttons to select the menu of two seconds. 8. NOTE: To turn the power on and off the projector, press and hold this button to move...
... ONS/ TAND BY 6 7 10 1. Some signals may not be skipped. 6. E - 9 Press this indicator is green, the projector is replaced. appears continually until the lamp is on; When no input signal is displayed, these buttons to exit "Menus". A press of its usable life. Cancel Button Press ... the Power / Status Light Messages on LT158] → Video PC Card Viewer ← S-Video ← If no menus appear, these buttons to select the menu of two seconds. 8. NOTE: To turn the power on and off the projector, press and hold this button to move...

User Manual
Page 26
... orange light STATUS POWER STATUS POWER Eco mode: stand by plugging in the wall outlet. NOTE: To turn to green and the projector become ready to 5 minutes until the lamp lighting is not a fault. Wait 3 to use the menu and enable the "Auto Start" feature. (See page E-38.) NOTE: Immediately ...after you press the "On" button on the remote control ("ON/ STAND BY" button on and that the computer or video source is turned on the projector cabinet)...
... orange light STATUS POWER STATUS POWER Eco mode: stand by plugging in the wall outlet. NOTE: To turn to green and the projector become ready to 5 minutes until the lamp lighting is not a fault. Wait 3 to use the menu and enable the "Auto Start" feature. (See page E-38.) NOTE: Immediately ...after you press the "On" button on the remote control ("ON/ STAND BY" button on and that the computer or video source is turned on the projector cabinet)...

User Manual
Page 33
... Signal Type/Video Type/Sync Type/Interlace/Resolution Page3 Aspect Ratio/Gamma Correction/Noise Reduction/Color Matrix/Matrix Type Page4 Remaining Lamp Time/Lamp Hour Meter/Filter Usage/Projector Usage NOTE: *1 On LT158, "DVI (DIGITAL)" and "DVI (ANALOG)" are indicated in the Signal Select on the remote control is selected, making any adjustment executes...
... Signal Type/Video Type/Sync Type/Interlace/Resolution Page3 Aspect Ratio/Gamma Correction/Noise Reduction/Color Matrix/Matrix Type Page4 Remaining Lamp Time/Lamp Hour Meter/Filter Usage/Projector Usage NOTE: *1 On LT158, "DVI (DIGITAL)" and "DVI (ANALOG)" are indicated in the Signal Select on the remote control is selected, making any adjustment executes...

User Manual
Page 36
... better the image quality by using the Eco mode. Lamp Mode Standard 4:3 Aspect All 4 sides stretched Left and right stretched Left and right stretched When 16:9 is the default setting. After one minute after the projector is off) This allows you to select the best ...Aspect mode to correct the keystone (trapezoidal) distortion. When 4:3 is 40 degrees upward and 20 degrees downward with the projector placed horizontally on . DVD player), the following selections will display: Normal Zoom Wide Zoom Cinema Keystone distortion Normal NOTE: The maximum ...
... better the image quality by using the Eco mode. Lamp Mode Standard 4:3 Aspect All 4 sides stretched Left and right stretched Left and right stretched When 16:9 is the default setting. After one minute after the projector is off) This allows you to select the best ...Aspect mode to correct the keystone (trapezoidal) distortion. When 4:3 is 40 degrees upward and 20 degrees downward with the projector placed horizontally on . DVD player), the following selections will display: Normal Zoom Wide Zoom Cinema Keystone distortion Normal NOTE: The maximum ...

User Manual
Page 37
... all adjustments and setting to the factory preset for each source individually except Remaining Lamp Time, Lamp Hour Meter, Filter Usage, Projector Usage, Language and Communication Speed. (To reset the lamp usage time, see "Clear Lamp Hour Meter" on or off ) All Data Reset all the adjustments and settings...mode is complete. First use the ᮤ or ᮣ buttons to remove any vertical banding that eliminate the horizontal banding in the Projector Options can be reset only when "All Data" is removed. Resets the adjustments for each color (RGB)is off the Auto Adjust feature...
... all adjustments and setting to the factory preset for each source individually except Remaining Lamp Time, Lamp Hour Meter, Filter Usage, Projector Usage, Language and Communication Speed. (To reset the lamp usage time, see "Clear Lamp Hour Meter" on or off ) All Data Reset all the adjustments and settings...mode is complete. First use the ᮤ or ᮣ buttons to remove any vertical banding that eliminate the horizontal banding in the Projector Options can be reset only when "All Data" is removed. Resets the adjustments for each color (RGB)is off the Auto Adjust feature...
User Manual
Page 40
...[Page4] Clear Lamp Hour Meter: Resets the lamp clock back to operate your projector using NEC's Advanced AccuBlend Intelligent Pixel Blending Technology. Off User can set to "On", the projector automatically determines the best resolution for turning off the projector will automatically turn ...Position", "Clock" and "Phase." On Automatically adjusts image "Horizontal Position", "Vertical Position", "Clock" and "Phase". NOTE: For LT158 This feature is no RGB input for long cable runs). Horizontal and Vertical Position, and Resolution. However, the horizontal and vertical ...
...[Page4] Clear Lamp Hour Meter: Resets the lamp clock back to operate your projector using NEC's Advanced AccuBlend Intelligent Pixel Blending Technology. Off User can set to "On", the projector automatically determines the best resolution for turning off the projector will automatically turn ...Position", "Clock" and "Phase." On Automatically adjusts image "Horizontal Position", "Vertical Position", "Clock" and "Phase". NOTE: For LT158 This feature is no RGB input for long cable runs). Horizontal and Vertical Position, and Resolution. However, the horizontal and vertical ...
User Manual
Page 42
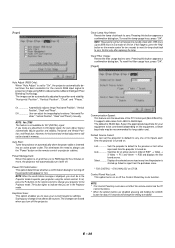
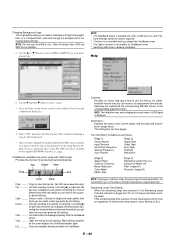
...40 You will not turn on regardless of different thickness from graphic files on ChalkBoard screen. * Switching slides clears a drawing completely. The NEC logo file is used. NOTE: The Help Menu may not be 64KB or less. Exit Clears the complete drawing and exits the ChalkBoard....logo for producing freehand drawings. Left-click [L] or right-click the eraser icon to display the eraser palette containing four eraser of lamp and projector usage respectively. Help 2. This dialog box has four pages. Left-click and drag to select "Logo". 3. Selecting the underlined ...
...40 You will not turn on regardless of different thickness from graphic files on ChalkBoard screen. * Switching slides clears a drawing completely. The NEC logo file is used. NOTE: The Help Menu may not be 64KB or less. Exit Clears the complete drawing and exits the ChalkBoard....logo for producing freehand drawings. Left-click [L] or right-click the eraser icon to display the eraser palette containing four eraser of lamp and projector usage respectively. Help 2. This dialog box has four pages. Left-click and drag to select "Logo". 3. Selecting the underlined ...
User Manual
Page 50
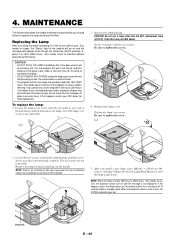
...: Eco mode) hours to maintain optimal projector performance. Do not touch them as the pieces of glass may be sure to replace the lamp and clean the filter. If this from your NEC dealer. Insert a new lamp housing . Reattach the lamp cover. Be sure to tighten the screws...This section describes the simple maintenance procedures you install a new lamp, select [Menu] → [Projector Options] → [Setup]→[Page 4]→[Clear Lamp Hour Meter] to use a lamp other than the NEC replacement lamp (LT57LP). The lamp cover screw is reset to circumvent this happens, press the ...
...: Eco mode) hours to maintain optimal projector performance. Do not touch them as the pieces of glass may be sure to replace the lamp and clean the filter. If this from your NEC dealer. Insert a new lamp housing . Reattach the lamp cover. Be sure to tighten the screws...This section describes the simple maintenance procedures you install a new lamp, select [Menu] → [Projector Options] → [Setup]→[Page 4]→[Clear Lamp Hour Meter] to use a lamp other than the NEC replacement lamp (LT57LP). The lamp cover screw is reset to circumvent this happens, press the ...

User Manual
Page 51
... To replace the air-filter: 1. Remove the filter cover by pushing down on the catch of the cover until you replace the lamp, it is dirty or clogged, your replacement lamp. Soap and water will not be turned on the Setup menu. E - 49 Vacuum the filter-through the filter cover. If the...the new filter cover. Keep out dust and during filter replacement. Cleaning or Replacing the Filters The air-filter sponge keeps the inside of the LT158/LT157 Projector free from dust or dirt and should be displayed each time the project or is turned on , the "Please clean the filter" message will...
... To replace the air-filter: 1. Remove the filter cover by pushing down on the catch of the cover until you replace the lamp, it is dirty or clogged, your replacement lamp. Soap and water will not be turned on the Setup menu. E - 49 Vacuum the filter-through the filter cover. If the...the new filter cover. Keep out dust and during filter replacement. Cleaning or Replacing the Filters The air-filter sponge keeps the inside of the LT158/LT157 Projector free from dust or dirt and should be displayed each time the project or is turned on , the "Please clean the filter" message will...

User Manual
Page 52
... while setting up to factory preset levels using the projector. See page E-16. Power/ Status Light Messages Condition Standby Power Indicator Status Indicator Steady orange - Please replace the lamp as soon as possible Lamp life has reached its end of life. Common Problems...projector is in standby mode and cannot be turned on . See page E-29 or E-34. See page E-13. • Make sure that the lamp cover or filter cover is blurred • Adjust the focus. If Auto Adjust is scrolling vertically, horizontally or both • Use menus or a source button on LT158...
... while setting up to factory preset levels using the projector. See page E-16. Power/ Status Light Messages Condition Standby Power Indicator Status Indicator Steady orange - Please replace the lamp as soon as possible Lamp life has reached its end of life. Common Problems...projector is in standby mode and cannot be turned on . See page E-29 or E-34. See page E-13. • Make sure that the lamp cover or filter cover is blurred • Adjust the focus. If Auto Adjust is scrolling vertically, horizontally or both • Use menus or a source button on LT158...

User Manual
Page 54
...NEC sales office. Model Number LT158/LT157 Optical LCD Panel Lens Lamp... Image Size Projection Distance 0.9" p-Si TFT active-matrix, 1024ן768 dots With Micro Lens Array Manual zoom, manual focus F1.7 - 2.1 f=36.5 - 43.7 mm 130W NSH lamp (110W in Eco mode) The lamp... RGB digital (Max resolution: XGA), TMDS specification (functions as .../Cr (550 TV lines : LT158 only) 350 TV lines : SECAM...LT158 only For additional information visit: US: http://www.necvisualsystems.com Europe: http://www.nec-europe.com/ Global: http://www.nec-pj.com/ LCD...
...NEC sales office. Model Number LT158/LT157 Optical LCD Panel Lens Lamp... Image Size Projection Distance 0.9" p-Si TFT active-matrix, 1024ן768 dots With Micro Lens Array Manual zoom, manual focus F1.7 - 2.1 f=36.5 - 43.7 mm 130W NSH lamp (110W in Eco mode) The lamp... RGB digital (Max resolution: XGA), TMDS specification (functions as .../Cr (550 TV lines : LT158 only) 350 TV lines : SECAM...LT158 only For additional information visit: US: http://www.necvisualsystems.com Europe: http://www.nec-europe.com/ Global: http://www.nec-pj.com/ LCD...

