
User Manual
Page 4
... can be determined by turning the equipment off main power, be sufficient to cause electrical shock. Record it is connected. • Consult the dealer or an experienced radio / TV technician for use with moulded plug has a Black (five Amps) fuse installed for help. NO USER-SERVICEABLE PARTS INSIDE. In UK, a BS approved power cable with this manual. Your serial number is encouraged to try...
... can be determined by turning the equipment off main power, be sufficient to cause electrical shock. Record it is connected. • Consult the dealer or an experienced radio / TV technician for use with moulded plug has a Black (five Amps) fuse installed for help. NO USER-SERVICEABLE PARTS INSIDE. In UK, a BS approved power cable with this manual. Your serial number is encouraged to try...
User Manual
Page 5
... projector. 2. Unplug the projector before replacing the lamp. This message will be displayed after the projector is turned off. • Immediately after the power cable is on page E-48. • Be sure to scratch or mar the lens. CAUTION Do not put the projector on the ceiling: a. Do not touch them carefully and heed all instructions provided on . If this requirement before attempting to use...
... projector. 2. Unplug the projector before replacing the lamp. This message will be displayed after the projector is turned off. • Immediately after the power cable is on page E-48. • Be sure to scratch or mar the lens. CAUTION Do not put the projector on the ceiling: a. Do not touch them carefully and heed all instructions provided on . If this requirement before attempting to use...
User Manual
Page 6
... Projector Pointer E-36 Menu Display Time E-36 Message E-36 Direct Button E-36 Setup E-37 Orientation E-37 Cinema Position E-37 Background E-37 Mouse Settings E-37 Button/Sensitivity E-37 PC Card Viewer Options E-37 Capture Options E-37 Signal Select E-37 Auto Adjust (RGB only E-38 Auto Start E-38 Power Management E-38 Power Off Confirmation E-38 Keystone Save E-38 Clear Lamp Hour Meter E-38 Clear Filter Usage E-38 Communication Speed E-38 Default Source Select E-38 Control Panel...
... Projector Pointer E-36 Menu Display Time E-36 Message E-36 Direct Button E-36 Setup E-37 Orientation E-37 Cinema Position E-37 Background E-37 Mouse Settings E-37 Button/Sensitivity E-37 PC Card Viewer Options E-37 Capture Options E-37 Signal Select E-37 Auto Adjust (RGB only E-38 Auto Start E-38 Power Management E-38 Power Off Confirmation E-38 Keystone Save E-38 Clear Lamp Hour Meter E-38 Clear Filter Usage E-38 Communication Speed E-38 Default Source Select E-38 Control Panel...

User Manual
Page 7
... image with UXGA (1600ן1200) resolution*2. • Supports most IBM VGA, SVGA, XGA, SXGA/UXGA(with any office, boardroom or auditorium. • Eight pointers are converted to review the user's manual. PAL60: TV standard used wirelessly. The LT158/LT157 enables you time later on the supplied CD-ROM. *5 The USB terminal meets the USB1.1 specification and accepts a USB mouse only. NOTE: Composite video standards...
... image with UXGA (1600ן1200) resolution*2. • Supports most IBM VGA, SVGA, XGA, SXGA/UXGA(with any office, boardroom or auditorium. • Eight pointers are converted to review the user's manual. PAL60: TV standard used wirelessly. The LT158/LT157 enables you time later on the supplied CD-ROM. *5 The USB terminal meets the USB1.1 specification and accepts a USB mouse only. NOTE: Composite video standards...
User Manual
Page 11
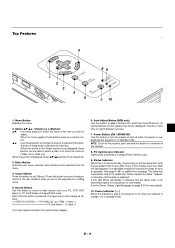
... displayed, these buttons work as possible. (See page E-48). Source Button Use this is lit red continually, it is pressed, the input source will change the level of two seconds. 8. Status Indicator When this button to replace the projection lamp as soon as a volume control. ᮤ ᮣ: Use these buttons to select the menu of the item you that the lamp cover is not attached properly or the projector is in Eco mode) of service...
... displayed, these buttons work as possible. (See page E-48). Source Button Use this is lit red continually, it is pressed, the input source will change the level of two seconds. 8. Status Indicator When this button to replace the projection lamp as soon as a volume control. ᮤ ᮣ: Use these buttons to select the menu of the item you that the lamp cover is not attached properly or the projector is in Eco mode) of service...

User Manual
Page 12
.... 3. Terminal Panel Features 8 AC IN 9 7 6 C CARD USB MENU SELECT CANCEL 5 4 3 PC CONTROL VIDEO S-VIDEO ENTER SOURCE LT158 AUATDOJUST 2 EO S-VIDEO ONS/ TAND BY PCACCCASRETSDASTPUOSWER DVI-D AUDIO RGB AUDIO 1. AC Input Connect the supplied power cable's three-pin plug here. E - 10 If you connect audio output from your PC or other end into an active wall outlet, the POWER indicator turns orange and the projector is put on page E-56. A cap is in standby mode. 10...
.... 3. Terminal Panel Features 8 AC IN 9 7 6 C CARD USB MENU SELECT CANCEL 5 4 3 PC CONTROL VIDEO S-VIDEO ENTER SOURCE LT158 AUATDOJUST 2 EO S-VIDEO ONS/ TAND BY PCACCCASRETSDASTPUOSWER DVI-D AUDIO RGB AUDIO 1. AC Input Connect the supplied power cable's three-pin plug here. E - 10 If you connect audio output from your PC or other end into an active wall outlet, the POWER indicator turns orange and the projector is put on page E-56. A cap is in standby mode. 10...

User Manual
Page 13
... Computer mode, this model. 64 5 8 7 11 13 OFF POWER VIDEO S-VIDEO RGB1 ON RGB2 AUTO ADJ. S-VIDEO Button Press this button to exit "Menus". MENU Button Displays the menu for a minimum of the ᮣ button executes the selection. RGB 1 Button Press this button to select an S-Video source from a computer or component equipment connected to switch between sources. 12. Some signals may not be displayed correctly or take time to your projector on LT158). 10. LASER Button...
... Computer mode, this model. 64 5 8 7 11 13 OFF POWER VIDEO S-VIDEO RGB1 ON RGB2 AUTO ADJ. S-VIDEO Button Press this button to exit "Menus". MENU Button Displays the menu for a minimum of the ᮣ button executes the selection. RGB 1 Button Press this button to select an S-Video source from a computer or component equipment connected to switch between sources. 12. Some signals may not be displayed correctly or take time to your projector on LT158). 10. LASER Button...

User Manual
Page 20
...: When using video, S-video, or audio cables, the cables should be sure to connect between the projector and the notebook PC before turning on the LT158. Do not disconnect the supplied DVI-D signal cable while the projector is selected. Failure to do so many not activate the digital output of the computer's screen-saver or power management software. * If you accidentally hit the POWER button on the projector. DVI-D signal cable (supplied) or DVI-A - VGA signal cable (supplied) To...
...: When using video, S-video, or audio cables, the cables should be sure to connect between the projector and the notebook PC before turning on the LT158. Do not disconnect the supplied DVI-D signal cable while the projector is selected. Failure to do so many not activate the digital output of the computer's screen-saver or power management software. * If you accidentally hit the POWER button on the projector. DVI-D signal cable (supplied) or DVI-A - VGA signal cable (supplied) To...

User Manual
Page 26
... SOURCE CANCEL CANCEL ENTER SELECT MENU RGB C CARD USB VIDEO PC CONTROL S-VIDEO AUDIO AC IN Plug the supplied power cable in the power cable, use . The power indicator will go into its standby mode and the power indicator will go out. OPERATION Connecting the Power Cable and Turning on the Projector Before you press the "On" button on the remote control ("ON/ STAND BY" button on and that your lens cap is removed. 1. Turn on by POWER change to the projector. NOTE: To turn off " button...
... SOURCE CANCEL CANCEL ENTER SELECT MENU RGB C CARD USB VIDEO PC CONTROL S-VIDEO AUDIO AC IN Plug the supplied power cable in the power cable, use . The power indicator will go into its standby mode and the power indicator will go out. OPERATION Connecting the Power Cable and Turning on the Projector Before you press the "On" button on the remote control ("ON/ STAND BY" button on and that your lens cap is removed. 1. Turn on by POWER change to the projector. NOTE: To turn off " button...

User Manual
Page 33
... Lamp Time/Lamp Hour Meter/Filter Usage/Projector Usage NOTE: *1 On LT158, "DVI (DIGITAL)" and "DVI (ANALOG)" are indicated in the Signal Select on the remote control is selected, making any adjustment executes the Auto Adjust feature. Menu Tree Advanced Menu Source Select Picture Volume Image Options Color Management Projector Options Tools Help NOTE: 1) When menu items are not available, they are displayed in the Source Select submenu. *2 On LT158, "DVI (ANALOG)" is displayed in white. 2) For LT158: When DVI (DIGITAL...
... Lamp Time/Lamp Hour Meter/Filter Usage/Projector Usage NOTE: *1 On LT158, "DVI (DIGITAL)" and "DVI (ANALOG)" are indicated in the Signal Select on the remote control is selected, making any adjustment executes the Auto Adjust feature. Menu Tree Advanced Menu Source Select Picture Volume Image Options Color Management Projector Options Tools Help NOTE: 1) When menu items are not available, they are displayed in the Source Select submenu. *2 On LT158, "DVI (ANALOG)" is displayed in white. 2) For LT158: When DVI (DIGITAL...
User Manual
Page 35
... display the volume bar without opening the menu. Prev Play Jump Setup View Drag Next Stop Select Delete A press of the image according to the incoming signal. (not valid for DVI digital on LT158) Color Increases or decreases the color saturation level (not valid for more details. NOTE: A frame may freeze for RGB and Component). See Setup on the set- Clicking with a Video or S-Video source. Adjusts...
... display the volume bar without opening the menu. Prev Play Jump Setup View Drag Next Stop Select Delete A press of the image according to the incoming signal. (not valid for DVI digital on LT158) Color Increases or decreases the color saturation level (not valid for more details. NOTE: A frame may freeze for RGB and Component). See Setup on the set- Clicking with a Video or S-Video source. Adjusts...

User Manual
Page 37
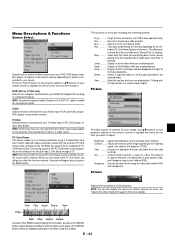
... Lamp Time, Lamp Hour Meter, Filter Usage, Projector Usage, Language and Communication Speed. (To reset the lamp usage time, see "Clear Lamp Hour Meter" on or off the Auto Adjust feature. All the items in the Native mode, the image is turned on . The projector displays the current image in a darkened room. Then select an appropriate matrix type from B-Y/R-Y, Cb/Cr or Pb/Pr. White Balance Changes all adjustments and setting to the factory...
... Lamp Time, Lamp Hour Meter, Filter Usage, Projector Usage, Language and Communication Speed. (To reset the lamp usage time, see "Clear Lamp Hour Meter" on or off the Auto Adjust feature. All the items in the Native mode, the image is turned on . The projector displays the current image in a darkened room. Then select an appropriate matrix type from B-Y/R-Y, Cb/Cr or Pb/Pr. White Balance Changes all adjustments and setting to the factory...

User Manual
Page 38
... off manually. a non-interlace signal at 15kHz such as VIDEO and RGB. Auto 45 sec .. button on LT158], Video, SVideo and PC Card Viewer), Picture, Volume, Image Options (Keystone), Projector Options (Menu and Setup), Tools (Capture, PC Card Files and ChalkBoad) and Help (Contents and Information). The menu can choose the desired information to be turned off the "Please clean the filters" message each time you switch sources or turn on the remote control are...
... off manually. a non-interlace signal at 15kHz such as VIDEO and RGB. Auto 45 sec .. button on LT158], Video, SVideo and PC Card Viewer), Picture, Volume, Image Options (Keystone), Projector Options (Menu and Setup), Tools (Capture, PC Card Files and ChalkBoad) and Help (Contents and Information). The menu can choose the desired information to be turned off the "Please clean the filters" message each time you switch sources or turn on the remote control are...
User Manual
Page 40
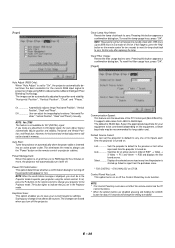
... source. Last Sets the projector to default to 2600 hours in the Projector mode. NOTE: * This Control Panel Key Lock does not affect the remote control and the PC Control functions. * When the cabinet buttons are disabled, pressing and holding the CANCEL button for position and stability; To reset the lamp usage hour, press "OK". To reset the filter usage hour, press "OK". [Page5] Auto Adjust (RGB Only): When "Auto Adjust" is displayed, you to operate your projector using NEC...
... source. Last Sets the projector to default to 2600 hours in the Projector mode. NOTE: * This Control Panel Key Lock does not affect the remote control and the PC Control functions. * When the cabinet buttons are disabled, pressing and holding the CANCEL button for position and stability; To reset the lamp usage hour, press "OK". To reset the filter usage hour, press "OK". [Page5] Auto Adjust (RGB Only): When "Auto Adjust" is displayed, you to operate your projector using NEC...
User Manual
Page 43
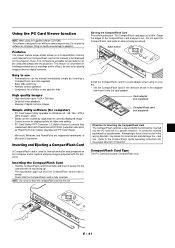
... data prepared on your PC. • Set the ComapctFlash card in the direction shown in a specific direction. Grasp the edges of insertion. Do not play images projected with the projector. This feature is being accessed. Eject button C CARD MENU SELECT ENTER AC IN USB PC CONTROL VIDEO S-VIDEO RGB CANCEL SOURCE AUATDOJUST ONS/TAND BY PCACCCASRETSDASTPUOSWER AUDIO Install the CompactFlash card on a card adapter when using the supplied software...
... data prepared on your PC. • Set the ComapctFlash card in the direction shown in a specific direction. Grasp the edges of insertion. Do not play images projected with the projector. This feature is being accessed. Eject button C CARD MENU SELECT ENTER AC IN USB PC CONTROL VIDEO S-VIDEO RGB CANCEL SOURCE AUATDOJUST ONS/TAND BY PCACCCASRETSDASTPUOSWER AUDIO Install the CompactFlash card on a card adapter when using the supplied software...
User Manual
Page 45
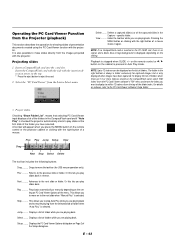
... when SLIDE +/- specific folder. Pressing the MENU button or clicking with the projector. on the remote control or ᮤ / ᮣ button on the top. * Press the eject button to make slides directly from the Source Select menu. Next .......... Checking "Show Folder List", means that selecting PC Card Viewer input displays a list of the folders in Auto Play mode. Setup ........ It is checked the projector automatically starts to 12 indexes...
... when SLIDE +/- specific folder. Pressing the MENU button or clicking with the projector. on the remote control or ᮤ / ᮣ button on the top. * Press the eject button to make slides directly from the Source Select menu. Next .......... Checking "Show Folder List", means that selecting PC Card Viewer input displays a list of the folders in Auto Play mode. Setup ........ It is checked the projector automatically starts to 12 indexes...

User Manual
Page 47
... depending on the tool bar for USB mouse operation only). NOTE: An hourglass indicating that an image is slightly degraded. Deleting Captured Images Prev Play Jump Setup View Drag Next Stop Select Delete Using the Delete button on the resolution of an input signal. • Since an image data is always a folder exclusively for captured images. Use ᮣ button to store on an MS-DOS format CompactFlash...
... depending on the tool bar for USB mouse operation only). NOTE: An hourglass indicating that an image is slightly degraded. Deleting Captured Images Prev Play Jump Setup View Drag Next Stop Select Delete Using the Delete button on the resolution of an input signal. • Since an image data is always a folder exclusively for captured images. Use ᮣ button to store on an MS-DOS format CompactFlash...
User Manual
Page 50
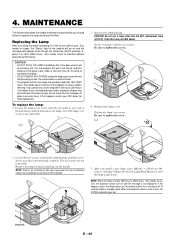
... install a new lamp, select [Menu] → [Projector Options] → [Setup]→[Page 4]→[Clear Lamp Hour Meter] to zero, the STATUS indicator goes out. Turn the projector off and go on the remote control for 1500 hours (2500 hours : Eco mode) or longer, the "Status" light in place with the two screws. Secure it has been used. Be sure to replace the lamp. When the lamp time clock is not removable. 3. The lamp cover screw is reset to reset the lamp usage hours...
... install a new lamp, select [Menu] → [Projector Options] → [Setup]→[Page 4]→[Clear Lamp Hour Meter] to zero, the STATUS indicator goes out. Turn the projector off and go on the remote control for 1500 hours (2500 hours : Eco mode) or longer, the "Status" light in place with the two screws. Secure it has been used. Be sure to replace the lamp. When the lamp time clock is not removable. 3. The lamp cover screw is reset to reset the lamp usage hours...

User Manual
Page 51
... the projector cabinet. If the filter is turned on the Setup menu. Reinstall the new filter cover. Soap and water will be displayed each time the project or is dirty or clogged, your replacement lamp. E - 49 rectly. CAUTION • Turn off using the "Menu" - "Filter Clean Message" option on after every 100 hours of operation (more often in excess of 100 hours. Keep out dust and during filter replacement. Vacuum the filter-through the filter cover. Before replacing the filter cover, remove...
... the projector cabinet. If the filter is turned on the Setup menu. Reinstall the new filter cover. Soap and water will be displayed each time the project or is dirty or clogged, your replacement lamp. E - 49 rectly. CAUTION • Turn off using the "Menu" - "Filter Clean Message" option on after every 100 hours of operation (more often in excess of 100 hours. Keep out dust and during filter replacement. Vacuum the filter-through the filter cover. Before replacing the filter cover, remove...

User Manual
Page 52
... control is on Blinking green No light in Advanced menu. No picture • Use the menu to the screen. Power/ Status Light Messages Condition Standby Power Indicator Status Indicator Steady orange - Please replace the lamp as soon as possible Lamp life has reached its end of lamp usage. Lamp error Steady orange Blinking red (12 sec interval) The projector is blurred • Adjust the focus. See page E-25. • Reposition the projector to improve its angle to factory preset levels using the projector. Remote control does not work • Install new...
... control is on Blinking green No light in Advanced menu. No picture • Use the menu to the screen. Power/ Status Light Messages Condition Standby Power Indicator Status Indicator Steady orange - Please replace the lamp as soon as possible Lamp life has reached its end of lamp usage. Lamp error Steady orange Blinking red (12 sec interval) The projector is blurred • Adjust the focus. See page E-25. • Reposition the projector to improve its angle to factory preset levels using the projector. Remote control does not work • Install new...

