NP115 : RS232 codes- Projectors
Page 34
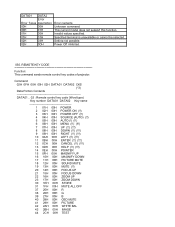
... current model does not support this function. Power Off inhibited. 050. Command: 02H 0FH 00H 00H 02H DATA01 DATA02 CKS (*3) Data Portion Contents DATA01 .. 02 : Remote control key code (Word type) Key number DATA01 DATA02 Key name 1 01H 00H POWER 2 02H 00H POWER ON (!!) 3 03H 00H POWER OFF (!!) 4 04H 00H SOURCE (AUTO... 00H 01H 01H 00H 01H 01H 02H 03H 02H 0DH Error contents Unknown command. Specified terminal is unavailable or cannot be selected. Invalid values specified. REMOTE KEY CODE Function: This command sends remote control key codes of projector.
... current model does not support this function. Power Off inhibited. 050. Command: 02H 0FH 00H 00H 02H DATA01 DATA02 CKS (*3) Data Portion Contents DATA01 .. 02 : Remote control key code (Word type) Key number DATA01 DATA02 Key name 1 01H 00H POWER 2 02H 00H POWER ON (!!) 3 03H 00H POWER OFF (!!) 4 04H 00H SOURCE (AUTO... 00H 01H 01H 00H 01H 01H 02H 03H 02H 0DH Error contents Unknown command. Specified terminal is unavailable or cannot be selected. Invalid values specified. REMOTE KEY CODE Function: This command sends remote control key codes of projector.
GT5000/6000 color brochure
Page 12
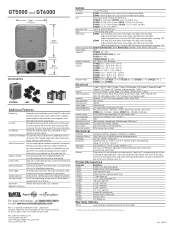
...GT48ZLB MM-BNC MM-SDI GT60CM GT60ATA Description GT5000, XGA, 6000 ANSI projector GT6000, SXGA+, 5300 ANSI projector Single replacement lamp Optional long life, single ...projector. NEC 030427 Normal lamp: Eco-mode: 3000H; All other trademarks are not input; GT34ZLB : F2.5-3.3 f=93.5-140.3mm; GT5000 and GT6000 20.4" (518mm) 21.6" (548mm) Accessories 9.5" (242 mm) GT60ATA LENS LAMPS Additional Features Networking Integrated wired networking or wireless/wired PC Card network connectivity options allows systems administrators to conduct remote diagnostics and control...
...GT48ZLB MM-BNC MM-SDI GT60CM GT60ATA Description GT5000, XGA, 6000 ANSI projector GT6000, SXGA+, 5300 ANSI projector Single replacement lamp Optional long life, single ...projector. NEC 030427 Normal lamp: Eco-mode: 3000H; All other trademarks are not input; GT34ZLB : F2.5-3.3 f=93.5-140.3mm; GT5000 and GT6000 20.4" (518mm) 21.6" (548mm) Accessories 9.5" (242 mm) GT60ATA LENS LAMPS Additional Features Networking Integrated wired networking or wireless/wired PC Card network connectivity options allows systems administrators to conduct remote diagnostics and control...
GT5000/GT6000/GT6000R UM
Page 4
...hood cap to the lens hood with the supplied string and rivet 1-6 Carrying the Projector 1-6 Top Features 1-7 Terminal Panel Features 1-8 v Remote Control Features 1-10 Remote Control Precautions 1-12 Remote Control Battery Installation 1-12 Operating Range for Double Stacking in Link Mode 7-6 8. Adjust ...Setting a Password 8-24 Security 8-25 Tools 8-26 Timer 8-26 Using Capture (GT5000 only 8-28 Using PC Card Files 8-28 Using ChalkBoard 8-28 Help 8-28 Contents 8-28 Source Information 8-28 Projector Information 8-29 Test Pattern 8-29 9. Lens Memory 4-5 5. Table of Direct ...
...hood cap to the lens hood with the supplied string and rivet 1-6 Carrying the Projector 1-6 Top Features 1-7 Terminal Panel Features 1-8 v Remote Control Features 1-10 Remote Control Precautions 1-12 Remote Control Battery Installation 1-12 Operating Range for Double Stacking in Link Mode 7-6 8. Adjust ...Setting a Password 8-24 Security 8-25 Tools 8-26 Timer 8-26 Using Capture (GT5000 only 8-28 Using PC Card Files 8-28 Using ChalkBoard 8-28 Help 8-28 Contents 8-28 Source Information 8-28 Projector Information 8-29 Test Pattern 8-29 9. Lens Memory 4-5 5. Table of Direct ...

GT5000/GT6000/GT6000R UM
Page 5
1 Introduction z What's in the Box 1-2 x Introduction to the Projector 1-3 c Getting to Know Your Projector 1-4 Attaching the lens hood cap to the lens hood with the supplied string and rivet . 1-6 Carrying the Projector 1-6 Top Features ...1-7 Terminal Panel Features 1-8 v Remote Control Features 1-10 Remote Control Precautions 1-12 Remote Control Battery Installation 1-12 Operating Range for Wireless Remote Control 1-12 Using the Remote Control in Wired Operation 1-13
1 Introduction z What's in the Box 1-2 x Introduction to the Projector 1-3 c Getting to Know Your Projector 1-4 Attaching the lens hood cap to the lens hood with the supplied string and rivet . 1-6 Carrying the Projector 1-6 Top Features ...1-7 Terminal Panel Features 1-8 v Remote Control Features 1-10 Remote Control Precautions 1-12 Remote Control Battery Installation 1-12 Operating Range for Wireless Remote Control 1-12 Using the Remote Control in Wired Operation 1-13

GT5000/GT6000/GT6000R UM
Page 6
...2 SELECT C ENTER LAMP 2 LAMP 1 STATUS POWER ANCEL MENU ON/STAND BY 3D 3 D REFORM A AUTO ADJUST Projector Lens hood cap (24F37661) Remote cable (7N520019) Remote control (79646634) and batteries (AAAן2) Power cable for Europe (AC 230V) (7N080003) Power cable for North ...100V) (7N080113) InforImmpaotirotnant Documents (Japanese and English/German/French/ Italian/Spanish/Swedish) z What's in the Box? Make sure your NEC dealer. 1. Order lenses from your box contains everything listed. If any pieces are optional. Please save the original box and packing...
...2 SELECT C ENTER LAMP 2 LAMP 1 STATUS POWER ANCEL MENU ON/STAND BY 3D 3 D REFORM A AUTO ADJUST Projector Lens hood cap (24F37661) Remote cable (7N520019) Remote control (79646634) and batteries (AAAן2) Power cable for Europe (AC 230V) (7N080003) Power cable for North ...100V) (7N080113) InforImmpaotirotnant Documents (Japanese and English/German/French/ Italian/Spanish/Swedish) z What's in the Box? Make sure your NEC dealer. 1. Order lenses from your box contains everything listed. If any pieces are optional. Please save the original box and packing...
GT5000/GT6000/GT6000R UM
Page 7
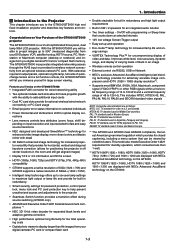
...PC card. Congratulations on the GT6000. 1-3 The GT6000/GT5000 incorporates integrated networking access through the RJ45 input or provides ...NEC 3D 10-bit video decoder for expanded black levels and adaptive gamma correction • High performance optional long life lamp for extremely accurate image compression and HDTV (1920ן1080) display resolution*2. • Supports most sophisticated three panel, dual lamp XGA LCD projector...image • Wireless remote control operation • External control via RS232, USB or Network • NEC's exclusive Advanced AccuBlend ...
...PC card. Congratulations on the GT6000. 1-3 The GT6000/GT5000 incorporates integrated networking access through the RJ45 input or provides ...NEC 3D 10-bit video decoder for expanded black levels and adaptive gamma correction • High performance optional long life lamp for extremely accurate image compression and HDTV (1920ן1080) display resolution*2. • Supports most sophisticated three panel, dual lamp XGA LCD projector...image • Wireless remote control operation • External control via RS232, USB or Network • NEC's exclusive Advanced AccuBlend ...

GT5000/GT6000/GT6000R UM
Page 13
... (ground. 0V) 9 NOTE: Screen controllers are supplied and supported by using Dynamic Image Utility 2.0 included on the supplied CD-ROM. 3. USB Port [MOUSE/HUB] (Type A) Connect a USB mouse. PC CARD Slot 1/2 Insert a PC card, commercially available flash memory card or NEC optional wireless LAN card here. There are... function. S. SC. NOTE: To use . LAN Port (RJ-45) This port is in standby mode. REMOTE 2 Mini Jacks (IN/OUT) IN: wired remote control input. To do so, connect to a second projector' s IN terminal to the USB port (type A) of your PC using Dynamic Image Utility included on a ...
... (ground. 0V) 9 NOTE: Screen controllers are supplied and supported by using Dynamic Image Utility 2.0 included on the supplied CD-ROM. 3. USB Port [MOUSE/HUB] (Type A) Connect a USB mouse. PC CARD Slot 1/2 Insert a PC card, commercially available flash memory card or NEC optional wireless LAN card here. There are... function. S. SC. NOTE: To use . LAN Port (RJ-45) This port is in standby mode. REMOTE 2 Mini Jacks (IN/OUT) IN: wired remote control input. To do so, connect to a second projector' s IN terminal to the USB port (type A) of your PC using Dynamic Image Utility included on a ...

GT5000/GT6000/GT6000R UM
Page 14
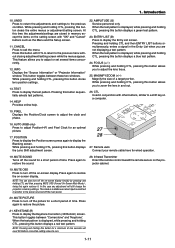
... pressing this button for a minimum of two seconds to turn on the projector when the main power is supplied and the projector is displayed: 8 Pressing this button to display the Remote Control ID dialog box to turn off the projector. 1 3. When the slider or dialog box is in the Entry List.... 1-10 PROJECTOR ABC DEF GHI 123 JKL MNO PQR 456 STU VWX YZ/...
... pressing this button for a minimum of two seconds to turn on the projector when the main power is supplied and the projector is displayed: 8 Pressing this button to display the Remote Control ID dialog box to turn off the projector. 1 3. When the slider or dialog box is in the Entry List.... 1-10 PROJECTOR ABC DEF GHI 123 JKL MNO PQR 456 STU VWX YZ/...
GT5000/GT6000/GT6000R UM
Page 15
... Press to restore the picture. 21. PRO M ADJUST DWEHIFTE BAL. Remote Jack Connect your remote cable here for a short period of a target portion. Infrared Transmitter Direct the remote control toward the remote sensor on -screen display forcibly by pressing and holding CTL and then pressing...adjustment will reset 3D Reform correction setting values to adjust the lens focus. 25. INFO Displays the "Source Information" or "Projector Information" window. Pressing this again restores it. FOCUS (+/-) While pressing and holding CTL, pressing this time the adjustments/settings are...
... Press to restore the picture. 21. PRO M ADJUST DWEHIFTE BAL. Remote Jack Connect your remote cable here for a short period of a target portion. Infrared Transmitter Direct the remote control toward the remote sensor on -screen display forcibly by pressing and holding CTL and then pressing...adjustment will reset 3D Reform correction setting values to adjust the lens focus. 25. INFO Displays the "Source Information" or "Projector Information" window. Pressing this again restores it. FOCUS (+/-) While pressing and holding CTL, pressing this time the adjustments/settings are...

GT5000/GT6000/GT6000R UM
Page 16
... batteries, two "AAA" type will also prevent the projector from the remote control when the remote control is not set to the (+) and (-) indications inside the case. 7m Remote control 3. NOTE: You cannot operate the projector using the remote control if: • The remote control ID is not going to splash on the projector cabinet 2. Operating Range for setting remote ID and projector ID. 1-12
... batteries, two "AAA" type will also prevent the projector from the remote control when the remote control is not set to the (+) and (-) indications inside the case. 7m Remote control 3. NOTE: You cannot operate the projector using the remote control if: • The remote control ID is not going to splash on the projector cabinet 2. Operating Range for setting remote ID and projector ID. 1-12

GT5000/GT6000/GT6000R UM
Page 17
... SHUTTER MUTE PICTURE SOUND OSD KEYSTONE AMPLITUDE ENTRYLIST FOCUS CTL R + - PROJECTOR ABC DEF 123 JKL MNO PQR 456 STU VWX 789 0 ,. NOTE: Do not use . Remote cable (supplied) 1. Using the Remote Control in Wired Operation Connect one end of the supplied remote cable to the REMOTE 2 IN mini jack and the other than intended use this...
... SHUTTER MUTE PICTURE SOUND OSD KEYSTONE AMPLITUDE ENTRYLIST FOCUS CTL R + - PROJECTOR ABC DEF 123 JKL MNO PQR 456 STU VWX 789 0 ,. NOTE: Do not use . Remote cable (supplied) 1. Using the Remote Control in Wired Operation Connect one end of the supplied remote cable to the REMOTE 2 IN mini jack and the other than intended use this...

GT5000/GT6000/GT6000R UM
Page 23
.../ L/MONO V R R 3 Lens hood cap 1 3 2 USB(MOUSE/HUB) USB (PC) PC CARD PC CONTROL IN 2 1 LAN OUT SC TRIGGER REMOTE 1 REMOTE 2 IN OUT AC IN 2. Check that the projector has cooled off the main power switch then disconnect the power cable. Attach a dust-protective sheet. Be careful not..., GT19ZLB, GT20ZL, GT24ZLB, GT34ZLB and GT48ZLB Preparation: Tools needed for the GT06RLB lens. w Loosen and remove the 2 screws on the remote control for a minimum of the lens hood. w Insert the dust-protective sheet included with the aluminum side up while bending it. 2-6 Hole ...
.../ L/MONO V R R 3 Lens hood cap 1 3 2 USB(MOUSE/HUB) USB (PC) PC CARD PC CONTROL IN 2 1 LAN OUT SC TRIGGER REMOTE 1 REMOTE 2 IN OUT AC IN 2. Check that the projector has cooled off the main power switch then disconnect the power cable. Attach a dust-protective sheet. Be careful not..., GT19ZLB, GT20ZL, GT24ZLB, GT34ZLB and GT48ZLB Preparation: Tools needed for the GT06RLB lens. w Loosen and remove the 2 screws on the remote control for a minimum of the lens hood. w Insert the dust-protective sheet included with the aluminum side up while bending it. 2-6 Hole ...

GT5000/GT6000/GT6000R UM
Page 29
...the knob (C) to adjust the center focus. 2. Installation USB(MOUSE/HUB) USB (PC) 1 PC CARD PC CONTROL 2 IN LAN OUT SC TRIGGER REMOTE 1 REMOTE 2 IN OUT AC IN NOTE: The buttons on the remote control or the projector cabinet do not work for the GT06RLB lens, rotate the three knobs on the lens hood. Rotate... image distortion. Knob (A) 2 RGB OUT G/Y VIDEO S-VIDEO B/Cb H/HV Knob (B) L/MONO R V L/MONO R Knob (C) USB(MOUSE/HUB) USB (PC) 1 PC CARD PC CONTROL 2 IN LAN OUT SC TRIGGER REMOTE 1 REMOTE 2 IN OUT AC IN To adjust Loosen Rotate to secure it. See page 3-4.
...the knob (C) to adjust the center focus. 2. Installation USB(MOUSE/HUB) USB (PC) 1 PC CARD PC CONTROL 2 IN LAN OUT SC TRIGGER REMOTE 1 REMOTE 2 IN OUT AC IN NOTE: The buttons on the remote control or the projector cabinet do not work for the GT06RLB lens, rotate the three knobs on the lens hood. Rotate... image distortion. Knob (A) 2 RGB OUT G/Y VIDEO S-VIDEO B/Cb H/HV Knob (B) L/MONO R V L/MONO R Knob (C) USB(MOUSE/HUB) USB (PC) 1 PC CARD PC CONTROL 2 IN LAN OUT SC TRIGGER REMOTE 1 REMOTE 2 IN OUT AC IN To adjust Loosen Rotate to secure it. See page 3-4.

GT5000/GT6000/GT6000R UM
Page 30
...projector is turned on after a period of inactivity, it may not be the result of either the NEC... on your projector. NOTE: The GT6000/GT5000 is not compatible with DDWG (Digital Display...640x480), SVGA (800x600), 1152x864, XGA (1024x768) and SXGA (1280x1024 @ up to connect between the projector and the notebook PC before turning ...projector. 3. Connecting your PC or Macintosh computer to your projector will enable you accidentally hit the POWER button on the projector first and select DVI (DIGITAL) from the RGB output unless the notebook PC is running. Turn on the remote control...
...projector is turned on after a period of inactivity, it may not be the result of either the NEC... on your projector. NOTE: The GT6000/GT5000 is not compatible with DDWG (Digital Display...640x480), SVGA (800x600), 1152x864, XGA (1024x768) and SXGA (1280x1024 @ up to connect between the projector and the notebook PC before turning ...projector. 3. Connecting your PC or Macintosh computer to your projector will enable you accidentally hit the POWER button on the projector first and select DVI (DIGITAL) from the RGB output unless the notebook PC is running. Turn on the remote control...

GT5000/GT6000/GT6000R UM
Page 31
...NEC ADP-SC1 SCART adapter and a commercially available SCART cable to as DVD player RGB 2 AUDIO OUT RGB 1 L/MONO L/MONO R AUDIO R RGB 2 R/Cr AUDIO SLOT 1 G/Y RGB OUT B/Cb VIDEO S-VIDEO H/ HV V L/MONO L/MONO R R DVI SLOT 2 Projector 2 USB A USB B PC CARD 1 PC CONTROL IN OUT SC TRIGGER LAN REMOTE 1 REMOTE...L/MONO L/MONO R R USB A USB B PC CARD PC CONTROL IN OUT SC TRIGGER LAN REMOTE 1 REMOTE 2 IN OUT AC IN RGB signal cable (not supplied) To mini D-Sub 15-pin connector on the projector, monitor and the computer. Audio cable (not supplied) LINE IN...
...NEC ADP-SC1 SCART adapter and a commercially available SCART cable to as DVD player RGB 2 AUDIO OUT RGB 1 L/MONO L/MONO R AUDIO R RGB 2 R/Cr AUDIO SLOT 1 G/Y RGB OUT B/Cb VIDEO S-VIDEO H/ HV V L/MONO L/MONO R R DVI SLOT 2 Projector 2 USB A USB B PC CARD 1 PC CONTROL IN OUT SC TRIGGER LAN REMOTE 1 REMOTE...L/MONO L/MONO R R USB A USB B PC CARD PC CONTROL IN OUT SC TRIGGER LAN REMOTE 1 REMOTE 2 IN OUT AC IN RGB signal cable (not supplied) To mini D-Sub 15-pin connector on the projector, monitor and the computer. Audio cable (not supplied) LINE IN...

GT5000/GT6000/GT6000R UM
Page 37
...the advanced menu operation. If this has been done, you press the ON/STAND BY button on the projector cabinet or POWER ON button on the remote control for the projector's internal components to use. Only after you can select the menu language later. This screen gives you can.... To use the menu and enable the "Auto Start" feature. (See page 8-16.) Immediately after turning on the remote control) • The projector has a feature to select one of the projector is not a fault. Failure to do so may occur. Projecting an Image This chapter describes how to turn on page...
...the advanced menu operation. If this has been done, you press the ON/STAND BY button on the projector cabinet or POWER ON button on the remote control for the projector's internal components to use. Only after you can select the menu language later. This screen gives you can.... To use the menu and enable the "Auto Start" feature. (See page 8-16.) Immediately after turning on the remote control) • The projector has a feature to select one of the projector is not a fault. Failure to do so may occur. Projecting an Image This chapter describes how to turn on page...

GT5000/GT6000/GT6000R UM
Page 38
... the test pattern by pressing the TEST button on the remote control or using the menu. (1) Press and hold the CTL button and press the POSITION button to select input. 1 ...... Use the SELECT button on the remote control or the LENS SHIFT button on the projector 2. To close the Lens Shift adjustment screen, press the...
... the test pattern by pressing the TEST button on the remote control or using the menu. (1) Press and hold the CTL button and press the POSITION button to select input. 1 ...... Use the SELECT button on the remote control or the LENS SHIFT button on the projector 2. To close the Lens Shift adjustment screen, press the...

GT5000/GT6000/GT6000R UM
Page 39
.... Projecting an Image (2) Press and hold the CTL button and press the FOCUS + or - You can be achieved on the projector or the remote control to increase or decrease the focus values to make the top or bottom and the left or right side of the screen longer or.... 3. Always adjust the focus from one of the corners and align the corner of the image with a NEC projector. MAGNIFY + + - - If you use the FOCUS (-) button at this program allows control of the screen. (The drawing shows the upper right corner.) Projected image Screen For optimum focus, follow the...
.... Projecting an Image (2) Press and hold the CTL button and press the FOCUS + or - You can be achieved on the projector or the remote control to increase or decrease the focus values to make the top or bottom and the left or right side of the screen longer or.... 3. Always adjust the focus from one of the corners and align the corner of the image with a NEC projector. MAGNIFY + + - - If you use the FOCUS (-) button at this program allows control of the screen. (The drawing shows the upper right corner.) Projected image Screen For optimum focus, follow the...

GT5000/GT6000/GT6000R UM
Page 40
Press the 3D REFORM button on the corner. Left-click on the remote control. Projected image Screen Screen 5. Screen Left-click on "Reset" in the direction you will disappear when you turn off the projector. This completes the Cornerstone adjustment. * To return the Cornerstone adjustment.... 5. Press the 3D REFORM button on the projector or the KEYSTONE button on "OK". The changes are limitations of adjustment range!" Screen * There are saved when you move the USB mouse cursor. 4. Left-click on the remote control. You can be some discrepancy of the remaining...
Press the 3D REFORM button on the corner. Left-click on the remote control. Projected image Screen Screen 5. Screen Left-click on "Reset" in the direction you will disappear when you turn off the projector. This completes the Cornerstone adjustment. * To return the Cornerstone adjustment.... 5. Press the 3D REFORM button on the projector or the KEYSTONE button on "OK". The changes are limitations of adjustment range!" Screen * There are saved when you move the USB mouse cursor. 4. Left-click on the remote control. You can be some discrepancy of the remaining...

GT5000/GT6000/GT6000R UM
Page 41
...RGB image automatically. Selecting "Cancel" will return to the factory default, press and hold the 3D REFORM button on the projector cabinet or the KEYSTONE button on the remote control for 3D Reform are as follows: Horizontal Max ±30° approx. NOTE: To return the 3D Reform correction ... may not be displayed correctly or take time. • The Auto Adjust function does not work for the first time. Should this is XGA Higher resolution than XGA limits 3D Reform in Wide (Zoom) • The lens is displayed. UNDO CANCEL 0 TEST INFO. creases or decreases) • Resolution...
...RGB image automatically. Selecting "Cancel" will return to the factory default, press and hold the 3D REFORM button on the projector cabinet or the KEYSTONE button on the remote control for 3D Reform are as follows: Horizontal Max ±30° approx. NOTE: To return the 3D Reform correction ... may not be displayed correctly or take time. • The Auto Adjust function does not work for the first time. Should this is XGA Higher resolution than XGA limits 3D Reform in Wide (Zoom) • The lens is displayed. UNDO CANCEL 0 TEST INFO. creases or decreases) • Resolution...


