
GT5000/GT6000/GT6000R UM
Page 3
...lamp case. When using a LAN cable: For safety, do so may cause injury. CAUTION • Do not look into your projector. If this projector, remove the lens and attach the lens hood cap. Do not touch the power plug with a damp cloth. Doing so may encounter damage caused by a qualified... NEC service personnel. 3. The Lens Shift mechanism may cause damage to elapse after the power cable is plugged into your projector. Fire and Shock ...
...lamp case. When using a LAN cable: For safety, do so may cause injury. CAUTION • Do not look into your projector. If this projector, remove the lens and attach the lens hood cap. Do not touch the power plug with a damp cloth. Doing so may encounter damage caused by a qualified... NEC service personnel. 3. The Lens Shift mechanism may cause damage to elapse after the power cable is plugged into your projector. Fire and Shock ...
GT5000/GT6000/GT6000R UM
Page 4
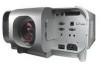
... 1. Introduction z What's in the Box 1-2 x Introduction to the Projector 1-3 c Getting to Know Your Projector 1-4 Attaching the lens hood cap to the lens hood with the supplied string and rivet 1-6 Carrying the Projector 1-6 Top Features 1-7 Terminal Panel Features 1-8 v Remote Control Features 1-10... a Password 8-24 Security 8-25 Tools 8-26 Timer 8-26 Using Capture (GT5000 only 8-28 Using PC Card Files 8-28 Using ChalkBoard 8-28 Help 8-28 Contents 8-28 Source Information 8-28 Projector Information 8-29 Test Pattern 8-29 9. Table of the Viewer Function 5-2 x...
... 1. Introduction z What's in the Box 1-2 x Introduction to the Projector 1-3 c Getting to Know Your Projector 1-4 Attaching the lens hood cap to the lens hood with the supplied string and rivet 1-6 Carrying the Projector 1-6 Top Features 1-7 Terminal Panel Features 1-8 v Remote Control Features 1-10... a Password 8-24 Security 8-25 Tools 8-26 Timer 8-26 Using Capture (GT5000 only 8-28 Using PC Card Files 8-28 Using ChalkBoard 8-28 Help 8-28 Contents 8-28 Source Information 8-28 Projector Information 8-29 Test Pattern 8-29 9. Table of the Viewer Function 5-2 x...

GT5000/GT6000/GT6000R UM
Page 5
1 Introduction z What's in the Box 1-2 x Introduction to the Projector 1-3 c Getting to Know Your Projector 1-4 Attaching the lens hood cap to the lens hood with the supplied string and rivet . 1-6 Carrying the Projector 1-6 Top Features ...1-7 Terminal Panel Features 1-8 v Remote Control Features 1-10 Remote Control Precautions 1-12 Remote Control Battery Installation 1-12 Operating Range for Wireless Remote Control 1-12 Using the Remote Control in Wired Operation 1-13
1 Introduction z What's in the Box 1-2 x Introduction to the Projector 1-3 c Getting to Know Your Projector 1-4 Attaching the lens hood cap to the lens hood with the supplied string and rivet . 1-6 Carrying the Projector 1-6 Top Features ...1-7 Terminal Panel Features 1-8 v Remote Control Features 1-10 Remote Control Precautions 1-12 Remote Control Battery Installation 1-12 Operating Range for Wireless Remote Control 1-12 Using the Remote Control in Wired Operation 1-13

GT5000/GT6000/GT6000R UM
Page 8
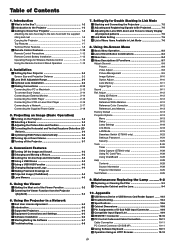
...1 (Right) Built-in Security Slot ( )* Remote sensor Carrying handle Air filter (Right) Speaker 5W (Stereo) Foot (four) Rotate to Know Your Projector 1. Attaching and Removing the Terminal Covers To remove the terminal cover, push and hold the latch. SOURCES N/STAND BY AUTO A ADJUST 2 1 AUDIO OUT L/MONO... V R DVI OPTION 2 USB A USB B PC CARD PC CONTROL IN LAN OUT SC TRIGGER REMOTE 1 REMOTE 2 IN OUT AC IN 1-4 To attach the terminal cover, align the protrusions inside and push it until you feel it click into place. The logo is a registered trademark of each foot...
...1 (Right) Built-in Security Slot ( )* Remote sensor Carrying handle Air filter (Right) Speaker 5W (Stereo) Foot (four) Rotate to Know Your Projector 1. Attaching and Removing the Terminal Covers To remove the terminal cover, push and hold the latch. SOURCES N/STAND BY AUTO A ADJUST 2 1 AUDIO OUT L/MONO... V R DVI OPTION 2 USB A USB B PC CARD PC CONTROL IN LAN OUT SC TRIGGER REMOTE 1 REMOTE 2 IN OUT AC IN 1-4 To attach the terminal cover, align the protrusions inside and push it until you feel it click into place. The logo is a registered trademark of each foot...

GT5000/GT6000/GT6000R UM
Page 10
Attaching the lens hood cap to the lens hood with the lens hood cap. CAUTION: Do not put the projector on its side when the lamp is not in use, cover the lens with the supplied string and rivet 1. FOCUS ZOOM F Z LEFT LENS SHIFT RIGHT ... when it is on the lens hood cap. Doing so may cause damage to the bottom of the projector. Use the rivet to attach the string to the projector. String 1. When moving the projector. Thread the string through the hole on . Introduction DVI OPTION 2 Rivet AUDIO OPTION 1 RGB 1 L/MONO R AUDIO R/Cr G/Y RGB OUT B/Cb...
Attaching the lens hood cap to the lens hood with the lens hood cap. CAUTION: Do not put the projector on its side when the lamp is not in use, cover the lens with the supplied string and rivet 1. FOCUS ZOOM F Z LEFT LENS SHIFT RIGHT ... when it is on the lens hood cap. Doing so may cause damage to the bottom of the projector. Use the rivet to attach the string to the projector. String 1. When moving the projector. Thread the string through the hole on . Introduction DVI OPTION 2 Rivet AUDIO OPTION 1 RGB 1 L/MONO R AUDIO R/Cr G/Y RGB OUT B/Cb...
GT5000/GT6000/GT6000R UM
Page 11
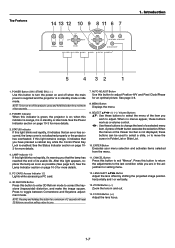
...: Use these buttons can be used to select a slide, or to turn on ; After this light blinks red rapidly, it is not attached properly or the projector has overheated. POWER Button (ON / STAND BY)( ) Use this button to return the adjustments to exit "Menus". See the Power Indicator ...1 PC CARD 2 LAMP 1 LAMP 2 STATUS POWER 1. when this button for more details. 4. See the Status Indicator section on and off the projector, press and hold this indicator is enabled. AUTO ADJUST Button Use this button to the last condition while you have pressed a cabinet key while the...
...: Use these buttons can be used to select a slide, or to turn on ; After this light blinks red rapidly, it is not attached properly or the projector has overheated. POWER Button (ON / STAND BY)( ) Use this button to return the adjustments to exit "Menus". See the Power Indicator ...1 PC CARD 2 LAMP 1 LAMP 2 STATUS POWER 1. when this button for more details. 4. See the Status Indicator section on and off the projector, press and hold this indicator is enabled. AUTO ADJUST Button Use this button to the last condition while you have pressed a cabinet key while the...

GT5000/GT6000/GT6000R UM
Page 23
..., GT34ZLB and GT48ZLB (Zoom lens) GT06RLB and GT10RLB (Short throw fixed-focus lens) * Press the power button (ON/STAND BY) on the projector or POWER OFF button on the right. 1 2 Shipping tape Insert the dust-protective sheet with the aluminum side up while bending it. 2-6 Do... the hexagonal driver. 2. q Remove the lens hood cap. Installation c Optional Lens Installation This section describes how to obtain a desired projection distance. Attach a dust-protective sheet. See page 2-8 for installing the GT12ZLB lens and page 2-10 for the GT06RLB lens. Hole Align the holes on the...
..., GT34ZLB and GT48ZLB (Zoom lens) GT06RLB and GT10RLB (Short throw fixed-focus lens) * Press the power button (ON/STAND BY) on the projector or POWER OFF button on the right. 1 2 Shipping tape Insert the dust-protective sheet with the aluminum side up while bending it. 2-6 Do... the hexagonal driver. 2. q Remove the lens hood cap. Installation c Optional Lens Installation This section describes how to obtain a desired projection distance. Attach a dust-protective sheet. See page 2-8 for installing the GT12ZLB lens and page 2-10 for the GT06RLB lens. Hole Align the holes on the...

GT5000/GT6000/GT6000R UM
Page 24
... that the grooves on the 4 corners of the lens hood are properly lined up with the 4 holes on the projector. q Remove the front lens cap from the rear end of the extension cable attached to reduce the risk of the lens when in desktop mode. 1 AUDIO OUT L/MONO RGB 1 AUDIO R RGB 2 .... NOTE: Leave the front lens cap for the moving gears of the lens shift motors used to the projector. If necessary, put the lens hood cap on the projector and connect the extension cable attached to the right of pinching fingers. Mount the lens unit on the lens hood. Do not defeat this...
... that the grooves on the 4 corners of the lens hood are properly lined up with the 4 holes on the projector. q Remove the front lens cap from the rear end of the extension cable attached to reduce the risk of the lens when in desktop mode. 1 AUDIO OUT L/MONO RGB 1 AUDIO R RGB 2 .... NOTE: Leave the front lens cap for the moving gears of the lens shift motors used to the projector. If necessary, put the lens hood cap on the projector and connect the extension cable attached to the right of pinching fingers. Mount the lens unit on the lens hood. Do not defeat this...

GT5000/GT6000/GT6000R UM
Page 26
... the lens hood so that the 4 screws on the lens unit are properly lined up with the 4 catches on the projector and connect the extension cable attached to the projector. w Insert the lens unit so that the grooves on the 4 corners of the lens shift motors used to the... projector. 1 AUDIO OUT L/MONO RGB 1 AUDIO R RGB 2 AUDIO R/Cr RGB OUT G/Y VIDEO S-VIDEO B/Cb L/MONO R SLOT 1 L/MONO R H/HV V L/MONO R DVI SLOT 2 2...
... the lens hood so that the 4 screws on the lens unit are properly lined up with the 4 catches on the projector and connect the extension cable attached to the projector. w Insert the lens unit so that the grooves on the 4 corners of the lens shift motors used to the... projector. 1 AUDIO OUT L/MONO RGB 1 AUDIO R RGB 2 AUDIO R/Cr RGB OUT G/Y VIDEO S-VIDEO B/Cb L/MONO R SLOT 1 L/MONO R H/HV V L/MONO R DVI SLOT 2 2...

GT5000/GT6000/GT6000R UM
Page 28
... lens cap from the rear end of pinching fingers. e Secure the 4 screws using the hexagonal driver. q Rotate the knob on the projector and connect the extension cable attached to loosen and remove the front part. w Insert the lens unit so that the 4 screws on the lens unit are properly lined up... with the knobs facing up with the 4 holes on the projector. w Insert the lens hood so that the lens unit is a lens shift...
... lens cap from the rear end of pinching fingers. e Secure the 4 screws using the hexagonal driver. q Rotate the knob on the projector and connect the extension cable attached to loosen and remove the front part. w Insert the lens unit so that the 4 screws on the lens unit are properly lined up... with the knobs facing up with the 4 holes on the projector. w Insert the lens hood so that the lens unit is a lens shift...