

User Manual
Page 5
...is rare for a long time. For best results, the projector should be serviced before cleaning the projector. • Clean the lens surface with hard or pointed objects. E-5 Solvents can cause rupture or leakage, and could result in the remote control, note the polarity (plus and minus signs) and ... area. • Do not use batteries other packaging is not cleaned for the lamp to wipe dry. • Do not wipe the projector with a soft cloth. Inserting a battery in a wrong direction can cause surface deformation or flaking of the scanner with a commercial blower or lens...
...is rare for a long time. For best results, the projector should be serviced before cleaning the projector. • Clean the lens surface with hard or pointed objects. E-5 Solvents can cause rupture or leakage, and could result in the remote control, note the polarity (plus and minus signs) and ... area. • Do not use batteries other packaging is not cleaned for the lamp to wipe dry. • Do not wipe the projector with a soft cloth. Inserting a battery in a wrong direction can cause surface deformation or flaking of the scanner with a commercial blower or lens...
User Manual
Page 7
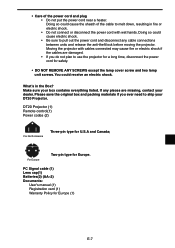
...; Do not connect or disconnect the power cord with cables connected may cause fire or electric shock if the cables are missing, contact your dealer. DT20 Projector (1) Remote control(1) Power codes (2) For North America Three-pin type for Europe. PC Signal cable (1) Lens cap(1) Batteries(2) (AA×2) Documents: User's manual (1) ...cover screw and two lamp unit screws. • Care of the cable to melt down, resulting in the Box? Make sure your DT20 Projector. Please save the original box and packing materials if you do not plan to ship your box contains everything listed.
...; Do not connect or disconnect the power cord with cables connected may cause fire or electric shock if the cables are missing, contact your dealer. DT20 Projector (1) Remote control(1) Power codes (2) For North America Three-pin type for Europe. PC Signal cable (1) Lens cap(1) Batteries(2) (AA×2) Documents: User's manual (1) ...cover screw and two lamp unit screws. • Care of the cable to melt down, resulting in the Box? Make sure your DT20 Projector. Please save the original box and packing materials if you do not plan to ship your box contains everything listed.

User Manual
Page 8
... Panel E-11 Buttons and Indicator Lights E-12 Remote Controller E-15 Remote Control Operations E-17 Battery Replacement E-17 How to Install the Projector E-18 Installation Sequence E-18 Adjusting the Tilt E-18 Projection Distance and Projected Image Size E-19 Typical Installation E-20 Compensating Keystone E-21 Connecting to a Personal Computer E-...
... Panel E-11 Buttons and Indicator Lights E-12 Remote Controller E-15 Remote Control Operations E-17 Battery Replacement E-17 How to Install the Projector E-18 Installation Sequence E-18 Adjusting the Tilt E-18 Projection Distance and Projected Image Size E-19 Typical Installation E-20 Compensating Keystone E-21 Connecting to a Personal Computer E-...

User Manual
Page 9
... the tilt angle as well as the left side of main unit) Air is located under this lens. * Be sure to adjust the adjustable feet. Remote Control Sensor Speakers Air Vent A (air filter) (side of the handle and it . See page E-30. Tilt Adjustment Buttons Press this to adjust the... focus. Contact the following for operating the projector are located here. See page E-31. Part Names and Functions Part Names and Functions Handle ■ Extended Press lightly on its right side to store...
... the tilt angle as well as the left side of main unit) Air is located under this lens. * Be sure to adjust the adjustable feet. Remote Control Sensor Speakers Air Vent A (air filter) (side of the handle and it . See page E-30. Tilt Adjustment Buttons Press this to adjust the... focus. Contact the following for operating the projector are located here. See page E-31. Part Names and Functions Part Names and Functions Handle ■ Extended Press lightly on its right side to store...
User Manual
Page 15
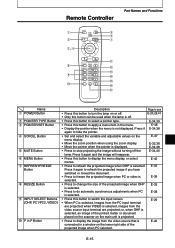
... input terminal E-29 are projected; Press it again and the image will reappear. • Press this button to display the menu display, or select menus. Remote Controller Part Names and Functions q w e,r POWER MENU MUTE POINTER TYPE REFRESH POINTER/ SET FREEZE t y u i o !0 ZOOM POSITION RESIZE ROTATION V H OHP BRIGHTNESS PC1/PC2 VOLUME VIDEO OHP...
... input terminal E-29 are projected; Press it again and the image will reappear. • Press this button to display the menu display, or select menus. Remote Controller Part Names and Functions q w e,r POWER MENU MUTE POINTER TYPE REFRESH POINTER/ SET FREEZE t y u i o !0 ZOOM POSITION RESIZE ROTATION V H OHP BRIGHTNESS PC1/PC2 VOLUME VIDEO OHP...
User Manual
Page 17
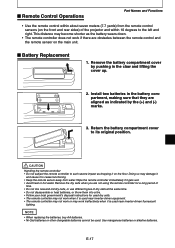
... pushing in the claw and lifting the cover up. 2. Doing so may become shorter as dropping it to cease functioning. • Keep the remote sensor away from the remote control sensors (on the front and rear sides) of dry cells at the same time. • Do not disassemble or heat batteries, or... your local government's disposal instructions for a long period of time. • Do not mix new and old dry cells, or use different types of the projector and within 10 degrees to the left and right. This distance may damage it and cause it on the floor. Return the battery compartment cover...
... pushing in the claw and lifting the cover up. 2. Doing so may become shorter as dropping it to cease functioning. • Keep the remote sensor away from the remote control sensors (on the front and rear sides) of dry cells at the same time. • Do not disassemble or heat batteries, or... your local government's disposal instructions for a long period of time. • Do not mix new and old dry cells, or use different types of the projector and within 10 degrees to the left and right. This distance may damage it and cause it on the floor. Return the battery compartment cover...
User Manual
Page 21
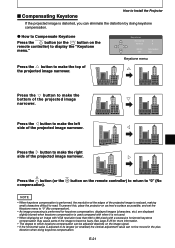
...narrower. Press the v button to make the left side of the projected image narrower. MENU MENU Press the button (or the button on the remote controller) to display the "Keystone menu." NOTE • When keystone compensation is performed, the resolution at the edges of the image to become... image narrower. Press the u button to make the right side of the projected image narrower. ■ Compensating Keystone How to Install the Projector If the projected image is distorted, you can not be moved in the plus direction when doing keystone compensation. ● How to Compensate ...
...narrower. Press the v button to make the left side of the projected image narrower. MENU MENU Press the button (or the button on the remote controller) to display the "Keystone menu." NOTE • When keystone compensation is performed, the resolution at the edges of the image to become... image narrower. Press the u button to make the right side of the projected image narrower. ■ Compensating Keystone How to Install the Projector If the projected image is distorted, you can not be moved in the plus direction when doing keystone compensation. ● How to Compensate ...

User Manual
Page 29
...lights, and the ON/STANDBY LED lights (green). If the LAMP/COVER LED lights red after turning on the POWER button, then there is displayed. Remote Control Operation OHP PC1/PC2 VIDEO The selected input display is something wrong. (See page E52 for details.) NOTE Make sure that the lens cap...been removed before turning on , "No input" is in the standby mode, and the power indicator LED lights (red). ON/ STANDBY LAMP/ COVER TEMP The projector is displayed. Press the POWER button. Select the video source to be displayed from OHP, PC1/PC2, or VIDEO. OHP PC/video See page E-30...
...lights, and the ON/STANDBY LED lights (green). If the LAMP/COVER LED lights red after turning on the POWER button, then there is displayed. Remote Control Operation OHP PC1/PC2 VIDEO The selected input display is something wrong. (See page E52 for details.) NOTE Make sure that the lens cap...been removed before turning on , "No input" is in the standby mode, and the power indicator LED lights (red). ON/ STANDBY LAMP/ COVER TEMP The projector is displayed. Press the POWER button. Select the video source to be displayed from OHP, PC1/PC2, or VIDEO. OHP PC/video See page E-30...

User Manual
Page 30
... shows how the document is used. 1 Adjust the size of the projected image. Rotate the zoom adjuster on the bottom right of the projected image. Remote Control Operation KEYSTONE 4 Check the OHP's initial screen.
... shows how the document is used. 1 Adjust the size of the projected image. Rotate the zoom adjuster on the bottom right of the projected image. Remote Control Operation KEYSTONE 4 Check the OHP's initial screen.

User Manual
Page 31
... and when projecting bright documents or printed matter, adjust to darken the projected image. 7 Main Unit Operation POSITION ROTATION V H Remote Control Operation POSITION ROTATION V H Switch the orientation of the document. ROTATION button: Flip the projected image top to a horizontal display...the projected material appears in accordance with the brightness adjustment. Press the POSITION button to view. 6 Main Unit Operation BRIGHTNESS Remote Control Operation BRIGHTNESS Adjust the brightness. However, unwanted objects will also be projected even if the materials cover is not ...
... and when projecting bright documents or printed matter, adjust to darken the projected image. 7 Main Unit Operation POSITION ROTATION V H Remote Control Operation POSITION ROTATION V H Switch the orientation of the document. ROTATION button: Flip the projected image top to a horizontal display...the projected material appears in accordance with the brightness adjustment. Press the POSITION button to view. 6 Main Unit Operation BRIGHTNESS Remote Control Operation BRIGHTNESS Adjust the brightness. However, unwanted objects will also be projected even if the materials cover is not ...

User Manual
Page 32
... the image. Move the zooming position. E-32 8 Main Unit Operation REFRESH FREEZE Remote Control Operation REFRESH FREEZE 9 Main Unit Operation LIVE IMAGE Remote Control Operation LIVE IMAGE 10 Main Unit Operation ZOOM Remote Control Operation ZOOM 11 Main Unit Operation SCROLL Remote Control Operation POINTER/ SET Freeze the projected image. Press the arrow buttons...
... the image. Move the zooming position. E-32 8 Main Unit Operation REFRESH FREEZE Remote Control Operation REFRESH FREEZE 9 Main Unit Operation LIVE IMAGE Remote Control Operation LIVE IMAGE 10 Main Unit Operation ZOOM Remote Control Operation ZOOM 11 Main Unit Operation SCROLL Remote Control Operation POINTER/ SET Freeze the projected image. Press the arrow buttons...

User Manual
Page 33
...not be adjusted when viewing OHP stored image. 12 Main Unit Operation RESIZE Remote Control Operation RESIZE Basic Operation Project a full-screen image. q Make the window live images in the window on the internal DT20 memory. button: Display the image following methods to view and change even if... you press the LIVE button. 14 Main Unit Operation OHP STORED IMAGE VOLUME Remote Control Operation OHP STORED IMAGE NOTE View OHP STORED IMAGE....
...not be adjusted when viewing OHP stored image. 12 Main Unit Operation RESIZE Remote Control Operation RESIZE Basic Operation Project a full-screen image. q Make the window live images in the window on the internal DT20 memory. button: Display the image following methods to view and change even if... you press the LIVE button. 14 Main Unit Operation OHP STORED IMAGE VOLUME Remote Control Operation OHP STORED IMAGE NOTE View OHP STORED IMAGE....

User Manual
Page 34
... an arbitrary image while the projected image is muted. E-34 After the projected image has been muted for details. 17 Main Unit Operation MUTE Remote Control Operation MUTE NOTE Mute the image. NOTE Adjusting the zoom or the brightness while the pointer is muted from "Pointer type" on the... two images. You can switch the type of time (about 15 minutes) it automatically goes into standby. 15 Main Unit Operation SET POINTER Remote Control Operation POINTER/ SET Display the pointer. Press the SET/POINTER button to hide the pointer. Press it will reappear after a short time. ...
... an arbitrary image while the projected image is muted. E-34 After the projected image has been muted for details. 17 Main Unit Operation MUTE Remote Control Operation MUTE NOTE Mute the image. NOTE Adjusting the zoom or the brightness while the pointer is muted from "Pointer type" on the... two images. You can switch the type of time (about 15 minutes) it automatically goes into standby. 15 Main Unit Operation SET POINTER Remote Control Operation POINTER/ SET Display the pointer. Press the SET/POINTER button to hide the pointer. Press it will reappear after a short time. ...

User Manual
Page 37
...size of the projected image. Rotate the zoom adjuster on page E-21. Pressing the button (or the BRIGHTNESS button on the remote controller) darkens the projected image, and pressing the BRIGHTNESS button (or the button on the projection lens until the projected image... is sharp. 3 Main Unit Operation KEYSTONE Remote Control Operation KEYSTONE 4 Main Unit Operation BRIGHTNESS Remote Control Operation BRIGHTNESS Compensate keystone. Adjust the focus adjuster on the remote controller) lightens the projected image. The "Brightness" value on the "Image...
...size of the projected image. Rotate the zoom adjuster on page E-21. Pressing the button (or the BRIGHTNESS button on the remote controller) darkens the projected image, and pressing the BRIGHTNESS button (or the button on the projection lens until the projected image... is sharp. 3 Main Unit Operation KEYSTONE Remote Control Operation KEYSTONE 4 Main Unit Operation BRIGHTNESS Remote Control Operation BRIGHTNESS Compensate keystone. Adjust the focus adjuster on the remote controller) lightens the projected image. The "Brightness" value on the "Image...

User Manual
Page 38
...SCROLL button to move in eight directions. (Up, down, left, right and diagonally). Pressing the ZOOM button (or the button on the remote controller) reduces the image, and pressing the ZOOM button (or the button on the "Sync Adjust" menu (Page E-44). 8 Main Unit... the pointer is displayed may cause it again to the most suitable status on the remote controller) enlarges the image. Remote Control Operation POINTER/ SET 7 Main Unit Operation RESIZE Remote Control Operation RESIZE Synchronized Adjustments Press the RESIZE button to do automatic synchronous adjustments of the...
...SCROLL button to move in eight directions. (Up, down, left, right and diagonally). Pressing the ZOOM button (or the button on the remote controller) reduces the image, and pressing the ZOOM button (or the button on the "Sync Adjust" menu (Page E-44). 8 Main Unit... the pointer is displayed may cause it again to the most suitable status on the remote controller) enlarges the image. Remote Control Operation POINTER/ SET 7 Main Unit Operation RESIZE Remote Control Operation RESIZE Synchronized Adjustments Press the RESIZE button to do automatic synchronous adjustments of the...

User Manual
Page 39
... OHP STORED Press the IMAGE button to reduce the volume. To unfreeze the image, press the FREEZE button again, or press the LIVE button. Remote Control Operation REFRESH FREEZE NOTE • You can also select the type from "Pointer type" on the "Setting 2" menu. You can switch the... Freeze the projected image. E-39 Press the FREEZE button to unfreeze the image when it is frozen. 9 Remote Control Operation POINTER TYPE 10 Main Unit Operation OHP STORED IMAGE VOLUME Remote Control Operation VOLUME Basic Operation Select the type of pointer with the POINTER TYPE button on the...
... OHP STORED Press the IMAGE button to reduce the volume. To unfreeze the image, press the FREEZE button again, or press the LIVE button. Remote Control Operation REFRESH FREEZE NOTE • You can also select the type from "Pointer type" on the "Setting 2" menu. You can switch the... Freeze the projected image. E-39 Press the FREEZE button to unfreeze the image when it is frozen. 9 Remote Control Operation POINTER TYPE 10 Main Unit Operation OHP STORED IMAGE VOLUME Remote Control Operation VOLUME Basic Operation Select the type of pointer with the POINTER TYPE button on the...

User Manual
Page 40
... the same time. While the image is muted, the projecting black image icon is selected. You can not use it automatically goes into standby. 12 Remote Control Operation P in P Display images from the personal computer and the video at the lower right side of the projected image. If you select personal... minutes) it when video is selected. • You can select the image projected while the image is not being input. 13 Main Unit Operation MUTE Remote Control Operation MUTE NOTE Mute the image. See page E-51 for a certain amount of the projected image.
... the same time. While the image is muted, the projecting black image icon is selected. You can not use it automatically goes into standby. 12 Remote Control Operation P in P Display images from the personal computer and the video at the lower right side of the projected image. If you select personal... minutes) it when video is selected. • You can select the image projected while the image is not being input. 13 Main Unit Operation MUTE Remote Control Operation MUTE NOTE Mute the image. See page E-51 for a certain amount of the projected image.

User Manual
Page 41
...) before the lamp goes off . Doing so may shorten the life of time (about one second.) Remote Control Operation "Press POWER button again to turn on even if you are not going to use the projector for at least one minute. ON/ STANDBY LAMP/ COVER The ON/STANDBY LED on the projected...
...) before the lamp goes off . Doing so may shorten the life of time (about one second.) Remote Control Operation "Press POWER button again to turn on even if you are not going to use the projector for at least one minute. ON/ STANDBY LAMP/ COVER The ON/STANDBY LED on the projected...

User Manual
Page 42
... is connected and the power is on, you can open the MENU "Quick menu" by operating the buttons with the menu display displayed on the remote controller) Menu Image adjustment Contrast 0 Brightness 0 Red 0 Blue 0 Sharpness 1 2 3 45 Image mode Standard / Natural Standard Return Image adjustment ... N SEC AM PAL 60 Return Displayed only when VIDEO input is selected E-42 MENU SET MENU (or the button on the remote controller) Main menu MENU Image adjustment Sync adjustment Setting 1 Setting 2 Language selection Projection mode Quit SET/ POINTER POINTER (or the...
... is connected and the power is on, you can open the MENU "Quick menu" by operating the buttons with the menu display displayed on the remote controller) Menu Image adjustment Contrast 0 Brightness 0 Red 0 Blue 0 Sharpness 1 2 3 45 Image mode Standard / Natural Standard Return Image adjustment ... N SEC AM PAL 60 Return Displayed only when VIDEO input is selected E-42 MENU SET MENU (or the button on the remote controller) Main menu MENU Image adjustment Sync adjustment Setting 1 Setting 2 Language selection Projection mode Quit SET/ POINTER POINTER (or the...

User Manual
Page 47
Main Unit Operation SCROLL RESIZE MENU SET POINTER 12 Remote Control Operation POWER MENU MUTE POINTER TYPE REFRESH 1 POINTER/ SET FREEZE ZOOM POSITION RESIZE ROTATION V H OHP BRIGHTNESS PC1/PC2 VOLUME VIDEO OHP STORED IMAGE ...P in the following describes basic operations in P LIVE IMAGE KEYSTONE 2 1 MENU Press the MENU button (or the button on the remote controller). MENU Image adjustment Sync adjustment Setting 1 Setting 2 Language selection Projection mode Quit E-47 The main menu is displayed. MENU Image adjustment Sync adjustment ...
Main Unit Operation SCROLL RESIZE MENU SET POINTER 12 Remote Control Operation POWER MENU MUTE POINTER TYPE REFRESH 1 POINTER/ SET FREEZE ZOOM POSITION RESIZE ROTATION V H OHP BRIGHTNESS PC1/PC2 VOLUME VIDEO OHP STORED IMAGE ...P in the following describes basic operations in P LIVE IMAGE KEYSTONE 2 1 MENU Press the MENU button (or the button on the remote controller). MENU Image adjustment Sync adjustment Setting 1 Setting 2 Language selection Projection mode Quit E-47 The main menu is displayed. MENU Image adjustment Sync adjustment ...


