User Manual
Page 5
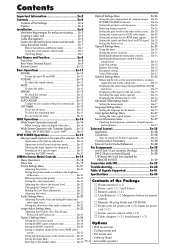
...for remote control) audio input select En-23 Ⅺ Manuals (Start up Guide and CD-ROM) Setting the allocation of the picture automatically: .. En-25 Setting the Input Skip En-25 • Tabletop Stand Resetting to the desired level En-22 Ⅺ Plasma ...Remote control (ן1) Ⅺ AAA Batteries (ן2, Manganese battery for the sub picture En-35 Displaying the entire image during DIGITAL ZOOM To mute the audio En-13 DISPLAY En-13 operations En-35 Displaying still images in on mode En-31 Enabling/disabling the front panel controls...
...for remote control) audio input select En-23 Ⅺ Manuals (Start up Guide and CD-ROM) Setting the allocation of the picture automatically: .. En-25 Setting the Input Skip En-25 • Tabletop Stand Resetting to the desired level En-22 Ⅺ Plasma ...Remote control (ן1) Ⅺ AAA Batteries (ן2, Manganese battery for the sub picture En-35 Displaying the entire image during DIGITAL ZOOM To mute the audio En-13 DISPLAY En-13 operations En-35 Displaying still images in on mode En-31 Enabling/disabling the front panel controls...
User Manual
Page 10
..., AUDIO3 These are audio input terminals. here. I JK A AC IN Connect the included power cord here. to obtain wired remote control. to your speaker's owner's manual. Please refer to the RGB1 terminal. This input can be set for Input or Output. DVD2/ HD2: You can connect an... analog RGB signal and the syncronization signal. L Handles Use when installing or carrying the plasma monitor. G RGB1 (mini D-Sub ...
..., AUDIO3 These are audio input terminals. here. I JK A AC IN Connect the included power cord here. to obtain wired remote control. to your speaker's owner's manual. Please refer to the RGB1 terminal. This input can be set for Input or Output. DVD2/ HD2: You can connect an... analog RGB signal and the syncronization signal. L Handles Use when installing or carrying the plasma monitor. G RGB1 (mini D-Sub ...
User Manual
Page 11
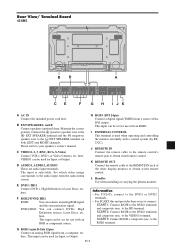
...sources, Laser Discs, etc. L Handles Use when installing or carrying the plasma monitor. G RGB1 (mini D-Sub 15pin) Connect an analog RGB signal ...the HD terminal. · SCART2: Connect R/G/B to your speaker's owner's manual. here. This input can connect an analog RGB signal and the syncronization signal....(MONO) EXTERNAL CONTROL REMOTE IN OUT CE F G H I EXTERNAL CONTROL This terminal is selectable. This input can be set for Input or Output. J REMOTE IN Connect the remote cable to the remote control's remote jack to obtain wired remote control. Information •...
...sources, Laser Discs, etc. L Handles Use when installing or carrying the plasma monitor. G RGB1 (mini D-Sub 15pin) Connect an analog RGB signal ...the HD terminal. · SCART2: Connect R/G/B to your speaker's owner's manual. here. This input can connect an analog RGB signal and the syncronization signal....(MONO) EXTERNAL CONTROL REMOTE IN OUT CE F G H I EXTERNAL CONTROL This terminal is selectable. This input can be set for Input or Output. J REMOTE IN Connect the remote cable to the remote control's remote jack to obtain wired remote control. Information •...

User Manual
Page 12
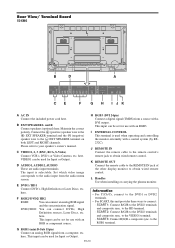
... ways to connect: · SCART1: Connect R/G/B to your speaker's owner's manual. Maintain the correct polarity. The input is used when operating and controlling the monitor externally with a control system (by RS232C). I JK A AC IN Connect the included power cord here...can be set for use with an RGB or component source. J REMOTE IN Connect the remote cable to the remote control's remote jack to obtain wired remote control. L Handles Use when installing or carrying the plasma monitor. Rear View/ Terminal Board 60XM5 L VIDEO AUDIO 1 DVD1 / HD1 AUDIO 2 RGB2 / DVD2 ...
... ways to connect: · SCART1: Connect R/G/B to your speaker's owner's manual. Maintain the correct polarity. The input is used when operating and controlling the monitor externally with a control system (by RS232C). I JK A AC IN Connect the included power cord here...can be set for use with an RGB or component source. J REMOTE IN Connect the remote cable to the remote control's remote jack to obtain wired remote control. L Handles Use when installing or carrying the plasma monitor. Rear View/ Terminal Board 60XM5 L VIDEO AUDIO 1 DVD1 / HD1 AUDIO 2 RGB2 / DVD2 ...

User Manual
Page 15
..., maintaining the original proportions. * Use this for watching normal video programs (4:3) with a 4 : 3 aspect ratio. Press the WIDE button on the remote control. 2. Within 3 seconds ... En-14 In order to fill the screen and avoid image retention. 14:9 size screen The normal size screen is displayed....the full size screen, select the 2.35:1 size screen to restore the entire image, select UNDERSCAN. WIDE Operations Wide Screen Operation (manual) With this screen size over a prolonged period of time may result in image retention. * When Macrovision signal is input, the brightness...
..., maintaining the original proportions. * Use this for watching normal video programs (4:3) with a 4 : 3 aspect ratio. Press the WIDE button on the remote control. 2. Within 3 seconds ... En-14 In order to fill the screen and avoid image retention. 14:9 size screen The normal size screen is displayed....the full size screen, select the 2.35:1 size screen to restore the entire image, select UNDERSCAN. WIDE Operations Wide Screen Operation (manual) With this screen size over a prolonged period of time may result in image retention. * When Macrovision signal is input, the brightness...

User Manual
Page 19
... in the main menu (1/2), full menu items will be shown. Repeat steps 2 - 5 to adjust an additional item, or press the EXIT button on the remote control to return to the main menu. * When adjusting using the cursor buttons ᮤ ᮣ on the screen's mode, the OSM may be displayed differently. ... from the ones in memory. Adjust the level or change is made. 6. The adjustments or settings are then stored in this manual. ADVANCED OSM : OFF NEXT PAGE SEL. En-18 OSM(On Screen Menu) Controls Menu Operations The OSM window is displayed with respect to display the MAIN MENU.
... in the main menu (1/2), full menu items will be shown. Repeat steps 2 - 5 to adjust an additional item, or press the EXIT button on the remote control to return to the main menu. * When adjusting using the cursor buttons ᮤ ᮣ on the screen's mode, the OSM may be displayed differently. ... from the ones in memory. Adjust the level or change is made. 6. The adjustments or settings are then stored in this manual. ADVANCED OSM : OFF NEXT PAGE SEL. En-18 OSM(On Screen Menu) Controls Menu Operations The OSM window is displayed with respect to display the MAIN MENU.

User Manual
Page 21
... Sub menu 2 Sub menu 3 Sub menu 4 OFF←→ON OFF←→ON PLE AUTO/LOCK 1/LOCK 2/LOCK 3 ORBITER AUTO 1 AUTO 2 MANUAL H-DOT/V-LINE/TIME OFF INVERSE OFF ON WORKING TIME/WAITING TIME WHITE SCREEN WIPER OFF ON WORKING TIME/WAITING TIME/SPEED SOFT FOCUS OFF/1/2/3/4 0←... SYSTEM AUTO/3.58 NTSC/4.43 NTSC/PAL/PAL 60/PAL-N/PAL-M/SECAM SOURCE INFORMATION - /EΛΛHNIKA/PORTUGUÊS/TÜRKÇE RESET YES NO NO - HIGH/TOP-3/TOP-2/TOP-1/LEFT/RIGHT YES INPUT/SUB. ON MODE CONTROL LOCK IR REMOTE LOOP OUT REMOTE ID ID NUMBER VIDEO WALL Sub menu 2 Sub...
... Sub menu 2 Sub menu 3 Sub menu 4 OFF←→ON OFF←→ON PLE AUTO/LOCK 1/LOCK 2/LOCK 3 ORBITER AUTO 1 AUTO 2 MANUAL H-DOT/V-LINE/TIME OFF INVERSE OFF ON WORKING TIME/WAITING TIME WHITE SCREEN WIPER OFF ON WORKING TIME/WAITING TIME/SPEED SOFT FOCUS OFF/1/2/3/4 0←... SYSTEM AUTO/3.58 NTSC/4.43 NTSC/PAL/PAL 60/PAL-N/PAL-M/SECAM SOURCE INFORMATION - /EΛΛHNIKA/PORTUGUÊS/TÜRKÇE RESET YES NO NO - HIGH/TOP-3/TOP-2/TOP-1/LEFT/RIGHT YES INPUT/SUB. ON MODE CONTROL LOCK IR REMOTE LOOP OUT REMOTE ID ID NUMBER VIDEO WALL Sub menu 2 Sub...

User Manual
Page 24
...IMAGE ADJUST ASPECT MODE : FULL V- OFF: The Picture ADJ., Fine Picture and Position adjustments are made manually. * If FINE PICTURE can also be adjusted, set Auto Picture to OFF and adjust manually. Ⅵ Adjusting the position of the image V-POSITION: Adjusts the vertical position of the image. (...Information Ⅵ When "AUTO PICTURE" is pressed: NORMAL ↔ FULL * The mode can 't be switched by pressing the WIDE button on the remote control. * The settings on the IMAGE ADJUST menu are available only when the "Auto Picture" is off , the Fine Picture and the Picture ADJ....
...IMAGE ADJUST ASPECT MODE : FULL V- OFF: The Picture ADJ., Fine Picture and Position adjustments are made manually. * If FINE PICTURE can also be adjusted, set Auto Picture to OFF and adjust manually. Ⅵ Adjusting the position of the image V-POSITION: Adjusts the vertical position of the image. (...Information Ⅵ When "AUTO PICTURE" is pressed: NORMAL ↔ FULL * The mode can 't be switched by pressing the WIDE button on the remote control. * The settings on the IMAGE ADJUST menu are available only when the "Auto Picture" is off , the Fine Picture and the Picture ADJ....

User Manual
Page 46
...60 Hz Current Rating 4.5 A (maximum) Power Consumption 285 W (typical) Dimensions 1022 mm(W)ן610 mm(H)ן98 mm(D) 40.2 inches(W)ן24 inches(H)ן3.9 inches(D) Weight 30 kg / 66.1 lbs (without notice. *1 HD/DVD/DTV input signals supported on the plasma...specifications may be displayed properly. En-45 Accessories Power cord (ן1), Remote control (ן1), AAA batteries (ן2), Manuals (Start up Guide and CD-ROM), Ferrite cores for power cord (&#...
...60 Hz Current Rating 4.5 A (maximum) Power Consumption 285 W (typical) Dimensions 1022 mm(W)ן610 mm(H)ן98 mm(D) 40.2 inches(W)ן24 inches(H)ן3.9 inches(D) Weight 30 kg / 66.1 lbs (without notice. *1 HD/DVD/DTV input signals supported on the plasma...specifications may be displayed properly. En-45 Accessories Power cord (ן1), Remote control (ן1), AAA batteries (ן2), Manuals (Start up Guide and CD-ROM), Ferrite cores for power cord (&#...

User Manual
Page 47
...DVD*1 , DTV*1 Input Terminals (VIDEO1 and RGB1 can also be displayed properly. Accessories Power cord (ן1), Remote control (ן1), AAA batteries (ן2), Manuals (Start up Guide and CD-ROM), Ferrite cores for power cord (ן2), bands for power code (ן...;720P @ 50 Hz • 19201080P @ 59.94/60 Hz • 19201080P @ 50 Hz Note: In some cases a signal on the plasma monitor may not be used as OUTPUT terminals) RGB Visual 1 (Analog) mini D-sub ...
...DVD*1 , DTV*1 Input Terminals (VIDEO1 and RGB1 can also be displayed properly. Accessories Power cord (ן1), Remote control (ן1), AAA batteries (ן2), Manuals (Start up Guide and CD-ROM), Ferrite cores for power cord (ן2), bands for power code (ן...;720P @ 50 Hz • 19201080P @ 59.94/60 Hz • 19201080P @ 50 Hz Note: In some cases a signal on the plasma monitor may not be used as OUTPUT terminals) RGB Visual 1 (Analog) mini D-sub ...

User Manual
Page 48
... may be displayed properly. Specifications Ⅵ 60XM5 Screen Size 1319 mm(H)ן742 mm(V) 51.9 inches(H)ן29.2 inches(V) diagonal 60 inches Aspect Ratio 16 : 9 Resolution 1365...60 Hz)), 2-2 pull down Converter (PAL, 576I, 625I, NTSC, 480I, 525I), Digital Zooming (100 % to change without notice. *1 HD/DVD/DTV input signals supported on the plasma monitor may not be an inconsistency with HDCP. Accessories Power cord (ן1), Remote control (ן1), AAA batteries (ן2), Manuals...
... may be displayed properly. Specifications Ⅵ 60XM5 Screen Size 1319 mm(H)ן742 mm(V) 51.9 inches(H)ן29.2 inches(V) diagonal 60 inches Aspect Ratio 16 : 9 Resolution 1365...60 Hz)), 2-2 pull down Converter (PAL, 576I, 625I, NTSC, 480I, 525I), Digital Zooming (100 % to change without notice. *1 HD/DVD/DTV input signals supported on the plasma monitor may not be an inconsistency with HDCP. Accessories Power cord (ן1), Remote control (ן1), AAA batteries (ן2), Manuals...


