60XM5 IG
Page 1
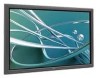
...30° Portrait 10° Max Tilt www.necvisualsystems.com PX-60XM5 Page 1 of America Visual Systems Division Rev 1.0 Product Description Type: Plasma Display Resolution: 1365x768 Aspect Ratio: 16:9 Color Correction: NEC AccuCrimson (in front filter) Screen Surface: Anti-Reflective Dimensions: 57....90"(W) x 34.70"(H) x 4.80"(D) Weight: 135.6lbs FCC: Class B Notes This document is not intended to wood studs. 4:3 sources can be a step-by 25.4. 60XM5 Installation Guide 60" Plasma Display...
...30° Portrait 10° Max Tilt www.necvisualsystems.com PX-60XM5 Page 1 of America Visual Systems Division Rev 1.0 Product Description Type: Plasma Display Resolution: 1365x768 Aspect Ratio: 16:9 Color Correction: NEC AccuCrimson (in front filter) Screen Surface: Anti-Reflective Dimensions: 57....90"(W) x 34.70"(H) x 4.80"(D) Weight: 135.6lbs FCC: Class B Notes This document is not intended to wood studs. 4:3 sources can be a step-by 25.4. 60XM5 Installation Guide 60" Plasma Display...

60XM5 IG
Page 2
www.necvisualsystems.com PX-60XM5 Page 2 of America Visual Systems Division Rev 1.0 NOTE: The ventilation space should not be incorporated into the design. If for some reason the opening needs to be covered, other means of ventilation will need to be covered or closed off at the front of the opening. NEC Corporation of 10 Contact NEC for proper ventilation. 60XM5 Installation Guide 60" Plasma Display Ventilation Requirements (all models) Dimensions below are minimum required for design review and recommendations.
www.necvisualsystems.com PX-60XM5 Page 2 of America Visual Systems Division Rev 1.0 NOTE: The ventilation space should not be incorporated into the design. If for some reason the opening needs to be covered, other means of ventilation will need to be covered or closed off at the front of the opening. NEC Corporation of 10 Contact NEC for proper ventilation. 60XM5 Installation Guide 60" Plasma Display Ventilation Requirements (all models) Dimensions below are minimum required for design review and recommendations.
60XM5 IG
Page 5
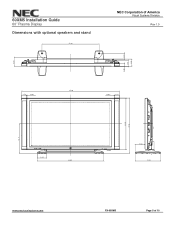
60XM5 Installation Guide 60" Plasma Display Dimensions with optional speakers and stand 37.90 NEC Corporation of America Visual Systems Division Rev 1.0 3.80 4.80 3.80 1.80 3.50 (0.02) 65.00 (0.02) 3.50 6.00 19.7" 34.60 37.10 6.40 44.00 LED&IR 6.00 17.00 www.necvisualsystems.com PX-60XM5 Page 5 of 10
60XM5 Installation Guide 60" Plasma Display Dimensions with optional speakers and stand 37.90 NEC Corporation of America Visual Systems Division Rev 1.0 3.80 4.80 3.80 1.80 3.50 (0.02) 65.00 (0.02) 3.50 6.00 19.7" 34.60 37.10 6.40 44.00 LED&IR 6.00 17.00 www.necvisualsystems.com PX-60XM5 Page 5 of 10
60XM5 IG
Page 6
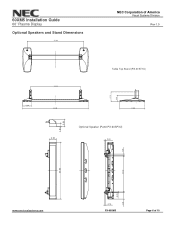
60XM5 Installation Guide 60" Plasma Display Optional Speakers and Stand Dimensions 37.90 NEC Corporation of America Visual Systems Division Rev 1.0 Table Top Stand (PX-61ST1U) 33.50 6.74 4.39 6.40 44.00 17.00 1.80 3.80 Optional Speaker (Part# PX-60SP3U) 3.50 0.50 1.20 22.10 34.60 0.20 4.20 www.necvisualsystems.com 0.70 PX-60XM5 Page 6 of 10
60XM5 Installation Guide 60" Plasma Display Optional Speakers and Stand Dimensions 37.90 NEC Corporation of America Visual Systems Division Rev 1.0 Table Top Stand (PX-61ST1U) 33.50 6.74 4.39 6.40 44.00 17.00 1.80 3.80 Optional Speaker (Part# PX-60SP3U) 3.50 0.50 1.20 22.10 34.60 0.20 4.20 www.necvisualsystems.com 0.70 PX-60XM5 Page 6 of 10
60XM5 IG
Page 7
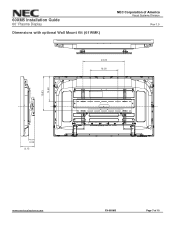
60XM5 Installation Guide 60" Plasma Display Dimensions with optional Wall Mount Kit (61WMK) NEC Corporation of America Visual Systems Division Rev 1.0 24.00 16.00 19.93 14.60 3.35 8.13 www.necvisualsystems.com PX-60XM5 Page 7 of 10
60XM5 Installation Guide 60" Plasma Display Dimensions with optional Wall Mount Kit (61WMK) NEC Corporation of America Visual Systems Division Rev 1.0 24.00 16.00 19.93 14.60 3.35 8.13 www.necvisualsystems.com PX-60XM5 Page 7 of 10
60XM5 IG
Page 8
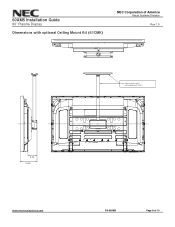
60XM5 Installation Guide 60" Plasma Display Dimensions with optional Ceiling Mount Kit (61CMK) NEC Corporation of America Visual Systems Division Rev 1.0 Note: Optional Acce ssories not included with 61CMK-1 5.70 10.45 www.necvisualsystems.com PX-60XM5 Page 8 of 10
60XM5 Installation Guide 60" Plasma Display Dimensions with optional Ceiling Mount Kit (61CMK) NEC Corporation of America Visual Systems Division Rev 1.0 Note: Optional Acce ssories not included with 61CMK-1 5.70 10.45 www.necvisualsystems.com PX-60XM5 Page 8 of 10

60XM5 IG
Page 9
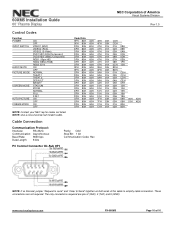
Speaker Connections www.necvisualsystems.com AC Inlet PX-60XM5 Page 9 of display Control Buttons Power Button Ext. 60XM5 Installation Guide 60" Plasma Display Connections NEC Corporation of America Visual Systems Division Rev 1.0 Located at bottom of 10
Speaker Connections www.necvisualsystems.com AC Inlet PX-60XM5 Page 9 of display Control Buttons Power Button Ext. 60XM5 Installation Guide 60" Plasma Display Connections NEC Corporation of America Visual Systems Division Rev 1.0 Located at bottom of 10
60XM5 IG
Page 10
... STADIUM ZOOM NORMAL FULL 2.35:1 ON OFF ON OFF NOTE: Contact your NEC rep for codes not listed. The only connections required are not required. 60XM5 Installation Guide 60" Plasma Display NEC Corporation of the cable to simplify cable connection. www.necvisualsystems.com PX-60XM5 Page 10 of 10 NOTE: Use a cross/reverse/null modem cable...
... STADIUM ZOOM NORMAL FULL 2.35:1 ON OFF ON OFF NOTE: Contact your NEC rep for codes not listed. The only connections required are not required. 60XM5 Installation Guide 60" Plasma Display NEC Corporation of the cable to simplify cable connection. www.necvisualsystems.com PX-60XM5 Page 10 of 10 NOTE: Use a cross/reverse/null modem cable...
User Manual
Page 3
... symbol alerts the user that the rotation speed of the cooling fan motor increases when the ambient temperature of a Plasma Display Panel. 8. Please see the section "Plasma monitor cleaning procedure". To avoid shock and fire hazards: 1. Unplug the power cord during use your dealer for ... Display a moving vehicle, as this happens, turn off . Continued operation at line voltages greater than 100 V to 240 V 50 Hz/60 Hz AC power supply. Recommendations to avoid or minimize image retention: Like all phosphor-based display devices and all service to cause electric shock....
... symbol alerts the user that the rotation speed of the cooling fan motor increases when the ambient temperature of a Plasma Display Panel. 8. Please see the section "Plasma monitor cleaning procedure". To avoid shock and fire hazards: 1. Unplug the power cord during use your dealer for ... Display a moving vehicle, as this happens, turn off . Continued operation at line voltages greater than 100 V to 240 V 50 Hz/60 Hz AC power supply. Recommendations to avoid or minimize image retention: Like all phosphor-based display devices and all service to cause electric shock....

User Manual
Page 4
... this monitor will not conform to the human health and the environment at the minimum level. Remote cable (not supplied) To plasma monitor core This product complies with a three-wire grounding (earthed) plug - When you dispose of such products, please follow the...you purchased the product. Wind the remote cable (not supplied) around the ferrite core (supplied) once, and then fasten the catch. This includes plasma monitors and their electrical accessories. Operating Environment Operating environment temperature and humidity: 0 °C to +40 °C (+32 °F to mandatory ...
... this monitor will not conform to the human health and the environment at the minimum level. Remote cable (not supplied) To plasma monitor core This product complies with a three-wire grounding (earthed) plug - When you dispose of such products, please follow the...you purchased the product. Wind the remote cable (not supplied) around the ferrite core (supplied) once, and then fasten the catch. This includes plasma monitors and their electrical accessories. Operating Environment Operating environment temperature and humidity: 0 °C to +40 °C (+32 °F to mandatory ...
User Manual
Page 5
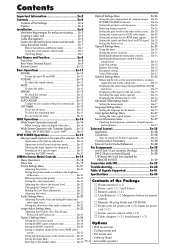
... • Ceiling mount unit screen En-25 • Tilt mount unit Setting high definition images to the desired level En-22 Ⅺ Plasma monitor (ן1) Changing the Gamma Curve En-22 Making the Low Tone adjustments En-22 Adjusting the colors En-22 Audio Settings ...1503;2) Ⅺ Cable clampers (ן3), beads bands (ן3) Setting the on mode En-31 Enabling/disabling the front panel controls .......... En-15 External Control En-38 When "PICTURE SIZE" is no input To adjust the sound volume En-13 MUTE En-13 signal ...
... • Ceiling mount unit screen En-25 • Tilt mount unit Setting high definition images to the desired level En-22 Ⅺ Plasma monitor (ן1) Changing the Gamma Curve En-22 Making the Low Tone adjustments En-22 Adjusting the colors En-22 Audio Settings ...1503;2) Ⅺ Cable clampers (ן3), beads bands (ן3) Setting the on mode En-31 Enabling/disabling the front panel controls .......... En-15 External Control En-38 When "PICTURE SIZE" is no input To adjust the sound volume En-13 MUTE En-13 signal ...

User Manual
Page 6
... level environment that is strong enough to support the weight. • Use the specified clasps for Wall enclosure mounting To allow heat to the plasma monitor in damage to the equipment or injury to use a stand or original mounting unit. (Wall mount unit, Stand, etc.) •...mm (2") objects as shown on its own. Drawing A Drawing B Ventilation Requirements for installing. • After installation, take appropriate measures to prevent the plasma from tipping over or falling. • Make sure to scratch the screen face. * Do not touch or hold the screen face when carrying the ...
... level environment that is strong enough to support the weight. • Use the specified clasps for Wall enclosure mounting To allow heat to the plasma monitor in damage to the equipment or injury to use a stand or original mounting unit. (Wall mount unit, Stand, etc.) •...mm (2") objects as shown on its own. Drawing A Drawing B Ventilation Requirements for installing. • After installation, take appropriate measures to prevent the plasma from tipping over or falling. • Make sure to scratch the screen face. * Do not touch or hold the screen face when carrying the ...

User Manual
Page 7
... commercially available distribution amplifier) to connect the split signals to an extraordinary load. 2. Clampers are input to the display. 42XM5 50XM6 60XM5 Back of the unit Back of the unit Back of the unit mounting holes mounting holes mounting holes To attach Insert q into ... rough-standard with lower than 1024ן768, 60 Hz signal. • A distribution amplifier is particularly recommended when creating a 3ן3 (or greater) video wall. • When looping from another plasma display, set the LOOP OUT to fix the clamper. Creating...
... commercially available distribution amplifier) to connect the split signals to an extraordinary load. 2. Clampers are input to the display. 42XM5 50XM6 60XM5 Back of the unit Back of the unit Back of the unit mounting holes mounting holes mounting holes To attach Insert q into ... rough-standard with lower than 1024ן768, 60 Hz signal. • A distribution amplifier is particularly recommended when creating a 3ן3 (or greater) video wall. • When looping from another plasma display, set the LOOP OUT to fix the clamper. Creating...
User Manual
Page 8
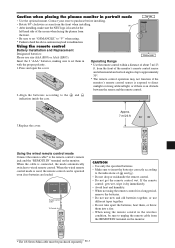
...of the monitor's remote control sensor and at the left hand side of the screen when facing the plasma from 90° / EXIT RIGHT/ + LEFT/ - Caution when placing the plasma monitor in the wireless condition, be sure to unplug the remote cable from the REMOTE IN terminal on... according to purchase before installing. • Rotate 90° clockwise as seen from the front when installing. • After installing, make sure the NEC logo is connected, the mode automatically switches to malfunction. INPUT SELECT RIGHT/ + / EXIT Please use different types together. • Do not take ...
...of the monitor's remote control sensor and at the left hand side of the screen when facing the plasma from 90° / EXIT RIGHT/ + LEFT/ - Caution when placing the plasma monitor in the wireless condition, be sure to unplug the remote cable from the REMOTE IN terminal on... according to purchase before installing. • Rotate 90° clockwise as seen from the front when installing. • After installing, make sure the NEC logo is connected, the mode automatically switches to malfunction. INPUT SELECT RIGHT/ + / EXIT Please use different types together. • Do not take ...

User Manual
Page 9
... information, please contact your dealer. INPUT SELECT RIGHT/ + / EXIT MENU/ ENTER VOLUME DOWN UP LEFT/ - When the power is RGB with composite sync. Note: This plasma monitor has the capasity to display images when connected to European DVD players with composite sync signal. t LEFT/- u MENU/ENTER Sets the On-Screen Menu...
... information, please contact your dealer. INPUT SELECT RIGHT/ + / EXIT MENU/ ENTER VOLUME DOWN UP LEFT/ - When the power is RGB with composite sync. Note: This plasma monitor has the capasity to display images when connected to European DVD players with composite sync signal. t LEFT/- u MENU/ENTER Sets the On-Screen Menu...
User Manual
Page 10
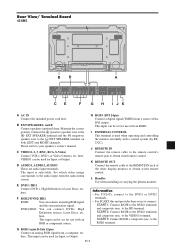
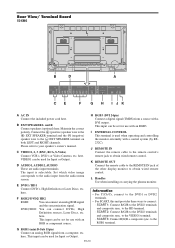
... when operating and controlling the monitor externally with an RGB3. D AUDIO1, AUDIO2, AUDIO3 These are audio input terminals. L Handles Use when installing or carrying the plasma monitor. here. I JK A AC IN Connect the included power cord here. K REMOTE OUT Connect the remote cable to the REMOTE IN jack of the other...
... when operating and controlling the monitor externally with an RGB3. D AUDIO1, AUDIO2, AUDIO3 These are audio input terminals. L Handles Use when installing or carrying the plasma monitor. here. I JK A AC IN Connect the included power cord here. K REMOTE OUT Connect the remote cable to the REMOTE IN jack of the other...
User Manual
Page 11
... can connect DVDs, High Definition sources, Laser Discs, etc. This input can be set for Input or Output. L Handles Use when installing or carrying the plasma monitor. to the HD terminal. · SCART2: Connect R/G/B to obtain wired remote control. to the audio input from the audio menu screen. En-10 Rear...
... can connect DVDs, High Definition sources, Laser Discs, etc. This input can be set for Input or Output. L Handles Use when installing or carrying the plasma monitor. to the HD terminal. · SCART2: Connect R/G/B to obtain wired remote control. to the audio input from the audio menu screen. En-10 Rear...

User Manual
Page 12
... or DVD2 terminals. • For SCART, this unit provides three ways to connect: · SCART1: Connect R/G/B to obtain wired remote control. Rear View/ Terminal Board 60XM5 L VIDEO AUDIO 1 DVD1 / HD1 AUDIO 2 RGB2 / DVD2 / HD2 L/R Y Cb/Pb Cr/Pr L/R R/Cr/Pr G/Y B/Cb/Pb HD VD RGB 1 (IN/OUT)...an RGB or component source. This input can be used for use with a DVI output. L Handles Use when installing or carrying the plasma monitor. VIDEO1 can connect an analog RGB signal and the syncronization signal. G RGB1 (mini D-Sub 15pin) Connect an analog RGB signal...
... or DVD2 terminals. • For SCART, this unit provides three ways to connect: · SCART1: Connect R/G/B to obtain wired remote control. Rear View/ Terminal Board 60XM5 L VIDEO AUDIO 1 DVD1 / HD1 AUDIO 2 RGB2 / DVD2 / HD2 L/R Y Cb/Pb Cr/Pr L/R R/Cr/Pr G/Y B/Cb/Pb HD VD RGB 1 (IN/OUT)...an RGB or component source. This input can be used for use with a DVI output. L Handles Use when installing or carrying the plasma monitor. VIDEO1 can connect an analog RGB signal and the syncronization signal. G RGB1 (mini D-Sub 15pin) Connect an analog RGB signal...

User Manual
Page 13
... in the wired condition. Remote Control q POWER ON/STANDBY Switches the power on/standby. (This does not operate when the POWER/STANDBY indicator of the plasma is off timer for the unit. !5 SIDE BY SIDE Press this button can be used to switch the input source quickly. @2 Remote control signal transmitter...
... in the wired condition. Remote Control q POWER ON/STANDBY Switches the power on/standby. (This does not operate when the POWER/STANDBY indicator of the plasma is off timer for the unit. !5 SIDE BY SIDE Press this button can be used to switch the input source quickly. @2 Remote control signal transmitter...

User Manual
Page 22
... between light and dark sections. DEFAULT: Use this mode when watching video in which the picture quality is not set color tone produced by the plasma display. PICTURE 1 / 2 CONTRAST : 52 BRIGHTNESS : 32 SHARPNESS : 16 COLOR : 32 TINT R G : 32 PICTURE MODE : NORMAL NR : OFF NEXT PAGE SEL. Each has a different level of...
... between light and dark sections. DEFAULT: Use this mode when watching video in which the picture quality is not set color tone produced by the plasma display. PICTURE 1 / 2 CONTRAST : 52 BRIGHTNESS : 32 SHARPNESS : 16 COLOR : 32 TINT R G : 32 PICTURE MODE : NORMAL NR : OFF NEXT PAGE SEL. Each has a different level of...


