User Manual
Page 1
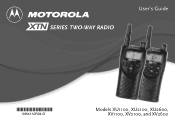
PRELIMINARY SERIES TWO-WAY RADIO User's Guide @6864110R04@ 6864110R04-O Models XU1100, XU2100, XU2600, XV1100, XV2100, and XV2600
PRELIMINARY SERIES TWO-WAY RADIO User's Guide @6864110R04@ 6864110R04-O Models XU1100, XU2100, XU2600, XV1100, XV2100, and XV2600
User Manual
Page 3
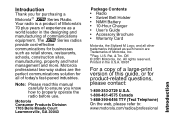
...: 1-800-353-2729 U.S.A. 1-800-461-4575 Canada 1-888-390-6456 TTY (Text Telephone) On the web, please refer to properly operate the radio before use. Your radio is a product of Motorola's 70 plus years of experience as such herein are the perfect communications solution for businesses such as retail stores, restaurants, schools, construction...
...: 1-800-353-2729 U.S.A. 1-800-461-4575 Canada 1-888-390-6456 TTY (Text Telephone) On the web, please refer to properly operate the radio before use. Your radio is a product of Motorola's 70 plus years of experience as such herein are the perfect communications solution for businesses such as retail stores, restaurants, schools, construction...
User Manual
Page 4
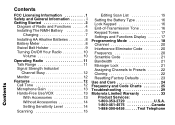
...17 Programming Mode 18 Channel 20 Swivel Belt Holster 9 Interference Eliminator Code 20 Turning On/Off Your Radio 10 Frequency 20 Volume 10 Scramble Code 21 Operating Radio 11 Bandwidth 21 Talk Range 11 Manager Lock 21 Signal Strength Indicator/ Assigning Channels to Presets 22 ... 12 Use and Care 24 Call Tone 12 Frequency and Code Charts 25 Microphone Gain 13 Troubleshooting 29 Hands-Free Use/VOX 13 Motorola Limited Warranty 33 With Accessories 13 Product Services: Without Accessories 14 1-800-353-2729 U.S.A. Setting Sensitivity Level 14 1-800-461-4575...
...17 Programming Mode 18 Channel 20 Swivel Belt Holster 9 Interference Eliminator Code 20 Turning On/Off Your Radio 10 Frequency 20 Volume 10 Scramble Code 21 Operating Radio 11 Bandwidth 21 Talk Range 11 Manager Lock 21 Signal Strength Indicator/ Assigning Channels to Presets 22 ... 12 Use and Care 24 Call Tone 12 Frequency and Code Charts 25 Microphone Gain 13 Troubleshooting 29 Hands-Free Use/VOX 13 Motorola Limited Warranty 33 With Accessories 13 Product Services: Without Accessories 14 1-800-353-2729 U.S.A. Setting Sensitivity Level 14 1-800-461-4575...
User Manual
Page 5
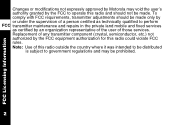
... made on page 25. Faxed contact the Fax-OnDemand system at: 1-202-418-0177 Mailed call Motorola Product Services at : 1-888-CALL-FCC 1-888-225-5322 Or: http://www.fcc.gov Before filling out your radio frequency, please call the FCC forms hotline at: 1-800-418-FORM 1-800-418-3676 Questions regarding...frequencies, you can operate on. See the Frequency and Code Charts on FCC Form 601 and Schedules D, E and G. FCC Licensing Information XSeries professional two-way radios operate on radio frequencies that are required to have questions, please use the following contact information.
... made on page 25. Faxed contact the Fax-OnDemand system at: 1-202-418-0177 Mailed call Motorola Product Services at : 1-888-CALL-FCC 1-888-225-5322 Or: http://www.fcc.gov Before filling out your radio frequency, please call the FCC forms hotline at: 1-800-418-FORM 1-800-418-3676 Questions regarding...frequencies, you can operate on. See the Frequency and Code Charts on FCC Form 601 and Schedules D, E and G. FCC Licensing Information XSeries professional two-way radios operate on radio frequencies that are required to have questions, please use the following contact information.
User Manual
Page 6
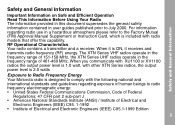
..., semiconductor, etc.) not authorized by an organization representative of the user of this radio and should be made . Note: Use of those services. FCC Licensing Information Changes or modifications not expressly approved by Motorola may void the user's authority granted by the FCC to operate this... radio outside the country where it was intended to be distributed is subject to perform FCC transmitter ...
..., semiconductor, etc.) not authorized by an organization representative of the user of this radio and should be made . Note: Use of those services. FCC Licensing Information Changes or modifications not expressly approved by Motorola may void the user's authority granted by the FCC to operate this... radio outside the country where it was intended to be distributed is subject to perform FCC transmitter ...
User Manual
Page 7
...receives and transmits radio frequency (RF) energy. When you communicate with XU1100 or XV1100 radios the output power level is 1.0 watt, with other XTN Series radios, the output power level is 2.0 watts Exposure to Radio Frequency Energy Your Motorola radio is designed to comply with radio models that ... This Information Before Using Your Radio The information provided in this capability. For information regarding exposure of human beings to July 2000. The XTN Series VHF radios operate in the frequency range of 151-158 MHz, the XTN Series UHF radios operate in the frequency range of...
...receives and transmits radio frequency (RF) energy. When you communicate with XU1100 or XV1100 radios the output power level is 1.0 watt, with other XTN Series radios, the output power level is 2.0 watts Exposure to Radio Frequency Energy Your Motorola radio is designed to comply with radio models that ... This Information Before Using Your Radio The information provided in this capability. For information regarding exposure of human beings to July 2000. The XTN Series VHF radios operate in the frequency range of 151-158 MHz, the XTN Series UHF radios operate in the frequency range of...
User Manual
Page 8
... to 300 GHz, 1999 • Australian Communications Authority Radiocommunications (Electromagnetic Radiation - ii Two-Way Radio Operation When using your radio as a traditional two-way radio, hold the antenna when the radio is within the guidelines set forth in the above standards, always adhere to the following procedures: ...• International Commission on Non-Ionizing Radiation Protection (ICNIRP) 1998 • Ministry of Human Exposure to Radio Frequency Electromagnetic Fields in the Frequency Range from the lips. Unauthorized antennas, modifications, or attachments could damage the...
... to 300 GHz, 1999 • Australian Communications Authority Radiocommunications (Electromagnetic Radiation - ii Two-Way Radio Operation When using your radio as a traditional two-way radio, hold the antenna when the radio is within the guidelines set forth in the above standards, always adhere to the following procedures: ...• International Commission on Non-Ionizing Radiation Protection (ICNIRP) 1998 • Ministry of Human Exposure to Radio Frequency Electromagnetic Fields in the Frequency Range from the lips. Unauthorized antennas, modifications, or attachments could damage the...
User Manual
Page 9
...cm) from the body. iii Aircraft When instructed to do so, turn off your radio in any data feature of a device, with applicable regulations per airline crew instructions. Use of non-Motorola-approved accessories may be using any facility where posted notices instruct you to electromagnetic interference...Nearly every electronic device is susceptible to do not use of www.motorola.com/store. Any use a body-worn accessory, ensure the radio and its antenna is sensitive to the Two-Way Radio section of a radio must be in accordance with or without an accessory cable, position ...
...cm) from the body. iii Aircraft When instructed to do so, turn off your radio in any data feature of a device, with applicable regulations per airline crew instructions. Use of non-Motorola-approved accessories may be using any facility where posted notices instruct you to electromagnetic interference...Nearly every electronic device is susceptible to do not use of www.motorola.com/store. Any use a body-worn accessory, ensure the radio and its antenna is sensitive to the Two-Way Radio section of a radio must be in accordance with or without an accessory cable, position ...
User Manual
Page 10
...recommends that interference is adequately shielded from their pacemaker when the radio is turned ON. • not carry the radio in obtaining this information. These recommendations are consistent with pacemakers should: • ALWAYS keep the radio more than six inches (15 centimeters) from RF energy. ...you in the breast pocket. • use the ear opposite the pacemaker to minimize the potential for interference. • turn the radio OFF immediately if you have any other personal medical device, consult the manufacturer of such interference, you use any reason to suspect that...
...recommends that interference is adequately shielded from their pacemaker when the radio is turned ON. • not carry the radio in obtaining this information. These recommendations are consistent with pacemakers should: • ALWAYS keep the radio more than six inches (15 centimeters) from RF energy. ...you in the breast pocket. • use the ear opposite the pacemaker to minimize the potential for interference. • turn the radio OFF immediately if you have any other personal medical device, consult the manufacturer of such interference, you use any reason to suspect that...
User Manual
Page 11
... decks on the use in such areas as grain, dust or metal powders, and any area with an Air Bag Do not place a portable radio in the area over an air bag or in the air bag deployment area. Do not remove, install, or charge batteries in bodily injury or... even death. Always obey them. Areas with great force. If a portable radio is a radio type especially qualified for use of the vehicle. When using your vehicle engine. Air bags inflate with potentially explosive atmospheres are often but not always...
... decks on the use in such areas as grain, dust or metal powders, and any area with an Air Bag Do not place a portable radio in the area over an air bag or in the air bag deployment area. Do not remove, install, or charge batteries in bodily injury or... even death. Always obey them. Areas with great force. If a portable radio is a radio type especially qualified for use of the vehicle. When using your vehicle engine. Air bags inflate with potentially explosive atmospheres are often but not always...
User Manual
Page 12
... you are near electrical blasting caps, in a blasting area, or in handling any portable radio that has a damaged antenna. the battery charger, and 3. Charging Safety Instructions Before using the battery. vi Other types of injury, charge only the...other container with metal objects. Caution: To reduce the risk of batteries may complete an electrical circuit (short circuit) and become quite hot. the radio using the battery charger, read all signs and instructions. The conductive material may burst, causing personal injury and damage. Obey all instructions and cautionary ...
... you are near electrical blasting caps, in a blasting area, or in handling any portable radio that has a damaged antenna. the battery charger, and 3. Charging Safety Instructions Before using the battery. vi Other types of injury, charge only the...other container with metal objects. Caution: To reduce the risk of batteries may complete an electrical circuit (short circuit) and become quite hot. the radio using the battery charger, read all signs and instructions. The conductive material may burst, causing personal injury and damage. Obey all instructions and cautionary ...
User Manual
Page 15
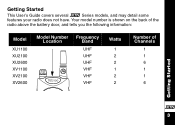
Getting Started This User's Guide covers several XSeries models, and may detail some features your radio does not have. Your model number is shown on the back of the radio above the battery door, and tells you the following information: Model XU1100 XU2100 XU2600 XV1100 XV2100 XV2600 Model Number Location Frequency Band UHF UHF UHF VHF VHF VHF Watts 1 2 2 1 2 2 Number of Channels 1 1 6 1 1 6 Getting Started X 3
Getting Started This User's Guide covers several XSeries models, and may detail some features your radio does not have. Your model number is shown on the back of the radio above the battery door, and tells you the following information: Model XU1100 XU2100 XU2600 XV1100 XV2100 XV2600 Model Number Location Frequency Band UHF UHF UHF VHF VHF VHF Watts 1 2 2 1 2 2 Number of Channels 1 1 6 1 1 6 Getting Started X 3

User Manual
Page 16
Diagram of Your New XSeries Radio and its Functions Getting Started X 4 Indicator Light Use B to: Transmit Call Tone Use M to: Talk Exit a menu Use \to: Scroll through menus Lock the keypad Use T / S to: *Access Presets Microphone Use P (Power) to: Turn power On/Off Adjust radio volume Accessory Jack Radio Plug-in Charging Audio Accessories Use J to: Turn Scan On/Off* Monitor the Frequency Use [ and ] to: Change Channels* Change menu settings Speaker * XU2600 and XV2600 Only
Diagram of Your New XSeries Radio and its Functions Getting Started X 4 Indicator Light Use B to: Transmit Call Tone Use M to: Talk Exit a menu Use \to: Scroll through menus Lock the keypad Use T / S to: *Access Presets Microphone Use P (Power) to: Turn power On/Off Adjust radio volume Accessory Jack Radio Plug-in Charging Audio Accessories Use J to: Turn Scan On/Off* Monitor the Frequency Use [ and ] to: Change Channels* Change menu settings Speaker * XU2600 and XV2600 Only
User Manual
Page 17
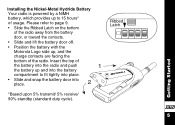
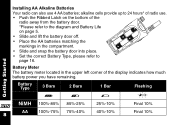
... to page 9. • Slide the Ribbed Latch on the bottom of the radio away from the battery door, or toward the contacts. • Slide and lift the battery door off. • Position the battery with the Motorola Logo side up, and the charge contacts are facing the bottom of the battery... into the radio and push 1 the battery up to fit tightly into place. • Slide and snap the battery door...
... to page 9. • Slide the Ribbed Latch on the bottom of the radio away from the battery door, or toward the contacts. • Slide and lift the battery door off. • Position the battery with the Motorola Logo side up, and the charge contacts are facing the bottom of the battery... into the radio and push 1 the battery up to fit tightly into place. • Slide and snap the battery door...
User Manual
Page 18
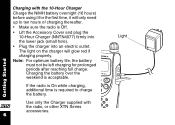
... plug the 10-Hour Charger (NNTN4077) firmly into the lower jack (small hole). • Plug the charger into an electric outlet. Charging with the radio, or other XTN Series accessories. The light on the charger will only need up to charge the battery. X 6 Use only the Charger supplied with the 10-Hour Charger...
... plug the 10-Hour Charger (NNTN4077) firmly into the lower jack (small hole). • Plug the charger into an electric outlet. Charging with the radio, or other XTN Series accessories. The light on the charger will only need up to charge the battery. X 6 Use only the Charger supplied with the 10-Hour Charger...
User Manual
Page 19
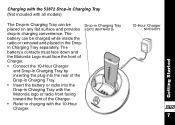
in Charging Tray separately. The battery can be charged while inside the radio or removed and placed in the Drop- The battery's contacts must face down and the Motorola Logo must face the front of Charger. • Connect the 10-Hour Charger and Drop-in Charging Tray by inserting the plug ...into the rear of the Drop-in Charging Tray. • Insert the battery or radio into the Drop-in Charging Tray with the Motorola logo or radio front facing toward the front of the Charger. • Refer to charging with all models) The Drop-in Charging ...
in Charging Tray separately. The battery can be charged while inside the radio or removed and placed in the Drop- The battery's contacts must face down and the Motorola Logo must face the front of Charger. • Connect the 10-Hour Charger and Drop-in Charging Tray by inserting the plug ...into the rear of the Drop-in Charging Tray. • Insert the battery or radio into the Drop-in Charging Tray with the Motorola logo or radio front facing toward the front of the Charger. • Refer to charging with all models) The Drop-in Charging ...
User Manual
Page 20
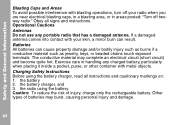
... lift the battery door off. • Place the AA batteries matching the markings in the upper left corner of the radio away from the battery door. *Please refer to 24 hours* of radio use 4 AA batteries; Battery Type 3 Bars 2 Bars 1 Bar Flashing Getting Started d b c m X 8 NiMH AA 100%-85% 100%-75% 85%-25...
... lift the battery door off. • Place the AA batteries matching the markings in the upper left corner of the radio away from the battery door. *Please refer to 24 hours* of radio use 4 AA batteries; Battery Type 3 Bars 2 Bars 1 Bar Flashing Getting Started d b c m X 8 NiMH AA 100%-85% 100%-75% 85%-25...
User Manual
Page 21
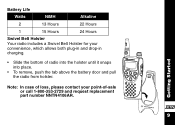
Battery Life Watts NiMH Alkaline 2 13 Hours 22 Hours 1 15 Hours 24 Hours Swivel Belt Holster Your radio includes a Swivel Belt Holster for your point-of radio into the holster until it snaps into place. • To remove, push the tab above the battery door and pull the radio from holster. Note: In case of loss, please contact your convenience, which allows both plug-in and drop-in charging. • Slide the bottom of -sale or call 1-800-353-2729 and request replacement part number NNTN4106AR. Getting Started X 9
Battery Life Watts NiMH Alkaline 2 13 Hours 22 Hours 1 15 Hours 24 Hours Swivel Belt Holster Your radio includes a Swivel Belt Holster for your point-of radio into the holster until it snaps into place. • To remove, push the tab above the battery door and pull the radio from holster. Note: In case of loss, please contact your convenience, which allows both plug-in and drop-in charging. • Slide the bottom of -sale or call 1-800-353-2729 and request replacement part number NNTN4106AR. Getting Started X 9
User Manual
Page 22
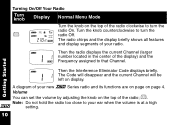
... knob Display Normal Menu Mode Turn the knob on the top of the radio; Volume You can set the volume by adjusting the knob on the top of the radio clockwise to turn the P k radio Off. 188 218 The radio chirps and the display briefly shows all features and display segments of the ...ear when the volume is at a high X setting. 10 P. Note: Do not hold the radio too close to that Channel. Then the radio displays the current Channel (larger number located in the center of your new XSeries radio and its functions are on page on display. The Code will disappear and the current...
... knob Display Normal Menu Mode Turn the knob on the top of the radio; Volume You can set the volume by adjusting the knob on the top of the radio clockwise to turn the P k radio Off. 188 218 The radio chirps and the display briefly shows all features and display segments of the ...ear when the volume is at a high X setting. 10 P. Note: Do not hold the radio too close to that Channel. Then the radio displays the current Channel (larger number located in the center of your new XSeries radio and its functions are on page on display. The Code will disappear and the current...

User Manual
Page 23
To maximize clarity hold M. Up to 15 Floors Up to 5 Miles VHF 2W Up to -three inches away from your mouth. • To listen for messages, release M. Ft. and speak into the radio. Talk Range Industrial Multi-Level Outdoor Model Inside steel/concrete Inside multi-level Flat ground with no industrial buildings ... Up to 10 Floors Up to 6 Miles VHF 1W Up to 250,000 Sq. If you hear static, then the channel is clear to 200,000 Sq. Note: The transmit light on the front left of the radio flashes every three seconds when the radio is On and is speaking on the channel...
To maximize clarity hold M. Up to 15 Floors Up to 5 Miles VHF 2W Up to -three inches away from your mouth. • To listen for messages, release M. Ft. and speak into the radio. Talk Range Industrial Multi-Level Outdoor Model Inside steel/concrete Inside multi-level Flat ground with no industrial buildings ... Up to 10 Floors Up to 6 Miles VHF 1W Up to 250,000 Sq. If you hear static, then the channel is clear to 200,000 Sq. Note: The transmit light on the front left of the radio flashes every three seconds when the radio is On and is speaking on the channel...


