
User Guide
Page 4
... 29 Turning radio ON/OFF 29 Adjusting Volume 29 Selecting a Channel 29 Talking and Monitoring 29 Receiving a Call 30 Talk Range 30 Radio LED Indicators 32 Hands-Free Use/VOX 33 With Compatible VOX Accessories. . . . .33 Setting VOX Sensitivity 34 Microphone Gain 34 Battery Save 34 Reset to Factory Defaults 34 End of Transmission Tone (Roger Beep Tone 35 Programming Features 36 Programming Mode 36 Learning to Read the Values the Radio Signals You 36 Entering Programming Mode 39 Reading Frequencies Values 39 English 2 Reading CTCSS/DPL...
... 29 Turning radio ON/OFF 29 Adjusting Volume 29 Selecting a Channel 29 Talking and Monitoring 29 Receiving a Call 30 Talk Range 30 Radio LED Indicators 32 Hands-Free Use/VOX 33 With Compatible VOX Accessories. . . . .33 Setting VOX Sensitivity 34 Microphone Gain 34 Battery Save 34 Reset to Factory Defaults 34 End of Transmission Tone (Roger Beep Tone 35 Programming Features 36 Programming Mode 36 Learning to Read the Values the Radio Signals You 36 Entering Programming Mode 39 Reading Frequencies Values 39 English 2 Reading CTCSS/DPL...

User Guide
Page 5
... Accessories 81 Power Supplies AC Pin Adaptors 81 Software Applications 81 Cables 81 Chargers 81 Power Supplies 82 RDX Series™ Features Summary 83 Programmable Buttons Chart 93 Icons Chart 94 3 English VHF Default Frequencies Chart 64 RDX UHF Frequencies Chart 65 RDU2020 - CONTENTS Cloning Radios 51 Cloning with a Multi Unit Charger (MUC 51 Cloning Radio using the Radio to Radio (R2R) Cloning Cable (Optional Accessory 53 Cloning using the CPS (Computer Programming Software 55 Troubleshooting 56 Use and Care 60 Frequency and Code Charts 61 RDX VHF Frequencies Chart...
... Accessories 81 Power Supplies AC Pin Adaptors 81 Software Applications 81 Cables 81 Chargers 81 Power Supplies 82 RDX Series™ Features Summary 83 Programmable Buttons Chart 93 Icons Chart 94 3 English VHF Default Frequencies Chart 64 RDX UHF Frequencies Chart 65 RDU2020 - CONTENTS Cloning Radios 51 Cloning with a Multi Unit Charger (MUC 51 Cloning Radio using the Radio to Radio (R2R) Cloning Cable (Optional Accessory 53 Cloning using the CPS (Computer Programming Software 55 Troubleshooting 56 Use and Care 60 Frequency and Code Charts 61 RDX VHF Frequencies Chart...

User Guide
Page 7
... for purchasing the Motorola® RDX Series™ Radio. The RDX Series™ radios provide cost-effective communications for RDU4100 and RDV5100) • Spring Action Belt-Clip • Lithium-Ion Battery • Power Supply • User Guide • Warranty Card • Drop-in the designing and manufacturing of today's fast-paced industries. Note: Read this user guide carefully to properly operate the radio before use Business Radios, RPSD 1C15, Motorola 8000 West...
... for purchasing the Motorola® RDX Series™ Radio. The RDX Series™ radios provide cost-effective communications for RDU4100 and RDV5100) • Spring Action Belt-Clip • Lithium-Ion Battery • Power Supply • User Guide • Warranty Card • Drop-in the designing and manufacturing of today's fast-paced industries. Note: Read this user guide carefully to properly operate the radio before use Business Radios, RPSD 1C15, Motorola 8000 West...
User Guide
Page 9
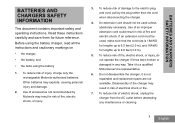
... of the charger may result in risk of electric shock, unplug the charger from the AC outlet before attempting any way. Use of an improper extension cord could result in risk of injury, charge only the rechargeable Motorola-authorized batteries. Do not disassemble the charger; If an extension cord must be used , make sure that the cord size is not repairable and replacement parts are...
... of the charger may result in risk of electric shock, unplug the charger from the AC outlet before attempting any way. Use of an improper extension cord could result in risk of injury, charge only the rechargeable Motorola-authorized batteries. Do not disassemble the charger; If an extension cord must be used , make sure that the cord size is not repairable and replacement parts are...

User Guide
Page 14
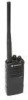
... default setting is 'Monitor'. For more information, see "Battery Features" on page 14. Channel Selector Knob Used to switch the radio to give battery status, power-up status, radio call information and scan status. For RDV5100, RDU4100 antennas are non-removable. Side Button 2 (SB2) • The Side Button 2 is a general button that can be configured by the Computer Programming Software - Microphone Speaks clearly into the microphone when sending a message. LED Indicator Used to different channels. Antenna...
... default setting is 'Monitor'. For more information, see "Battery Features" on page 14. Channel Selector Knob Used to switch the radio to give battery status, power-up status, radio call information and scan status. For RDV5100, RDU4100 antennas are non-removable. Side Button 2 (SB2) • The Side Button 2 is a general button that can be configured by the Computer Programming Software - Microphone Speaks clearly into the microphone when sending a message. LED Indicator Used to different channels. Antenna...

User Guide
Page 15
This User Guide covers multiple RDX Series™ models, and may detail some features your radio does not have. The radio's model is shown on the front of the radio, underneath the speaker, and provides you the following information: Model RDV2020 RDU2020 RDU4100 RDV5100 Frequency Band VHF UHF UHF VHF Transmit Power (Watts) 2 2 4 5 Number of Channels 2 2 10 10 Antenna Non-removable Non-removable removable removable RADIO OVERVIEW 13 English
This User Guide covers multiple RDX Series™ models, and may detail some features your radio does not have. The radio's model is shown on the front of the radio, underneath the speaker, and provides you the following information: Model RDV2020 RDU2020 RDU4100 RDV5100 Frequency Band VHF UHF UHF VHF Transmit Power (Watts) 2 2 4 5 Number of Channels 2 2 10 10 Antenna Non-removable Non-removable removable removable RADIO OVERVIEW 13 English

User Guide
Page 33
... English Channel: Current channel that make the transmissions sound garbled to anyone listening who is using, depending on both radios. GETTING STARTED To establish a proper two-way communication, the channel, frequency, and interference eliminator codes must be the same on radio model. 2. Frequency: The frequency the radio uses to that has been preprogrammed on how to set to transmit/receive. 3. For details on the radio: 1. This depends on the stored profile that specific code.
... English Channel: Current channel that make the transmissions sound garbled to anyone listening who is using, depending on both radios. GETTING STARTED To establish a proper two-way communication, the channel, frequency, and interference eliminator codes must be the same on radio model. 2. Frequency: The frequency the radio uses to that has been preprogrammed on how to set to transmit/receive. 3. For details on the radio: 1. This depends on the stored profile that specific code.
User Guide
Page 34
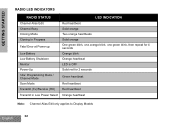
... STARTED RADIO LED INDICATORS RADIO STATUS LED INDICATION Channel Alias Edit Channel Busy Cloning Mode Red heartbeat Solid orange Two orange heartbeats Cloning In Progress Fatal Error at Power up Low Battery Solid orange One green blink, one orange blink, one green blink, then repeat for 4 seconds Orange blink Low Battery Shutdown Monitor Power-Up 'Idle' Programming Mode / Channel Mode Scan Mode Orange heartbeat LED is OFF Solid red for 2 seconds Green heartbeat Red heartbeat Transmit (Tx)/Receive (RX) Red heartbeat Transmit in Low Power...
... STARTED RADIO LED INDICATORS RADIO STATUS LED INDICATION Channel Alias Edit Channel Busy Cloning Mode Red heartbeat Solid orange Two orange heartbeats Cloning In Progress Fatal Error at Power up Low Battery Solid orange One green blink, one orange blink, one green blink, then repeat for 4 seconds Orange blink Low Battery Shutdown Monitor Power-Up 'Idle' Programming Mode / Channel Mode Scan Mode Orange heartbeat LED is OFF Solid red for 2 seconds Green heartbeat Red heartbeat Transmit (Tx)/Receive (RX) Red heartbeat Transmit in Low Power...
User Guide
Page 35
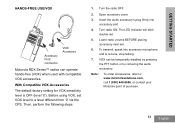
... will blink double red 5. VOX can operate hands-free (VOX) when used with compatible VOX accessories. With Compatible VOX Accessories The default factory setting for VOX sensitivity level is OFF (level '0'). To transmit, speak into accessory port. 4. GETTING STARTED HANDS-FREE USE/VOX Accessory Port/ Connector VOX Accessory Motorola RDX Series™ radios can be temporarily disabled by pressing the PTT button or by removing the audio accessory. Turn radio ON. Before using VOX, set VOX level to receive, stop talking. 7. Lower radio volume BEFORE placing accessory near...
... will blink double red 5. VOX can operate hands-free (VOX) when used with compatible VOX accessories. With Compatible VOX Accessories The default factory setting for VOX sensitivity level is OFF (level '0'). To transmit, speak into accessory port. 4. GETTING STARTED HANDS-FREE USE/VOX Accessory Port/ Connector VOX Accessory Motorola RDX Series™ radios can be temporarily disabled by pressing the PTT button or by removing the audio accessory. Turn radio ON. Before using VOX, set VOX level to receive, stop talking. 7. Lower radio volume BEFORE placing accessory near...
User Guide
Page 36
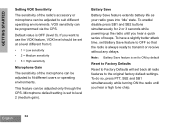
... adjusted to the original factory default settings. GETTING STARTED Setting VOX Sensitivity The sensitivity of the radio's accessory or microphone can be programmed via the CPS. To enable/ disable press SB1 and SB2 buttons simultaneously for 2 or 3 seconds while powering up the radio until you hear a quick series of beeps. To have a slightly better attack time, set back all radio features to suit different operating environments. Note: Battery Save feature is set to ON by default Reset to Factory Defaults Reset...
... adjusted to the original factory default settings. GETTING STARTED Setting VOX Sensitivity The sensitivity of the radio's accessory or microphone can be programmed via the CPS. To enable/ disable press SB1 and SB2 buttons simultaneously for 2 or 3 seconds while powering up the radio until you hear a quick series of beeps. To have a slightly better attack time, set back all radio features to suit different operating environments. Note: Battery Save feature is set to ON by default Reset to Factory Defaults Reset...

User Guide
Page 38
.../RDX PROGRAMMING MODE Programming Mode is set a particular channel to automatically enable Scan each channel. Short and long red blinks differentiate the specific number the radio is recommended to read and modify three features: • Frequencies, • Codes (CTCSS/DPL) and, • Auto-Scan. Learning to Read the Values the Radio Signals You As the non-display model does not have a display to show the values that are able to use the CPS Programming Cable and CPS software...
.../RDX PROGRAMMING MODE Programming Mode is set a particular channel to automatically enable Scan each channel. Short and long red blinks differentiate the specific number the radio is recommended to read and modify three features: • Frequencies, • Codes (CTCSS/DPL) and, • Auto-Scan. Learning to Read the Values the Radio Signals You As the non-display model does not have a display to show the values that are able to use the CPS Programming Cable and CPS software...
User Guide
Page 41
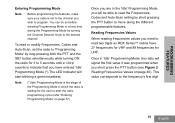
... modify Frequencies, Codes and Auto-Scan, set to the channel you wish to program. Note: (*)'Idle' Programming Mode is the stage of the Programming Mode in which the radio is set the radio to 'Programming Mode' by short pressing the PTT button to move along the different programmable features. Once in 'Idle' Programming Mode, the radio will signal the first value it was programmed when you need to read two digits as RDX Series™ radios...
... modify Frequencies, Codes and Auto-Scan, set to the channel you wish to program. Note: (*)'Idle' Programming Mode is the stage of the Programming Mode in which the radio is set the radio to 'Programming Mode' by short pressing the PTT button to move along the different programmable features. Once in 'Idle' Programming Mode, the radio will signal the first value it was programmed when you need to read two digits as RDX Series™ radios...
User Guide
Page 43
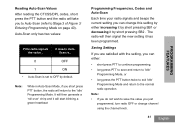
... radio operation. It will then generate a 'roll-over' chirp and it will start blinking a green heartbeat Programming Frequencies, Codes and Auto-Scan Each time your radio signals and beeps the current setting you can either increasing it by short pressing SB1 or decreasing it has been programmed. Note: While in Auto-Scan Mode, if you short press PTT button, the radio will return to Stage 3 of Figure 3: Entering Programming Mode...
... radio operation. It will then generate a 'roll-over' chirp and it will start blinking a green heartbeat Programming Frequencies, Codes and Auto-Scan Each time your radio signals and beeps the current setting you can either increasing it by short pressing SB1 or decreasing it has been programmed. Note: While in Auto-Scan Mode, if you short press PTT button, the radio will return to Stage 3 of Figure 3: Entering Programming Mode...
User Guide
Page 45
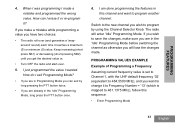
... 464.5500 MHz), and you will enter 'Idle' Programming Mode. PROGRAMMING VALUES EXAMPLE Example of Programming a Frequency Assuming current frequency value is set to Channel 1, with the UHF default frequency '02' (equivalent to save the changes, make a mistake while programming a value you get the desired value or, • Turn OFF the radio and start-over (and generates a 'wraparound' sound) each time it reaches a maximum (9) or minimum (0) value. I just programmed the value...
... 464.5500 MHz), and you will enter 'Idle' Programming Mode. PROGRAMMING VALUES EXAMPLE Example of Programming a Frequency Assuming current frequency value is set to Channel 1, with the UHF default frequency '02' (equivalent to save the changes, make a mistake while programming a value you get the desired value or, • Turn OFF the radio and start-over (and generates a 'wraparound' sound) each time it reaches a maximum (9) or minimum (0) value. I just programmed the value...

User Guide
Page 50
... also lock the Front-Panel Radio Programming or restrict any specific radio feature to be programmed CPS Software USB Connector Drop-in Charger Tray Mini Connector CPS Programming Cable The easiest way to program or change features in your Motorola point of the user guide for free as shown in Charger Tray and CPS Programming Cable as web based downloadable software at the end of purchase for profile radio's management. It also provides security by using...
... also lock the Front-Panel Radio Programming or restrict any specific radio feature to be programmed CPS Software USB Connector Drop-in Charger Tray Mini Connector CPS Programming Cable The easiest way to program or change features in your Motorola point of the user guide for free as shown in Charger Tray and CPS Programming Cable as web based downloadable software at the end of purchase for profile radio's management. It also provides security by using...

User Guide
Page 53
... PTT button and SB2 simultaneously while turning the radio ON. 51 English Turn ON the Target radio and place it into a power source, but ALL radios require charged batteries. 1. Radio cloning cable (optional accessory), • the CPS (free software download) Cloning with a Multi Unit Charger (MUC) To clone radios using any one of these 3 methods: • a Multi Unit Charger (optional accessory), • Two Single Unit Chargers (SUC) and a Radio-to- PROGRAMMING FEATURES CLONING RADIOS You can clone RDX Series™ radio profiles from one Source radio to a Target radio...
... PTT button and SB2 simultaneously while turning the radio ON. 51 English Turn ON the Target radio and place it into a power source, but ALL radios require charged batteries. 1. Radio cloning cable (optional accessory), • the CPS (free software download) Cloning with a Multi Unit Charger (MUC) To clone radios using any one of these 3 methods: • a Multi Unit Charger (optional accessory), • Two Single Unit Chargers (SUC) and a Radio-to- PROGRAMMING FEATURES CLONING RADIOS You can clone RDX Series™ radio profiles from one Source radio to a Target radio...
User Guide
Page 59
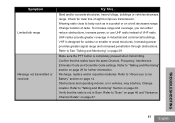
..., increase power, or use UHF radio instead of radio. VHF is completely pressed when transmitting. Increasing power provides greater signal range and increased penetration through obstructions. Change location. Symptom Limited talk range Message not transmitted or received Try This... Wearing radio close to "Talking and Monitoring" Section on a belt decreases range. Refer to body such as in Scan. Verify that the radios have the same Channel, Frequency, Interference Eliminator Code and Scramble Code settings. Confirm that the radio is...
..., increase power, or use UHF radio instead of radio. VHF is completely pressed when transmitting. Increasing power provides greater signal range and increased penetration through obstructions. Change location. Symptom Limited talk range Message not transmitted or received Try This... Wearing radio close to "Talking and Monitoring" Section on a belt decreases range. Refer to body such as in Scan. Verify that the radios have the same Channel, Frequency, Interference Eliminator Code and Scramble Code settings. Confirm that the radio is...
User Guide
Page 64
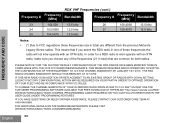
... inter-operate with an XTN radio, make sure you select the RDX radio in total) that are different from the previous Motorola Legacy Series radios. TO CHANGE THE CHANNEL BANDWITH OF YOUR OLDER RDX RADIO FROM 25 KHZ TO 12.5 KHZ YOU MAY USE THE CUSTOMER PROGRAMMING SOFTWARE AVAILABLE FOR FREE DOWNLOAD AT HYPERLINK "http://www.motorola.com/RDX" WWW.MOTOROLASOLUTIONS.COM/RDX (PROGRAMMING CABLE REQUIRED) OR YOU CAN FOLLOW DIRECTIONS IN THE USER GUIDE UNDER 'PROGRAMMING FEATURES' .
... inter-operate with an XTN radio, make sure you select the RDX radio in total) that are different from the previous Motorola Legacy Series radios. TO CHANGE THE CHANNEL BANDWITH OF YOUR OLDER RDX RADIO FROM 25 KHZ TO 12.5 KHZ YOU MAY USE THE CUSTOMER PROGRAMMING SOFTWARE AVAILABLE FOR FREE DOWNLOAD AT HYPERLINK "http://www.motorola.com/RDX" WWW.MOTOROLASOLUTIONS.COM/RDX (PROGRAMMING CABLE REQUIRED) OR YOU CAN FOLLOW DIRECTIONS IN THE USER GUIDE UNDER 'PROGRAMMING FEATURES' .
User Guide
Page 88
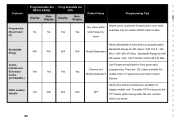
... to customize frequencies in your radio. To enable IVOX long press the PTT button while turning radio ON and until the IVOX icon blinks. 86 IVOX, enable/ Yes N/A N/A N/A disable OFF Hands free without accessories, available for front panel radio Interference Channel and programming. Bandwidth Range Radios Bandwidth is fixed and non-programmable. Codes, Use Programming Mode for display models only. Available only for 4W/ 5W radios: VHF: 146-174 Mhz / UHF 438-470 Mhz. Features Frequencies, Direct Input (3) Programmable Via RADIO PANEL Display NonDisplay No...
... to customize frequencies in your radio. To enable IVOX long press the PTT button while turning radio ON and until the IVOX icon blinks. 86 IVOX, enable/ Yes N/A N/A N/A disable OFF Hands free without accessories, available for front panel radio Interference Channel and programming. Bandwidth Range Radios Bandwidth is fixed and non-programmable. Codes, Use Programming Mode for display models only. Available only for 4W/ 5W radios: VHF: 146-174 Mhz / UHF 438-470 Mhz. Features Frequencies, Direct Input (3) Programmable Via RADIO PANEL Display NonDisplay No...

User Guide
Page 96
...up to SCAN mode. Icons Chart Icon Battery Level Channel Code Frequency Keypad lock Program Scan Scramble 94 Symbol G L Comments Displayed during normal radio mode operation, displays battery life remaining Displayed during normal radio operation and when programming channel features Displayed during normal radio operation and when programming codes features Displayed during normal radio operation and when programming frequency features Displayed whenever the Keypad lock feature is enabled (keypad is locked) Displayed whenever the radio is set to Programming Mode. Displayed whenever the...
...up to SCAN mode. Icons Chart Icon Battery Level Channel Code Frequency Keypad lock Program Scan Scramble 94 Symbol G L Comments Displayed during normal radio mode operation, displays battery life remaining Displayed during normal radio operation and when programming channel features Displayed during normal radio operation and when programming codes features Displayed during normal radio operation and when programming frequency features Displayed whenever the Keypad lock feature is enabled (keypad is locked) Displayed whenever the radio is set to Programming Mode. Displayed whenever the...


