User Guide
Page 3
... 6 Operational Safety Guidelines 7 Introduction 8 Package Contents 8 FCC Licensing Information 10 Interference Information 10 Radio Overview 12 Parts of the Radio 12 On/Off/Volume Knob 13 Accessory Connector 13 Model Label 13 Microphone 13 Antenna 13 LED Indicator 13 Front Buttons 13 Side Buttons ...17 Installing the Lithium-Ion (Li-Ion) Battery 18 Removing the Lithium-Ion (Li-Ion) Battery 18 Alkaline Battery Pack (Optional Accessory 19 Installing Alkaline Batteries 19 Removing Alkaline Batteries 19 Attaching and Removing Antenna . . . . . 20 Attaching the Antenna 20 ...
... 6 Operational Safety Guidelines 7 Introduction 8 Package Contents 8 FCC Licensing Information 10 Interference Information 10 Radio Overview 12 Parts of the Radio 12 On/Off/Volume Knob 13 Accessory Connector 13 Model Label 13 Microphone 13 Antenna 13 LED Indicator 13 Front Buttons 13 Side Buttons ...17 Installing the Lithium-Ion (Li-Ion) Battery 18 Removing the Lithium-Ion (Li-Ion) Battery 18 Alkaline Battery Pack (Optional Accessory 19 Installing Alkaline Batteries 19 Removing Alkaline Batteries 19 Attaching and Removing Antenna . . . . . 20 Attaching the Antenna 20 ...
User Guide
Page 4
...a Call 33 Signal Strength Indicator and Channel Busy Indicators 34 Talk Range 34 Radio LED Indicators 36 Hands-Free Use/VOX 37 With Compatible VOX Accessories. . . . .37 Hands Free without Accessories (iVOX 38 Battery Save 38 Reset to Factory Defaults 38 End of Transmission ...Scramble 44 Programming Maximum Number of Channels 45 Programming Call Tones 46 Programming Microphone Gain Level . . . . . 47 Programming Microphone Accessory Gain Level 47 Other Programming Features 48 Scan 48 Programming Buttons 50 Editing Channel Alias Name 50 Nuisance Channel Delete 52 CPS (Computer ...
...a Call 33 Signal Strength Indicator and Channel Busy Indicators 34 Talk Range 34 Radio LED Indicators 36 Hands-Free Use/VOX 37 With Compatible VOX Accessories. . . . .37 Hands Free without Accessories (iVOX 38 Battery Save 38 Reset to Factory Defaults 38 End of Transmission ...Scramble 44 Programming Maximum Number of Channels 45 Programming Call Tones 46 Programming Microphone Gain Level . . . . . 47 Programming Microphone Accessory Gain Level 47 Other Programming Features 48 Scan 48 Programming Buttons 50 Editing Channel Alias Name 50 Nuisance Channel Delete 52 CPS (Computer ...
User Guide
Page 5
... 86 Chargers 86 3 English VHF Default Frequencies Chart 68 RDX UHF Frequencies Chart 69 RDU2080d - UHF Default Frequencies Chart 73 RDU4160d - CONTENTS Scramble 54 Reverse Burst 54 Cloning Radios 54 Cloning with a Multi-Unit Charger (MUC 55 Cloning Radios using the Radio to Radio (R2R) Cloning Cable (optional accessory 56 Cloning Radios using the CPS (Computer Programming Software) . . . .58 Repeater...
... 86 Chargers 86 3 English VHF Default Frequencies Chart 68 RDX UHF Frequencies Chart 69 RDU2080d - UHF Default Frequencies Chart 73 RDU4160d - CONTENTS Scramble 54 Reverse Burst 54 Cloning Radios 54 Cloning with a Multi-Unit Charger (MUC 55 Cloning Radios using the Radio to Radio (R2R) Cloning Cable (optional accessory 56 Cloning Radios using the CPS (Computer Programming Software) . . . .58 Repeater...

User Guide
Page 7
ATTENTION! This radio is restricted to occupational use only to satisfy FCC RF energy exposure requirements. For a list of Motorola-approved antennas, batteries, and other accessories, visit the following website which lists approved accessories: www.motorolasolutions.com/RDX SAFETY 5 English SAFETY PRODUCT SAFETY AND RF EXPOSURE COMPLIANCE ! Caution Before using this product, read the operating instructions and RF energy awareness information contained in the Product Safety and RF Exposure booklet enclosed with your radio.
ATTENTION! This radio is restricted to occupational use only to satisfy FCC RF energy exposure requirements. For a list of Motorola-approved antennas, batteries, and other accessories, visit the following website which lists approved accessories: www.motorolasolutions.com/RDX SAFETY 5 English SAFETY PRODUCT SAFETY AND RF EXPOSURE COMPLIANCE ! Caution Before using this product, read the operating instructions and RF energy awareness information contained in the Product Safety and RF Exposure booklet enclosed with your radio.
User Guide
Page 8
... To reduce risk of damage to 9.8 feet (3.0 m). 5. Take it is 18AWG for lengths up to the electric plug and cord, pull by Motorola may explode, causing personal injury and damage. 2. it to 6.5 feet (2.0 m), and 16AWG for future reference. Do not disassemble the charger; Before... and cautionary markings on • the charger, • the battery, and • the radio using the battery. 1. To reduce risk of fire, electric shock, or injury. 3. Use of accessories not recommended by the plug rather than the cord when disconnecting the charger. 4. Read these instructions...
... To reduce risk of damage to 9.8 feet (3.0 m). 5. Take it is 18AWG for lengths up to the electric plug and cord, pull by Motorola may explode, causing personal injury and damage. 2. it to 6.5 feet (2.0 m), and 16AWG for future reference. Do not disassemble the charger; Before... and cautionary markings on • the charger, • the battery, and • the radio using the battery. 1. To reduce risk of fire, electric shock, or injury. 3. Use of accessories not recommended by the plug rather than the cord when disconnecting the charger. 4. Read these instructions...
User Guide
Page 14
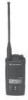
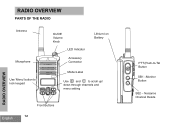
Nuisance Channel Delete RADIO OVERVIEW PARTS OF THE RADIO Antenna Microphone Use 'Menu' button to lock keypad On/Off/ Volume Knob LED Indicator Accessory Connector Lithium-Ion Battery Model Label Use and to scroll up/ down through channels and menu setting RADIO OVERVIEW English Front Buttons 12 PTT (Push-to-Tal Button SB1 -Monitor Button SB2 -
Nuisance Channel Delete RADIO OVERVIEW PARTS OF THE RADIO Antenna Microphone Use 'Menu' button to lock keypad On/Off/ Volume Knob LED Indicator Accessory Connector Lithium-Ion Battery Model Label Use and to scroll up/ down through channels and menu setting RADIO OVERVIEW English Front Buttons 12 PTT (Push-to-Tal Button SB1 -Monitor Button SB2 -

User Guide
Page 15
...clearly into the microphone when sending a message. These buttons are non-removable antenna. It also allows you access to adjust the radio's volume. LED Indicator Used to scroll up/ down buttons Allows you to change channels and to give you to move through... the model of the radio. Front Buttons • M E N U Button This button give battery status, power-up status, radio call information and scan status. For RDU4160d, the antenna is removable. Antenna For Models RDU2080d and RDV2080d, the antennas are not programmable buttons. Accessory Connector Used to connect ...
...clearly into the microphone when sending a message. These buttons are non-removable antenna. It also allows you access to adjust the radio's volume. LED Indicator Used to scroll up/ down buttons Allows you to change channels and to give you to move through... the model of the radio. Front Buttons • M E N U Button This button give battery status, power-up status, radio call information and scan status. For RDU4160d, the antenna is removable. Antenna For Models RDU2080d and RDV2080d, the antennas are not programmable buttons. Accessory Connector Used to connect ...

User Guide
Page 21
... battery latches, on both sides of the battery away from the radio's body, and lift the battery from alkaline battery pack. 5. Alkaline Battery Pack (Optional Accessory) Installing Alkaline Batteries Removing Alkaline Batteries RADIO OVERVIEW Alkaline Battery Door Alkaline Battery Door 1. Turn OFF the radio, if it is turned ON. 2. Pull the top of the...
... battery latches, on both sides of the battery away from the radio's body, and lift the battery from alkaline battery pack. 5. Alkaline Battery Pack (Optional Accessory) Installing Alkaline Batteries Removing Alkaline Batteries RADIO OVERVIEW Alkaline Battery Door Alkaline Battery Door 1. Turn OFF the radio, if it is turned ON. 2. Pull the top of the...

User Guide
Page 33
...in the Instructions Sheet provided with the radios or removed and placed in charging of the 6 charging pockets can be charged with the MUC. Notes: • This Multi Unit Charger also allows you to clone up to the Accessories section. MUC LED Indicator Status LED... was faulty when inserted Note: (*) Normally re-seating the battery pack will correct this issue. 31 English RADIO OVERVIEW Set removable bracket for details. • Further details on a flat surface. 2. MUC (Optional Accessory) The Multi Unit Charger (MUC) allows drop-in the MUC separately. Insert the...
...in the Instructions Sheet provided with the radios or removed and placed in charging of the 6 charging pockets can be charged with the MUC. Notes: • This Multi Unit Charger also allows you to clone up to the Accessories section. MUC LED Indicator Status LED... was faulty when inserted Note: (*) Normally re-seating the battery pack will correct this issue. 31 English RADIO OVERVIEW Set removable bracket for details. • Further details on a flat surface. 2. MUC (Optional Accessory) The Multi Unit Charger (MUC) allows drop-in the MUC separately. Insert the...

User Guide
Page 39
... HANDS-FREE USE/VOX Accessory Connector VOX Accessory Motorola RDX™ radios can disable VOX operation by pressing the PTT button or removing the audio accessory. Before using VOX, set the VOX level to receive, stop talking. 7. Then, perform the following steps: 1. Note: To order accessories, call 1 (800) 448-6686, or contact your Motorola point of purchase. 37...
... HANDS-FREE USE/VOX Accessory Connector VOX Accessory Motorola RDX™ radios can disable VOX operation by pressing the PTT button or removing the audio accessory. Before using VOX, set the VOX level to receive, stop talking. 7. Then, perform the following steps: 1. Note: To order accessories, call 1 (800) 448-6686, or contact your Motorola point of purchase. 37...

User Guide
Page 40
...To do so press PTT, SB2 and SB1 simultaneously while turning ON the radio until you hear a quick series of beeps. English 38 Note: • The iVOX feature is always ready to transmit or receive without Accessories (iVOX) • Enable iVOX by pressing the PTT button. Note: Battery...8226; iVOX operation can be temporarily disabled by pressing the PTT button while turning the radio ON and the icon will set back all radio features to "MENU Options" on display models RDU2080d, RDV2080d, and RDU4160d. • To learn how to set VOX/iVOX sensitivity levels, refer to the ...
...To do so press PTT, SB2 and SB1 simultaneously while turning ON the radio until you hear a quick series of beeps. English 38 Note: • The iVOX feature is always ready to transmit or receive without Accessories (iVOX) • Enable iVOX by pressing the PTT button. Note: Battery...8226; iVOX operation can be temporarily disabled by pressing the PTT button while turning the radio ON and the icon will set back all radio features to "MENU Options" on display models RDU2080d, RDV2080d, and RDU4160d. • To learn how to set VOX/iVOX sensitivity levels, refer to the ...
User Guide
Page 42
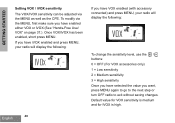
... you have iVOX enabled and press MENU, your radio will display the following: IVOX If you have VOX enabled (with accessory connected) and press MENU, your radio will display the following: VOX To change the sensitivity level, use the / buttons: 0 = OFF (For VOX accessories only) 1 = Low sensitivity 2 = Medium ...sensitivity 3 = High sensitivity Once you want, press MENU again to go to the next step or turn OFF radio to exit without saving changes. Default value for VOX sensitivity is medium ...
... you have iVOX enabled and press MENU, your radio will display the following: IVOX If you have VOX enabled (with accessory connected) and press MENU, your radio will display the following: VOX To change the sensitivity level, use the / buttons: 0 = OFF (For VOX accessories only) 1 = Low sensitivity 2 = Medium ...sensitivity 3 = High sensitivity Once you want, press MENU again to go to the next step or turn OFF radio to exit without saving changes. Default value for VOX sensitivity is medium ...

User Guide
Page 49
... Programming Mode' the display will read as follows: IMIC The current microphone gain level setting will be blinking. The current accessory microphone gain level setting will blink. PROGRAMMING MICROPHONE GAIN LEVEL To configure the microphone gain level, enter 'Programming Mode' and...the PTT button. Note: The values available for microphone gain level are dependent upon maximum levels the radio supports. PROGRAMMING MICROPHONE ACCESSORY GAIN LEVEL To configure the Accessory Microphone Gain Level, enter 'Programming Mode' and scroll through the programming options by short pressing the ...
... Programming Mode' the display will read as follows: IMIC The current microphone gain level setting will be blinking. The current accessory microphone gain level setting will blink. PROGRAMMING MICROPHONE GAIN LEVEL To configure the microphone gain level, enter 'Programming Mode' and...the PTT button. Note: The values available for microphone gain level are dependent upon maximum levels the radio supports. PROGRAMMING MICROPHONE ACCESSORY GAIN LEVEL To configure the Accessory Microphone Gain Level, enter 'Programming Mode' and scroll through the programming options by short pressing the ...

User Guide
Page 50
... without saving. When the radio detects channel activity, it will stop scanning, short press the SB2 button again. • If you press the PTT button while the radio is talking going on Channel 2 during this time, the radio will wait for accessory microphone gain level are dependent... upon maximum levels the radio supports. Whenever the radio is not programmed to the next programming feature without having to...
... without saving. When the radio detects channel activity, it will stop scanning, short press the SB2 button again. • If you press the PTT button while the radio is talking going on Channel 2 during this time, the radio will wait for accessory microphone gain level are dependent... upon maximum levels the radio supports. Whenever the radio is not programmed to the next programming feature without having to...

User Guide
Page 55
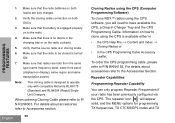
...the option to be terminated by setting up a password for more information. Please contact your Motorola Point of the user guide for optimum audio quality. Bandwidth Select Default setting for RDX™ series 2W toggle between high and low transmission power per frequency in each channel. ...spacing, which must match other features such as it can be changed (to avoid preset radio values from being accidentally erased). CPS is an accessory sold separately. Please refer to select the radio between 1W and 2W or 2W and 4W/5W depending on the specific frequency and ...
...the option to be terminated by setting up a password for more information. Please contact your Motorola Point of the user guide for optimum audio quality. Bandwidth Select Default setting for RDX™ series 2W toggle between high and low transmission power per frequency in each channel. ...spacing, which must match other features such as it can be changed (to avoid preset radio values from being accidentally erased). CPS is an accessory sold separately. Please refer to select the radio between 1W and 2W or 2W and 4W/5W depending on the specific frequency and ...
User Guide
Page 56
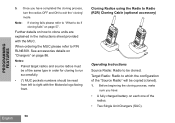
... Setting The RDX™ series radio can clone RDX™ Series radio profiles from one of these 3 methods: • One Multi Unit Charger (optional accessory) • Two Single Unit Chargers and a Radio-toRadio cloning cable (optional accessory) • the CPS (free software download) English 54 For more capabilities that don't allow them to a second radio (the 'Target' radio) by...
... Setting The RDX™ series radio can clone RDX™ Series radio profiles from one of these 3 methods: • One Multi Unit Charger (optional accessory) • Two Single Unit Chargers and a Radio-toRadio cloning cable (optional accessory) • the CPS (free software download) English 54 For more capabilities that don't allow them to a second radio (the 'Target' radio) by...
User Guide
Page 58
... page 86. Target Radio: Radio to be cloned. Cloning Radios using the Radio to Radio (R2R) Cloning Cable (optional accessory) Operating Instructions Source Radio: Radio to which the configuration of the same type in the instructions sheet provided with the Motorola logo facing front. Notes: • Paired target radios and source radios must be of the "Source Radio" will be read from...
... page 86. Target Radio: Radio to be cloned. Cloning Radios using the Radio to Radio (R2R) Cloning Cable (optional accessory) Operating Instructions Source Radio: Radio to which the configuration of the same type in the instructions sheet provided with the Motorola logo facing front. Notes: • Paired target radios and source radios must be of the "Source Radio" will be read from...
User Guide
Page 60
... fully charged. 2. Make sure that the radio batteries on both radios are both SUCs. 3. For details about accessories refer to the radio. 4. English 58 Cloning Radios using the CPS (Computer Programming Software) To clone RDX™ radios using the CPS is engaged properly on how to Accessories section. For details about accessories refer to clone using the CPS software...
... fully charged. 2. Make sure that the radio batteries on both radios are both SUCs. 3. For details about accessories refer to the radio. 4. English 58 Cloning Radios using the CPS (Computer Programming Software) To clone RDX™ radios using the CPS is engaged properly on how to Accessories section. For details about accessories refer to clone using the CPS software...

User Guide
Page 66
.... Check the charger's LEDs indicators to OFF. Symptom Try This... Refer to "Charging with a customized profile. Accessory not working or not compatible. Refer to "Drop-in tray charger is not set to see if the radio has been programmed using the CPS with the Drop-In Tray Single Unit Charger" section on... 64 Note: Whenever a feature in tray charger adjustable piece placed on page 28. Use the CPS to ensure that you have the drop-in the radio seems to not correspond to the default or preprogrammed values, check to a compatible power supply.
.... Check the charger's LEDs indicators to OFF. Symptom Try This... Refer to "Charging with a customized profile. Accessory not working or not compatible. Refer to "Drop-in tray charger is not set to see if the radio has been programmed using the CPS with the Drop-In Tray Single Unit Charger" section on... 64 Note: Whenever a feature in tray charger adjustable piece placed on page 28. Use the CPS to ensure that you have the drop-in the radio seems to not correspond to the default or preprogrammed values, check to a compatible power supply.

User Guide
Page 83
... Cases. WARRANTY 81 English Business Two-way Radio Accessories One (1) year from defects in the United States, which are Repaired or Replaced. Products and Accessories that operate via Family Radio Service or General Mobile Radio Service, Motorola-branded or certified accessories sold for use with these Products ("Accessories") and Motorola software contained on CD-ROMs or other tangible media...
... Cases. WARRANTY 81 English Business Two-way Radio Accessories One (1) year from defects in the United States, which are Repaired or Replaced. Products and Accessories that operate via Family Radio Service or General Mobile Radio Service, Motorola-branded or certified accessories sold for use with these Products ("Accessories") and Motorola software contained on CD-ROMs or other tangible media...


